Cusocue JJ.31
Cusocue High-Speed Slot Car Race Track Playset (Model JJ.31) Instruction Manual
Your guide to assembly, operation, and maintenance.
1. Introduction
Welcome to the exciting world of high-speed slot car racing with your new Cusocue Slot Car Race Track Playset. This manual provides detailed instructions for the assembly, operation, and maintenance of your race track to ensure a safe and enjoyable experience. Please read all instructions carefully before use.

Image 1.1: The fully assembled Cusocue High-Speed Slot Car Race Track Playset.
2. Safety Information
To prevent injury or damage, always observe the following safety precautions:
- This product is recommended for ages 6-12 years. Adult supervision is advised for younger children.
- Keep fingers, hair, and loose clothing away from moving parts of the track and cars.
- Do not operate the track near water or in wet conditions.
- Use only the power adapter and controllers provided with the set.
- Ensure all track connections are secure before operating.
- Do not modify the track, cars, or controllers.
- Unplug the power adapter when not in use or during cleaning.
3. Package Contents
Carefully unpack all components and verify that you have received the following items:

Image 3.1: Overview of included components and their quantities.
- Track sections (various types including straight, curved, loop, uphill, lane changers)
- 2 x 1:64 Scale Race Cars (with LED lights)
- 2 x Electric Powered Controllers
- Power Adapter
- Guardrails
- Track Supports
- Spare Guide Pins for cars
If any parts are missing or damaged, please contact customer support.
4. Setup Instructions
Follow these steps to assemble your race track:
- Choose a Location: Select a flat, stable surface large enough for the track layout (approximately 220 cm x 125 cm as shown in Image 4.1).
- Assemble Track Sections: Connect the track pieces by aligning the connectors and pressing them firmly together. Refer to the included layout diagram for suggested configurations. The set includes various track types such as 360° loops, uphill sections, and turning tracks (see Image 4.2).
- Install Track Supports and Guardrails: Place the track supports under elevated sections and loops to ensure stability. Attach guardrails to the outer edges of curves to help prevent cars from derailing.
- Connect Power:
- Plug-in Mode: Connect the power adapter to the designated power input track section and then plug it into a standard electrical outlet.
- Battery-powered Mode: For portable play, insert the required batteries (not included) into the battery compartment of the power input track section. Ensure correct polarity.

Image 4.3: Two power options: battery-powered for portability and plug-in for home use.
- Connect Controllers: Plug each controller into its respective port on the power input track section.
- Prepare Cars: Ensure the brushes on the bottom of each car are correctly positioned to make contact with the track's metal rails. Refer to Image 4.4 for correct brush usage.
Image 4.1: Track dimensions and layout example.

Image 4.2: Various track components and their labels.
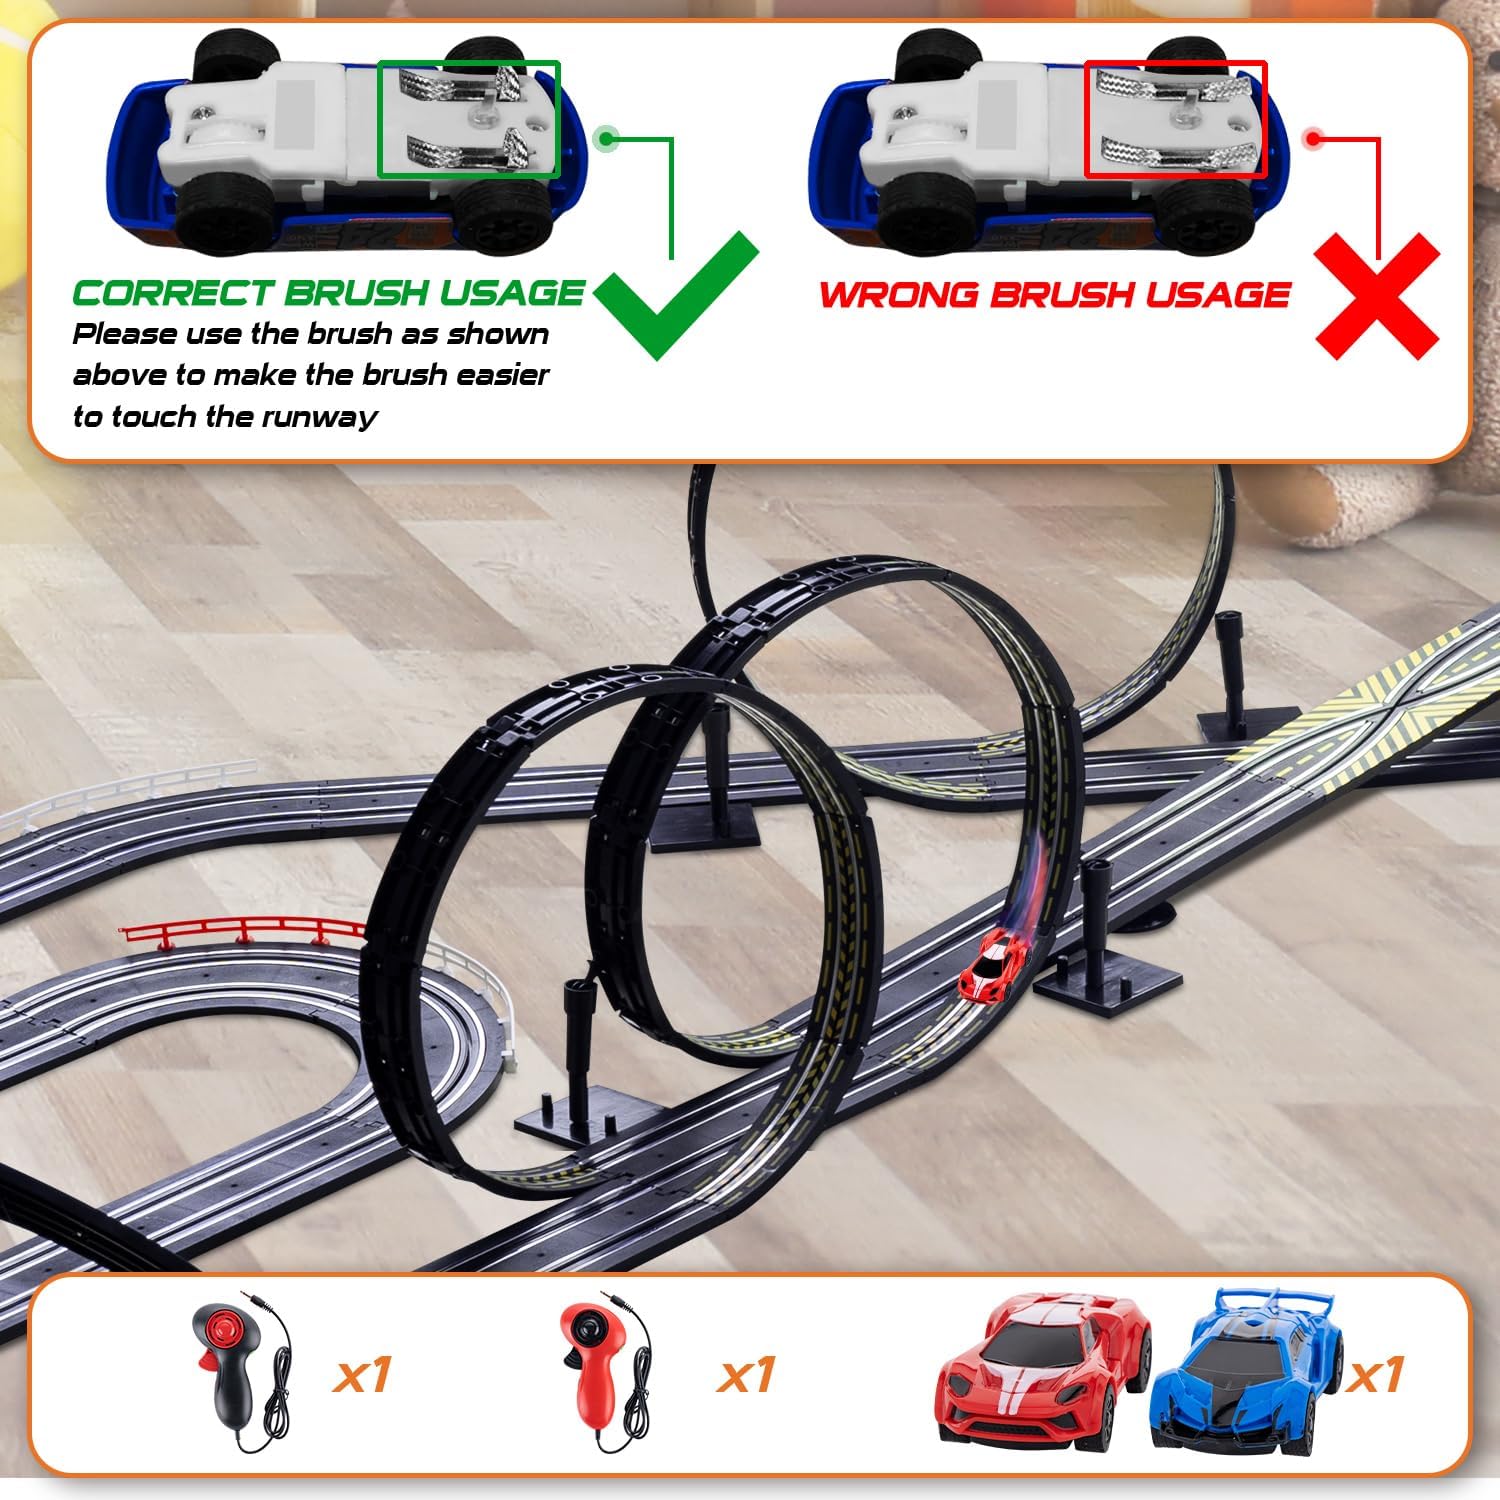
Image 4.4: Correct brush usage for slot cars.
5. Operating Instructions
Once the track is assembled and powered, you are ready to race!
- Place Cars on Track: Carefully place each slot car into its designated slot on the track, ensuring the guide pin aligns with the track groove and the brushes make contact with the metal rails.
- Controller Operation:
- The electric controllers feature a trigger for speed adjustment. Pull the trigger to accelerate.
- A boost button on top of the controller provides temporary extra speed.
- Controllers allow for variable speed control, enabling drivers to adjust to their skill level.
- Driving Technique:
- To keep cars on the track, especially around corners and loops, it is crucial to manage speed. Reduce speed before entering turns and accelerate on straightaways.
- The cars are designed with strengthened magnatraction to assist in staying on track, but skill is still required.
- Practice will improve your ability to navigate the track without derailing.

Image 5.1: Children enjoying the dual racing experience.
6. Maintenance
Regular maintenance ensures optimal performance and longevity of your race track:
- Cleaning Track: Use a clean, dry cloth to wipe down track surfaces periodically to remove dust and debris, which can affect car performance.
- Car Brushes: Inspect the car brushes regularly. If they become worn or bent, replace them with the provided spare guide pins. Ensure they are positioned correctly for good electrical contact (refer to Image 4.4).
- Track Connections: Periodically check all track connections to ensure they are secure and free from corrosion.
- Storage: When not in use, disassemble the track and store all components in their original packaging or a suitable container to prevent damage.
7. Troubleshooting
If you encounter issues, refer to the following common problems and solutions:
- Car not moving:
- Check if the power adapter is securely plugged in and the power is on.
- Ensure batteries (if used) are correctly inserted and not depleted.
- Verify that the controller is properly connected to the track.
- Inspect the car's brushes and guide pin for proper contact with the track rails and groove. Adjust or replace if necessary.
- Clean the track rails and car brushes to remove any dirt or dust.
- Car frequently derails:
- Reduce speed, especially when entering curves and loops.
- Ensure guardrails are properly installed on curves.
- Check for any uneven track connections or debris on the track surface.
- Verify the car's guide pin is intact and correctly seated in the track groove.
- One car is slower than the other:
- Check the brushes on the slower car for wear or misalignment.
- Ensure the track section for that lane is clean and free of obstructions.
- Test with a different controller if available to rule out controller issues.
8. Specifications
| Feature | Detail |
|---|---|
| Model Number | JJ.31 |
| Brand | Cusocue |
| Track Length | Approximately 36.5 feet (11.1 meters) |
| Scale | 1:64 |
| Power Source | Electric (AC adapter) or Battery-powered |
| Recommended Age | 6 - 12 years |
| Product Dimensions | 9.45 x 7.87 x 5.12 inches (packaged) |
| Item Weight | 6.47 pounds |
9. Warranty and Support
This product comes with a standard manufacturer's warranty. For specific warranty details, please refer to the product packaging or contact your retailer. For technical support, missing parts, or any other inquiries, please contact Cusocue customer service through the retailer's platform or the official brand website.
Please note: No official product videos with "creator_type":"Seller" were provided in the product data, therefore no videos are embedded in this manual.
Ask a question about this manual
Ask about setup, troubleshooting, compatibility, parts, safety, or missing instructions. Manuals+ will review the question and use this page’s manual context to help answer it.