1. Introduction
This manual provides detailed instructions for the safe and effective operation of your MULIKE Astronaut Galaxy Projector, Model XL-819. This device combines a star projector, galaxy light, moon lamp, Bluetooth music speaker, and night light to create an immersive celestial experience.

Image 1.1: The MULIKE Astronaut Galaxy Projector, Model XL-819, depicted in a cosmic environment, showcasing its design and projection capabilities.
2. Safety Information
- Ensure the projector is placed on a stable, flat surface to prevent accidental falls.
- Do not look directly into the laser aperture to avoid eye injury.
- Keep the device away from water or other liquids.
- Do not disassemble or attempt to repair the device yourself. Contact customer support for assistance.
- Use only the provided power adapter.
- Keep out of reach of small children to prevent choking hazards from small parts.
- Operate the device in a well-ventilated area.
3. Package Contents
Verify that all items are present in the package:
- Astronaut Galaxy Projector (Model XL-819)
- Remote Control (Model XL-731)
- USB Power Cable
- User Manual

Image 3.1: The MULIKE Astronaut Galaxy Projector, its remote control, USB power cable, and user manual, displayed alongside its retail packaging.
4. Product Overview
Familiarize yourself with the components of your projector:
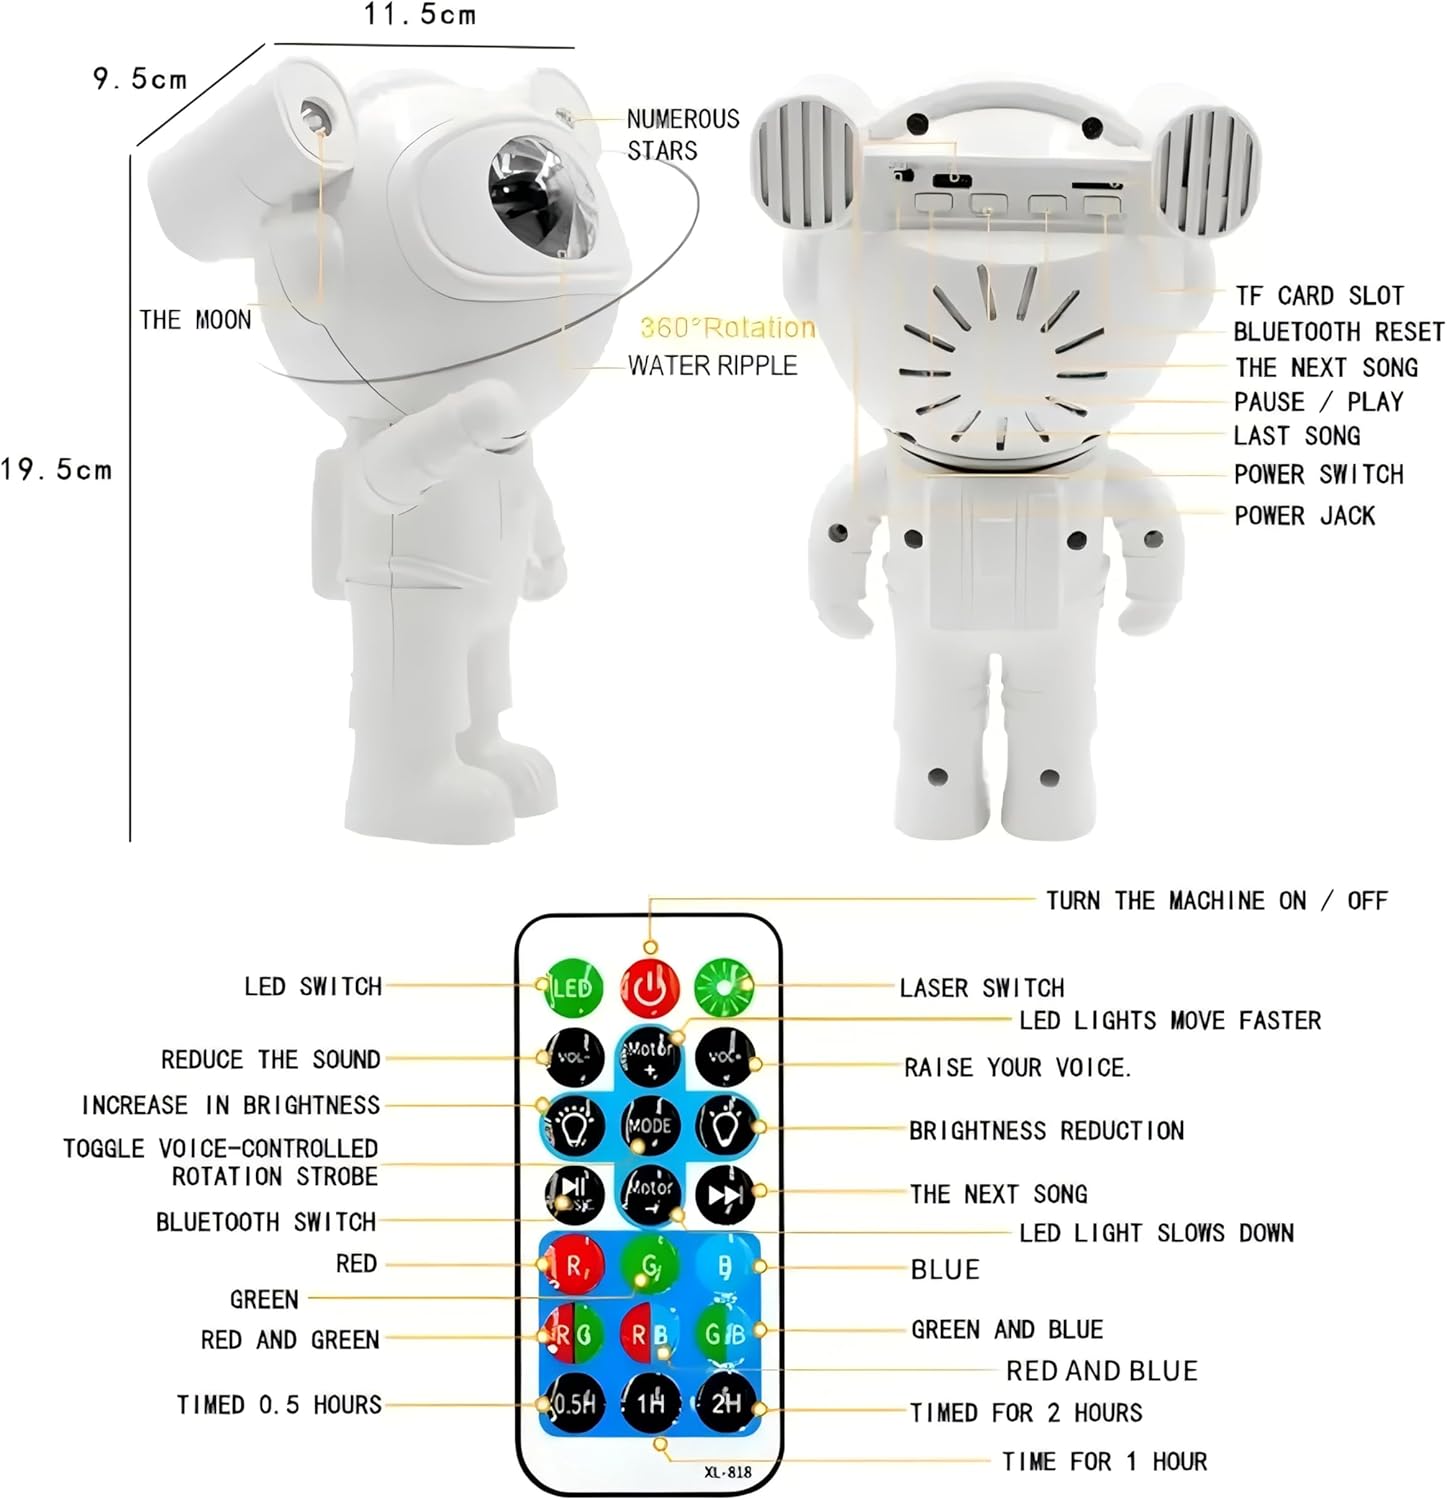
Image 4.1: A detailed diagram illustrating the various parts of the Astronaut Galaxy Projector, including the projection lens, moon projection, and rear panel controls, along with a comprehensive layout of the remote control functions.
4.1 Projector Components
- Projection Lens: Emits nebula, star, and moon projections.
- 360° Rotatable Head: Allows adjustment of projection angle.
- TF Card Slot: For playing audio from a memory card (if supported by specific model variant).
- Bluetooth Reset Button: Resets Bluetooth connection.
- Next Song / Previous Song Buttons: For media playback.
- Pause / Play Button: For media playback.
- Power Switch: Turns the device on or off.
- Power Jack: Connects to the USB power cable.
4.2 Remote Control (Model XL-731)
- LED Switch: Controls the LED nebula light.
- Laser Switch: Controls the laser stars.
- Power Button: Turns the projector on/off.
- Volume Up/Down: Adjusts audio volume.
- Brightness Up/Down: Adjusts projection brightness.
- Motor Speed Up/Down: Adjusts nebula movement speed.
- Voice Control: Activates sound-activated projection mode.
- Rotation Strobe: Toggles rotation and strobe effects.
- Bluetooth Switch: Toggles Bluetooth mode.
- Color Selection Buttons (R, G, B, Y, RG, RB, GB): Selects nebula colors and combinations.
- Timer Buttons (0.5H, 1H, 2H): Sets automatic shut-off timer.
5. Setup
- Unpack: Carefully remove all components from the packaging.
- Power Connection: Connect the USB power cable to the projector's power jack and plug the other end into a compatible USB power adapter (not included) or a USB port.
- Placement: Place the projector on a stable surface. Adjust the astronaut's head to direct the projection onto a desired surface (ceiling, wall, etc.). The head offers 360° rotation.
- Power On: Press the Power Switch on the back of the projector or the Power Button on the remote control to turn on the device.
6. Operating Instructions
6.1 Basic Projection Control
- Nebula Light: Use the LED Switch button on the remote to turn the nebula projection on or off.
- Star Light: Use the Laser Switch button on the remote to turn the green laser stars on or off.
- Moon Lamp: The moon projection is typically integrated with the star projection.
- Brightness Adjustment: Use the Brightness Up (+) and Brightness Down (-) buttons on the remote to adjust the intensity of the projection.
- Nebula Speed: Use the Motor Speed Up (+) and Motor Speed Down (-) buttons to control the movement speed of the nebula.
- Color Selection: Press the R, G, B, Y buttons or their combinations (RG, RB, GB) on the remote to change the nebula color.

Image 6.1: Various projection combinations of colorful nebulae, stars, and the moon, demonstrating the projector's diverse lighting effects.
6.2 Bluetooth Speaker Function
- Activate Bluetooth: Press the Bluetooth Switch button on the remote control. The projector will enter pairing mode.
- Pairing: On your smartphone or audio device, search for Bluetooth devices and select "XL-819" to connect.
- Play Music: Once paired, you can play audio from your device through the projector's speaker.
- Music Controls: Use the Previous Song, Next Song, and Pause/Play buttons on the projector's back panel or the remote control to manage playback.
- Rhythm Mode: The projector features a Rhythm Mode where the lights synchronize with the beat of the music.
6.3 Timer Function
The projector includes an automatic shut-off timer:
- Press the 0.5H button on the remote for a 30-minute timer.
- Press the 1H button on the remote for a 1-hour timer.
- Press the 2H button on the remote for a 2-hour timer.
- The projector will automatically turn off after the selected duration.

Image 6.2: The Astronaut Galaxy Projector displaying its timer options, indicating automatic shut-off after 45 or 90 minutes.
7. Maintenance
- Cleaning: Use a soft, dry cloth to clean the exterior of the projector. Do not use abrasive cleaners or solvents.
- Lens Care: Gently wipe the projection lens with a microfiber cloth to remove dust or smudges.
- Storage: When not in use, store the projector in a cool, dry place, away from direct sunlight and extreme temperatures.
8. Troubleshooting
| Problem | Possible Cause | Solution |
|---|---|---|
| Projector does not turn on. | No power connection. | Ensure the USB power cable is securely connected to both the projector and a working power source. |
| Remote control is not working. | Low battery in remote; remote not aimed at sensor. | Replace remote control batteries. Ensure the remote is pointed towards the projector's sensor. |
| No projection or dim projection. | Projection mode off; brightness set too low. | Press the LED Switch or Laser Switch on the remote. Increase brightness using the remote. |
| Bluetooth connection issues. | Device not in pairing mode; incorrect device selected. | Ensure Bluetooth is enabled on your audio device. Press the Bluetooth Switch on the remote. Select "XL-819" from your device's Bluetooth list. Try pressing the Bluetooth Reset button on the projector. |
| Projection is blurry. | Lens is dirty. | Gently clean the projection lens with a microfiber cloth. |
9. Specifications
| Feature | Detail |
|---|---|
| Model Name | Astronaut Galaxy Projector |
| Item Model Number | XL-819 |
| Brand | MULIKE |
| Product Dimensions | 4.6"D x 7.5"W x 4.6"H (approx. 11.7cm D x 19.1cm W x 11.7cm H) |
| Item Weight | 13.7 ounces (approx. 388 grams) |
| Material | Plastic |
| Power Source | Corded Electric (USB) |
| Voltage | 120 Volts (AC) - Note: Refers to compatible USB power adapter input. |
| Light Source Type | LED, Laser |
| Light Colors | Red, Green, Blue, Yellow (for nebula) |
| Control Method | Remote Control, On-device buttons |
| Special Features | Bluetooth Speaker, Timer Function, 360° Adjustable Head, Voice Control (Rhythm Mode) |
| Indoor/Outdoor Usage | Indoor |
10. Warranty and Support
For warranty information, technical support, or any inquiries regarding your MULIKE Astronaut Galaxy Projector, please contact the manufacturer directly through their official channels or the retailer where the product was purchased.
Please retain your proof of purchase for warranty claims.