1. Introduction
Thank you for choosing the HOMVILLA Digital LED Alarm Clock. This manual provides detailed instructions for setting up and operating your new alarm clock. Please read it thoroughly to ensure proper use and to maximize the features of your device.
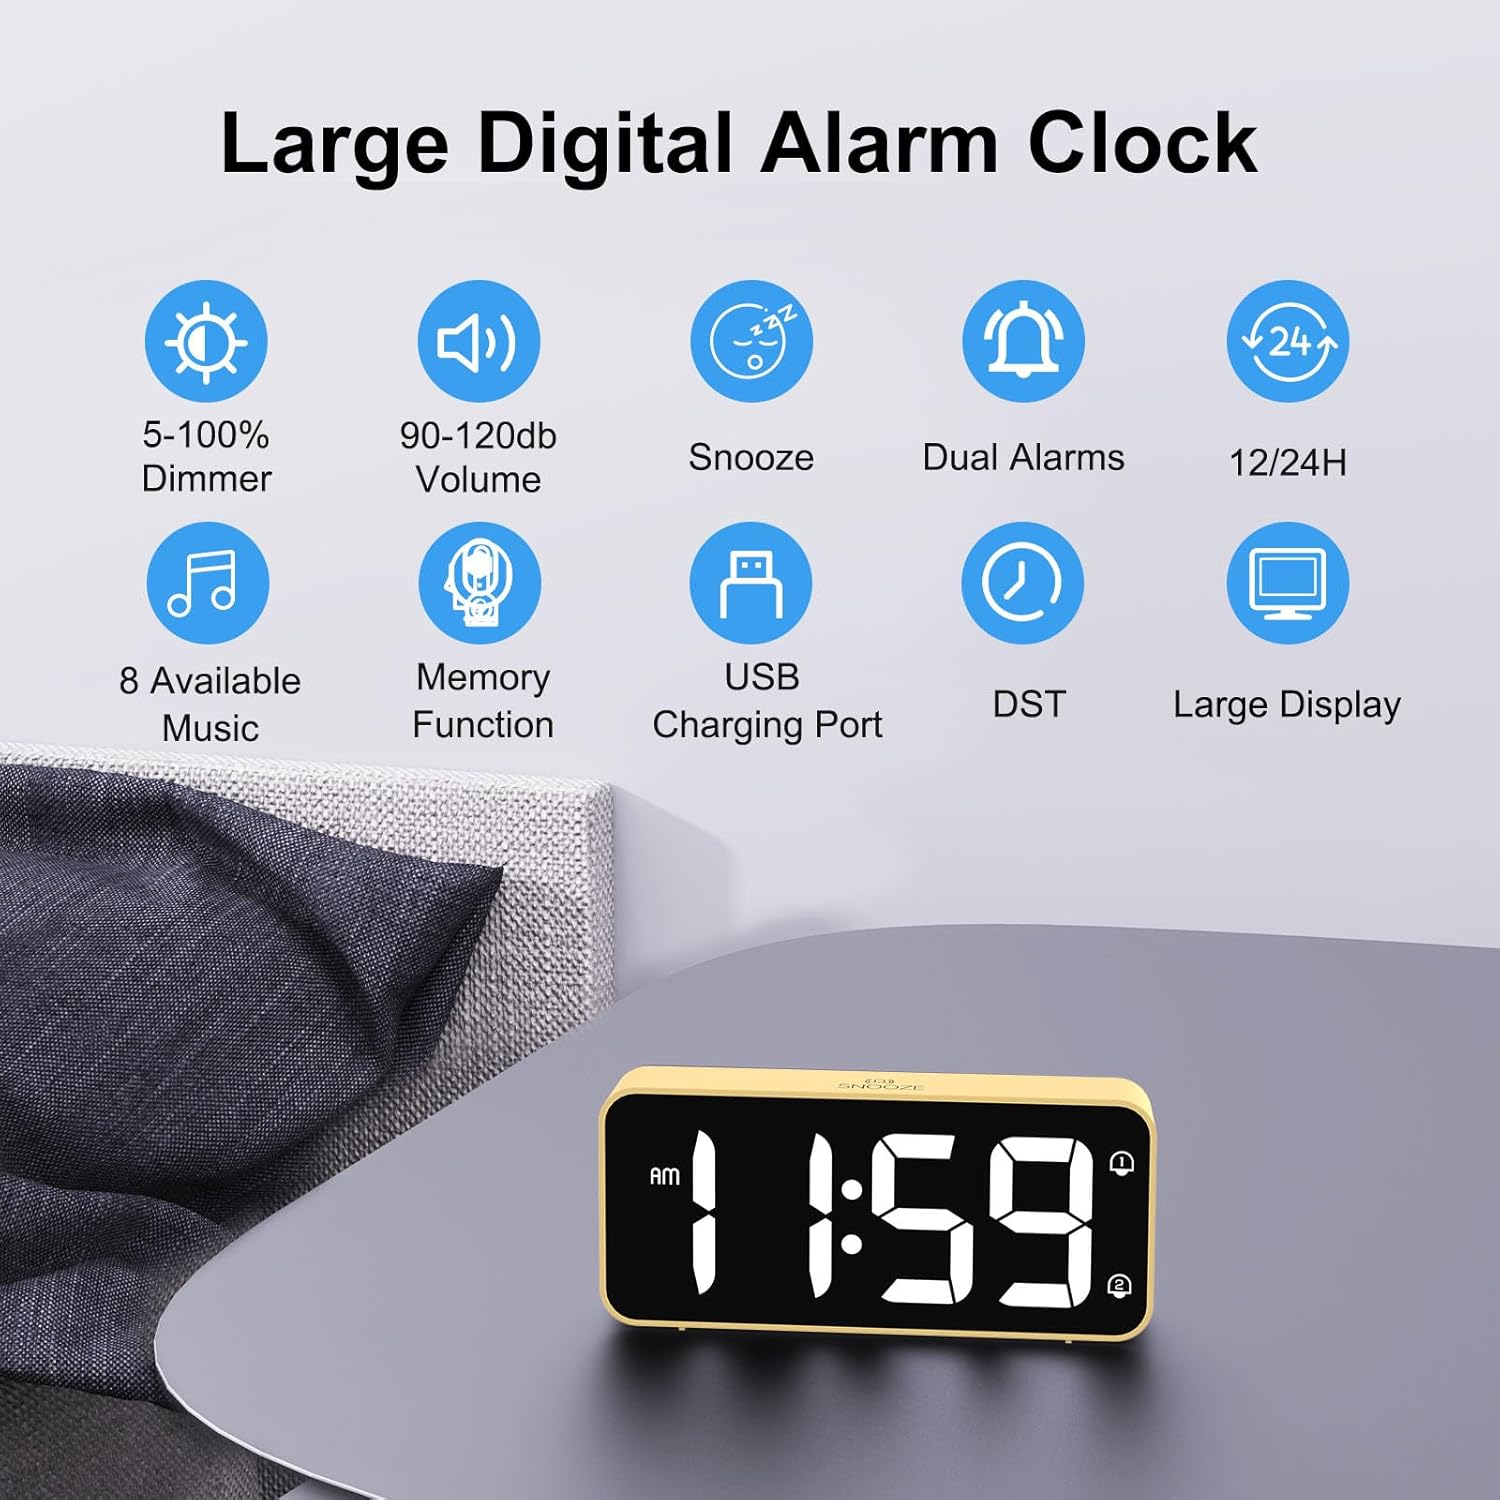
Figure 1: Overview of the HOMVILLA Digital LED Alarm Clock and its key features.
2. Product Overview
2.1 Key Features
- Large LED Display: Clear, easy-to-read digits for day and night viewing.
- Adjustable Brightness: 5% to 100% dimmer control via a rear dial.
- Adjustable Volume: 90 dB to 120 dB volume range for alarms.
- 8 Alarm Tones: Select from various melodies for your alarm.
- Dual Alarms: Set two independent alarm times.
- Snooze Function: Provides an additional 5 minutes of sleep.
- 12/24H Format: Switch between 12-hour and 24-hour time display.
- Mains Powered: Includes USB charging cable and power adapter.
- Battery Backup: Requires 2 AAA batteries (not included) for memory function during power outages.
- USB Charging Port: Conveniently charge your smartphone or other devices.
2.2 Controls and Ports
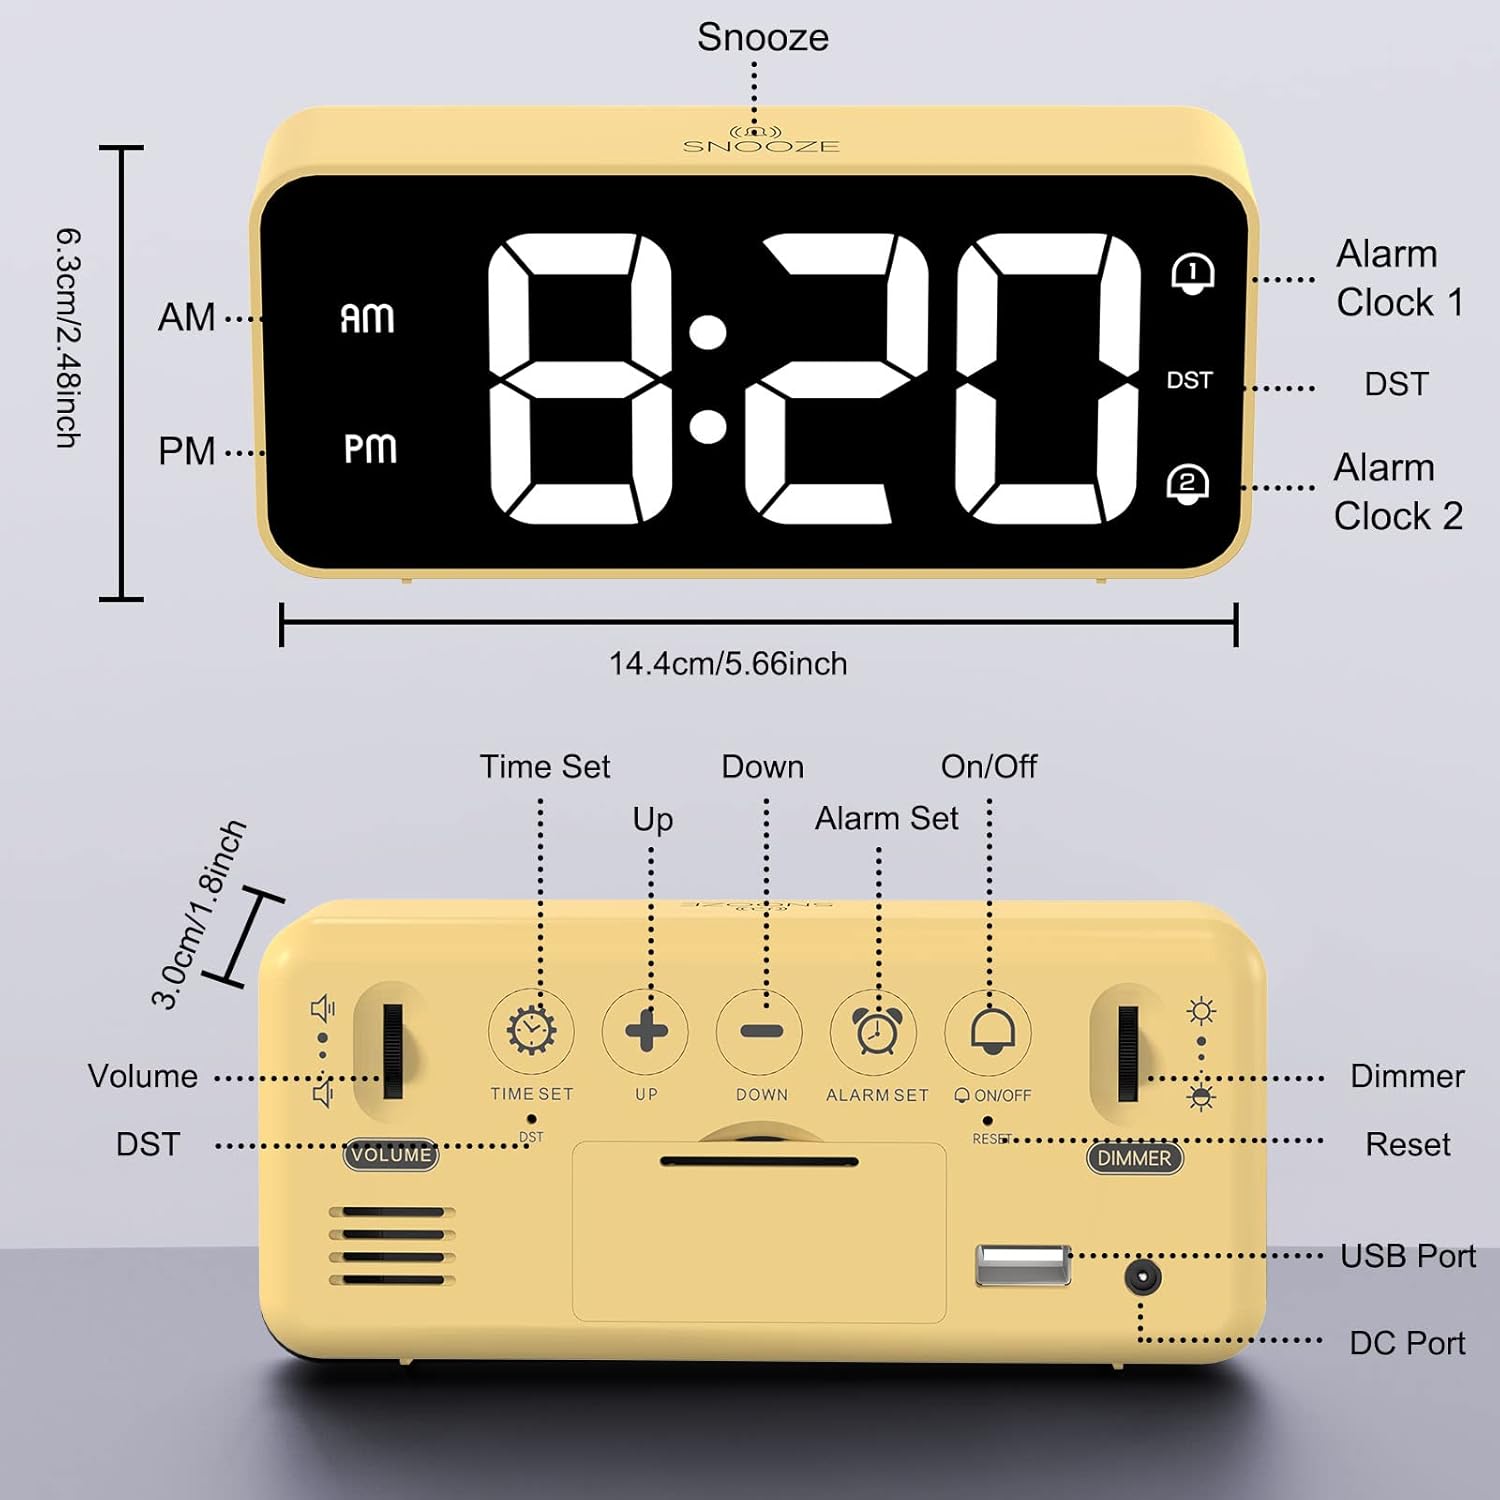
Figure 2: Rear panel controls and ports of the alarm clock.
- VOLUME Dial: Adjusts alarm volume.
- TIME SET Button: Enters time setting mode.
- UP Button: Increases values during setting.
- DOWN Button: Decreases values during setting.
- ALARM SET Button: Enters alarm setting mode.
- ON/OFF Button: Toggles alarm on/off.
- RESET Button: Resets the clock to factory defaults.
- DIMMER Dial: Adjusts display brightness.
- USB Port: For charging external devices.
- DC Port: For power input.
- SNOOZE Button: Located on top, activates snooze.
3. Setup
3.1 Power Connection
- Connect the provided USB cable to the DC Port on the back of the alarm clock.
- Plug the USB cable into the included power adapter.
- Insert the power adapter into a standard wall outlet. The display will light up.

Figure 3: Connecting the alarm clock to a power source.
3.2 Battery Backup (Memory Function)
To retain time and alarm settings during a power outage, install 2 AAA batteries (not included) into the battery compartment on the back of the clock. These batteries only support memory functions and will not power the display or alarm operation.
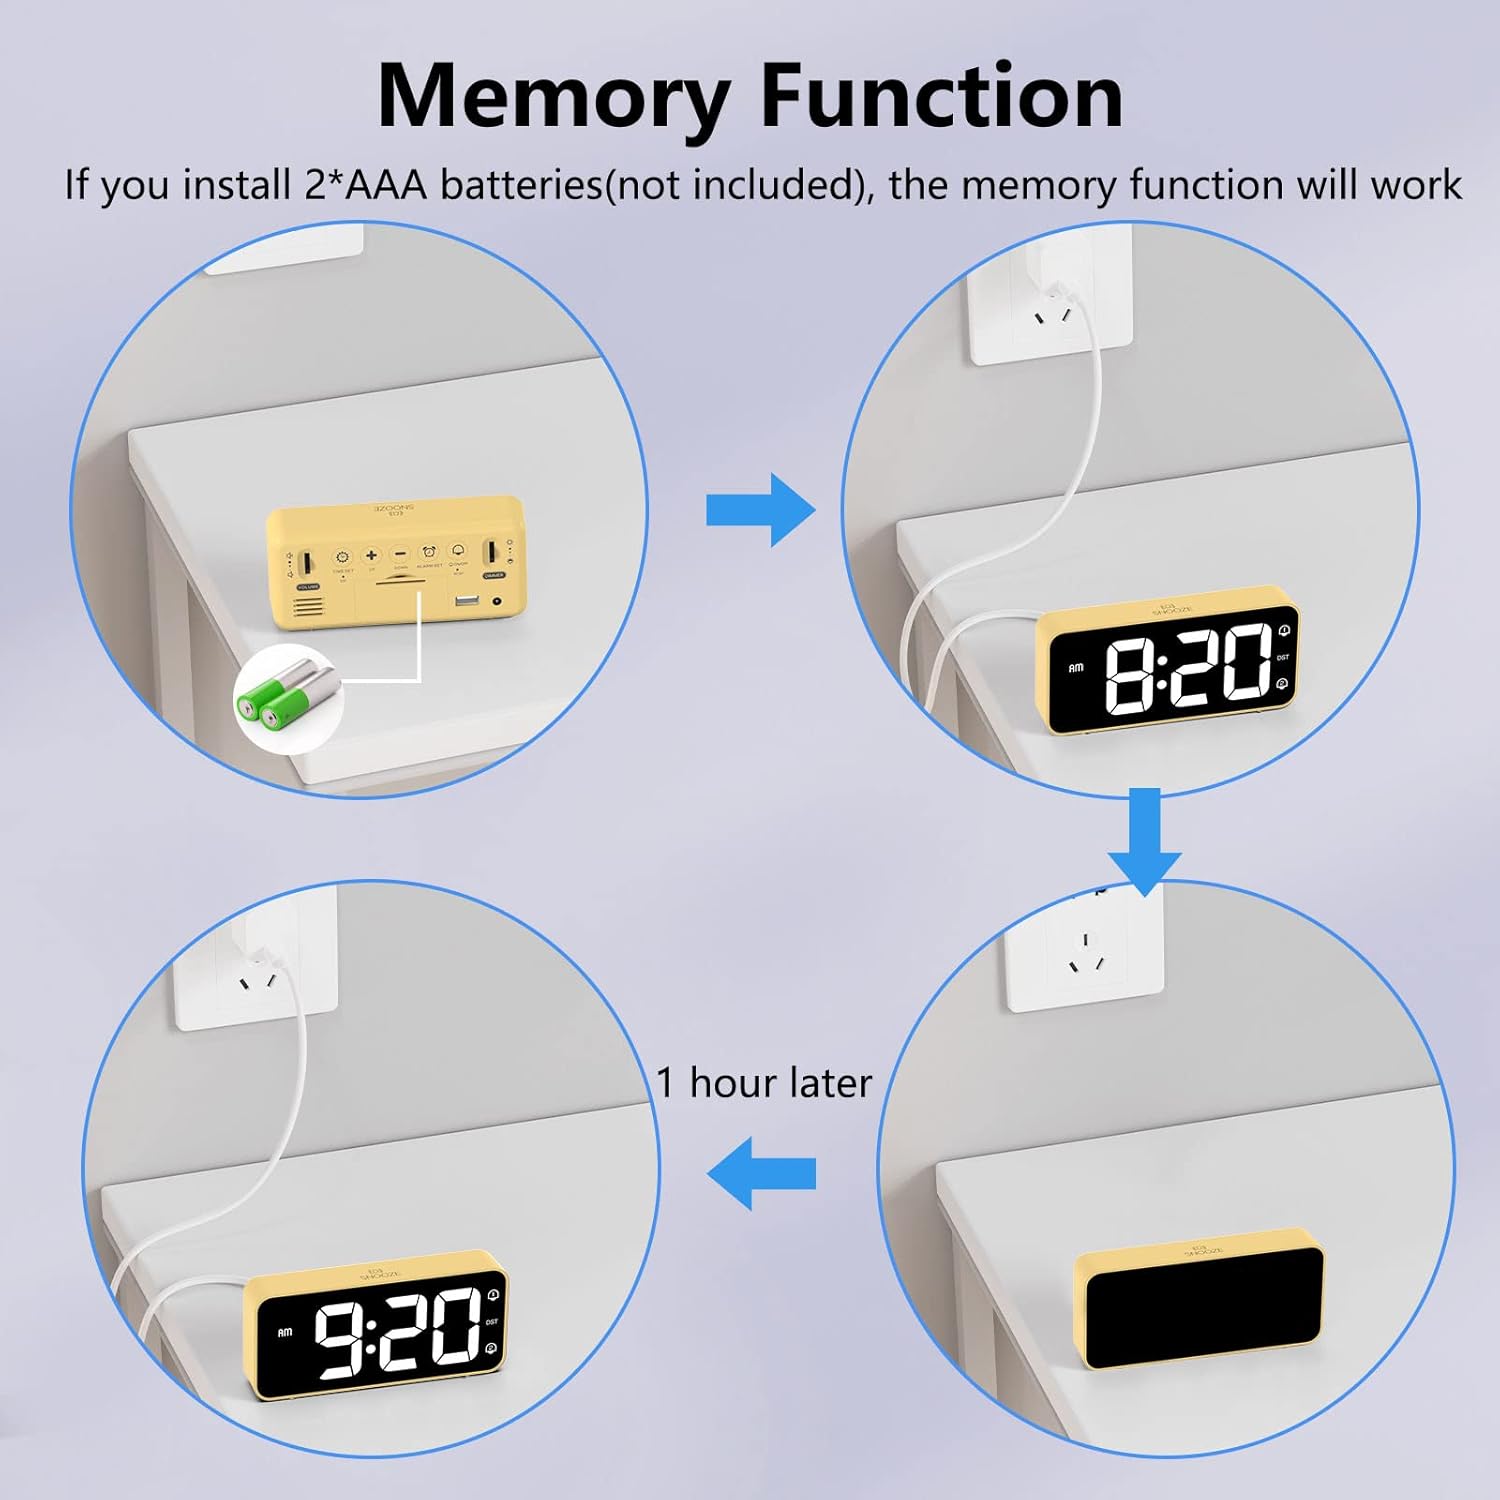
Figure 4: Battery installation for memory function.
4. Operating Instructions
4.1 Setting the Time
- Press and hold the TIME SET button on the back. The hour digits will flash.
- Use the UP or DOWN buttons to adjust the hour.
- Press TIME SET again. The minute digits will flash.
- Use the UP or DOWN buttons to adjust the minutes.
- Press TIME SET once more to confirm and exit time setting mode.
4.2 12/24 Hour Format
While in time setting mode (hour digits flashing), press the TIME SET button repeatedly to toggle between 12-hour (with AM/PM indicator) and 24-hour formats.

Figure 5: 12-hour and 24-hour time display options.
4.3 Setting Alarms (Dual Alarms)
The clock supports two independent alarms (Alarm 1 and Alarm 2).
- Press and hold the ALARM SET button. The Alarm 1 hour digits will flash.
- Use the UP or DOWN buttons to set the desired hour for Alarm 1.
- Press ALARM SET again. The Alarm 1 minute digits will flash.
- Use the UP or DOWN buttons to set the desired minutes for Alarm 1.
- Press ALARM SET again to proceed to Alarm 2 settings, or press TIME SET to exit.
- Repeat steps 2-4 for Alarm 2.
- After setting Alarm 2 minutes, press ALARM SET to cycle through alarm tone selection.
4.4 Activating/Deactivating Alarms
Briefly press the ON/OFF button to toggle Alarm 1 or Alarm 2 on or off. An alarm icon will appear on the display when an alarm is active.

Figure 6: Dual alarm functionality.
4.5 Selecting Alarm Tones
During alarm setting mode (after setting alarm minutes), press the ALARM SET button to cycle through the 8 available alarm tones. Stop when you hear your preferred tone.

Figure 7: Available alarm sounds.
4.6 Adjusting Alarm Volume
Rotate the VOLUME dial on the back of the clock to adjust the alarm volume from 90 dB (low) to 120 dB (high).

Figure 8: Adjusting volume and brightness using the rear dials.
4.7 Adjusting Display Brightness
Rotate the DIMMER dial on the back of the clock to adjust the display brightness from 5% (dim) to 100% (bright). This allows for comfortable viewing day or night.

Figure 9: Display brightness adjustment range.
4.8 Snooze Function
When the alarm sounds, press the large SNOOZE button on the top of the clock. The alarm will pause for 5 minutes and then sound again.

Figure 10: Activating the snooze function.
4.9 USB Charging Port
The USB port on the back of the clock can be used to charge your smartphone or other small electronic devices. Connect your device's charging cable to this port.

Figure 11: Using the USB charging port.
5. Maintenance
- Clean the clock with a soft, dry cloth. Do not use abrasive cleaners or solvents.
- Keep the clock away from direct sunlight, extreme temperatures, and high humidity.
- Ensure proper ventilation around the device.
6. Troubleshooting
| Problem | Possible Cause | Solution |
|---|---|---|
| Display is blank. | No power connection. | Ensure the power adapter is securely plugged into the clock and a working wall outlet. |
| Alarm does not sound. | Alarm is not activated or volume is too low. | Check if the alarm icon is displayed. If not, activate the alarm. Increase the alarm volume using the VOLUME dial. |
| Time/settings reset after power outage. | No backup batteries or batteries are depleted. | Install 2 new AAA batteries for memory function. |
| Display is too dim/bright. | Brightness setting is incorrect. | Adjust the DIMMER dial on the back of the clock. |
7. Specifications
| Feature | Detail |
|---|---|
| Brand | HOMVILLA |
| Model Number | 8813 |
| Color | Light Yellow |
| Product Dimensions (L x W x H) | 14.4 x 3.81 x 6.3 cm |
| Item Weight | 150 grams |
| Display Type | Digital LED |
| Power Source | Corded Electric |
| Battery Backup | 2 x AAA batteries (not included) for memory |
| Frame Material | Acrylonitrile Butadiene Styrene (ABS) |
| Mounting Type | Tabletop |
8. Safety Information
- Do not expose the device to water or excessive moisture.
- Avoid dropping or subjecting the device to strong impacts.
- Do not attempt to disassemble or repair the device yourself. Contact qualified service personnel.
- Keep out of reach of children.
9. Warranty and Support
HOMVILLA products are designed for reliability and performance. For warranty information or technical support, please refer to the contact details provided with your purchase or visit the official HOMVILLA website. Please retain your proof of purchase for warranty claims.