1. Introduction
This manual provides detailed instructions for the Bestsee Golf Rangefinder KF1500. This high-precision laser rangefinder is designed for golf, hunting, and archery, offering accurate distance measurements up to 1500 yards. Key features include slope compensation, flagpole locking with vibration, 7x magnification, and a convenient USB-C rechargeable battery.

Image 1.1: The Bestsee Golf Rangefinder KF1500, showcasing its compact design and ergonomic grip.
2. Package Contents
Upon unboxing, please ensure all the following items are present:
- 1x Bestsee Golf Rangefinder KF1500
- 1x Hard Carry Case
- 1x Carabiner
- 1x Hand Rope
- 1x Lens Cleaning Cloth
- 1x USB-C Charging Cable
- 1x User Manual (this document)
3. Setup
3.1. Charging the Battery
The rangefinder is equipped with a built-in 800mAh rechargeable lithium battery. Before first use, or when the battery indicator shows low power, charge the device using the provided USB-C cable.
- Locate the USB-C charging port on the device.
- Connect the USB-C cable to the rangefinder and the other end to a compatible USB power adapter (5V/2A recommended, not included) or a computer USB port.
- The charging indicator will illuminate, typically red during charging and green when fully charged.
A full charge provides extended usage. Avoid using the device while charging for optimal battery life.

Image 3.1: Illustration of the 800mAh rechargeable battery feature, highlighting USB-C charging.
3.2. Attaching the Hand Rope
For secure handling, attach the included hand rope to the designated loop on the rangefinder. This helps prevent accidental drops.
4. Operating Instructions
4.1. Power On/Off
- To power on: Press the power button (usually located on the top of the device). The display will activate.
- To power off: The device will automatically power off after a period of inactivity to conserve battery. Alternatively, press and hold the power button for a few seconds.
4.2. Focus Adjustment
Rotate the eyepiece (diopter adjustment ring) to achieve a clear view of the display and the target. Adjust until the image appears sharp and in focus for your vision.
4.3. Measurement Modes
The rangefinder offers three distinct measurement modes. Briefly press the "M" button (Mode button) to cycle through them.
- M1: Flag Pole Lock + Slope Correction Mode - Ideal for golf. This mode identifies the flagpole and provides the slope-adjusted distance.
- M2: Ranging + Angle Mode - Measures direct distance and the angle to the target. Continuous measurement is available in this mode.
- M3: Ranging + Horizontal Distance Mode - Measures direct distance and the horizontal distance to the target. Continuous measurement is available in this mode.

Image 4.1: The rangefinder in use, demonstrating its 1500-yard measuring capability and accuracy.
4.4. Flagpole Locking Function
In M1 mode, aim the crosshairs at the flagpole. Press and hold the power button while slowly sweeping the rangefinder across the target. Once the laser locks onto the flag (up to 300 yards), the device will vibrate briefly twice to confirm the lock, and the distance will be displayed.

Image 4.2: Visual representation of the flagpole lock mode, showing the vibration feedback upon target acquisition.
4.5. Slope Measurement (On/Off)
The rangefinder features a slope compensation function that calculates the adjusted distance based on elevation changes. This feature can be toggled on or off using the dedicated button on the side of the device. When the slope function is active, the ballistic distance and degree of angle will be displayed. For tournament play, ensure the slope function is turned off if required by rules.
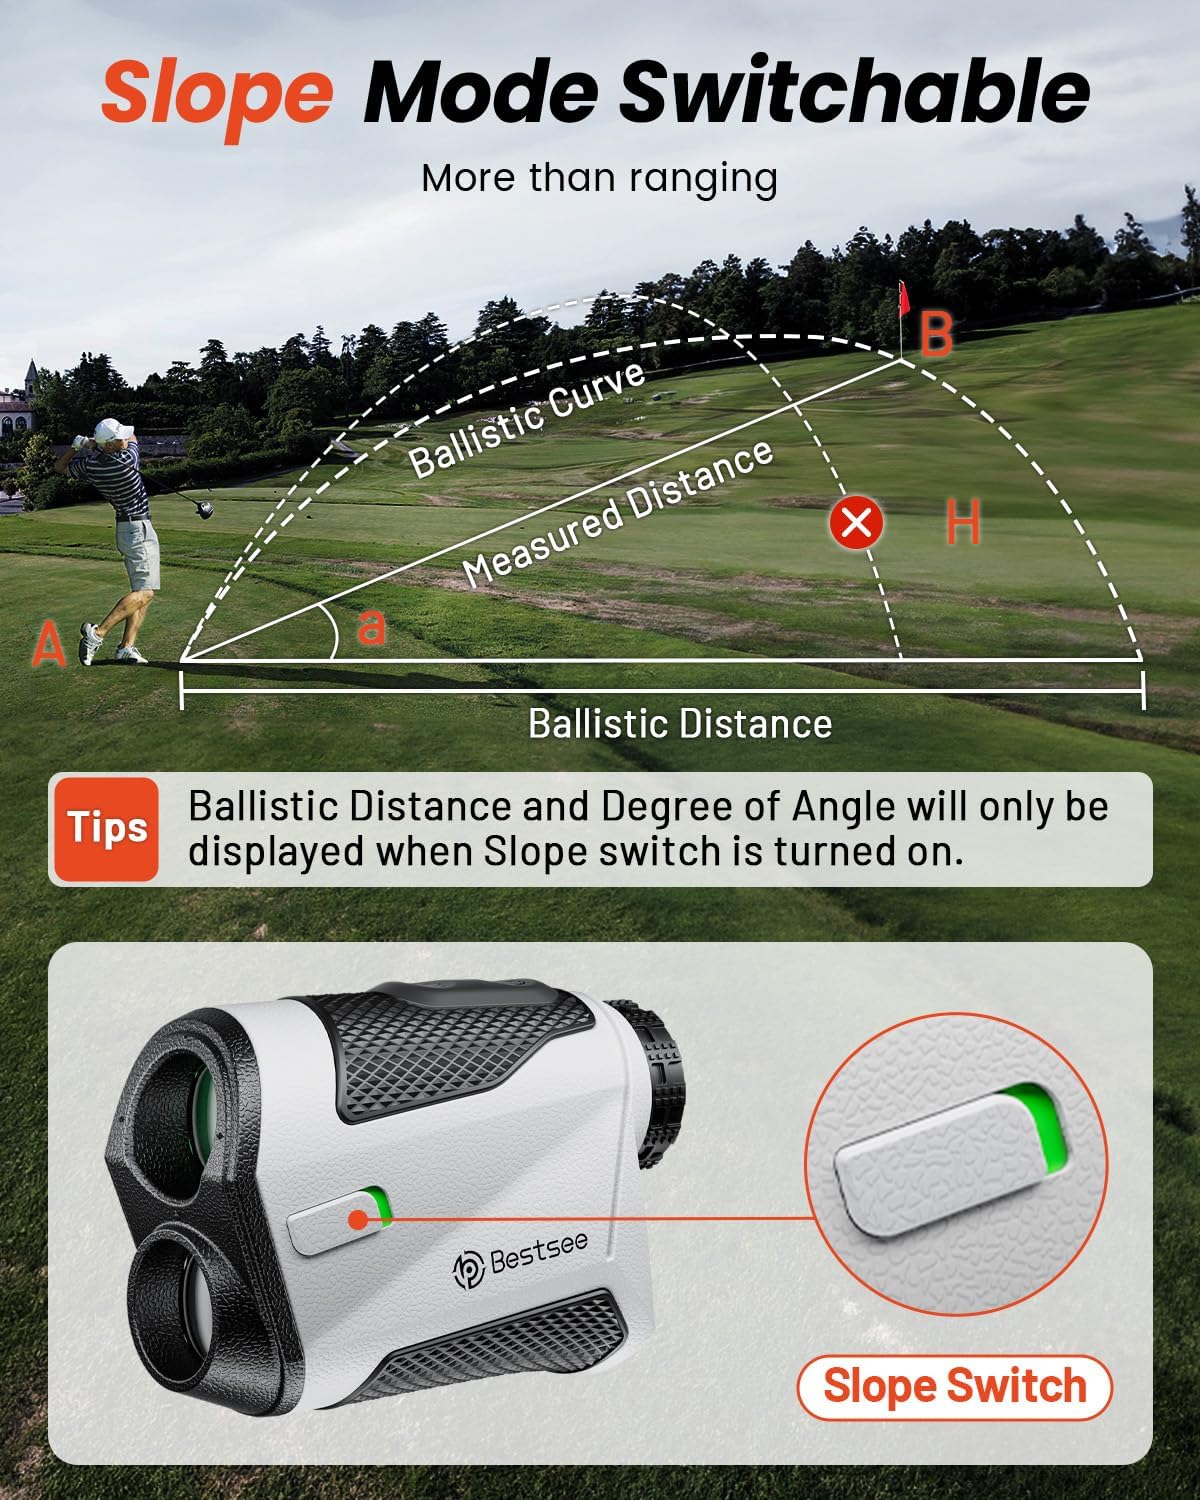
Image 4.3: Diagram illustrating the slope measurement feature and the physical slope switch on the device.
4.6. Using the Magnetic Strip
The integrated magnetic strip allows the rangefinder to be securely attached to metal surfaces, such as a golf cart frame or club. This provides convenient access and helps prevent the device from being dropped or misplaced during play.

Image 4.4: Examples of how the rangefinder can be easily carried and attached using its magnetic strip.
5. Maintenance
5.1. Cleaning the Device
- Lenses: Use the provided lens cleaning cloth to gently wipe the objective and eyepiece lenses. Avoid using abrasive materials or harsh chemicals, which can damage the optical coatings.
- Body: Wipe the body of the rangefinder with a soft, damp cloth. The gray-black magnetic exterior is designed to be sweat-proof and dirt-resistant, making cleaning straightforward.
5.2. Storage
When not in use, store the rangefinder in its hard carry case to protect it from dust, moisture, and physical impact. Store in a cool, dry place away from direct sunlight and extreme temperatures.
5.3. Battery Care
To prolong battery life, avoid fully discharging the battery frequently. Recharge the device regularly, especially if it will be stored for an extended period. The device supports USB-C fast charging.
6. Troubleshooting
- No Power/Display Not Turning On:
- Ensure the battery is charged. Connect the USB-C cable and allow it to charge for at least 30 minutes.
- Press the power button firmly.
- Inaccurate Readings:
- Ensure the lenses are clean. Dirt or smudges can interfere with laser transmission.
- Verify that you are not attempting to measure through glass (e.g., a window), as this can block or interfere with the laser signal.
- Ensure the target is within the specified measuring range (10-1500 yards).
- For flagpole locking, ensure you are sweeping slowly across the target.
- Difficulty Focusing:
- Rotate the eyepiece adjustment ring until the display and target appear sharp.
- No Vibration Feedback (Flagpole Lock):
- Ensure you are in M1 (Flag Pole Lock) mode.
- Confirm the target is a flagpole and within the 300-yard lock range.
7. Specifications
| Model Number | KF1500 |
| Measuring Range | 10 - 1500 yards |
| Accuracy | +/- 0.5 yards |
| Magnification | 7x |
| Flag Lock Distance | Up to 300 yards |
| Battery Type | 800mAh Lithium-Ion (Rechargeable via USB-C) |
| Material | Plastic |
| Waterproof Rating | IP54 |
| Included Components | Rangefinder, Hard Carry Case, Carabiner, Hand Rope, Lens Cloth, USB-C Cable |

Image 7.1: Illustration of the 7X magnification lens, providing a high-definition view for various activities.

Image 7.2: Summary of key features and specifications of the Bestsee Golf Rangefinder.
8. Warranty and Support
Bestsee products are manufactured to high-quality standards. For information regarding warranty coverage, please refer to the warranty card included with your purchase or visit the official Bestsee website. If you encounter any issues or require technical assistance, please contact Bestsee customer support through the retailer where the product was purchased or via the contact information provided on the official Bestsee website.