1. Introduction
Thank you for choosing the VIANIS Motion Sensor Outdoor Light Fixture. This manual provides essential information for the safe installation, operation, and maintenance of your new lighting system. Please read these instructions thoroughly before installation and retain them for future reference.
Important Safety Information
- Always turn off the power at the main circuit breaker before beginning any installation or maintenance.
- Consult a qualified electrician if you are not familiar with electrical wiring.
- Ensure all wiring connections are secure and comply with local electrical codes.
- Do not exceed the maximum wattage specified for the bulb (100W E26).
- This product is designed for outdoor wet-location use. Ensure all seals and connections are properly secured to maintain weather resistance.
2. Package Contents
Verify that all components are present before installation:
- VIANIS Motion Sensor Outdoor Wall Light Fixture (V81092KG) - Quantity: 2
- VIANIS Motion Sensor Outdoor Post Light Fixture (V82092KG) - Quantity: 2
- Pier Mount Base (for post light installation) - Quantity: 2
- Mounting Hardware Kit (screws, wire nuts, etc.)
- User Manual

Image 2.1: Overview of the VIANIS Motion Sensor Outdoor Wall and Post Light Fixtures included in the package.
3. Product Overview
The VIANIS outdoor light fixtures are constructed from 100% die-cast aluminum with a matte black finish, ensuring anti-rust and weather-resistant properties. They feature advanced sensing technology for convenience and energy efficiency.
Key Features:
- Integrated Motion Sensor: Detects movement to activate full brightness.
- Dusk to Dawn Sensor: Automatically turns the light on at night and off at dawn.
- Two Standby Modes: DIM MODE (30% brightness) and ECO+ MODE (full off) at night.
- One-Click Mode Switch: Easy selection between standby modes.
- Durable Construction: Anti-rust, waterproof, sunproof, snowproof, and stormproof die-cast aluminum body with tempered clear glass shades.
- E26 Base: Compatible with standard E26 base bulbs (up to 100W, bulb not included).
- Versatile Mounting: Wall mount for wall fixtures, and pole mount (for 3-inch poles) or pier mount base for post fixtures.
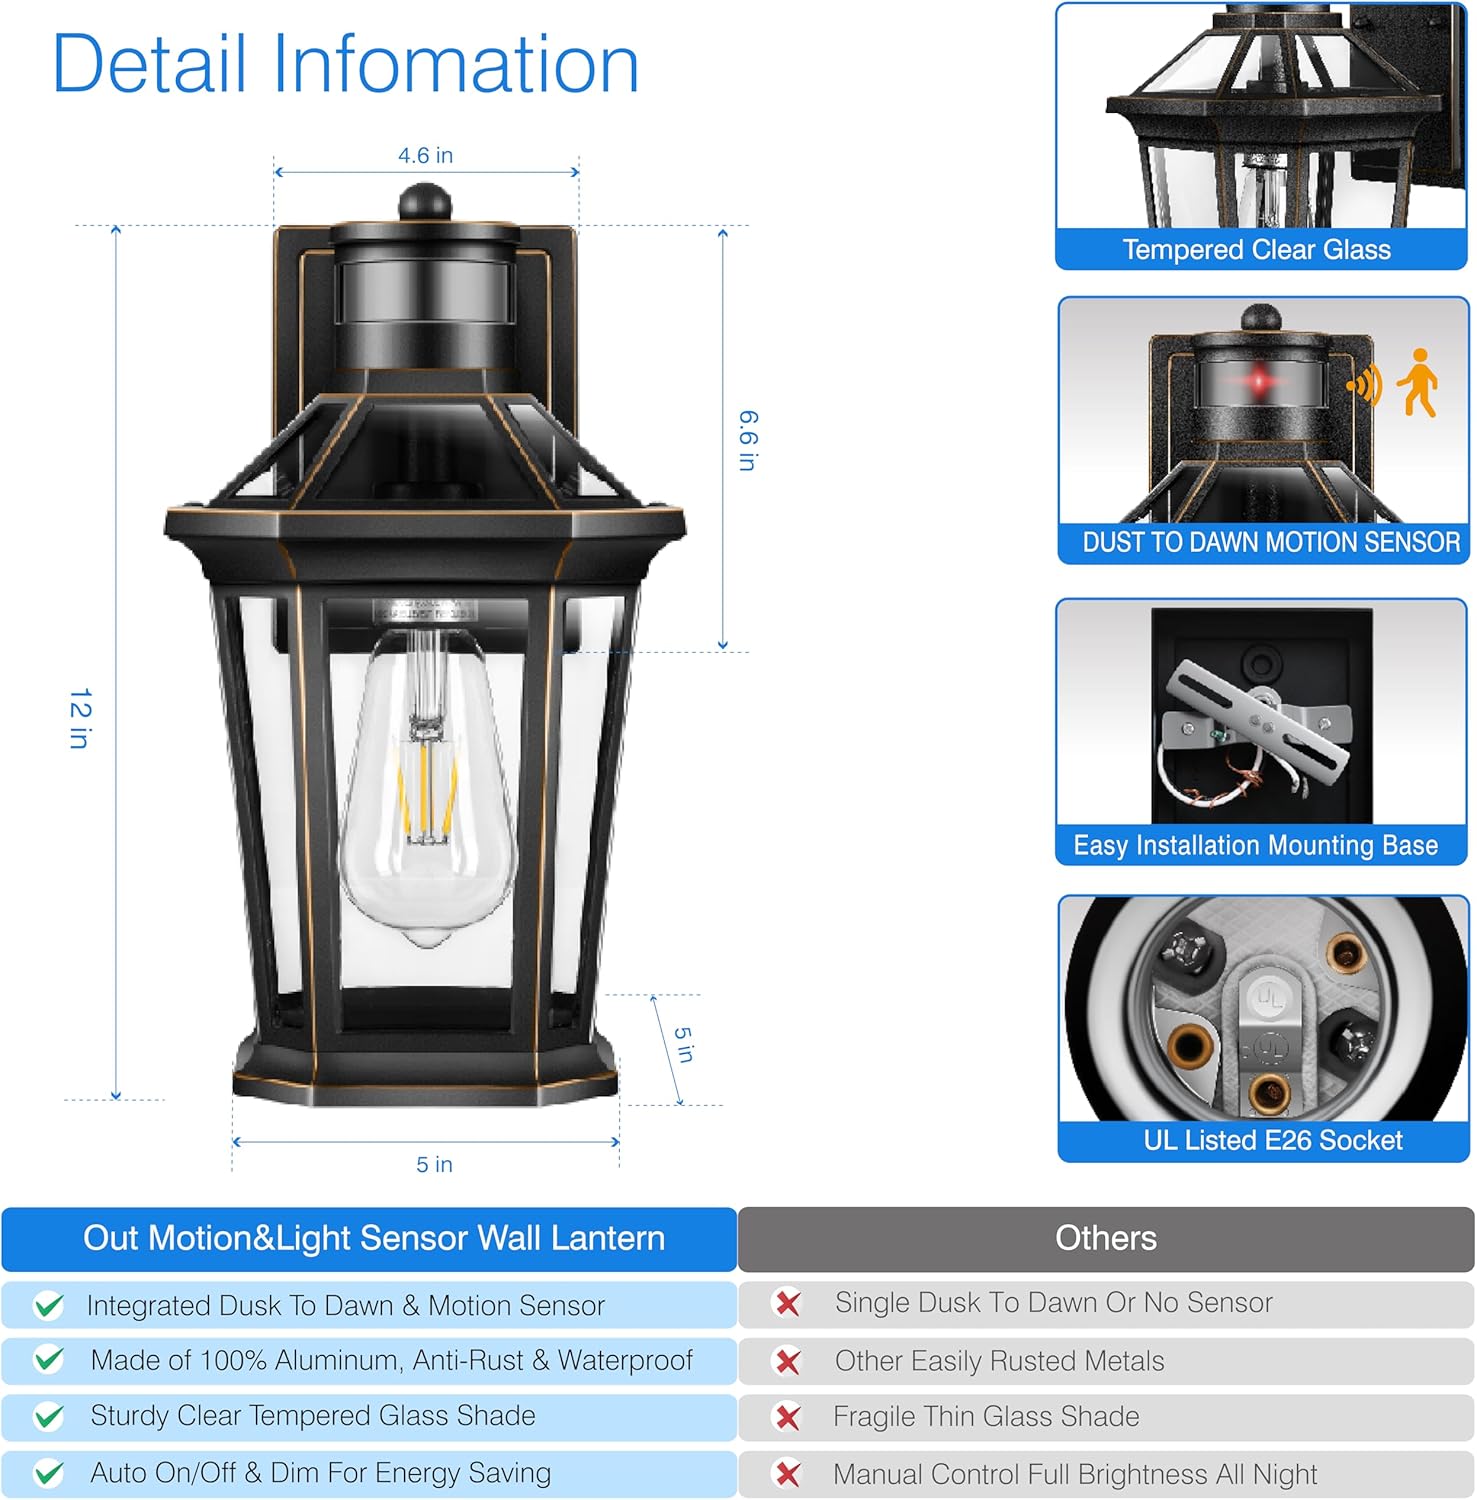
Image 3.1: Detailed view of the wall light, showing dimensions, tempered clear glass, dusk to dawn motion sensor, easy installation mounting base, and UL listed E26 socket.

Image 3.2: Dimensions of the post light fixture, illustrating options for a 3-inch post mount (pole not included) and pier mount base (base included).
4. Setup and Installation
Before installation, ensure the power is OFF at the circuit breaker. Follow these steps carefully.
4.1 Wall Mount Installation (Model V81092KG)
- Prepare Wiring: Pull the electrical wires from the junction box.
- Attach Mounting Plate: Secure the mounting plate to the junction box using the provided screws.
- Make Electrical Connections: Connect the fixture's wires to your household wiring:
- Black (Live) to Black (Live)
- White (Neutral) to White (Neutral)
- Green/Bare Copper (Ground) to Green/Bare Copper (Ground)
- Mount Fixture: Align the fixture with the mounting plate and secure it with the provided screws.
- Install Bulb: Screw in an E26 base bulb (max 100W, not included).
- Seal: Apply weather-resistant sealant around the fixture's base where it meets the wall to prevent water intrusion.
4.2 Post Mount Installation (Model V82092KG)
The post light can be installed on a 3-inch diameter pole (not included) or directly onto a flat surface using the included pier mount base.
Option A: 3-inch Pole Mount
- Prepare Pole: Ensure your existing 3-inch pole has electrical wiring accessible.
- Make Electrical Connections: Connect the fixture's wires to the pole's wiring (Black to Black, White to White, Ground to Ground). Secure with wire nuts.
- Mount Fixture: Slide the fixture onto the 3-inch pole and secure it using the set screws provided.
- Install Bulb: Screw in an E26 base bulb (max 100W, not included).
Option B: Pier Mount Base Installation
- Secure Pier Mount Base: Attach the pier mount base to a flat, stable surface (e.g., concrete pier, wooden post) using appropriate hardware (not always included, depending on surface type).
- Prepare Wiring: Route electrical wires through the pier mount base.
- Make Electrical Connections: Connect the fixture's wires to your household wiring (Black to Black, White to White, Ground to Ground). Secure with wire nuts.
- Mount Fixture: Secure the post light fixture onto the pier mount base.
- Install Bulb: Screw in an E26 base bulb (max 100W, not included).
5. Operating Instructions
The VIANIS outdoor lights feature advanced motion and dusk-to-dawn sensors with selectable operating modes.
5.1 Motion Sensor and Dusk to Dawn Functionality
The integrated sensors detect ambient light levels and motion. The light will automatically turn off during the day when brightness exceeds 100 lux and turn on at night when brightness falls below 20 lux.

Image 5.1: Illustration of the advanced PIR motion sensor with a super wide range of 40 feet detection distance and a 220-degree wide detection angle.

Image 5.2: Visual representation of the dusk to dawn sensor, showing the light automatically turning off during the daytime and turning on at night.
5.2 Operating Modes (Wall Lights Only)
The wall lights offer two standby modes selectable via a one-click switch:
- ① DIM MODE: At night, the light will maintain 30% brightness. When motion is detected, it will activate to 100% brightness. After no motion is detected for a period, it will revert to 30% brightness.
- ② ECO+ MODE: At night, the light will remain fully off. When motion is detected, it will activate to 100% brightness. After no motion is detected for a period, it will revert to full off.
The light will remember your last selected mode. The mode switch button is typically located on the fixture itself.
5.3 Manual Override Mode (Wall Lights Only)
To temporarily override the sensor and keep the light at 100% brightness for an extended period:
- Turn the light OFF using your wall switch.
- Within 2 seconds, turn the light ON again.
The light will now stay on at 100% brightness for 8 hours. After 8 hours, or when dawn arrives, it will automatically return to the previously selected AUTO MODE (DIM MODE or ECO+ MODE).

Image 5.3: Instructions for activating Manual Override Mode, which keeps the light at 100% brightness for 8 hours before returning to auto mode.
6. Maintenance
Regular maintenance ensures optimal performance and longevity of your light fixtures.
- Cleaning: Clean the fixture periodically with a soft, damp cloth. Do not use abrasive cleaners or solvents, as they may damage the finish or sensors.
- Inspection: Annually inspect the wiring and connections for any signs of wear, fraying, or corrosion. Ensure the fixture is securely mounted.
- Bulb Replacement: Always turn off power at the circuit breaker before replacing the bulb. Allow the bulb to cool completely before handling. Use only E26 base bulbs, not exceeding 100W.

Image 6.1: The wall light demonstrating its weather resistance against rain, sun, snow, and storms, highlighting its waterproof and anti-rust properties.

Image 6.2: The post light demonstrating its weather resistance against rain, sun, snow, and storms, highlighting its die-cast aluminum and anti-rust construction.
7. Troubleshooting
If your light fixture is not operating as expected, refer to the following common issues and solutions:
| Problem | Possible Cause | Solution |
|---|---|---|
| Light does not turn on at night. | 1. Power is off. 2. Bulb is faulty or loose. 3. Ambient light is too high (dusk-to-dawn sensor). 4. Wiring issue. | 1. Check circuit breaker and wall switch. 2. Replace bulb or tighten it. 3. Ensure the sensor is not obstructed or exposed to other light sources. 4. Check wiring connections. Consult an electrician if necessary. |
| Light stays on during the day. | 1. Dusk-to-dawn sensor is obstructed or faulty. 2. Manual Override Mode is active. | 1. Ensure the sensor is clean and not blocked. Relocate if necessary. If faulty, contact support. 2. Turn the light OFF and ON once to reset from Manual Override Mode. |
| Motion sensor not detecting movement. | 1. Sensor is obstructed. 2. Sensor range/angle is not optimal. 3. Incorrect operating mode selected. | 1. Clear any obstructions in front of the sensor. 2. Adjust the fixture's position if possible to optimize detection. 3. Ensure the light is not in Manual Override Mode or ECO+ MODE (if expecting dim light). |
| Light flickers or dims unexpectedly. | 1. Loose bulb or wiring. 2. Incompatible bulb. 3. Power fluctuations. | 1. Tighten bulb, check wiring connections. 2. Ensure bulb is E26 base and within 100W. 3. Consult an electrician to check household power supply. |
8. Specifications
| Feature | Specification |
|---|---|
| Brand | VIANIS |
| Models | V81092KG (Wall Light), V82092KG (Post Light) |
| Material | Die-cast Aluminum, Tempered Clear Glass |
| Finish | Matte Black |
| Light Fixture Form | Sconce (Wall), Post Lantern (Post) |
| Special Features | Motion Sensor, Dusk to Dawn Sensor, Weather Resistance (Waterproof, Sunproof, Snowproof, Stormproof) |
| Controller Type | Push Button (Mode Switch) |
| Mounting Type | Wall Mount (V81092KG), Pole Mount (3-inch) or Pier Mount (V82092KG) |
| Bulb Base | E26 (Bulb not included) |
| Max Wattage | 100W |
| Power Source | Hardwired (Not Solar Powered) |
| Wall Light Dimensions | Approximately 5 in (W) x 12 in (H) x 6.6 in (D) |
| Post Light Dimensions | Approximately 7 in (W) x 17 in (H) (with pier mount base) |
9. Warranty and Support
VIANIS products are designed for quality and durability. For specific warranty details, please refer to the product packaging or contact VIANIS customer support directly. If you encounter any issues or have questions regarding your product, please reach out to our customer service team for assistance.
Customer Support: Please visit the official VIANIS website or refer to your purchase documentation for contact information.