1. Introduction
This manual provides essential instructions for the safe and effective operation, setup, and maintenance of your Supdex Heng Long 1/16 RC T-90 Tank. Please read this manual thoroughly before use to ensure proper function and longevity of the product.
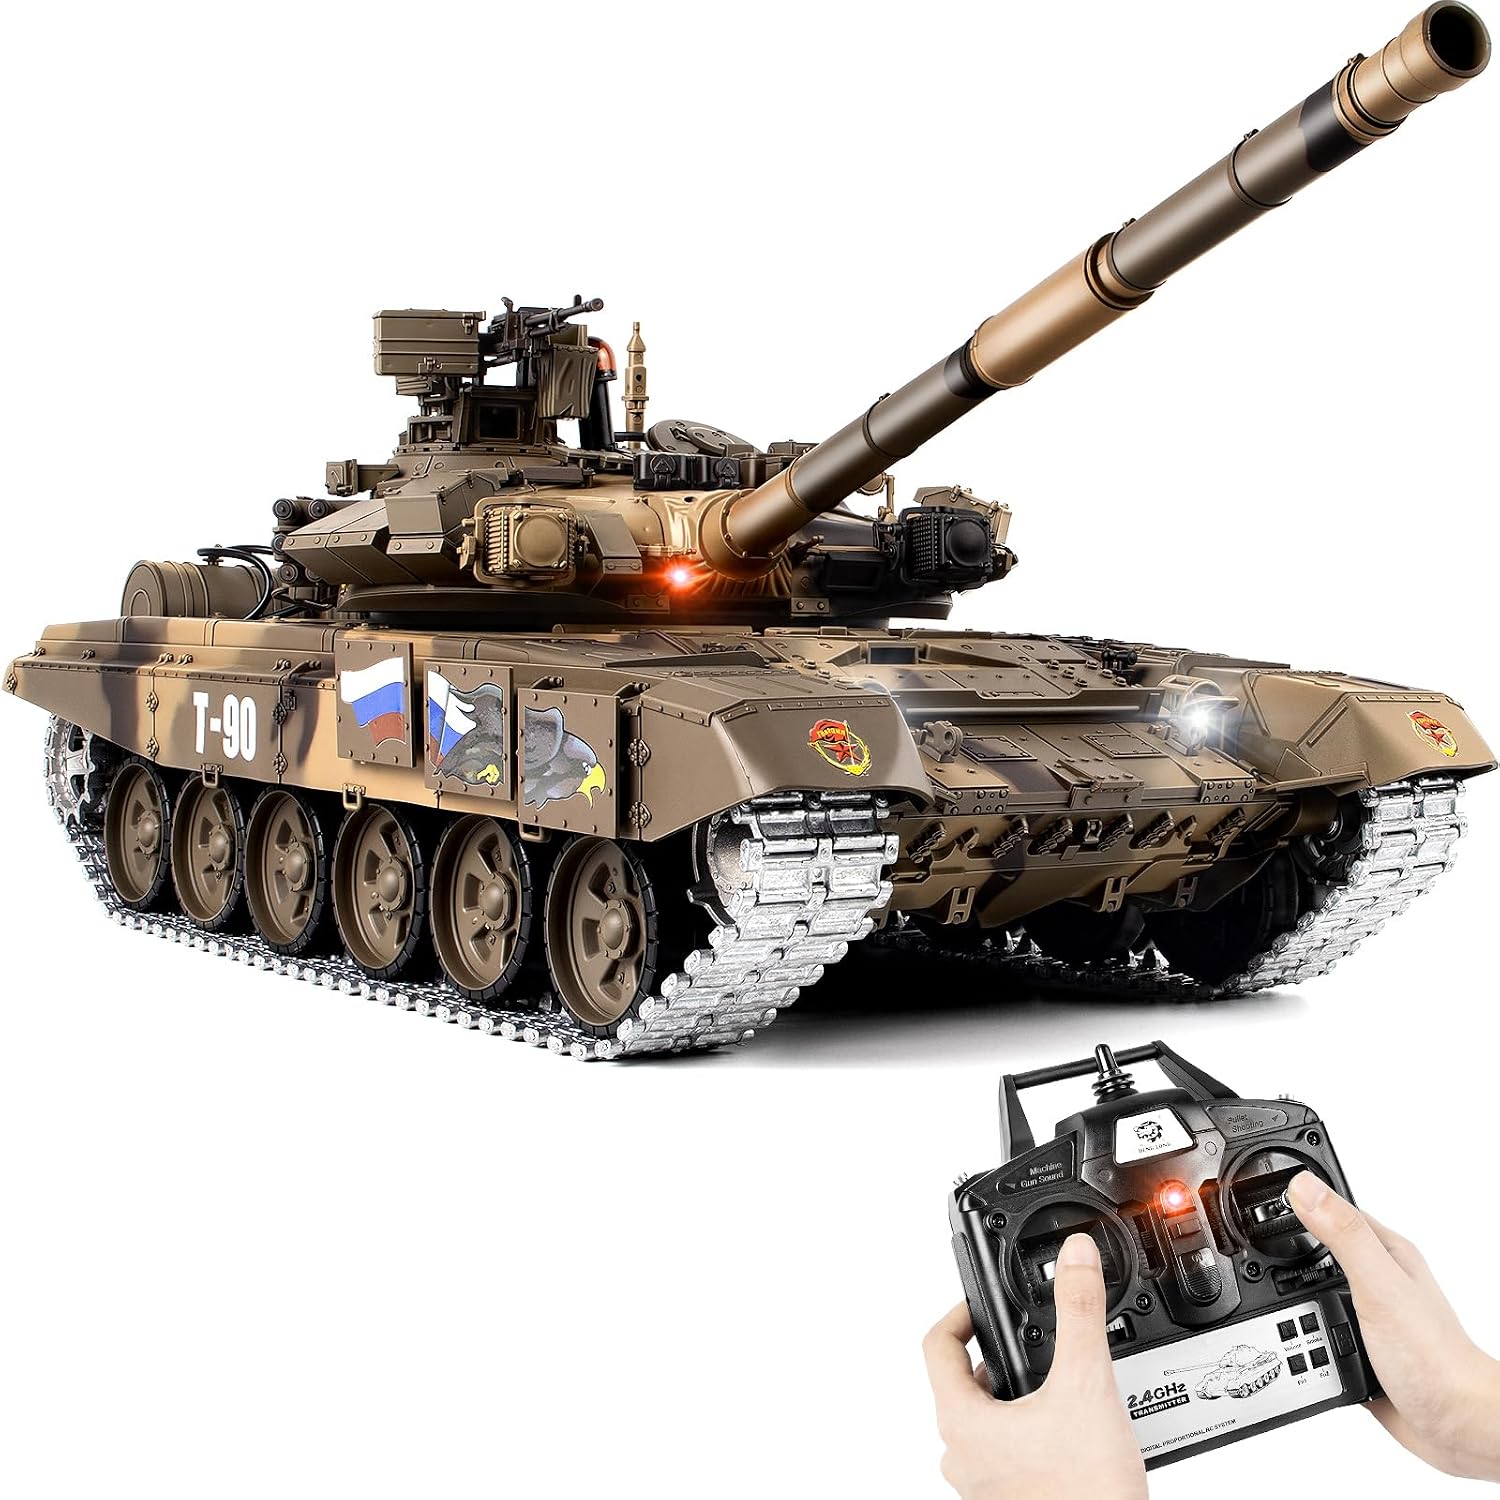
Image 1.1: The Supdex Heng Long 1/16 RC T-90 Tank and its 2.4G remote control.
2. Safety Information
Always prioritize safety during operation. This product is recommended for ages 14 and up.
- Do not aim or fire at people or animals. The tank fires plastic BBs which can cause injury.
- Keep fingers and loose clothing away from moving parts, especially tracks and gears.
- Do not operate near water or in wet conditions to prevent electrical damage.
- Ensure batteries are charged correctly and handled with care.
- Supervise younger users to ensure adherence to safety guidelines.
3. Package Contents and Setup
3.1 Package Contents

Image 3.1: Overview of all included components, including the tank, remote, batteries, charger, BBs, and smoke fluid bottle.
Verify that all components are present and undamaged upon unboxing:
- 1/16 Scale T-90 RC Tank
- 2.4G Remote Control Transmitter
- Rechargeable Lithium-Ion Batteries (x2)
- USB Charging Cable
- Airsoft BBs (approx. 100)
- Smoke Fluid Bottle with Dropper
- Accessory parts (e.g., machine gun, lamplight)
3.2 Battery Installation and Charging
The tank requires two rechargeable Lithium-Ion batteries. The remote control requires 6 AA batteries (not included).
- Tank Batteries: Locate the battery compartment on the tank. Connect the rechargeable battery to the tank's power connector and carefully place it inside the compartment. Ensure the power switch is in the OFF position before connecting.
- Charging: Use the provided USB charging cable to charge the tank's batteries. Connect the battery to the charging cable, then plug the USB end into a suitable USB power source. The charging indicator will show the charging status.
- Remote Control Batteries: Open the battery cover on the back of the remote control. Insert 6 AA batteries, observing the correct polarity (+/-). Close the battery cover securely.
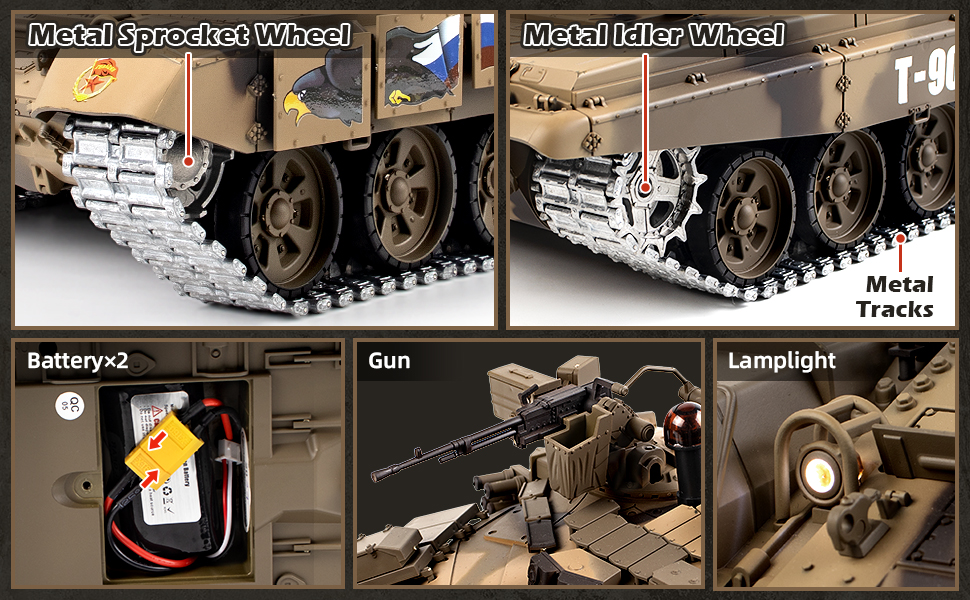
Image 3.2: Details of the tank's components, including the battery compartment (bottom left).
3.3 Smoke Fluid Addition
To activate the realistic smoke effect, add a small amount of tap water to the smoke injection hole.
- Locate the smoke injection hole on the tank.
- Using the provided dropper, carefully add 2-3 drops of tap water into the hole. Do not overfill.
- After adding water, press the smoke button on the remote control to activate the smoke function during operation.

Image 3.3: Step-by-step guide for adding water to the smoke generator.
3.4 BB Loading
To enable the shooting function, load the provided Airsoft BBs into the tank's turret.
- Ensure the tank's power is off and the muzzle is pointed in a safe direction.
- Locate the BB loading hatch on the turret.
- Carefully pour the Airsoft BBs into the hatch. Do not force or overfill.

Image 3.4: Loading 6mm Airsoft BBs into the tank's ammunition compartment.
4. Operating Instructions
4.1 Remote Control Overview
Familiarize yourself with the remote control functions before operating the tank.

Image 4.1: Detailed layout of the 2.4G remote control transmitter with labeled functions.
- Power Indicator: Lights up when the remote is on.
- Machine Gun Sound: Activates machine gun sound effect.
- Bullet Shooting (BBs): Fires BBs (requires long press with Machine Gun Sound button).
- Laser Aiming: Activates a laser pointer for aiming.
- Turret Left/Right Rotation: Controls the turret's horizontal movement.
- Muzzle Up/Down: Controls the main gun's vertical movement (30-degree tilt angle).
- Forward/Backward: Controls tank movement. Adjustable speed.
- Tank 360° Rotation: Allows the tank to rotate in place.
- Smoke Switch: Toggles the smoke generator on/off.
- Start/Stop Button: Powers the tank on/off.
- Volume Switch (V+/V-): Adjusts sound volume.
- Function Setting Keys (Fn1, Fn2): Used for advanced settings or infrared battle mode.
4.2 Basic Driving and Turret Control
Turn on the tank using the power switch located at the rear of the tank, then turn on the remote control. The tank and remote will automatically pair.
- Use the left joystick for forward/backward movement and tank rotation.
- Use the right joystick for turret rotation (320 degrees) and muzzle elevation/depression (30 degrees).

Image 4.2: Demonstrates the tank's maneuverability, including turret and muzzle movement.
4.3 Smoke and Sound Functions
The tank features realistic smoke and sound effects.
- Smoke: After adding water (see Section 3.3), press the 'Smoke Switch' button on the remote to activate the simulated exhaust smoke.
- Sound: The tank produces engine sounds and other effects. Use the 'Volume Switch' (V+/V-) on the remote to adjust the volume or turn it off. Press V+ (left control stick up) to increase volume. Press V- (left control stick down) to decrease volume or turn it off. To reactivate sound after turning off, press V+ (left control stick up).

Image 4.3: Visual representation of the tank's smoke and sound features.
4.4 Shooting BBs
The tank can fire 6mm Airsoft BBs with a simulated recoil effect.
- Ensure BBs are loaded (see Section 3.4).
- To fire, long press both the 'Machine Gun Sound' button and the 'Bullet Shooting' button (A+B) simultaneously on the remote control.
- The tank will produce a realistic recoil and sound effect when firing.
- Always ensure the firing area is clear and safe.
4.5 Infrared Battle Function
Engage in multi-tank battles with the infrared battle system.
- To enter infrared battle mode, press the 'G+B (Bullet Shooting)' buttons on the remote simultaneously.
- Multiple tanks can participate without interference.
- When a tank is hit, it will make sounds and vibrate.
- After five hits, the tank is defeated. Press the start-up button to begin a new round.

Image 4.4: The infrared battle function allows multiple tanks to engage in simulated combat.
Video 4.1: A demonstration of the Supdex 1/16 T-90 RC tank's movement and features in action.
5. Maintenance
Regular maintenance ensures optimal performance and extends the lifespan of your RC tank.
- Cleaning: After use, especially in dusty or dirty environments, gently clean the tank's exterior with a soft, dry cloth. Remove any debris from the tracks and wheels.
- Track Inspection: Periodically inspect the metal tracks, idler wheels, and sprocket wheels for wear or damage. Ensure tracks are properly tensioned.
- Smoke Device: If the smoke function stops working or you smell burning, the smoke device may be out of water. Add tap water as described in Section 3.3. Do not operate the smoke function without water to prevent damage.
- Battery Care: Always fully charge batteries before storage and recharge them periodically if not used for extended periods. Store batteries in a cool, dry place.
- Storage: Store the tank and remote control in a dry, cool place away from direct sunlight and extreme temperatures.
6. Troubleshooting
If you encounter issues with your RC tank, refer to the following common problems and solutions:
| Problem | Possible Cause | Solution |
|---|---|---|
| Tank does not respond to remote. | Low batteries in tank or remote; tank/remote not powered on; pairing issue. | Ensure tank and remote are powered on. Check and replace/recharge all batteries. Power cycle both devices to re-establish connection. |
| Smoke function not working. | No water in smoke generator; smoke switch off. | Add tap water to the smoke injection hole (Section 3.3). Ensure the smoke switch on the remote is activated. |
| Tank not firing BBs. | No BBs loaded; incorrect firing button sequence. | Load BBs into the turret (Section 3.4). Ensure you are long-pressing both 'Machine Gun Sound' and 'Bullet Shooting' buttons simultaneously. |
| Sound not working or too low. | Volume turned down or off. | Use the V+ (left control stick up) on the remote to increase volume or reactivate sound. |
| Tracks come off frequently. | Operating on uneven terrain; track tension issue; debris in tracks. | Avoid excessively rough terrain. Inspect tracks for debris and ensure proper tension. |
7. Specifications
| Feature | Detail |
|---|---|
| Model | T-90 Russian Main Battle Tank |
| Scale | 1/16 |
| Product Dimensions | 25 x 9 x 9 inches (approx.) |
| Item Weight | 10.88 pounds |
| Control Frequency | 2.4 GHz |
| Tank Battery | Lithium Ion (x2, included) |
| Remote Battery | 6 AA batteries (not included) |
| Turret Rotation | 320 degrees |
| Muzzle Elevation | Up/Down 30 degrees |
| Climbing Slope | Up to 40 degrees |
| Recommended Age | 14 years and up |

Image 7.1: Approximate dimensions of the 1/16 scale T-90 RC tank.
8. Warranty and Support
For any questions, technical support, or warranty inquiries regarding your Supdex Heng Long 1/16 RC T-90 Tank, please contact the manufacturer or seller directly through your purchase platform. Please retain your proof of purchase for warranty claims.