1. Product Overview
The Supdex 1/16 RC Tank US M1A2 Abrams Army Toy is a highly detailed, full-scale remote-controlled model of the M1A2 Abrams tank. It features realistic functions including infrared battle capabilities, smoke and sound effects, lights, simulated recoil, and the ability to fire 6mm BBs. Designed for enthusiasts aged 14 and up, this model incorporates upgraded metal tracks, idler and sprocket wheels, and a steel gearbox for enhanced durability and performance across various terrains.

Figure 1: Supdex 1/16 RC Tank US M1A2 Abrams Army Toy.
2. Safety Information
WARNING:
- Do not fire at animals or people.
- Do not aim at fragile articles.
- Always ensure the area is clear before operating the tank, especially when firing BBs.
- Keep small parts away from children to prevent choking hazards.
- Adult supervision is recommended for users under 14 years of age.
3. Setup
3.1. Unpacking and Component Identification
Carefully remove all components from the packaging. Verify that all parts listed in the "Product Configuration" image are present.

Figure 2: Product Configuration showing the tank, remote control, batteries, charger, BBs, and various accessory parts.
3.2. Battery Installation
- Tank Battery: Locate the battery compartment on the underside of the tank. Insert one of the provided Lithium-Ion batteries, ensuring correct polarity. The tank comes with two rechargeable batteries.
- Remote Control Batteries: The remote control requires 6 AA batteries (not included). Open the battery compartment on the back of the remote control and insert the batteries, observing the correct polarity.

Figure 3: Location of tank battery compartment, metal tracks, metal idler and sprocket wheels, gun, and lamplight. The remote control battery compartment is also shown.
3.3. Attaching Accessories
Attach the small accessory parts to the tank as shown in the assembly video. Use tweezers for precision if necessary.
Video 1: This video demonstrates the assembly of various small parts and accessories onto the M1A2 Abrams tank model, including machine guns, antennas, and other external details. It shows the process of attaching these components to enhance the tank's realistic appearance.
3.4. Adding Smoke Fluid
To activate the smoke effect, add pure water into the injection hole located on the tank's rear. Use the provided dropper for precise filling.

Figure 4: Step-by-step guide on how to add smoke fluid (pure water) to the tank for the smoke effect. It highlights the injection points and the use of the dropper.
4. Operating Instructions
4.1. Powering On/Off
The power switch for the tank is located under the turret. Turn it ON to begin operation and OFF when finished.

Figure 5: The power switch for the tank is located discreetly under the turret, as indicated by the red circle.
4.2. Remote Control Functions
Familiarize yourself with the remote control layout and functions:

Figure 6: Detailed diagram of the 2.4GHz remote control, highlighting buttons for machine gun sound, bullet shooting, turret rotation, muzzle movement, smoke switch, start/stop button, and volume control.
- Movement: Use the left control stick for forward, backward, right, and left spin. The tank also supports 360-degree central rotation.
- Turret Control: The turret can rotate 320 degrees. Use the right control stick for turret left/right rotation and muzzle up/down (30 degrees).
- Speed Adjustment: Tank forward, backward, and turret rotating speed can be adjusted.
4.3. Smoke and Sound Effects
- Smoke: After adding pure water (see Section 3.4), press the smoke button on the remote to produce simulated exhaust smoke. If you smell a burning odor, stop the smoke function and add more water to prevent damage.
- Sound: Sound can be adjusted or turned off.
- Volume Up: Press V+ (left control stick up).
- Volume Down/Off: Press V- (left control stick down). Press twice to turn off.
- Activate Sound: After turning off, press V+ (left control stick up) to reactivate.

Figure 7: Visual representation of the tank producing smoke and demonstrating sound effects, highlighting the realism of these features.
4.4. Safe Shooting Mode (6mm BBs)
The tank can fire 6mm BBs. To shoot, long-press both buttons A+B (machine gun sound + bullet shooting) simultaneously on the remote. The tank will produce a realistic recoil and sound effect. Always adhere to safety warnings in Section 2.
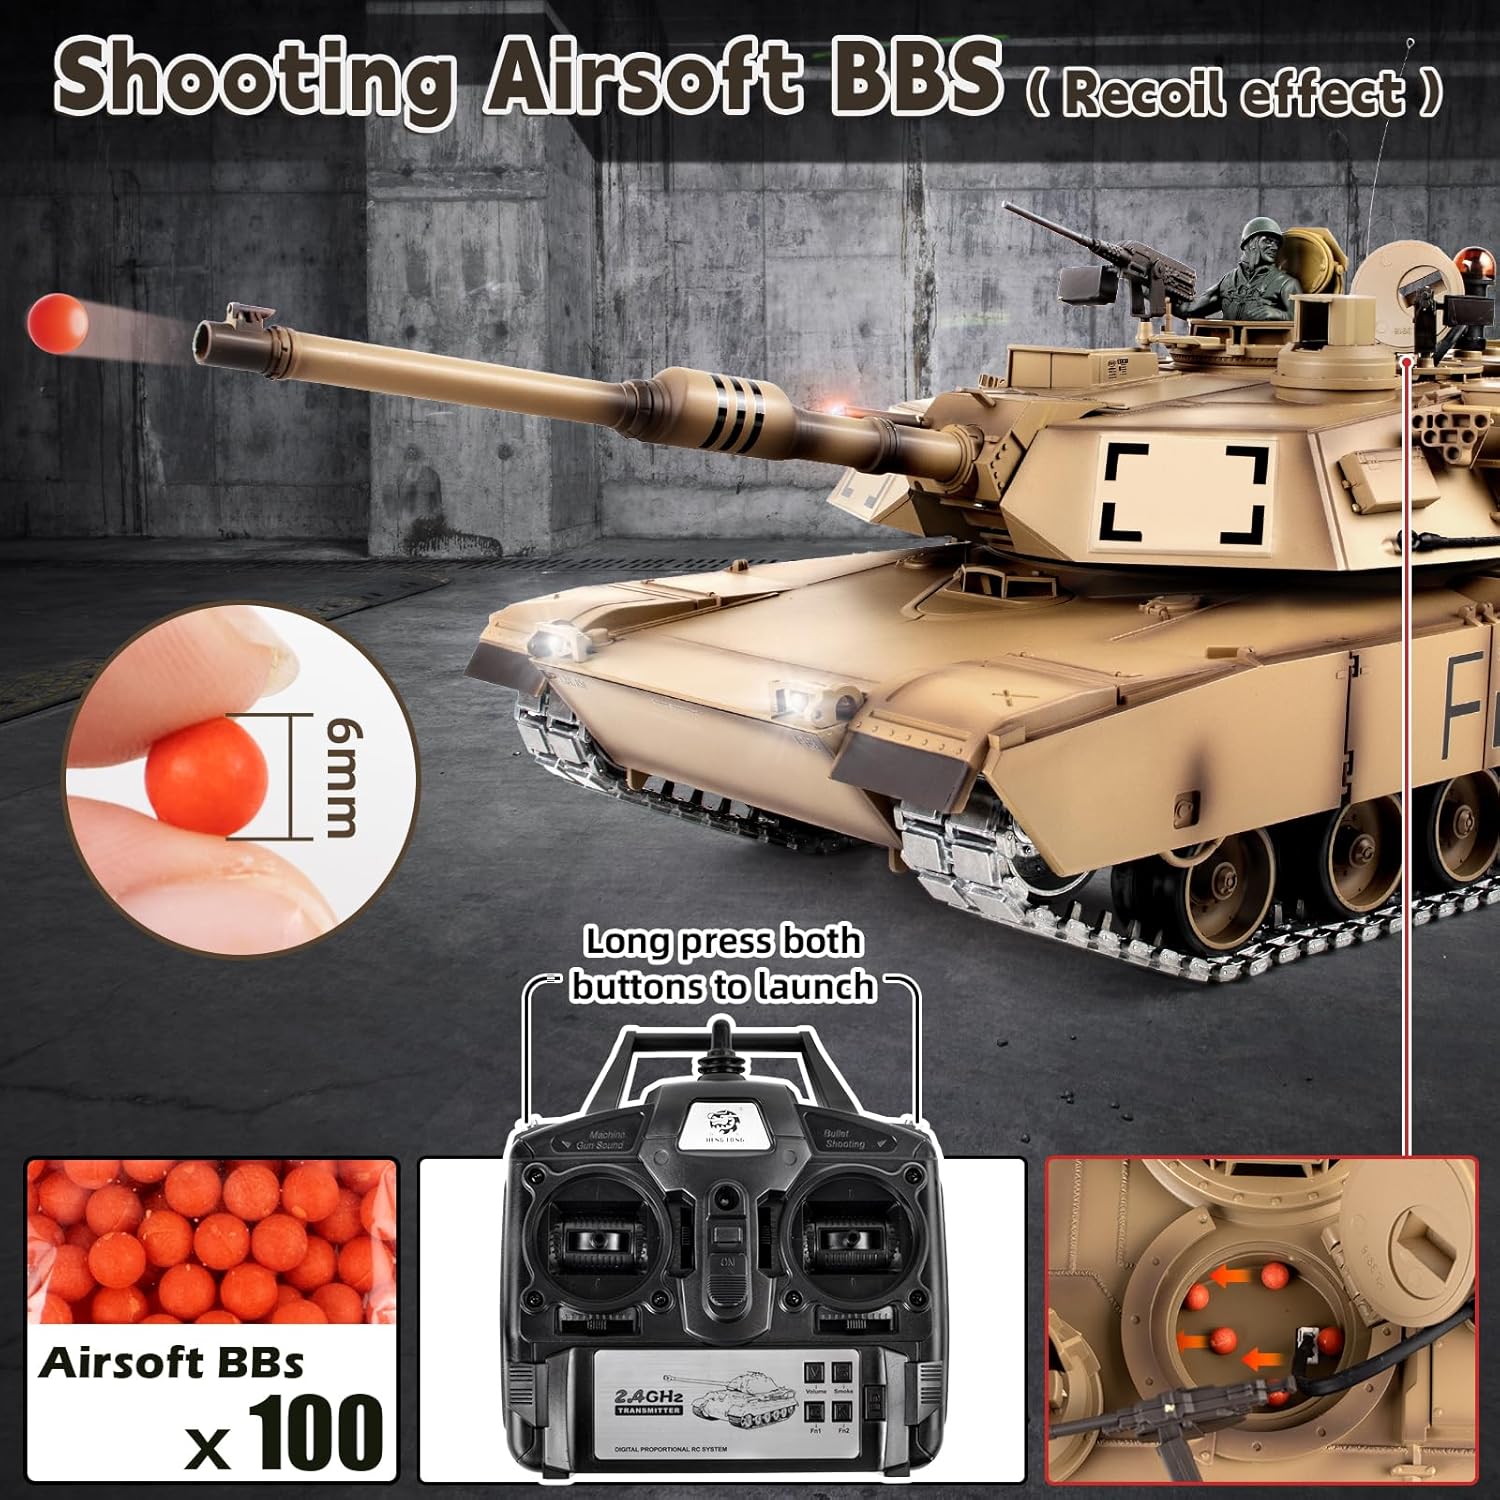
Figure 8: Illustration of the 6mm BB shooting function, showing the BBs, the remote control buttons for firing, and the loading mechanism.
4.5. Infrared Battle System
The 2.4G RC model tank features an infrared receiver for battle mode. Press the G+B (Bullet Shooting) buttons on the remote at the same time to enter infrared battle mode. Multiple tanks can combat without interference. If a tank is hit, it will make sounds and vibrate. A tank is defeated after five hits. Press the start-up button to begin another round.

Figure 9: Depiction of the infrared battle system, showing multiple tanks engaging in combat and the effect of being hit.
Video 2: This video demonstrates the 1/16 M1A2 RC tank in action, showcasing its movement and features. It provides a brief overview of the tank's capabilities during operation.
5. Maintenance
- Cleaning: After use, especially in dusty or dirty environments, gently wipe down the tank with a soft, dry cloth. Avoid using water or harsh chemicals directly on electronic components.
- Track Inspection: Regularly check the metal tracks, idler wheels, and sprocket wheels for any debris or damage. Clean as needed to ensure smooth operation.
- Battery Care: Always fully charge the batteries before storage. If storing for extended periods, remove batteries from both the tank and the remote control.
- Smoke Unit: Ensure the smoke unit is clean and free of residue. Only use pure water for the smoke effect.
6. Troubleshooting
| Problem | Possible Cause | Solution |
|---|---|---|
| Tank does not respond to remote. |
|
|
| Smoke effect is weak or absent. |
|
|
| BBs are not firing. |
|
|
7. Specifications
- Scale: 1/16
- Model: US M1A2 Abrams
- Product Dimensions: 10 x 9 x 9 inches
- Item Weight: 14.22 pounds
- Recommended Age: 14 years and up
- Batteries: 1 Lithium Ion battery required (included, 2 provided). Remote requires 6 AA batteries (not included).
- Features: Infrared battle function, smoke, sound, lights, simulated recoil, firing 6mm BBs, omnidirectional movement, 360-degree central rotation, 320-degree turret rotation, 30-degree muzzle up/down, 40-degree climbing slope.
- Upgraded Parts: Metal tracks, metal idler wheel, metal sprocket wheel, steel gearbox.
8. Warranty and Support
For warranty information or technical support, please contact Supdex customer service through the retailer where the product was purchased. Keep your proof of purchase for any warranty claims.
For additional resources and product updates, visit the official Supdex Store: Supdex Store on Amazon.


