1. Important Safety Instructions
- Read all instructions carefully before use.
- Keep this manual for future reference.
- Do not expose the device to water or excessive moisture.
- Avoid placing the device near heat sources or direct sunlight.
- Use only the provided power adapter or a certified equivalent.
- Do not attempt to disassemble or repair the device yourself. Contact qualified service personnel.
2. Package Contents
- Lancoon Digital Alarm Clock Radio
- USB Power Cable
- User Manual
3. Product Overview
Familiarize yourself with the various parts and controls of your alarm clock radio.
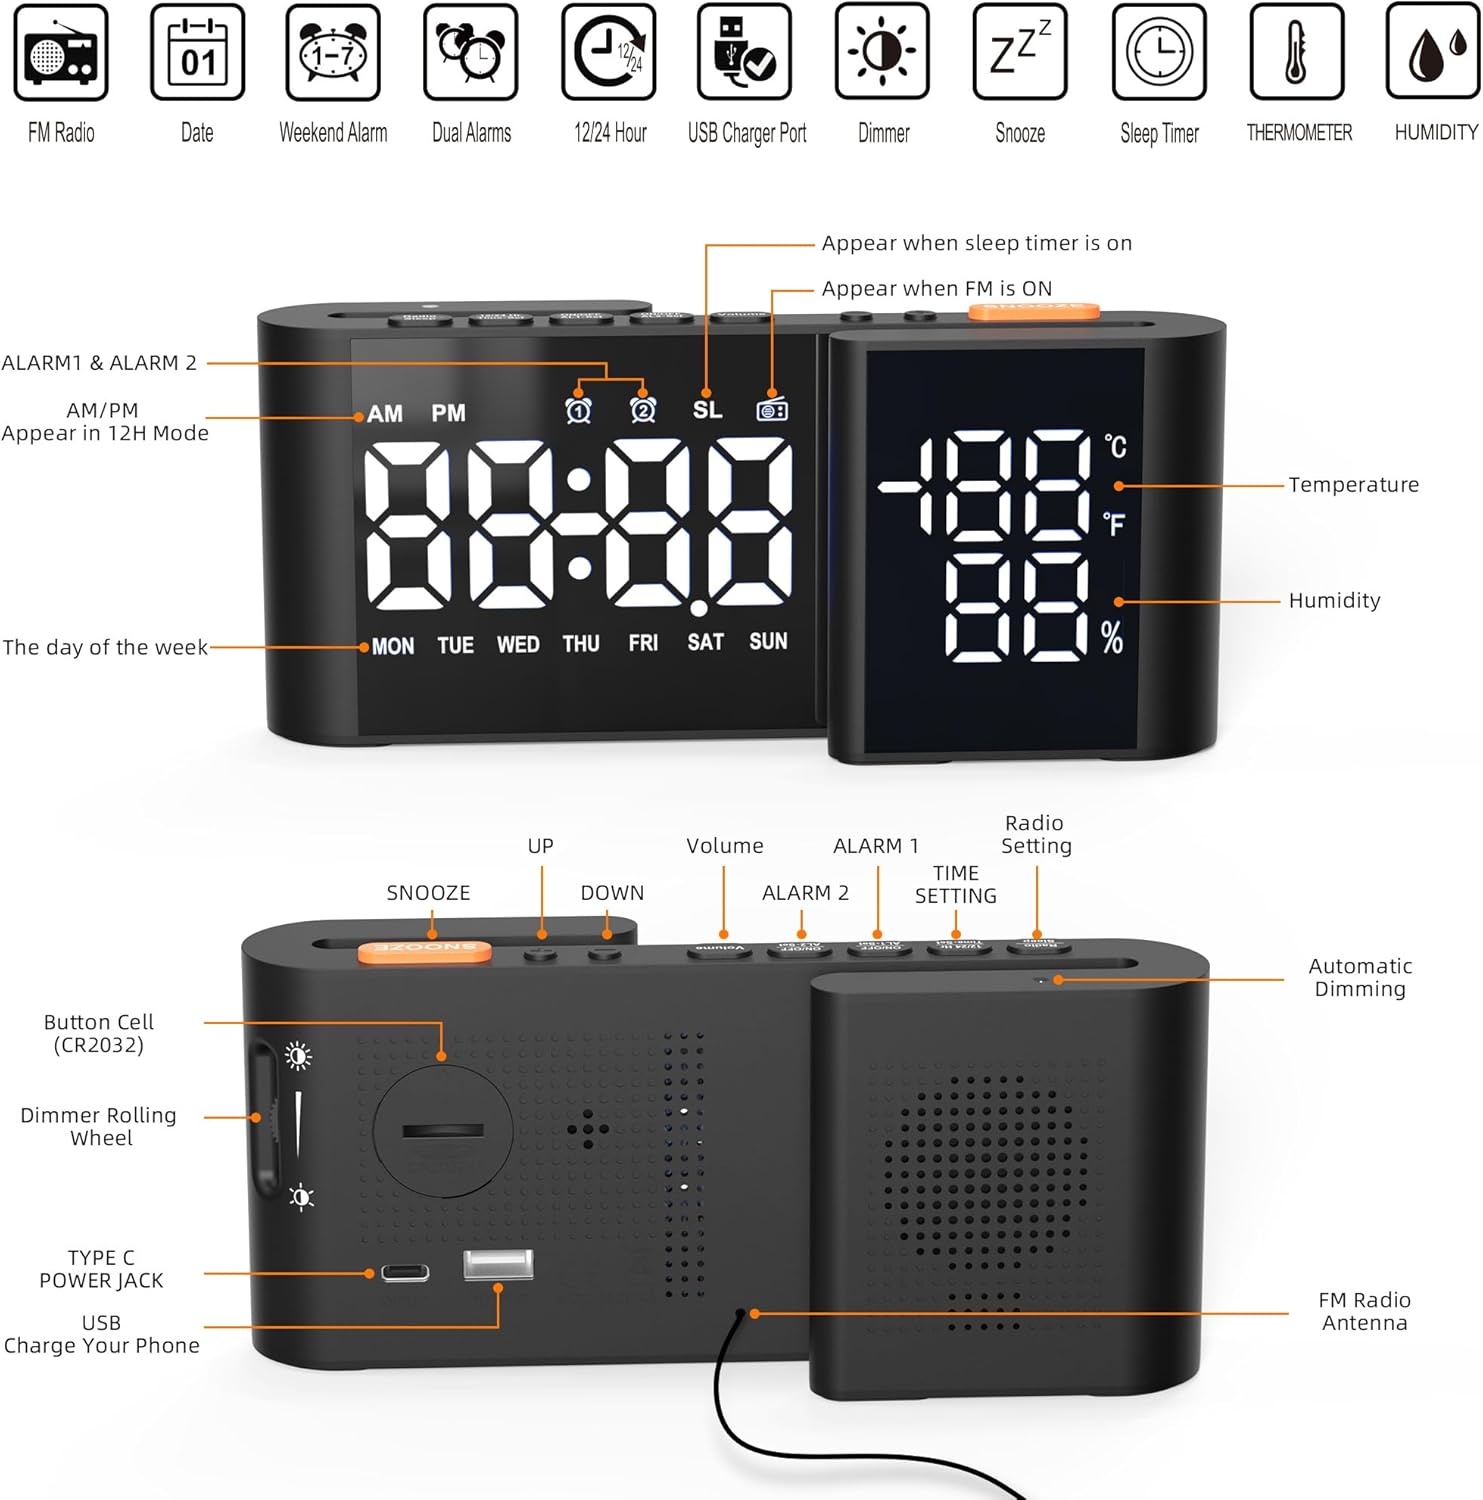
Image Description: This image displays the front and rear views of the Lancoon Digital Alarm Clock Radio. The front view highlights the time, temperature, and humidity display, along with indicators for AM/PM, alarms, sleep timer, and FM radio. The rear view shows the physical buttons for SNOOZE, UP, DOWN, Volume, ALARM 1, ALARM 2, TIME SETTING, Radio Setting, a Dimmer Rolling Wheel, TYPE C POWER JACK, USB Charge Your Phone port, and the FM Radio Antenna. A button cell (CR2032) compartment is also visible.
Controls and Display Elements:
- Display: Shows time, temperature, humidity, day of the week, and various status icons.
- SNOOZE Button: Activates snooze function, adjusts brightness.
- UP/DOWN Buttons: Adjust values, navigate menus.
- Volume Buttons: Adjust radio or alarm volume.
- ALARM 1/ALARM 2 Buttons: Set and activate alarms.
- TIME SETTING Button: Enters time and date setting mode.
- Radio Setting Button: Controls FM radio functions.
- Dimmer Rolling Wheel: Manually adjusts display brightness.
- TYPE C POWER JACK: Main power input.
- USB Charge Your Phone Port: USB output for charging external devices.
- FM Radio Antenna: For radio signal reception.
- Button Cell (CR2032): For memory backup.
4. Setup
4.1 Power Connection
- Connect the provided USB power cable to the TYPE C POWER JACK on the back of the alarm clock.
- Plug the other end of the USB cable into a compatible USB power adapter (not included) and then into a wall outlet.
- The display will light up, indicating the device is powered on.

Image Description: The image shows the Lancoon Digital Alarm Clock Radio placed on a bedside table, with its USB power cable plugged into a wall adapter. A smartphone is also shown connected to the clock's USB charging port, indicating its charging capability.
4.2 Battery Backup (CR2032)
The device uses a CR2032 button cell battery (not included) for time and alarm settings memory backup during power outages. This battery does not power the display or functions.
- Locate the battery compartment on the bottom of the unit.
- Open the compartment and insert a CR2032 battery with the correct polarity (+ side up).
- Close the compartment securely.
5. Basic Operation
5.1 Setting Time and Date

Image Description: This image illustrates the cyclic display feature of the Lancoon Digital Alarm Clock Radio. It shows the clock displaying the current time, then cycling to show the year, and subsequently the month, day, and day of the week. This demonstrates how the device can show various time-related information.
- Press and hold the TIME SETTING button. The hour digits will flash.
- Use the UP or DOWN buttons to adjust the hour.
- Press TIME SETTING again to confirm the hour and move to minutes.
- Use the UP or DOWN buttons to adjust the minutes.
- Continue pressing TIME SETTING to cycle through and set the year, month, and day using the UP or DOWN buttons.
- Press TIME SETTING one last time to save all settings and exit.
5.2 12/24 Hour Format
While in time setting mode (hour flashing), press the TIME SETTING button repeatedly until the 12/24 hour format option appears. Use the UP or DOWN buttons to select your preferred format.
6. Alarm Functions
6.1 Setting Dual Alarms (Alarm 1, Alarm 2)

Image Description: This image highlights the dual alarm feature of the Lancoon Digital Alarm Clock Radio. It shows two separate alarm times, 6:00 and 8:30, suggesting the ability to set different wake-up times for different users or purposes. The image also indicates options for setting weekday or weekend alarms.
The clock allows setting two independent alarms.
- Press and hold the ALARM 1 or ALARM 2 button. The hour digits for the selected alarm will flash.
- Use the UP or DOWN buttons to adjust the hour.
- Press the respective ALARM button again to confirm the hour and move to minutes.
- Use the UP or DOWN buttons to adjust the minutes.
- Press the ALARM button again to select the alarm source (Buzzer or FM Radio).
- Press the ALARM button one last time to save the settings and activate the alarm. An alarm icon will appear on the display.
6.2 Alarm Volume Adjustment
When setting the alarm, after selecting the alarm source, you can adjust the alarm volume (1-15 levels) using the Volume buttons.
6.3 Snooze Function
When an alarm sounds, press the SNOOZE button to temporarily silence it. The alarm will sound again after the set snooze duration (adjustable from 5 to 90 minutes). To adjust the snooze duration, press and hold the SNOOZE button, then use UP/DOWN to set the desired time.
6.4 Weekday/Weekend Alarm
During alarm setting, after setting the time and source, you can select the alarm frequency: every day, weekdays only, or weekends only. Use the UP or DOWN buttons to cycle through these options.
7. FM Radio Operation

Image Description: This image shows the Lancoon Digital Alarm Clock Radio with various FM radio frequencies displayed as colorful waves, indicating its radio functionality. The display shows the time, temperature, and humidity, along with icons for automatic storage, FM frequency range (76.0MHz-108.0MHz), 15 level volume, and auto-off after 5-90 minutes.
7.1 Tuning and Scanning
- Extend the FM radio antenna for better reception.
- Press the Radio Setting button to turn on the FM radio.
- Press and hold the Radio Setting button to automatically scan and save available FM stations (up to 70 channels).
- Alternatively, short press the UP or DOWN buttons to manually tune to a specific frequency.
7.2 Selecting Saved Stations
After automatic scanning, short press the Radio Setting button to cycle through your saved stations.
7.3 Radio Volume Control
While the radio is on, use the Volume buttons to adjust the listening volume (1-15 levels).
8. Display and Brightness
8.1 Temperature and Humidity Display
The clock continuously displays the ambient temperature and humidity. The temperature range is -10°C to 50°C (14°F-122°F), and humidity range is 20% to 95%.
8.2 Automatic Dimming
The display brightness automatically adjusts based on ambient light conditions. This feature ensures optimal visibility during the day and reduced brightness at night.
8.3 Manual Brightness Adjustment

Image Description: This image demonstrates the automatic and manual dimming capabilities of the Lancoon Digital Alarm Clock Radio. It shows a slider indicating brightness levels from 0% to 100% and a close-up of the dimmer rolling wheel. Below, several clock displays illustrate different brightness settings, from completely off to full brightness.
You can manually adjust the display brightness from 0% to 100% using the Dimmer Rolling Wheel located on the side of the unit. Rotate the wheel to increase or decrease brightness.
9. USB Charging Port
The integrated USB output port allows you to charge other electronic devices, such as smartphones, directly from the alarm clock. Connect your device's charging cable to the USB port on the back of the alarm clock.
10. Specifications
| Feature | Detail |
|---|---|
| Brand | Lancoon |
| Model Number | LK-AE40 |
| Color | Black-White |
| Dimensions (L x W x H) | 5.5 x 3.81 x 8 cm (2.2 x 1.5 x 3.1 inches) |
| Weight | 330 grams |
| Material | Plastic |
| Display Type | Digital LED |
| Power Source | Corded Electric (USB Type-C) |
| Battery Backup | CR2032 (not included) |
| FM Frequency Range | 76-108MHz |
| Alarm Volume Levels | 1-15 levels |
| Snooze Duration | Adjustable 5-90 minutes |
| Temperature Range | -10°C to 50°C (14°F-122°F) |
| Humidity Range | 20% to 95% |
| USB Output Port | For charging external devices |
11. Maintenance and Care
- Clean the device with a soft, dry cloth. Do not use abrasive cleaners or solvents.
- Keep the device away from dust and direct sunlight.
- Ensure the FM antenna is not bent or damaged for optimal radio reception.
12. Troubleshooting
- No Display / Device Not Turning On:
- Ensure the USB power cable is securely connected to both the clock and a working power outlet.
- Check if the power adapter is functioning correctly.
- Alarm Not Sounding:
- Verify that the alarm is activated (alarm icon visible on display).
- Check the alarm time and ensure it is set correctly.
- Ensure the alarm volume is not set to minimum.
- If using radio as alarm, ensure the radio station is tuned and has signal.
- Poor FM Radio Reception:
- Fully extend the FM antenna.
- Reposition the clock to a different location to improve signal.
- Perform an automatic scan again to find stronger stations.
- Display Too Bright/Dim:
- Adjust the manual dimmer rolling wheel.
- Ensure the automatic dimming sensor is not obstructed.
- Time/Settings Lost After Power Outage:
- Ensure a fresh CR2032 battery is installed correctly in the backup compartment.
13. Warranty and Support
Lancoon products are designed and manufactured to high-quality standards. For any questions, technical support, or warranty claims, please refer to the contact information provided with your purchase or visit the official Lancoon website. Please retain your proof of purchase for warranty purposes.