1. Introduction
Thank you for purchasing the SUNLINKCO LED Desk Lamp with Clamp. This manual provides detailed instructions for the proper setup, operation, and maintenance of your new desk lamp. Please read this manual thoroughly before use to ensure optimal performance and safety.

Image 1: The SUNLINKCO LED Desk Lamp with Clamp, featuring its dual-head design and flexible gooseneck.
2. Package Contents
Verify that all components are present in the package:
- LED Desk Lamp (Dual-Head with Gooseneck)
- Desk Clamp
- Remote Control
- Power Adapter
- User Manual (this document)
3. Specifications
| Feature | Specification |
|---|---|
| Brand | SUNLINKCO |
| Model Name | LED Desk Lamp with Clamp |
| Wattage | 24 watts |
| Light Source Type | LED |
| Color Temperature | 2700K to 6500K (Adjustable) |
| Brightness Adjustment | 10% to 100% (Stepless Dimming) |
| Material | Aluminum |
| Finish Type | Matte |
| Mounting Type | Tabletop Clamp (Max 2.7 inches thickness) |
| Product Dimensions | 9.25"D x 17.44"W x 2.36"H (Folded) |
| Extended Light Bar Length | Up to 31.5 inches |
| Special Features | Light Induction, Remote Control, Memory Function, Flexible Gooseneck, Eye-Caring (Flicker-Free, No Blue Light Hazard) |
4. Setup Instructions
4.1 Mounting the Lamp
The lamp can be easily installed on a tabletop edge using the provided metal clamp. Ensure the tabletop thickness is up to 2.7 inches for secure attachment.
- Fix the clamp on the desk: Place the clamp on the edge of your desk and tighten the knob until it is securely fastened.
- Align the DC hole of the support rod: Insert the support rod into the clamp hole, ensuring the DC hole aligns correctly.
- Insert and fix the raised part of the tube: Connect the main lamp body to the support rod by inserting the raised part of the tube into the corresponding hole.
- Insert and fix the raised part of the lamp head: Attach the lamp heads to the main lamp body, ensuring they click into place.

Image 2: Visual guide for the four-step installation process of the desk lamp using the clamp.
5. Operating Instructions
5.1 Power On/Off
Press the power button on the lamp's control panel or the remote control to turn the lamp on or off.
5.2 Brightness and Color Temperature Adjustment (Stepless Dimming)
The lamp offers stepless adjustment for both brightness and color temperature, along with 10 preset levels for convenience.
- Brightness: Adjust from 10% to 100% using the dedicated buttons on the remote or touch controls on the lamp.
- Color Temperature: Adjust from 2700K (warm white) to 6500K (cool white) using the dedicated buttons on the remote or touch controls.
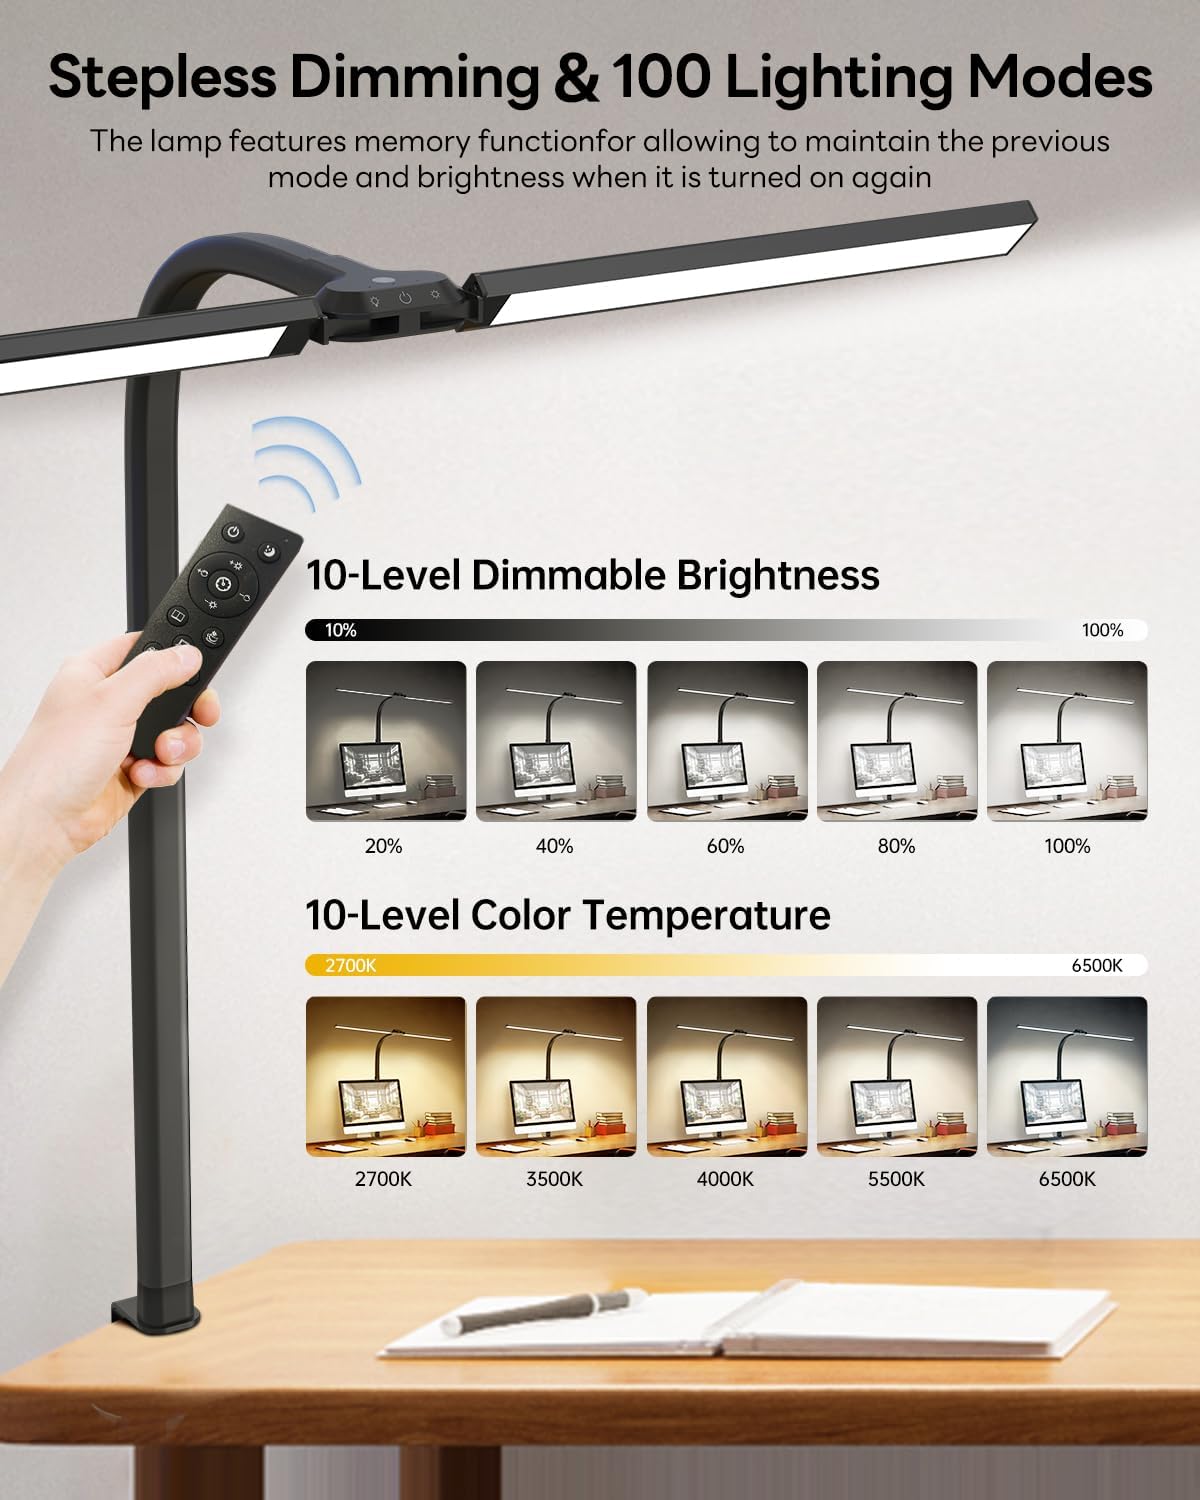
Image 3: Illustration of the 10-level dimmable brightness and 10-level color temperature settings, controlled by remote.
5.3 Light Induction Function
The integrated light sensor automatically adjusts the lamp's brightness based on ambient light conditions. This feature helps maintain a comfortable and consistent illumination level, reducing eye strain.

Image 4: Depiction of the smart light induction feature, showing how the lamp adjusts brightness in bright and dim environments.
5.4 Remote Control Usage
The included remote control allows for convenient adjustment of all lamp functions from a distance, including power, brightness, color temperature, and scene modes.
5.5 Scene Modes
The lamp features 6 pre-programmed scene modes designed for various activities:
- Sleeping Mode
- Relaxing Mode
- Reading Mode
- Working Mode
- Feeding Mode
- Gaming Mode
Select the appropriate mode using the remote control to optimize lighting for your current task.
5.6 Memory Function
The lamp retains the last used brightness and color temperature settings when turned off and on again, eliminating the need to re-adjust your preferred lighting.
5.7 Adjusting Lamp Angles
The lamp features a flexible design for versatile positioning:
- 180° Gooseneck: The main gooseneck allows for broad directional adjustment.
- Dual Lamp Heads: Each lamp head has a 90° horizontally-adjustable angle and an 85° rotating angle, allowing the light bar to extend up to 180° for wide illumination.

Image 5: Details on the lamp's flexible design, including the 180° extendable lamp bar, 180° flexible gooseneck, and clamp capacity.
6. Maintenance
To ensure the longevity and optimal performance of your SUNLINKCO LED Desk Lamp, follow these maintenance guidelines:
- Cleaning: Disconnect the power before cleaning. Use a soft, dry cloth to wipe the lamp's surface. Avoid abrasive cleaners or solvents that may damage the finish.
- Storage: If storing the lamp for an extended period, ensure it is clean and dry. Store it in a cool, dry place away from direct sunlight.
- Handling: Handle the lamp with care. Avoid excessive force when adjusting the gooseneck or lamp heads to prevent damage.
7. Troubleshooting
If you encounter any issues with your lamp, refer to the following table for common problems and solutions:
| Problem | Possible Cause | Solution |
|---|---|---|
| Lamp does not turn on | No power supply; Loose connection; Remote control battery depleted | Ensure power adapter is securely plugged in; Check all connections; Replace remote control batteries. |
| Brightness/Color temperature cannot be adjusted | Remote control not working; Lamp controls unresponsive | Ensure remote control has fresh batteries and is pointed at the lamp; Try using the touch controls on the lamp directly. |
| Light flickers | Unstable power supply; Faulty connection | Plug the lamp into a different power outlet; Check power adapter and cable for damage. |
| Light Induction not working | Sensor obstructed; Feature disabled | Ensure the light sensor (usually on the lamp head) is not covered; Refer to operating instructions to enable/disable the feature. |
If the problem persists after trying these solutions, please contact customer support.
8. Warranty and Support
Specific warranty details are not provided in this manual. For warranty information, please refer to the product packaging or contact SUNLINKCO customer support directly.
For further assistance, technical support, or inquiries, please visit the official SUNLINKCO store or contact their customer service department.
SUNLINKCO Store: https://www.amazon.com/stores/SUNLINKCO/page/9EB1D05E-6724-4A3D-806F-C5A7BB6FF25B