
AZUIQiMeng 8Core 2+32GB
AZUIQiMeng 12.3" Touch Screen Car Stereo User Manual
For Hyundai Tucson 2017-2021 (Model: 8Core 2+32GB)
Introduction
This manual provides detailed instructions for the installation, operation, and maintenance of your AZUIQiMeng 12.3" Touch Screen Car Stereo. Designed specifically for Hyundai Tucson models from 2017 to 2021, this Android 12 head unit offers advanced features including wireless CarPlay, Android Auto, 5G WiFi, GPS navigation, and Digital Sound Processing (DSP). Please read this manual thoroughly to ensure proper use and to maximize your device's capabilities.

Image: Comparison of the car dashboard before and after installing the 12.3-inch car stereo, highlighting the integrated display.
Getting Started
Unpacking and Inspection
Carefully unpack all components and inspect them for any signs of damage. Ensure all listed items are present. If any items are missing or damaged, contact customer support immediately.
Installation Overview
Professional installation is highly recommended for this car stereo to ensure correct wiring and integration with your vehicle's systems. Incorrect installation can lead to damage to the unit or your vehicle. For precise fitment, ensure your car dashboard matches the compatible models (Hyundai Tucson 2017-2021).
Initial Power On
After successful installation, turn on your vehicle's ignition. The car stereo should power on automatically. Follow any on-screen prompts for initial setup.
Basic Settings
Wi-Fi Settings
To connect to Wi-Fi, navigate to Settings > Network & Internet > Wi-Fi. Select your desired network and enter the password. A successful connection allows access to online apps like YouTube and Google. On subsequent uses, the unit will connect with one click.
Video: Demonstrates how to connect the car stereo to a Wi-Fi network, including entering the password and confirming connection.
Language Settings
To change the system language, go to Settings > System > Languages & input > Languages. Select 'Add a language' and choose your preferred language from the list. You can then reorder the languages to set the primary display language.
Video: Shows the steps to navigate through the settings menu to add and select a new language for the car stereo interface.
Time Settings
To configure date and time, go to Settings > System > Date & time. You can choose to use network-provided time, GPS-provided time, or set it manually. Using GPS-provided time may take a few minutes for initial synchronization.
Video: Illustrates how to access and adjust the date and time settings, including options for automatic synchronization via network or GPS.
Screen Brightness Adjustment
Adjust the screen brightness by navigating to Car Settings > Display > Brightness. Use the slider to set the desired brightness level for day and night. You can also swipe down the status bar for quick adjustments.
Video: Demonstrates how to access display settings and adjust screen brightness using the provided sliders for optimal visibility.
Advanced Features & Customization
Steering Wheel Control Learning
To configure your steering wheel controls, go to Car Settings > General > SWC setting interface. Follow the on-screen instructions to bind each button on your steering wheel to the corresponding function on the stereo. Ensure to press and hold each button as instructed for successful learning.
Video: Guides the user through the process of programming the car's steering wheel controls to interact with the stereo functions.
Button Learning (Physical Buttons)
If your unit has physical buttons, you can program them. Go to Factory Setup (password: 000000) > Knob Panel Button Learning. Select the function you wish to assign and then press the corresponding physical button on the unit. Repeat for all desired buttons.
Video: Demonstrates how to program the physical buttons on the car stereo unit by entering the factory setup and assigning functions.
Touchscreen Learning (Touch Calibration)
For optimal touch response, perform a five-point calibration. Go to Factory Setup (password: 000000) > Touch Calibration. Place all five fingers on the screen simultaneously to activate the calibration process. Follow the on-screen prompts to touch the indicated points.
Video: Shows the process of performing a five-point touch calibration on the car stereo screen for improved accuracy.
Car System Protocol Settings
To configure car-specific settings, go to Factory Setup (password: 000000) > CarType Setting. Select the appropriate brand, model, year, and protocol for your Hyundai Tucson to ensure full compatibility with vehicle features.
Video: Demonstrates how to access and configure car system protocol settings, including selecting the vehicle's brand and model.
Speed Unit Switch
You can switch the speed unit displayed on the stereo. Go to Factory Setup (password: 000000) > Speed Unit. Choose between kilometers per hour (km/h) or miles per hour (mph) as desired.
Video: Shows how to change the speed unit display between kilometers per hour and miles per hour within the factory settings.
Clear Memory
To optimize performance, you can clear the system memory. Swipe down from the top of the screen to access quick settings, then tap the 'System Optimize' icon. This will clear background applications and free up RAM.
Video: Demonstrates how to clear the car stereo's memory by optimizing the system through the quick settings menu.
UI Theme Customization
The stereo offers multiple UI themes for personalization. Navigate to the 'Theme' application from the main menu. Browse through the available themes (e.g., XT38, XT35, XT188, XT103, XT27, XT112, XT52, XT51, XT183, XT29, YT88, YT36, YTQQ, XT25, XT37, XT70, XT24, XT246, XT50, XT11, XT55) and select one to apply. Some themes allow wallpaper customization.
Video: Shows how to access and apply different user interface themes to customize the appearance of the car stereo's display.
Radio Settings (FM/AM)
Access the Radio application to tune into FM/AM stations. You can manually adjust frequencies or use the search function to find stations. Save your favorite stations for quick access. The unit supports RDS for enhanced radio information.

Image: The car stereo's radio interface, displaying FM/AM frequencies and options for automatic or manual station search.
Video: Demonstrates how to navigate the radio settings, including tuning to different frequencies and saving preset stations.
EQ Settings (DSP)
Customize your audio experience with the built-in DSP (Digital Sound Processor). Access the EQ settings to adjust sound frequencies, select preset sound modes (e.g., Jazz, Pop, Electronic, Rock, Techno), and fine-tune the balance for different seating positions (Front left, Front right, Passenger, Full vehicle mode).

Image: The car stereo's DSP interface, illustrating controls for sound timing and bass/filter enhancements.
Video: Explains how to access and adjust the equalizer settings, including selecting sound presets and fine-tuning audio balance.
Bluetooth Connection
To connect your phone via Bluetooth, open the Bluetooth application on the stereo. Ensure Bluetooth is enabled on your phone and search for 'Car BT'. Pair your device using the provided PIN (default: 1234) and allow access to contacts and call history. After connecting, you can make hands-free calls and stream music.

Image: The car stereo's Bluetooth interface, showing options for hands-free calling, music streaming, and contact synchronization.
Video: Demonstrates the process of pairing a mobile phone with the car stereo via Bluetooth for calls and music playback.
Wireless CarPlay Connection
To use wireless CarPlay, open the 'Zlink' application on the stereo. Ensure Bluetooth is enabled on your iPhone and search for 'Car BT'. Pair your device. Once connected, CarPlay will launch, allowing access to iPhone apps like navigation, music, and messages directly on the stereo screen.
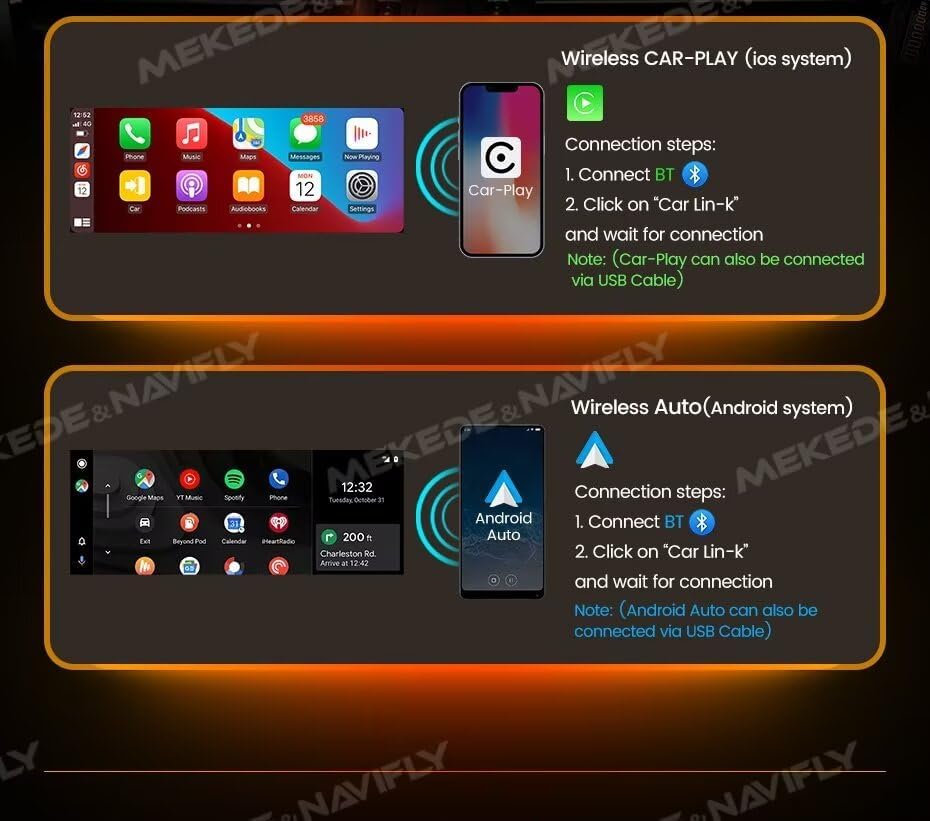
Image: Instructions for connecting to Wireless CarPlay and Android Auto, showing the respective interfaces on the car stereo.
Video: A detailed guide on how to connect and use Wireless CarPlay with the car stereo, including pairing via Bluetooth.
Android Auto Connection
For Android Auto, open the 'Zlink' application on the stereo. Ensure Bluetooth is enabled on your Android phone and search for 'Car BT'. Pair your device. Once connected, Android Auto will launch, providing access to Android apps like Google Maps, Spotify, and messages on the stereo display.
Video: Provides instructions for connecting and utilizing Android Auto wirelessly with the car stereo unit.
Split Screen and Floating Window
The stereo supports split-screen functionality, allowing two applications to be displayed simultaneously for enhanced multitasking. It also features a floating window mode for video playback or other applications, which can be customized in position.

Image: The car stereo demonstrating split-screen functionality with navigation and a floating video window, enhancing multitasking.
Maintenance
Cleaning
To clean the touchscreen, use a soft, lint-free cloth. For stubborn smudges, lightly dampen the cloth with a screen cleaner solution. Avoid abrasive materials or harsh chemicals that could damage the screen coating.
Software Updates
Periodically check for software updates to ensure optimal performance and access to new features. Updates can typically be found in the system settings or through the manufacturer's website. Follow the on-screen instructions carefully during the update process.
Cooling System
The unit is equipped with a powerful cooling fan to prevent overheating during long-term use or in high-temperature environments, ensuring stable operation. Ensure the vents are not obstructed to maintain proper airflow.

Image: A visual representation of the car stereo's high-efficiency cooling fan, designed to prevent overheating.
Troubleshooting
- No Power: Check all power connections and fuses. Ensure the vehicle's ignition is on.
- No Sound: Verify speaker connections, volume levels, and EQ settings. Check if the unit is muted.
- Touchscreen Unresponsive: Perform a touchscreen calibration as described in the 'Touchscreen Learning' section. If the issue persists, a system restart may be necessary.
- Bluetooth/CarPlay/Android Auto Connection Issues: Ensure Bluetooth is enabled on both the stereo and your phone. Forget the device on both ends and attempt to re-pair. Check for any software updates for the stereo or your phone.
- GPS Signal Loss: Ensure the GPS antenna is properly installed and has a clear view of the sky.
- Unit Overheating: Ensure the cooling fan vents are not obstructed. Reduce prolonged heavy usage in extreme temperatures.
Product Specifications
| Feature | Specification |
|---|---|
| Brand | AZUIQiMeng |
| Model Name | JGMCMEFEB-8CORE2+32GB |
| Screen Size | 12.3 Inches |
| Operating System | Android 12 |
| Memory/Storage | 2GB RAM + 32GB ROM (8Core) |
| Connectivity | Bluetooth 5.0, Wi-Fi (5G supported), 4G LTE (via SIM card/hotspot) |
| Special Features | Touchscreen, Wireless CarPlay, Android Auto, GPS Navigation, DSP, FM/AM Radio, Split Screen, Floating Window |
| Compatible Vehicle Type | Car, SUV (Hyundai Tucson 2017-2021) |
| Mounting Type | Dashboard Mount |
| Item Weight | 50 Grams |
Warranty and Support
Your AZUIQiMeng car stereo comes with a standard manufacturer's warranty. Please refer to the warranty card included in your product packaging for specific terms and conditions. For technical support, troubleshooting assistance, or warranty claims, please contact the seller or manufacturer directly. Keep your purchase receipt and product serial number handy when contacting support.
Related Documents - 8Core 2+32GB
 |
Install Guide: 2014-2019 Toyota Tundra Entune Premium GPS Navigation Radio Upgrade Step-by-step installation guide for upgrading your 2014-2019 Toyota Tundra Entune Premium GPS Navigation Radio. Includes parts list, tools required, installation instructions, and warranty information from Infotainment.com. |
 |
ZZPLAY ITZ-GX1-A: CarPlay & Android Auto Integration for Lexus GX460 (2014-2021) - Installation Guide Comprehensive installation guide and user manual for the ZZPLAY ITZ-GX1-A interface, enabling advanced Apple CarPlay and Android Auto integration for 2014-2021 Lexus GX460 vehicles equipped with navigation. Includes components, removal, installation diagram, setup, operation, and FAQ. |
 |
Stinger SR-TUN14HX HORIZON10 Radio Replacement Kit for Toyota Tundra (2014-2021) Installation Guide Comprehensive installation guide for the Stinger SR-TUN14HX HORIZON10 radio replacement kit, designed for 2014-2021 Toyota Tundra models. Covers disassembly, wiring, component installation, and testing to integrate a Stinger HORIZON10 modular radio while retaining factory features. |
 |
Velossa Tech BIG MOUTH "LIT KIT" Ram Air Intake Installation Guide for Genesis G70 (2017-2021) Step-by-step installation guide by Velossa Tech for the BIG MOUTH "LIT KIT" Ram Air Intake system for 2017-2021 Genesis G70 (3.3T/2.0T). Learn how to install this performance automotive part, including component breakdown, disassembly, AGS simulator assembly, and wiring. |
 |
Puig Pro 2.0 Crash Pads Installation for Suzuki GSX-R1000 (2017-2022) Official installation instructions for Puig Pro 2.0 Crash Pads (REF 21344N) designed for the Suzuki GSX-R1000 model years 2017-2022. Includes parts list and assembly guidance. |
 |
FTI-STK1 Installation Guide: Subaru Impreza 2017-23 Remote Start & Security System Comprehensive installation guide for the FRSTECH FTI-STK1 remote start and security system module, featuring BLADE-AL-SUB9 firmware. This document provides detailed instructions for installing the system in 2017-2023 Subaru Impreza models with standard key ignition. It covers vehicle compatibility, wiring connections, immobilizer integration, CAN bus setup, ACC-RFID1 requirements, and the module programming procedure using the Weblink HUB. Includes troubleshooting tips via LED error codes and feature coverage details. |
Ask a question about this manual
Ask about setup, troubleshooting, compatibility, parts, safety, or missing instructions. Manuals+ will review the question and use this page’s manual context to help answer it.