Introduction
Thank you for choosing the Powate 40 PSI Multi-Function Dual-Action Airbrush Set Compressor. This manual provides essential information for the safe and effective use of your new airbrush system. Please read these instructions carefully before operation and retain them for future reference.
This versatile airbrush kit is designed for a wide range of applications, including nail art, crafts, cake decoration, model painting, and fine art, offering precise control and consistent performance.
Product Components
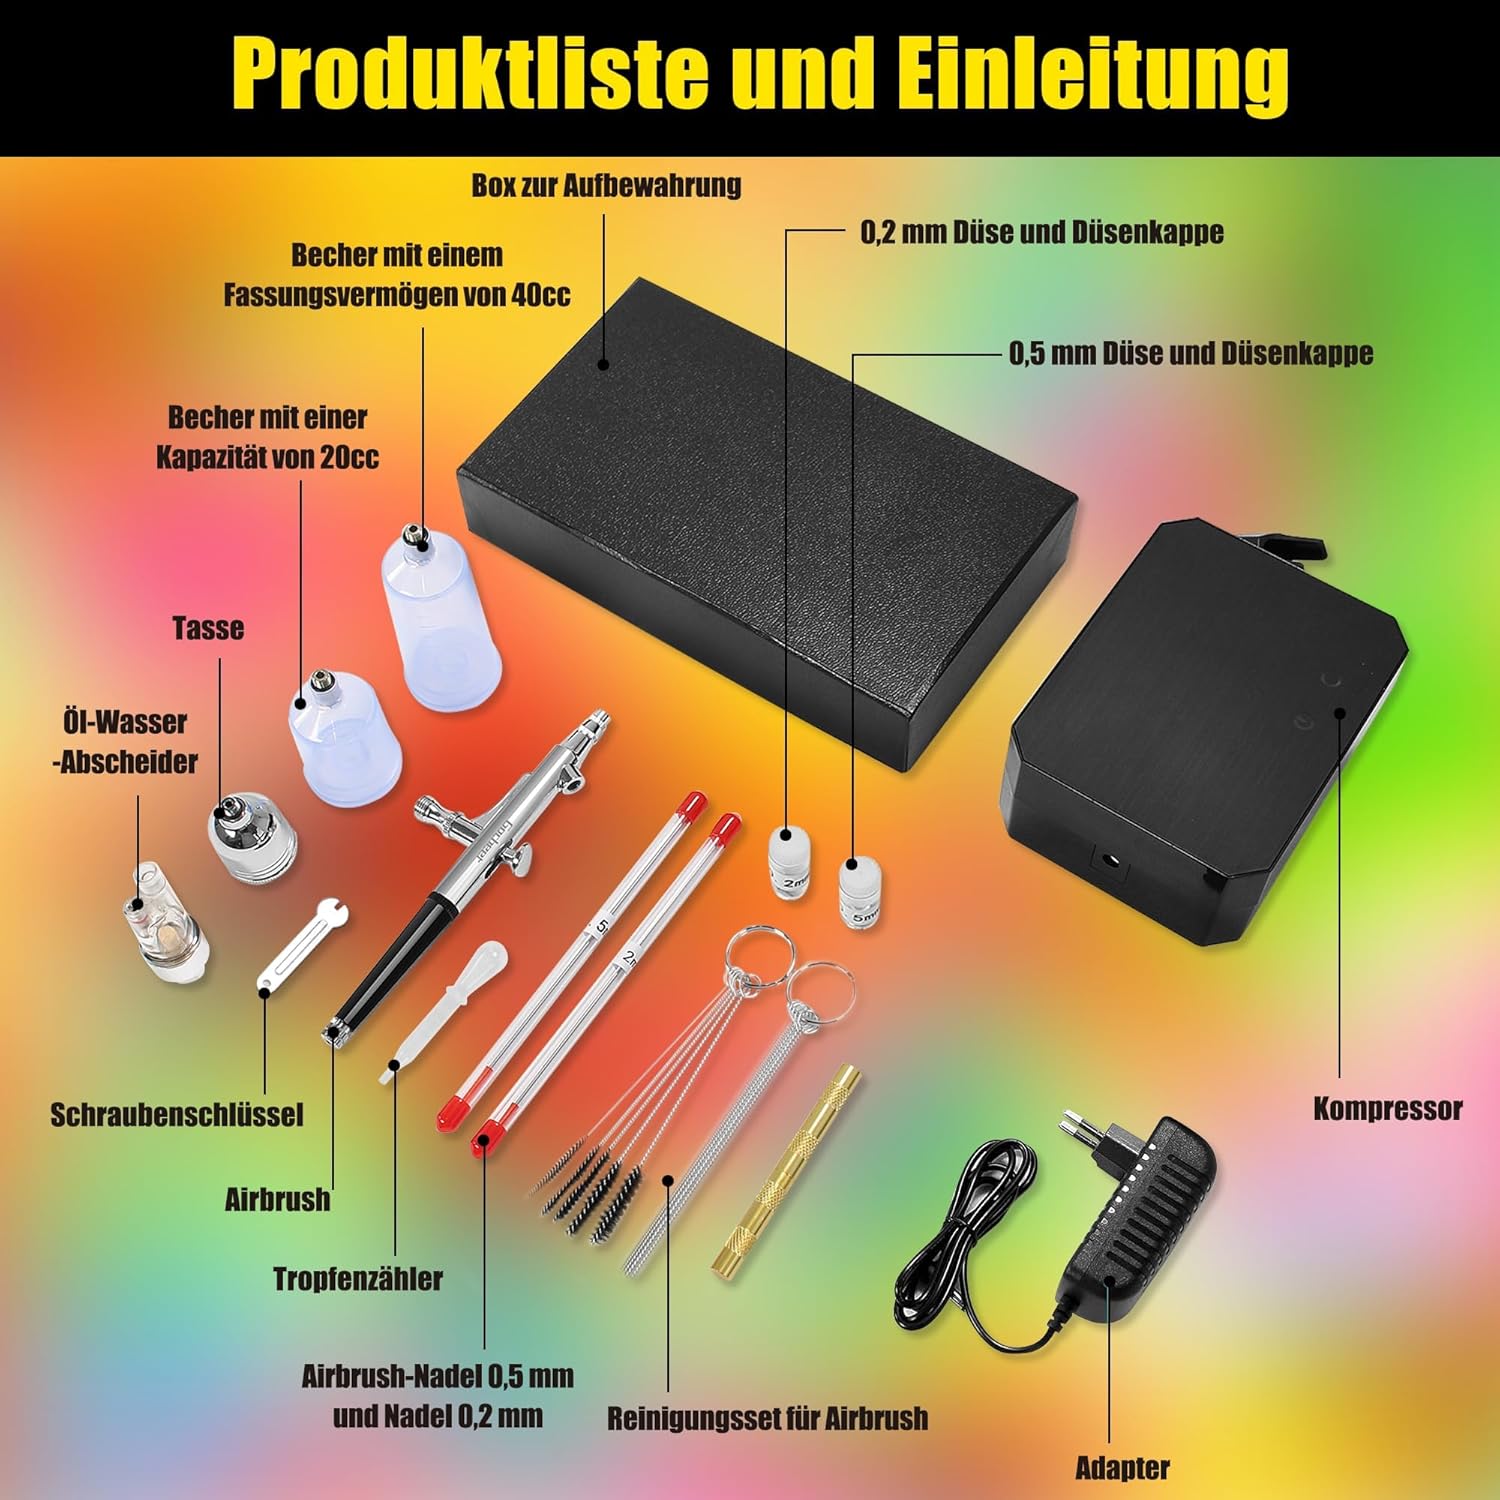
Your Powate airbrush kit includes the following items:
This image displays all the components included in the airbrush kit. It features the compressor, airbrush gun, 0.2mm and 0.5mm nozzles with caps, 20cc and 40cc capacity cups, an oil-water separator, dropper, cleaning needles, cleaning brushes, wrench, and power adapter.
- Airbrush Compressor
- Dual-Action Airbrush Gun
- Nozzles: 0.2mm, 0.3mm, 0.5mm (pre-installed and spares)
- Airbrush Cups (20cc and 40cc capacity)
- Oil-Water Separator
- Dropper
- Cleaning Needles
- Cleaning Brushes
- Wrench
- Power Adapter
Setup Instructions
Follow these steps to set up your airbrush system for first use:

This image illustrates the four basic steps for setting up and starting the airbrush. Step 1: Connect the compressor to the airbrush gun. Step 2: Add your desired liquid (paint, ink, etc.) into the airbrush cup. Step 3: Turn on the device using the power button. Step 4: Activate the airbrush by pressing the trigger button.
- Connect the Compressor: Securely attach the air hose from the compressor to the airbrush gun. Ensure all connections are tight to prevent air leaks.
- Add Liquid: Open the airbrush cup and carefully pour your desired liquid (e.g., paint, ink, makeup) into it. Do not overfill.
- Power On: Connect the power adapter to the compressor and a suitable power outlet. Press the power button on the compressor to turn it on.
- Activate Airbrush: Once the compressor is on, press the trigger button on the airbrush gun to begin air flow.
Operating the Airbrush
Dual-Action Control
Your airbrush features dual-action control, allowing for precise manipulation of both air and paint flow:

This diagram explains the dual-action functionality of the airbrush. Pressing the trigger controls the air flow. Pulling the trigger backward controls the paint flow. This allows for precise atomization and control over your work.
- Air Control: Press the trigger down to release air.
- Paint Control: While holding the trigger down for air, pull the trigger backward to release paint. The further back you pull, the more paint is released.
This combined control allows for fine detail work, broad strokes, and smooth transitions.
Adjustable Working Modes
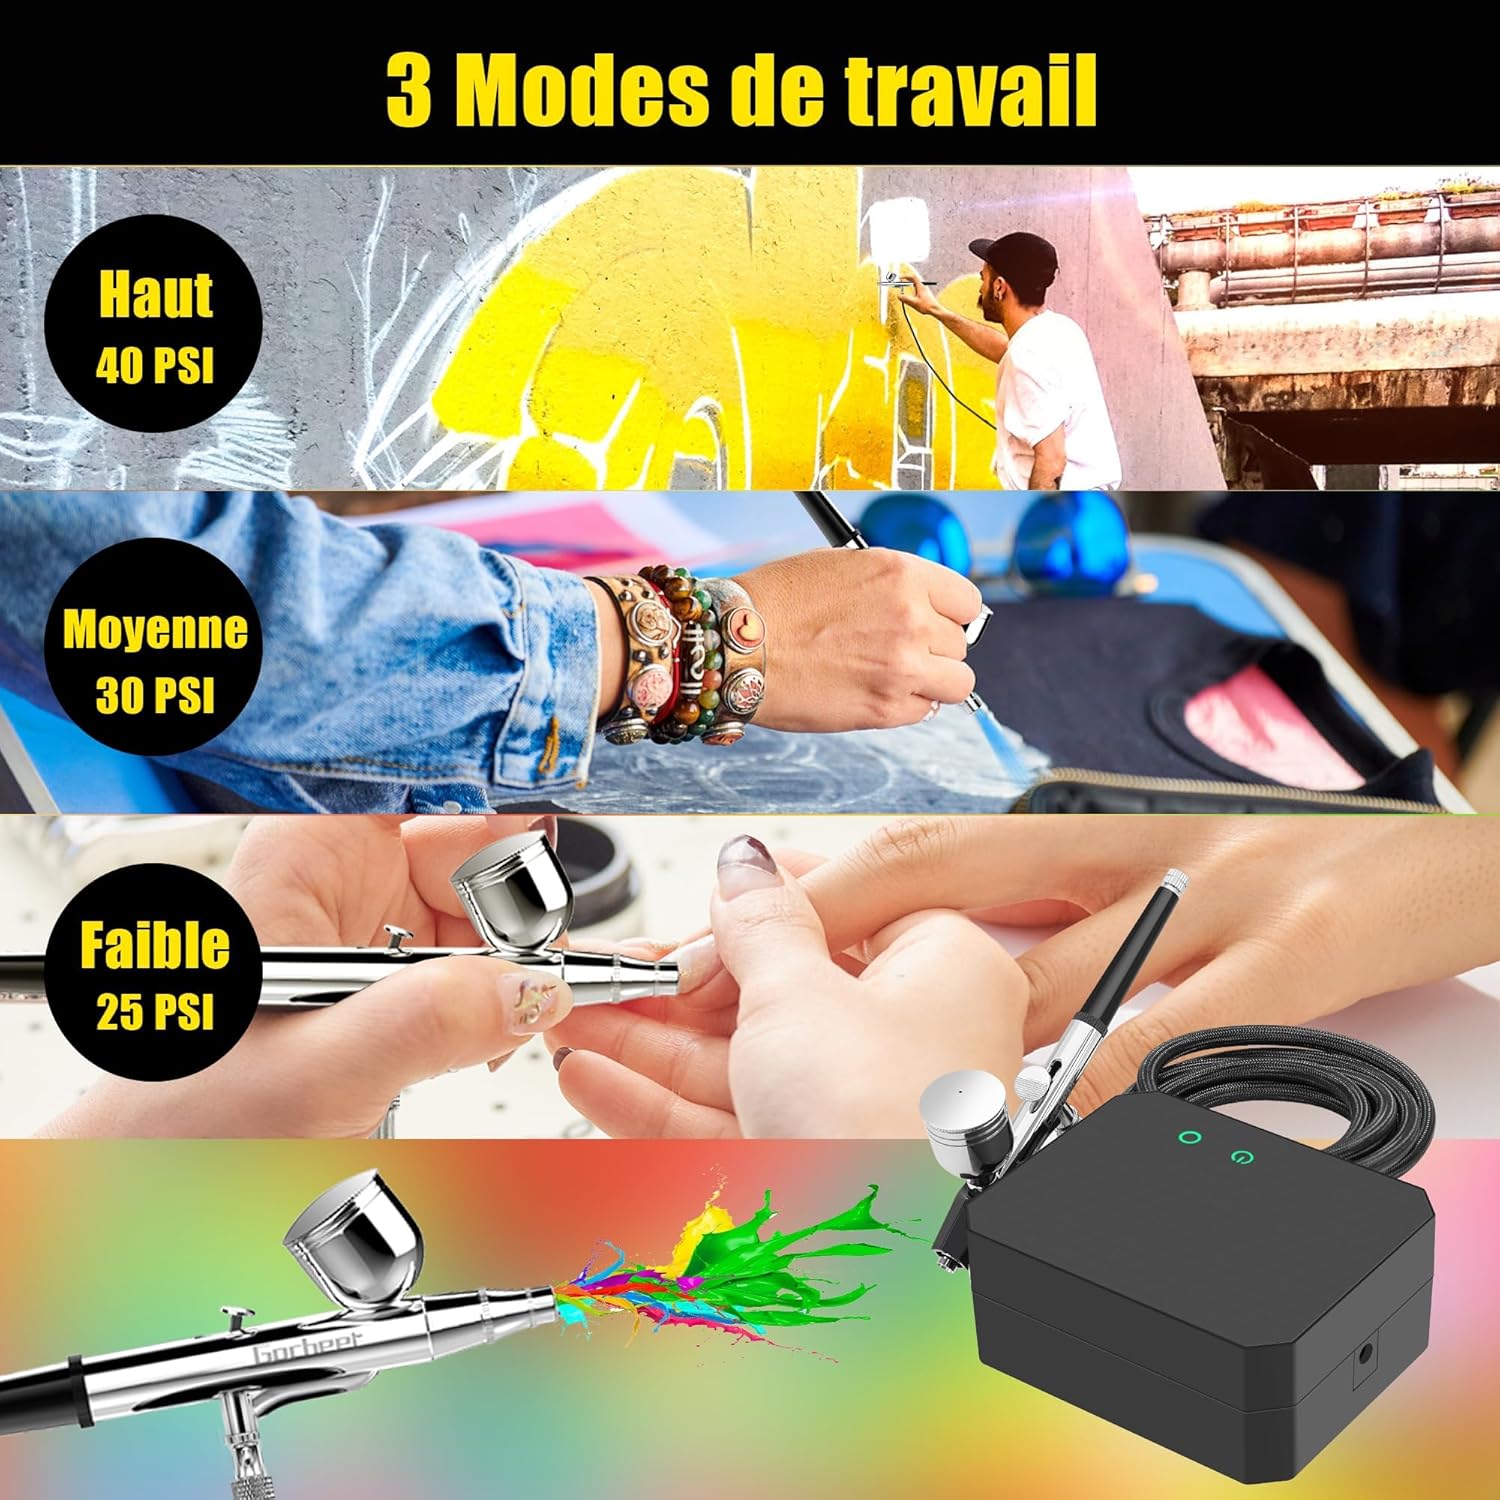
The compressor offers three distinct pressure modes to suit various applications and paint viscosities:
This image demonstrates the three adjustable working modes of the airbrush compressor: High pressure at 40 PSI, Medium pressure at 30 PSI, and Low pressure at 25 PSI. These modes allow for versatility across different applications and paint viscosities.
- High Mode: Approximately 40 PSI for thicker paints or larger coverage.
- Medium Mode: Approximately 30 PSI for general purpose painting.
- Low Mode: Approximately 25 PSI for fine details or thinner liquids.
Adjust the mode by pressing the designated button on the compressor.
Nozzle Selection
The kit includes 0.2mm, 0.3mm, and 0.5mm nozzles. Choose the appropriate nozzle based on your project requirements:
- 0.2mm Nozzle: Ideal for extra fine details and thin lines.
- 0.3mm Nozzle: Suitable for general detail work and medium lines.
- 0.5mm Nozzle: Best for broader coverage, background work, and thicker paints.
Refer to the maintenance section for instructions on changing nozzles.
Applications
The Powate airbrush system is suitable for a variety of creative and professional uses:

This image showcases the wide range of applications for the airbrush kit, including fabric art, cosmetic makeup, model painting, fine art, intricate nail designs, and detailed cake decoration.
- Nail Art and Design
- Crafts and Hobby Projects
- Cake Decoration and Food Coloring
- Model Painting and Miniatures
- Fine Art and Illustration
- Temporary Tattoos
Maintenance and Cleaning
Proper cleaning and maintenance are crucial for the longevity and optimal performance of your airbrush. A professional cleaning kit is included for this purpose.
After Each Use
- Empty Paint Cup: Pour out any remaining paint from the cup.
- Rinse: Add a small amount of appropriate cleaning solution (e.g., water for water-based paints, specific cleaner for acrylics/oils) to the cup.
- Backflush: Cover the nozzle with your finger or a cap and press the trigger for air. This will force air back into the cup, bubbling and cleaning the inside.
- Spray Through: Spray the cleaning solution through the airbrush until it runs clear. Repeat if necessary.
- Wipe Down: Use a soft cloth to wipe the exterior of the airbrush and cup.
Deep Cleaning (Periodically or for Clogs)
- Disassemble: Carefully disassemble the airbrush, removing the needle, nozzle, and air cap. Refer to your airbrush's specific diagram for proper disassembly.
- Soak Components: Soak the disassembled parts (needle, nozzle, air cap) in an appropriate cleaning solution.
- Clean Body: Use the included cleaning brushes and needles to thoroughly clean the inside of the airbrush body, especially the paint channel and nozzle area.
- Rinse and Dry: Rinse all components with clean water and allow them to air dry completely.
- Reassemble: Carefully reassemble the airbrush. Be gentle with the needle and nozzle as they are delicate.
Important: Always use cleaning solutions compatible with your paint type to avoid damage to the airbrush components.
Troubleshooting
Here are some common issues and their potential solutions:
| Problem | Possible Cause | Solution |
|---|---|---|
| No air flow | Compressor off, hose disconnected, clogged air path | Check power, reconnect hose, clean airbrush. |
| No paint flow | Clogged nozzle, paint too thick, needle bent/damaged, empty cup | Clean nozzle, thin paint, inspect/replace needle, refill cup. |
| Uneven spray pattern | Partially clogged nozzle, damaged air cap, inconsistent paint consistency | Deep clean nozzle, check air cap for damage, ensure paint is properly thinned. |
| Air bubbles in paint cup | Loose nozzle, damaged nozzle, clogged air cap | Tighten nozzle, inspect/replace nozzle, clean air cap. |
| Compressor not turning on | Power adapter issue, faulty power outlet | Check power connections, try a different outlet, contact support if issue persists. |
If you encounter issues not listed here or if the suggested solutions do not resolve the problem, please contact customer support.
Specifications
| Feature | Detail |
|---|---|
| Brand | Powate |
| Model Number | TA101 |
| Max Air Pressure Output | 40 PSI (High Mode) |
| Adjustable Pressure Modes | High (40 PSI), Medium (30 PSI), Low (25 PSI) |
| Air Flow Rate | 8-10 L/min |
| Nozzle Sizes | 0.2mm, 0.3mm, 0.5mm |
| Power Type | Battery Powered (Compressor also supports 230V AC via adapter) |
| Voltage | 230 Volts (AC) |
| Package Dimensions | 21.1 x 18.3 x 7.3 cm |
| Weight | 990 grams |
| Included Components | Adapter, Cleaning Needles, Dropper, Airbrush Kit, Brush Cleaning |
| UPC | 748327508341 |
Warranty and Support
No specific warranty information or dedicated support contact details were provided with the product data. For any inquiries or assistance, please refer to the retailer or your purchase documentation for customer service options.