
1. Important Safety Information
Please read this manual thoroughly before installation and operation. Keep this manual for future reference. Failure to follow these instructions may result in electric shock, fire, or personal injury.
- Always disconnect power before servicing or cleaning the unit.
- Installation must be performed by a qualified technician in accordance with all applicable codes and standards.
- Ensure proper ventilation to prevent back-drafting of combustion gases from other fuel-burning appliances.
- Do not operate the range hood without filters in place.
- Never leave cooking food unattended.
- Clean grease filters regularly to prevent grease fires.
- This appliance is not intended for use by persons (including children) with reduced physical, sensory or mental capabilities, or lack of experience and knowledge, unless they have been given supervision or instruction concerning use of the appliance by a person responsible for their safety.
2. Package Contents
Verify that all components are present and undamaged before beginning installation.
- Range Hood Unit
- Adjustable Chimney Sections
- Mesh Filters (pre-installed)
- LED Lights (pre-installed)
- Flexible Ducting (for ducted installation)
- Mounting Brackets and Hardware (screws, anchors)
- User Manual

Image: All components included with the Tiesay Range Hood, including the main hood unit, chimney, flexible duct, and mounting hardware.
3. Product Specifications
| Feature | Specification |
|---|---|
| Model Number | 1790A |
| Dimensions (W x D x H) | 35.2" x 18.3" x 36.3" (adjustable height) |
| Material | 430 Grade Stainless Steel |
| Air Flow Capacity | 450 CFM |
| Noise Level | < 55 dB |
| Control Type | Button Control |
| Number of Speeds | 3 |
| Lighting | LED (1.5W) |
| Filter Type | 5-Layer Reusable Aluminum Mesh Filters |
| Installation Type | Wall Mount, Ducted/Ductless Convertible |
| Chimney Adjustment | Fits 7.5-8.5 ft ceilings (extendable to 10ft with separate kit) |

Image: Detailed diagram illustrating the dimensions of the Tiesay Range Hood, including width, depth, height, and adjustable chimney range.

Image: Graphic indicating the low noise level of the range hood, less than 55dB at high speed, for a quiet cooking environment.
4. Installation Instructions
This range hood can be installed in either a ducted (vented to the outside) or ductless (recirculating) configuration. Ensure you have the necessary tools and follow all local building codes.
4.1 Ducted Installation
For ducted installation, the range hood vents air directly outside your home through a duct system. This method offers the most effective removal of smoke, odors, and grease.
- Prepare the Wall: Mark the mounting points for the hood and chimney bracket. Ensure the wall is structurally sound to support the weight of the unit.
- Cut Duct Opening: Create an opening in the wall or ceiling for the 6-inch round duct.
- Mount the Hood: Secure the main hood body to the wall using the provided mounting hardware. Ensure it is level.
- Connect Ducting: Attach the flexible ducting to the top exhaust outlet of the hood and extend it to the exterior vent cap. Ensure all connections are sealed to prevent air leaks.
- Install Chimney: Assemble and install the adjustable chimney sections, sliding them over the ducting and securing them to the wall bracket.
- Electrical Connection: Connect the range hood to a grounded electrical outlet according to local electrical codes.
4.2 Ductless (Recirculating) Installation
For ductless installation, the air is filtered through optional carbon filters (sold separately, Part # USGDCF-Y) and recirculated back into the kitchen. This is suitable when external venting is not feasible.
- Prepare for Carbon Filters: Purchase and install the appropriate carbon filters onto the motor housing inside the hood.
- Mount the Hood: Secure the main hood body to the wall using the provided mounting hardware. Ensure it is level.
- Install Chimney: Assemble and install the adjustable chimney sections. Ensure the top chimney section has vents to allow filtered air to re-enter the room.
- Electrical Connection: Connect the range hood to a grounded electrical outlet according to local electrical codes.
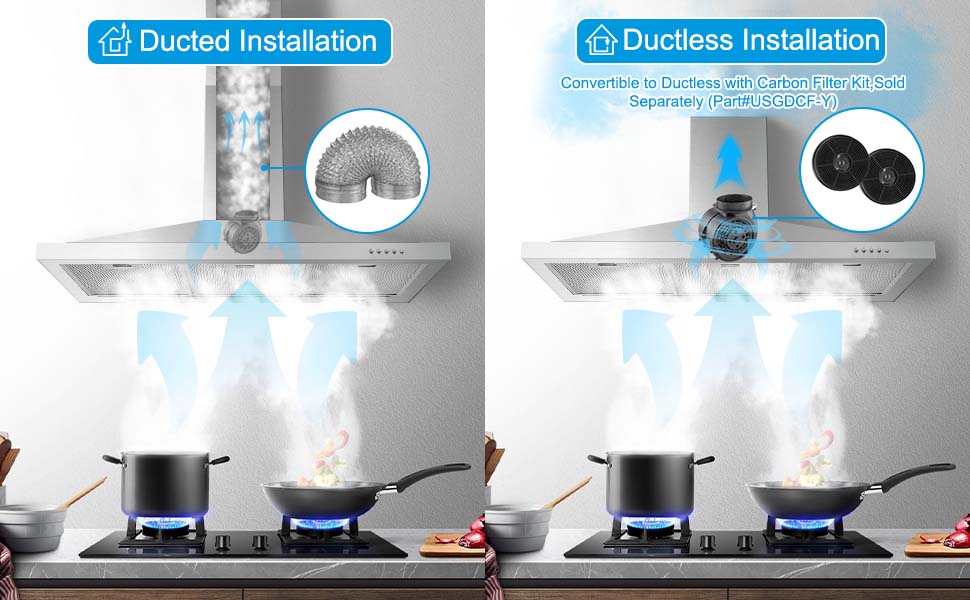
Image: A side-by-side comparison illustrating the setup for ducted installation (venting outside) and ductless installation (recirculating with carbon filters).
5. Operating Instructions
The Tiesay range hood features intuitive button controls for fan speed and lighting.

Image: Overview of the range hood's features, highlighting 430-grade stainless steel, energy-saving LED lights, easy disassembly, 3-speed settings, and easy push-button control.
5.1 Fan Speed Control
The range hood is equipped with a 3-speed exhaust fan to effectively remove cooking odors, smoke, and grease. Use the buttons on the control panel to adjust the fan speed:
- Speed 1 (Low): Ideal for light cooking, simmering, or maintaining air quality.
- Speed 2 (Medium): Suitable for general cooking and moderate smoke/odor.
- Speed 3 (High): For heavy cooking, frying, or when significant smoke and odors are present.
5.2 LED Lighting
The integrated 1.5W LED lights provide illumination for your cooking surface. Press the light button on the control panel to turn the lights on or off.

Image: The Tiesay Range Hood installed above a stove, with its LED lights brightly illuminating the cooking area where pots are simmering.
6. Maintenance
Regular maintenance ensures optimal performance and extends the lifespan of your range hood.
6.1 Cleaning the Mesh Filters
The 5-layer reusable aluminum mesh filters effectively trap grease and cooking odors. Clean them regularly (ideally every 3-6 weeks, depending on cooking frequency) to maintain airflow and efficiency.
- Remove Filters: Gently push the latch on each filter and pull downwards to remove them from the hood.
- Clean Filters: Wash the filters in warm, soapy water or place them in a dishwasher. For stubborn grease, a degreasing agent can be used.
- Dry and Reinstall: Allow filters to dry completely before reinstalling them into the hood.

Image: Close-up view of the 5-layer reusable aluminum mesh filter, highlighting its cleanability, durability, strength, stability, and corrosion resistance.
6.2 Cleaning the Exterior Surface
Wipe the stainless steel exterior with a soft cloth and a non-abrasive stainless steel cleaner. Avoid harsh chemicals or abrasive pads that can scratch the surface.
6.3 Replacing Carbon Filters (Ductless Only)
If using the ductless configuration, the carbon filters (Part # USGDCF-Y) should be replaced every 3-6 months, depending on usage. Refer to the carbon filter packaging for specific replacement instructions.
7. Troubleshooting
Review the following common issues and solutions before contacting customer support.
| Problem | Possible Cause | Solution |
|---|---|---|
| Hood does not operate | No power supply | Check if the power cord is plugged in and the circuit breaker is on. |
| Poor suction performance | Clogged grease filters | Clean or replace the mesh filters. |
| Improper ducting (ducted models) | Ensure ducting is properly installed, sealed, and not obstructed. Check that backdraft dampers open freely. | |
| Saturated carbon filters (ductless models) | Replace carbon filters. | |
| Excessive noise | Loose components or motor imbalance | Ensure all mounting screws are tight. Contact customer support if noise persists. |
| LED lights not working | Faulty LED module or connection | Check connections. If lights are still not working, contact customer support for replacement. |
8. Warranty and Customer Support
This Tiesay range hood comes with a 2-year limited parts warranty from the date of purchase. This warranty covers defects in materials and workmanship under normal use.
For warranty claims, technical assistance, or any questions regarding your product, please refer to the customer service information provided in your purchase documentation or contact Tiesay customer support directly.
When contacting support, please have your model number (1790A) and proof of purchase readily available.


