1. Important Safety Information
Read all safety instructions before installing or operating the solar panel kit. Failure to follow these instructions may result in electric shock, fire, or serious injury.
- Electrical Safety: Solar panels generate electricity when exposed to light. Always handle wiring with care. Ensure all connections are secure and properly insulated.
- Installation: Installation should be performed by qualified personnel. Wear appropriate personal protective equipment (PPE), including gloves and eye protection.
- Handling: Solar panels are heavy and fragile. Handle with care to prevent damage to the glass or frame. Avoid dropping or striking the panel.
- Wiring: Ensure correct polarity when connecting the solar panel to the charge controller and battery. Reverse polarity can damage components.
- Environment: Do not install panels in areas prone to excessive shading, as this can reduce efficiency and potentially damage cells.
- Maintenance: Disconnect all power sources before performing any maintenance or cleaning.
2. Product Overview
The WERCHTAY 200W Bifacial Solar Panel Kit is designed for efficient power generation in various off-grid applications. It features high-efficiency monocrystalline cells and a dual-glass design to capture sunlight from both sides, maximizing energy yield.
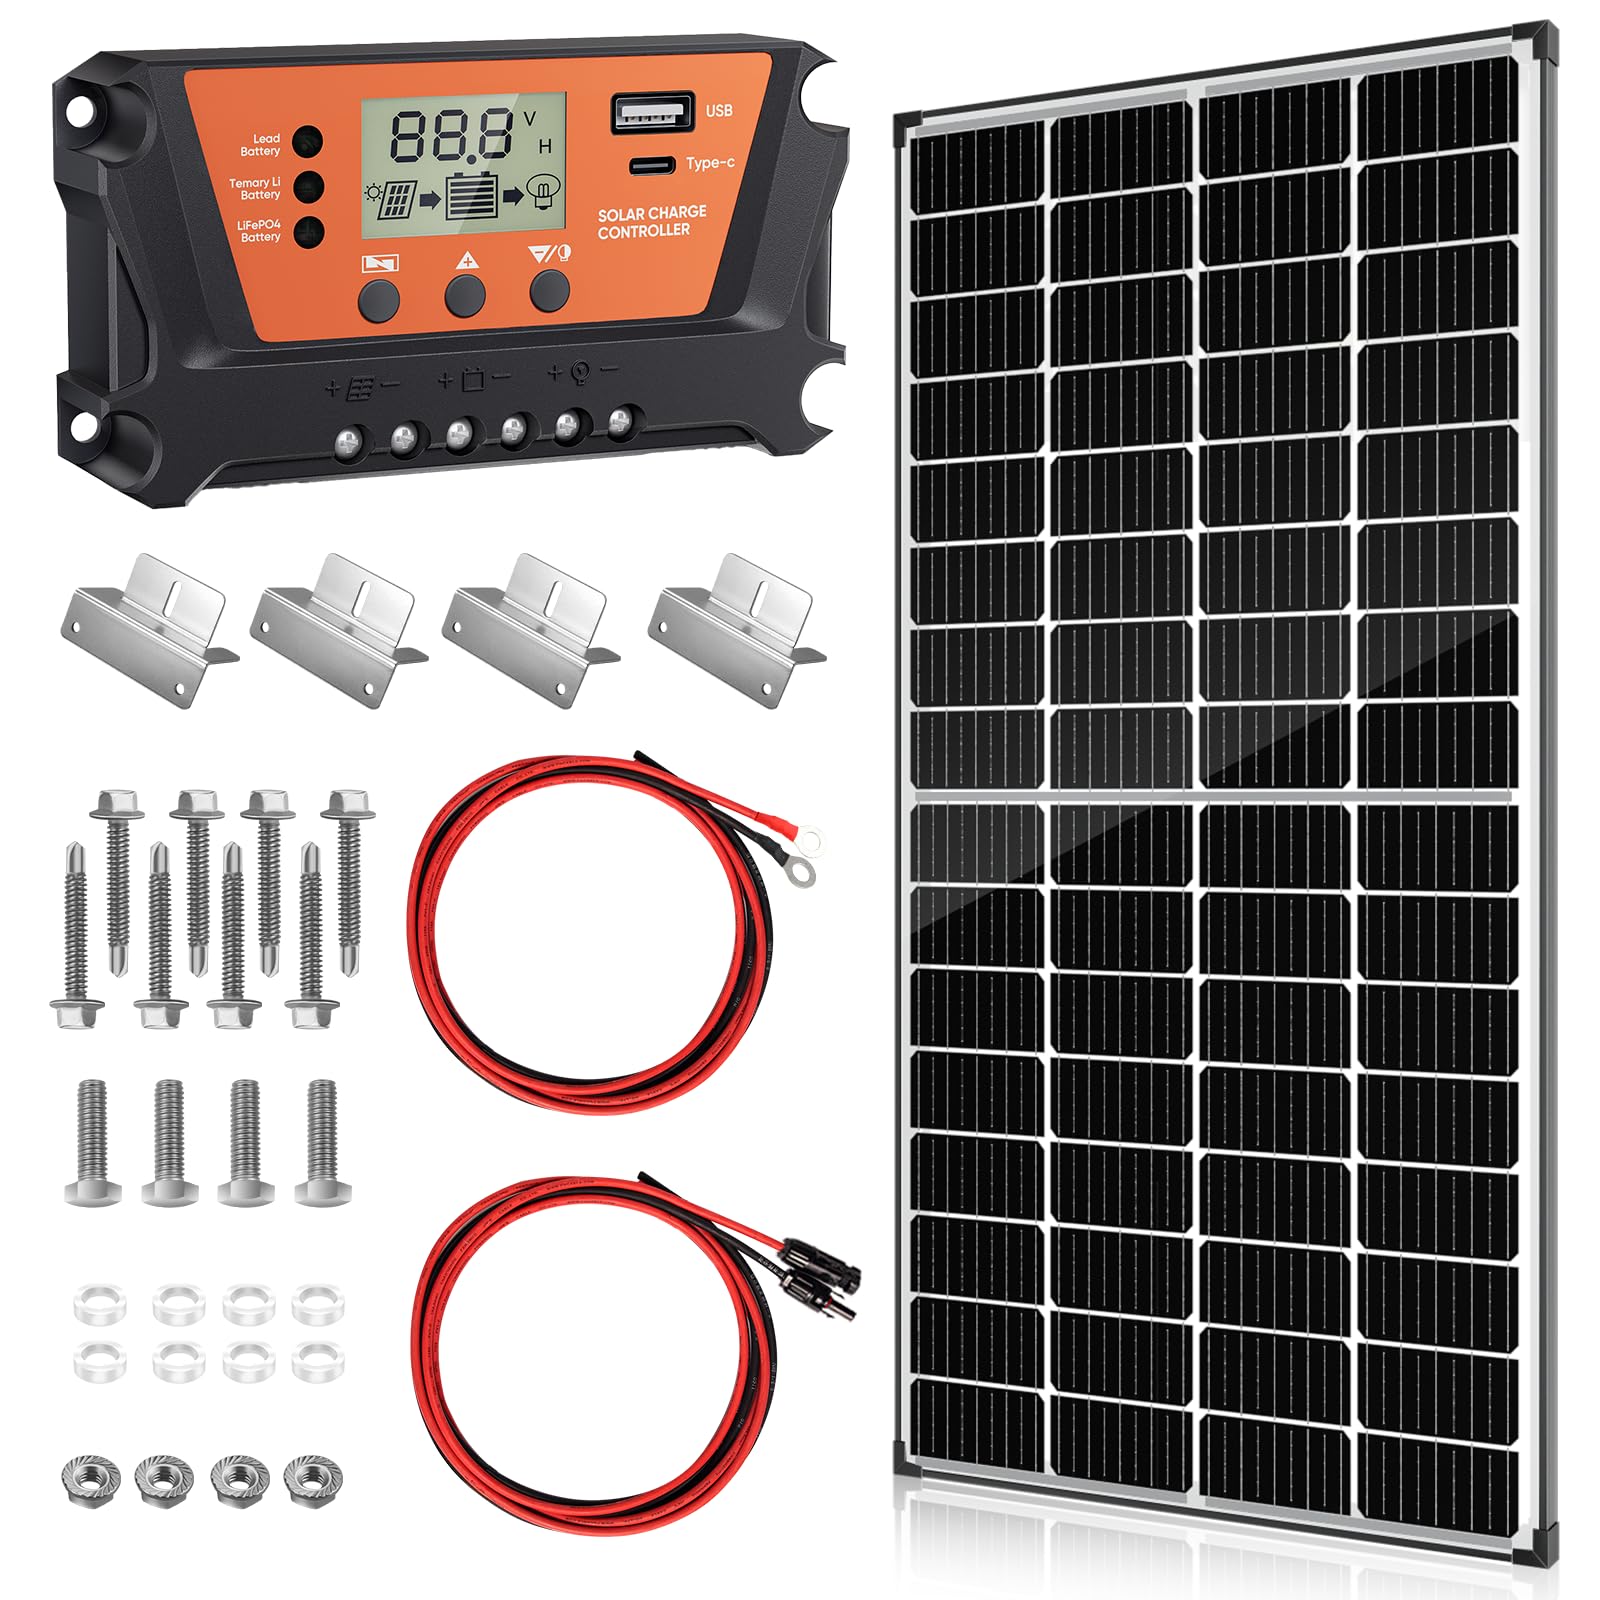
Figure 2.1: WERCHTAY 200W Bifacial Solar Panel Kit components.
Key Features:
- Bifacial Technology: Captures direct sunlight on the front and reflected light on the back, increasing total energy yield.
- High Efficiency: Grade A+ monocrystalline cells with PERC, half-cut cell, and 18-busbar technology for up to 25% conversion efficiency.
- Smart 10A PWM Charge Controller: Features 4-stage charging (Bulk, Boost, Float, Equalization) and built-in protections. Includes dual USB-A (5V/2A) and USB-C ports.
- Durable Construction: Corrosion-resistant aluminum alloy frame and tempered glass, designed to withstand high wind (2400Pa) and snow loads (5400Pa).
- Complete Kit: Includes solar panels, PWM controller, Z-shaped mounting brackets, solar cables with MC4 connectors, and battery cables.
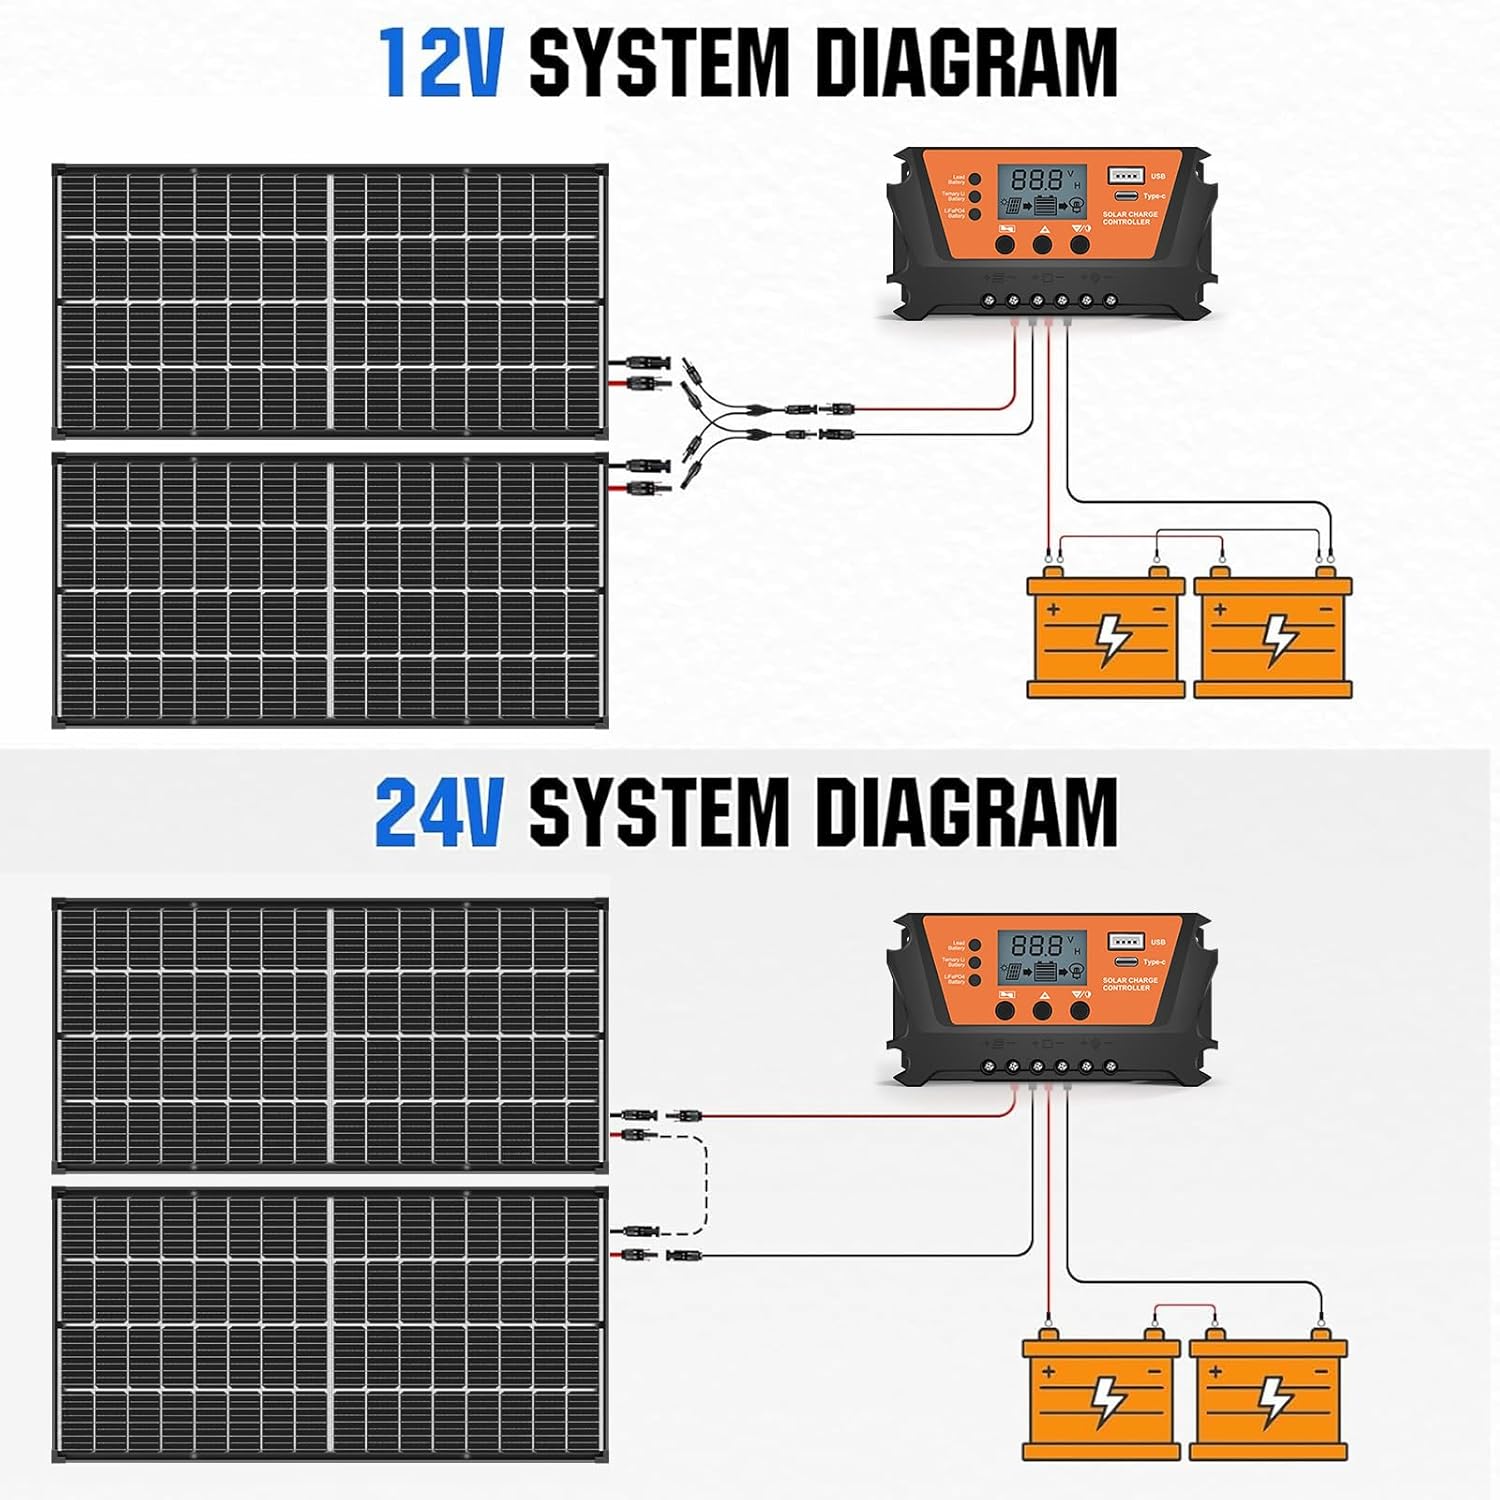
Figure 2.2: Illustration of bifacial solar panel technology, capturing light from both sides for enhanced power generation.
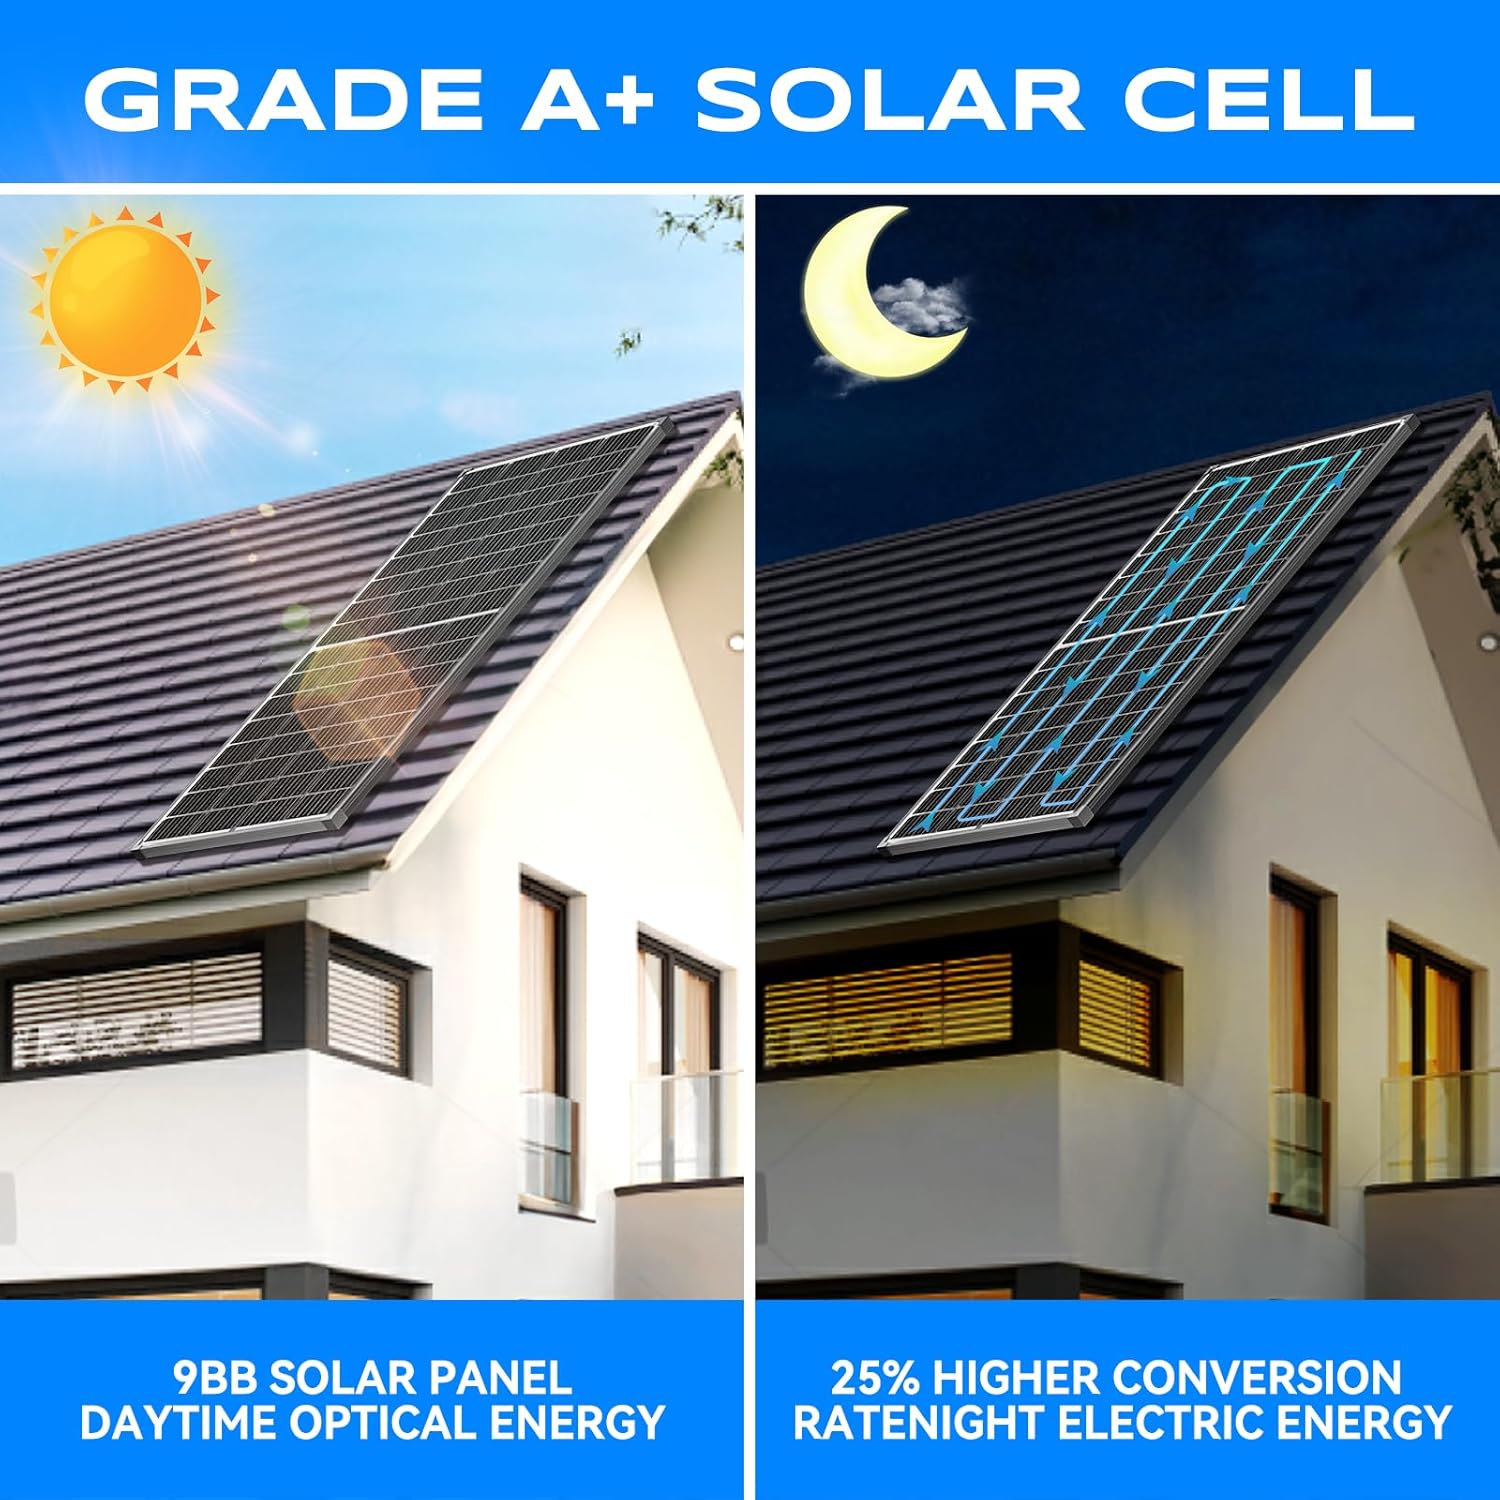
Figure 2.3: Grade A+ solar cells provide high conversion rates, ensuring efficient energy capture.

Figure 2.4: The solar panel is designed to withstand harsh weather conditions, including high wind and snow loads.
3. Package Contents
Verify that all components listed below are included in your package:

Figure 3.1: Contents of the WERCHTAY 200W Solar Panel Kit.
- 100W Bifacial Solar Panel(s) (Totaling 200W for the kit)
- 10A PWM Charge Controller
- Z-shaped Mounting Brackets
- 16.7ft 12AWG Solar Cables with MC4 Connectors (Pair)
- 4.92ft 12AWG Battery Cables (Pair)
4. Setup and Installation
Proper installation is crucial for optimal performance and safety. Follow these steps carefully.
4.1 General Installation Guidelines
- Choose a location for your solar panel(s) that receives maximum direct sunlight throughout the day, free from shading.
- Ensure the mounting surface is strong enough to support the weight of the panel(s) and withstand wind loads.
- Mount the charge controller in a dry, well-ventilated area, close to the battery.
- Always connect the battery to the charge controller first, then the solar panel(s). Disconnect in reverse order.
4.2 Wiring Connection Procedure
Watch this video for a visual guide on connecting your solar panel system:
Video 4.1: Step-by-step guide on connecting the 200W solar panel system, including the charge controller and battery.
Step-by-step wiring:
- Connect the battery cables to the charge controller's battery terminals (positive to positive, negative to negative).
- Connect the battery cables to your 12V/24V battery (positive to positive, negative to negative).
- Connect the solar panel cables (MC4 connectors) to the charge controller's solar panel terminals (positive to positive, negative to negative).
- Ensure all connections are tight and secure.
4.3 System Wiring Diagrams
Refer to the diagrams below for typical 12V and 24V system configurations.

Figure 4.2: Wiring diagrams for 12V and 24V solar panel systems, showing connections between panels, controller, and batteries.
4.4 Physical Installation
Use the provided Z-shaped mounting brackets to secure the solar panel(s) to your desired surface. The panel frame includes pre-drilled holes for easy installation.

Figure 4.3: Example of solar panel installation on various structures.

Figure 4.4: Detailed view of the solar panel's IP67 waterproof junction box, MC4 connectors, pre-drilled mounting holes, and corrosion-resistant aluminum alloy frame.
5. Operating Instructions
Once installed, the solar panel system will automatically begin charging your battery when exposed to sunlight. The PWM charge controller manages the charging process.
5.1 Charge Controller Operation
- The controller's display will show battery voltage, charging current, and other system parameters.
- Use the buttons on the controller to navigate through display modes and adjust settings if necessary (refer to the controller's specific manual for advanced settings).
- The dual USB-A and USB-C ports can be used to directly charge compatible devices.
For a general overview of the bifacial solar panel in various applications, watch this video:
Video 5.1: Overview of the WERCHTAY 200W Bifacial Solar Panel, showcasing its features and suitability for homes, camping, and RV use.

Figure 5.1: The solar panel kit is suitable for a wide range of applications, including RVs, boats, and residential off-grid systems.
6. Maintenance
Regular maintenance ensures the longevity and optimal performance of your solar panel kit.
- Cleaning: Periodically clean the surface of the solar panels with a soft cloth and water to remove dust, dirt, and debris. Avoid abrasive materials or harsh chemicals.
- Inspection: Regularly inspect all wiring and connections for signs of wear, corrosion, or damage. Ensure all connections remain tight.
- Shading: Trim any vegetation that may grow and cause shading on the solar panels.
- Controller: Ensure the charge controller is free from dust and moisture. Check its display for any error codes.
7. Troubleshooting
If you encounter issues with your solar panel kit, refer to the table below for common problems and solutions.
| Problem | Possible Cause | Solution |
|---|---|---|
| No power output from panel | No sunlight, panel shaded, dirty panel, faulty wiring, damaged panel | Ensure direct sunlight, remove shading, clean panel, check connections, inspect for damage |
| Battery not charging | Incorrect wiring, faulty charge controller, discharged battery, insufficient sunlight | Verify wiring polarity, check controller status, allow sufficient charging time, test battery health |
| Charge controller display off | No power from battery or solar panel, loose connections | Check battery and solar panel connections, ensure battery has sufficient charge |
| Low charging current | Partial shading, dirty panel, cloudy weather, incorrect panel angle | Remove shading, clean panel, adjust panel angle for optimal sun exposure |
8. Specifications
Detailed technical specifications for the WERCHTAY 200W Bifacial Solar Panel Kit.
| Feature | Specification |
|---|---|
| Brand | WERCHTAY |
| Model Number | 1773 |
| Maximum Power | 200 Watts (Kit Total) |
| Efficiency | Up to 25% Conversion |
| Material | Aluminum, Monocrystalline Silicon, Tempered Glass |
| Product Dimensions (L x W x H) | 18.11" x 1.2" x 39.76" (per panel) |
| Item Weight | 12 Pounds (per panel) |
| Amperage Capacity | 5.13 Amps |
| Maximum Voltage | 19.5 Volts |
| Upper Temperature Rating | 55 Degrees Celsius |
| Charge Controller | 10A PWM with Dual USB (USB-A, USB-C) |
| Waterproof Rating | IP67 (Connectors), IP68 (Junction Box) |
9. Warranty and Support
WERCHTAY products are designed for reliability and performance. For warranty information and technical support, please refer to the contact details below.

Figure 9.1: WERCHTAY customer support is available to assist with product inquiries and issues.
Customer Support:
For assistance with your WERCHTAY solar panel kit, including technical support, warranty claims, or general inquiries, please contact our customer service team. We aim to provide a response within 24 hours.
- Email: [Insert Manufacturer's Support Email Here]
- Phone: [Insert Manufacturer's Support Phone Number Here]
- Website: Visit the WERCHTAY Store on Amazon
Please retain your purchase receipt for warranty purposes.