1. Introduction
This manual provides detailed instructions for the installation, operation, and maintenance of your AUHIFVAX 8MP Outdoor WiFi PTZ Camera. This camera features a dual-lens system, AI auto-tracking, two-way audio, and is designed for reliable outdoor video surveillance. Please read this manual thoroughly before using the product to ensure proper function and safety.
2. What's in the Box
Verify that all components are present in the package:
- 1x PTZ Camera
- 1x User Manual
- 1x Power Supply (shorter than 1 meter)
- 1x Screws Bag for mounting

Image: Contents of the package, including the camera, power supply with EU/US plugs, and mounting screws.
3. Product Features
- 8MP Dual Lens System: The camera features two lenses, each contributing to the total 8MP resolution (4MP per lens). This allows for a wider field of view or simultaneous monitoring of two distinct areas.
- AI Humanoid Detection & Auto Tracking: When an intruder is detected, the camera sends an alarm message to your mobile device. It automatically tracks the movement of detected individuals within the surveillance area.
- Smart Three Light Modes: Equipped with built-in White LED and IR LED. The camera can automatically illuminate moving objects. It offers three night vision modes, including a color vision option.
- Clear Two-Way Audio: Features a built-in microphone and speaker, enabling real-time two-way communication and audio recording.
- 270° Pan & 90° Tilt Rotation: Remotely control the camera's horizontal (270°) and vertical (90°) movement via your mobile phone to monitor various angles.
- Weatherproof Design: Constructed for outdoor use, this IP video surveillance camera is designed to withstand various weather conditions, ensuring durability and longevity.
- Storage Options: Supports Micro SD card storage up to 128GB (optional) and cloud storage services.

Image: Overview of camera features including 4MP/8MP UHD, 2-way audio, IP66 waterproof rating, PTZ control, SD card storage, cloud storage, human detection & tracking, and iCsee app compatibility.

Image: Illustration of the camera's pan (270°) and tilt (90°) capabilities, showing remote control via a mobile device.

Image: Depiction of the camera's auto-tracking feature, showing it adjusting its rotation to follow moving subjects and sending a motion detection alert to a phone.

Image: Visual representation of the dual-lens and dual-screen functionality, allowing one camera to monitor two positions simultaneously.
4. Setup
4.1 Physical Installation
- Choose a Location: Select a suitable outdoor location that provides the desired surveillance coverage and has access to a power outlet. Ensure the mounting surface is sturdy.
- Mount the Camera: Use the provided screws and mounting bracket to securely attach the camera to a wall, ceiling, or other appropriate surface.
4.2 Power Connection
Connect the provided power adapter to the camera's power input and then plug it into a standard electrical outlet. The camera will power on and initiate its startup sequence.
4.3 App Download and Account Creation
- Download the iCsee app from your mobile device's app store (Android or iOS).
- Open the app and follow the on-screen instructions to create a new user account or log in if you already have one.
4.4 Network Connection
The camera supports AP Mode, Wi-Fi, and Wired connections.
- Add Device: In the iCsee app, tap the "+" icon to add a new device.
- Select Connection Type: Follow the app's prompts to choose your preferred connection method (e.g., "Add Wi-Fi Camera").
- Configure Network: Enter your Wi-Fi network details (SSID and password) if connecting wirelessly. For wired connections, connect an Ethernet cable to the camera and your router.
- Complete Setup: Follow the remaining steps in the app to finalize the camera's network configuration and add it to your account.
4.5 SD Card Installation (Optional)
If you plan to use local storage, install a Micro SD card (up to 128GB, not always included) into the designated slot on the camera. Ensure the camera is powered off before inserting or removing the SD card.
5. Operating Instructions
5.1 Live View
Open the iCsee app and select your camera from the device list to access the live video feed. You can switch between the dual lenses if supported by the app interface.
5.2 Pan/Tilt Control
On the live view screen, use the directional controls within the app to remotely adjust the camera's pan (horizontal) and tilt (vertical) angles.
5.3 Two-Way Audio
Tap the microphone icon in the app to speak through the camera's speaker. Tap the speaker icon to listen to audio from the camera's environment.
5.4 Night Vision Modes
The camera offers three night vision modes, typically selectable within the app settings:
- Infrared Mode: Standard black and white night vision using IR LEDs.
- Color Night Vision: Utilizes white LEDs to provide full-color video in low-light conditions.
- Smart Mode: Automatically switches between IR and color night vision based on detected motion or light levels.
5.5 Motion Detection and AI Tracking
Enable motion detection and AI humanoid tracking in the app settings. You will receive push notifications on your phone when motion or a human shape is detected. The camera will automatically follow detected human movement.
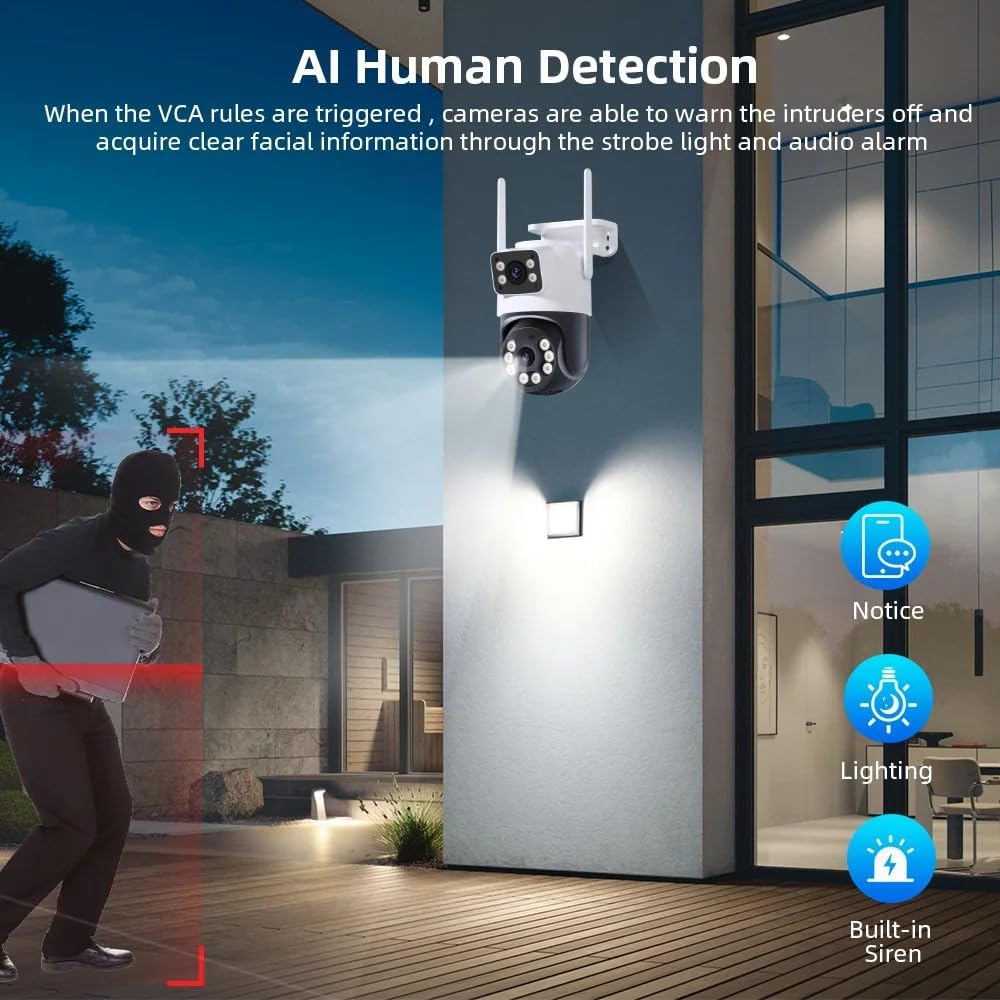
Image: The camera's AI Human Detection feature in action, showing how it triggers a strobe light and audio alarm to deter intruders and sends a notification to the user.
5.6 Recording and Playback
Recordings are stored on the Micro SD card (if installed) or in the cloud (subscription may be required). Access recorded footage through the "Playback" section of the iCsee app. You can select specific times to review events.
5.7 Remote Access
Once connected to the internet, your camera can be accessed remotely from anywhere using the iCsee app on your mobile device.
6. Maintenance
- Cleaning: Periodically clean the camera lens and housing with a soft, damp cloth. Do not use harsh chemicals or abrasive materials.
- Firmware Updates: Check the iCsee app regularly for available firmware updates. Keeping the firmware updated ensures optimal performance and security.
- SD Card Management: If using an SD card, periodically check its status in the app. Format the card if necessary to maintain recording efficiency.
7. Troubleshooting
- Camera Not Connecting to Wi-Fi:
- Ensure your Wi-Fi password is correct.
- Place the camera closer to your Wi-Fi router during initial setup.
- Check if your router is operating on a 2.4GHz network (most cameras do not support 5GHz).
- Restart the camera and your router.
- No Image/Poor Image Quality:
- Check power connection.
- Clean the camera lens.
- Ensure sufficient lighting for optimal image quality, especially at night.
- Motion Detection Not Working:
- Verify motion detection settings are enabled in the iCsee app.
- Adjust sensitivity settings.
- Ensure there are no obstructions blocking the camera's view.
- Two-Way Audio Issues:
- Check volume settings on your phone and in the app.
- Ensure your phone's microphone is not muted.
- Verify network connection stability.
8. Specifications
| Brand | AUHIFVAX |
| Model Number | A31 |
| High Definition | 8.0 Megapixels (4MP + 4MP Dual Lens) |
| Connectivity | IP/Network Wireless (AP Mode / Wifi / Wired Connection) |
| Movement Range (Pan) | 0°-360° |
| Movement Range (Tilt) | -10°-180° |
| Audio Output | Two Way Audio |
| Video Compression Format | H.265 |
| IR Distance | 10-20m |
| Power Supply | DC 12V2A |
| Power Consumption | Max 8W |
| Supported Mobile Systems | Android, iOS |
| Special Features | Waterproof / Weatherproof, AI Smart Function, Human Detection, Night Vision |
| Lens (mm) | 3.6mm, 4mm |
| Cloud Storage | 30 Days Free (then paid subscription) |
| Card Slot | Max support 128GB Micro SD card |
| Compatible Devices | ONVIF/NVR |
9. Warranty and Support
For warranty information, technical support, or service inquiries, please refer to the contact information provided with your purchase documentation or visit the official AUHIFVAX website. Keep your purchase receipt as proof of purchase for warranty claims.