Introduction
This manual provides comprehensive instructions for the installation, operation, and maintenance of your GIGABYTE X870E AORUS PRO Motherboard. Please read this manual thoroughly before beginning installation to ensure proper setup and to maximize the performance and longevity of your system.

Figure 1: GIGABYTE X870E AORUS PRO Motherboard and its retail packaging. The image displays the motherboard alongside its box, highlighting the product's branding and design.
Key Features
- AMD Socket AM5: Supports AMD Ryzen 9000 Series, 8000 Series, and 7000 Series Processors.
- Twin 16+2+2 Phases Digital VRM: Equipped with 80A Smart Power Stage for stable power delivery.
- Dual Channel DDR5: Features 4 DIMMs with AMD EXPO & Intel XMP Memory Module Support for high-speed memory.
- PCIe Gen5 x16: Includes PCIe UD Slot X & EZ-Latch Plus for enhanced graphics card support and easy installation.
- M.2 Gen5: With EZ-Latch Plus for high-speed storage solutions and convenient installation.
- Efficient Overall Thermal: Fully Covered MOSFET Heatsinks ensure optimal heat dissipation.
- Extended Connectivity: Provides HDMI, Sensor Panel Link (Front HDMI), and 2 USB-C DP ports.
- Fast Networking: Features 2.5GbE LAN & Wi-Fi 7 with WIFI EZ-Plug & Directional Antenna for robust network performance.
Setup Guide
1. Component Overview
Familiarize yourself with the motherboard layout before installation.

Figure 2: Top-down view of the GIGABYTE X870E AORUS PRO Motherboard. This image provides a clear overhead perspective, showing the CPU socket, DIMM slots, PCIe slots, and various headers.
2. CPU Installation
- Locate the AM5 CPU socket.
- Open the socket retention lever.
- Carefully align the CPU with the socket's triangle mark and gently place it into the socket. Do not force it.
- Close the retention lever to secure the CPU.
3. Memory (RAM) Installation
- Identify the DDR5 DIMM slots. For optimal performance, refer to the motherboard's silkscreen for recommended dual-channel configuration (typically slots A2 and B2 first).
- Open the clips on both ends of the DIMM slot.
- Align the memory module with the slot, ensuring the notch on the module matches the key in the slot.
- Press down firmly on both ends of the memory module until the clips snap into place.
4. M.2 SSD Installation
The motherboard supports M.2 Gen5 SSDs with EZ-Latch Plus for tool-less installation.
- Locate the M.2 slots, often covered by heatsinks.
- Remove the M.2 heatsink if present.
- Insert the M.2 SSD into the slot at a slight angle.
- Press down the EZ-Latch Plus mechanism to secure the SSD.
- Reattach the M.2 heatsink for thermal management.

Figure 3: Angled view of the GIGABYTE X870E AORUS PRO Motherboard, highlighting the M.2 heatsink area. This perspective shows the design of the heatsinks that cover the M.2 slots, crucial for high-performance SSDs.
5. PCIe Device Installation
Install your graphics card and other PCIe expansion cards into the appropriate slots.
- Open the retention clip on the desired PCIe slot (e.g., PCIe Gen5 x16 slot for graphics card).
- Align the card with the slot and press down firmly until it seats correctly and the retention clip locks.
- Secure the card with a screw to the chassis.
6. Power Connections
- Connect the 24-pin ATX main power connector from your power supply to the motherboard.
- Connect the 8-pin (or 4+4 pin) CPU power connector(s) to the motherboard.
- Connect any necessary PCIe power cables to your graphics card.
7. Front Panel and Peripheral Connections
Connect the front panel headers (power button, reset button, USB ports, audio jacks) and other peripherals.
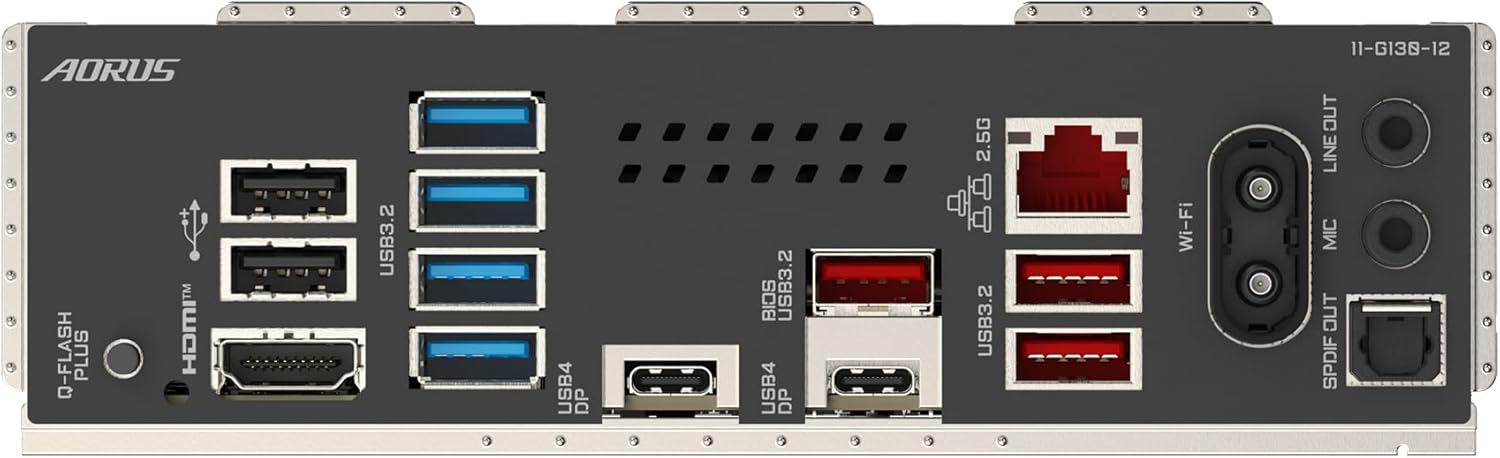
Figure 4: Rear I/O panel of the GIGABYTE X870E AORUS PRO Motherboard. This image details the various ports available for external connections, including USB, HDMI, LAN, Wi-Fi antenna connectors, and audio jacks.
- Connect the front panel connectors according to the motherboard manual's pinout diagram.
- Connect USB devices, display cables (HDMI, DisplayPort), and network cables to the rear I/O panel.
- Install Wi-Fi antennas if using the integrated Wi-Fi 7.
Operating Instructions
1. Initial Boot and BIOS/UEFI Setup
- After assembling all components, connect a monitor, keyboard, and mouse.
- Power on the system. Press the designated key (usually DEL or F2) repeatedly during startup to enter the BIOS/UEFI setup utility.
- In the BIOS/UEFI, verify that all installed components (CPU, RAM, storage) are recognized.
- Configure boot order to prioritize your operating system installation media (USB drive or DVD).
- Save changes and exit BIOS/UEFI. The system will restart.
2. Operating System Installation
Follow the on-screen prompts to install your preferred operating system (e.g., Windows, Linux).
3. Driver Installation
After OS installation, install the necessary drivers for your motherboard components to ensure full functionality and performance.
- Install Chipset Drivers.
- Install Graphics Drivers (for integrated graphics or discrete GPU).
- Install LAN Drivers.
- Install Wi-Fi/Bluetooth Drivers.
- Install Audio Drivers.
- Install USB Drivers (if specific ones are provided).
Drivers can typically be found on the GIGABYTE official website for your specific motherboard model.
4. GIGABYTE Software Utilities
GIGABYTE provides various software utilities to enhance your user experience, such as:
- GIGABYTE Control Center (GCC): For system monitoring, fan control, RGB lighting customization, and driver updates.
- BIOS Update Utilities: For updating the motherboard's firmware.
Maintenance
1. System Cleaning
Regular cleaning helps maintain optimal performance and extends the lifespan of your components.
- Periodically clean dust from the motherboard, CPU cooler, and case fans using compressed air.
- Ensure the system is powered off and unplugged before cleaning.
- Avoid using liquid cleaners directly on components.
2. BIOS/UEFI Updates
Updating the BIOS/UEFI can improve system stability, add support for new CPUs or features, and fix bugs.
- Download the latest BIOS/UEFI version from the GIGABYTE official website.
- Use the Q-Flash or Q-Flash Plus utility (refer to the GIGABYTE website for detailed instructions) to update the BIOS/UEFI.
- Do not interrupt the update process.
3. Driver and Software Updates
Keep your drivers and GIGABYTE utilities updated to ensure compatibility and optimal performance.
- Regularly check the GIGABYTE website for updated drivers and software.
- Utilize the GIGABYTE Control Center (GCC) for convenient driver and utility updates.
Troubleshooting
This section provides solutions to common issues you might encounter.
No Power / No Boot
- Ensure all power cables (24-pin ATX, 8-pin CPU) are securely connected to the motherboard and power supply.
- Verify the power supply switch is in the 'ON' position.
- Check front panel power button connection to the motherboard.
- Try reseating RAM modules and graphics card.
No Display Output
- Ensure the monitor is connected to the correct display output (either integrated graphics on the motherboard or your discrete graphics card).
- Verify the display cable is securely connected at both ends.
- Try a different display cable or monitor if possible.
- Reseat the graphics card.
System Instability / Crashes
- Check CPU and GPU temperatures using monitoring software. Ensure adequate cooling.
- Verify RAM modules are properly seated and compatible. Run a memory diagnostic tool.
- Ensure all drivers are up-to-date.
- Check for loose cables or components.
BIOS/UEFI Issues
- If you cannot enter BIOS/UEFI, try clearing the CMOS. Refer to your motherboard manual for the specific jumper or button location.
- Ensure your keyboard is functioning correctly.
For more complex issues, refer to the detailed troubleshooting section in the full GIGABYTE X870E AORUS PRO Motherboard manual available on the official GIGABYTE website or contact GIGABYTE technical support.
Specifications
| Category | Specification |
|---|---|
| Brand | GIGABYTE |
| Model Name | X870E AORUS PRO |
| CPU Socket | Socket AM5 |
| Compatible Processors | AMD Ryzen 9000 Series, 8000 Series, 7000 Series |
| RAM Memory Technology | DDR5 |
| Memory Clock Speed | 8000 MHz (OC) |
| Chipset Type | AMD X670E |
| Product Dimensions | 9.61 x 12.01 x 1.38 inches |
| Item Weight | 2.2 pounds |
| Manufacturer | Gigabyte |
| Platform | Windows |
| Batteries | 1 Lithium Metal battery required (included) |
Warranty and Support
GIGABYTE motherboards typically come with a limited warranty. Please refer to the official GIGABYTE website or the warranty card included with your product for specific warranty terms and conditions, including duration and coverage details.
Technical Support
For technical assistance, driver downloads, BIOS updates, and further product information, please visit the official GIGABYTE support website:
You may also find helpful resources, FAQs, and community forums on their website.


