1. Introduction
Thank you for choosing the Kaschun CT-60S 6-Channel Professional Audio Mixer. This mixer is designed to provide versatile audio control for various applications, including live performances, studio recording, streaming, podcasting, and karaoke. It features 6 input channels, 48V phantom power, 3-band EQ, Bluetooth connectivity, and USB recording/playback capabilities. This manual provides detailed instructions for setup, operation, and maintenance to ensure optimal performance and longevity of your device.
2. Important Safety Information
Please read and understand all safety instructions before operating the device. Retain this manual for future reference.
- Electrical Safety: To reduce the risk of electric shock, do not open the casing. Refer all servicing to qualified personnel.
- Moisture: Do not expose this equipment to rain or moisture. Keep liquids away from the device.
- Ventilation: Ensure adequate ventilation. Do not block ventilation openings.
- Power Source: Use only the provided power adapter. Ensure the voltage matches your local power supply.
- Placement: Place the mixer on a stable, flat surface. Avoid placing it near heat sources or in direct sunlight.
3. Package Contents
Verify that all items listed below are included in your package:
- Kaschun CT-60S Audio Mixer
- Power Adapter
- User Manual

Image: Contents of the Kaschun CT-60S package, including the audio mixer, power adapter, and user manual.
Video: An unboxing demonstration of the Kaschun CT-60S mixer, showing the mixer, power adapter, and user manual being removed from the box.
4. Product Overview
The Kaschun CT-60S mixer features a comprehensive layout for intuitive control over your audio. Below is a diagram highlighting the main components and their functions.
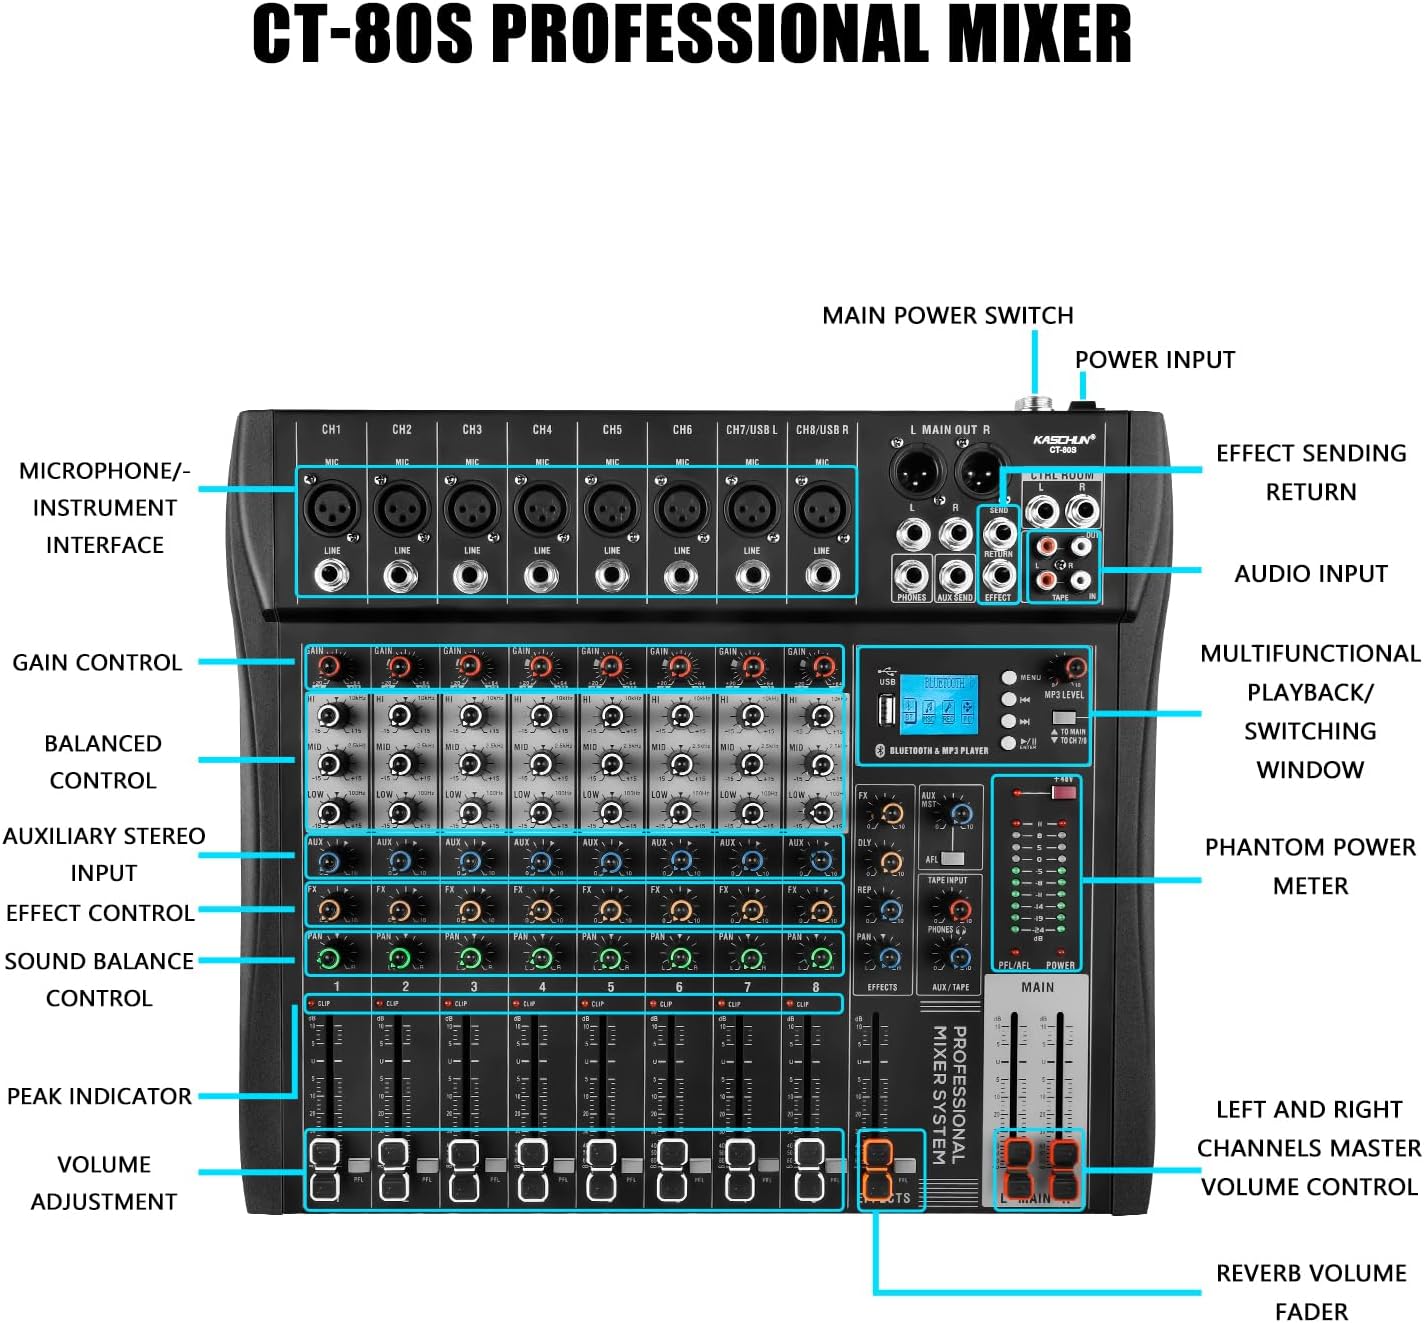
Image: Detailed diagram of the Kaschun CT-60S mixer, illustrating the location and labels of all input/output ports, control knobs, and faders.
4.1. Front Panel Controls
- Channels 1-6 (CH1-CH6): Individual mono input channels with XLR (Mic) and 1/4" (Line) jacks. Channels 5/USB L and 6/USB R also serve as USB input channels.
- GAIN Control: Adjusts the input sensitivity for each channel.
- EQ (High, Mid, Low): 3-band equalizer for adjusting the treble, midrange, and bass frequencies of each channel.
- AUX Control: Sends signal to an external effects processor or monitor mix.
- FX Control: Adjusts the level of the internal effects for each channel.
- PAN Control: Positions the channel's sound in the stereo field (left to right).
- Volume Fader: Controls the output level of each individual channel.
- CLIP Indicator: Lights up when the input signal is too high, indicating potential distortion.
- +48V Phantom Power Switch: Activates phantom power for condenser microphones.
- Bluetooth & MP3 Player Section: Includes a display, USB port, and controls for Bluetooth pairing, MP3 playback, and recording functions.
- MAIN Faders: Controls the overall output level of the main stereo mix.
- EFFECTS Fader: Controls the overall level of the internal effects.
4.2. Rear Panel Connections
- L MAIN OUT R (XLR/1/4"): Main stereo outputs for connecting to power amplifiers or active speakers.
- CTRL ROOM (1/4"): Control room outputs for connecting to studio monitors.
- PHONES (1/4"): Headphone output.
- AUX SEND (1/4"): Output for sending signals to external effects units.
- EFFECT RETURN (1/4"): Input for returning signals from external effects units.
- TAPE IN/OUT (RCA): Stereo RCA inputs and outputs for connecting to recording devices or playback sources.
- AC INPUT: Power input for the provided power adapter.
- POWER Switch: Turns the mixer on or off.
5. Setup Guide
5.1. Power Connection
- Ensure the mixer's POWER switch is in the OFF position.
- Connect the provided power adapter to the AC INPUT on the rear panel of the mixer.
- Plug the power adapter into a suitable electrical outlet.
- Flip the POWER switch to the ON position. The power indicator light will illuminate.

Image: The Kaschun CT-60S mixer with its power cable properly connected to the AC input.
5.2. Connecting Audio Inputs
The mixer supports various audio input sources:
- Microphones: Connect microphones to the XLR (MIC) inputs on channels 1-6. For condenser microphones, ensure the +48V phantom power is activated (see Section 6.2).
- Line-Level Devices: Connect instruments (keyboards, guitars with preamps), CD players, or other line-level devices to the 1/4" (LINE) inputs on channels 1-6.
- USB Audio: Connect a computer via USB to channels 5/USB L and 6/USB R for digital audio input/output.
- Tape/RCA Input: Use the TAPE IN RCA jacks for stereo input from devices like media players.

Image: An illustrative diagram detailing how to connect various audio sources such as microphones, instruments, and external devices to the mixer's input channels.
5.3. Connecting Audio Outputs
- Main Output: Connect your main speakers or power amplifier to the L MAIN OUT R XLR or 1/4" jacks.
- Control Room: Connect studio monitors to the CTRL ROOM 1/4" outputs.
- Headphones: Plug your headphones into the PHONES 1/4" jack.
- Recording Devices: Use the TAPE OUT RCA jacks to send the stereo mix to a recording device.
6. Operating Instructions
6.1. Basic Channel Operation
- Gain Adjustment: Set the GAIN knob for each active channel to an appropriate level. The CLIP indicator should only flash occasionally during the loudest parts of the signal.
- Equalization (EQ): Use the HI, MID, and LOW knobs to shape the tone of each channel. Adjust to achieve desired clarity and balance.
- Volume Control: Use the channel faders to set the individual volume levels.
- Main Mix: Adjust the MAIN faders to control the overall output volume.

Image: A close-up view of the mixer's 3-band EQ controls, demonstrating the adjustable frequency ranges for High, Mid, and Low tones.
6.2. Using 48V Phantom Power
The CT-60S provides +48V phantom power for condenser microphones. This power is supplied to all XLR inputs simultaneously.
- Connect your condenser microphone(s) to the XLR inputs.
- Locate the +48V PHANTOM POWER switch on the mixer.
- Press the switch to activate phantom power. The indicator light will turn on.
- Caution: Do not activate phantom power when dynamic microphones or other non-phantom powered devices are connected via XLR, as this may cause damage. Always ensure connections are secure before activating.

Image: A visual representation of the 48V phantom power switch on the mixer, indicating its function for powering condenser microphones.
6.3. Bluetooth Connectivity
The mixer features built-in Bluetooth for wireless audio streaming from compatible devices.
- On the mixer's display, navigate to the Bluetooth mode using the menu buttons.
- On your external device (e.g., smartphone, tablet), enable Bluetooth and search for available devices.
- Select "Kaschun CT-60S" (or similar name) from the list to pair.
- Once paired, you can stream audio wirelessly to the mixer. Adjust the MP3 LEVEL knob to control the Bluetooth audio volume.

Image: A visual demonstration of the mixer's Bluetooth playback feature, showing a smartphone wirelessly connected and streaming audio.
6.4. USB Playback and Recording
The USB port allows for MP3 playback from a USB drive and direct recording to a computer.
- USB Playback: Insert a USB flash drive containing MP3, WAV, or WMA files into the USB port. Use the display and control buttons to navigate and play tracks.
- USB Recording (to PC): Connect the mixer to your computer via a USB cable. The mixer will be recognized as an audio interface. You can then use your preferred digital audio workstation (DAW) software to record the mixed audio.

Image: An illustration demonstrating the USB connectivity of the mixer, showing how it connects to a laptop for audio input and output, supporting lossless audio playback.
6.5. Language Switching
The mixer's display supports multiple languages. To switch between Chinese and English:
- Press the 'MENU' button to access the system settings.
- Use the navigation buttons (left/right arrows) to scroll through the options until you find 'Language' or a similar setting.
- Press the 'ENTER' button (often the play/pause button) to select the language option.
- Use the navigation buttons to select your desired language (e.g., 'English').
- Press 'ENTER' to confirm your selection.
Video: A short demonstration showing the steps to change the display language on the mixer from Chinese to English using the menu buttons.
7. Maintenance
Proper maintenance ensures the longevity and optimal performance of your mixer.
- Cleaning: Use a soft, dry cloth to clean the exterior of the mixer. Avoid abrasive cleaners or solvents. For stubborn dirt, a slightly damp cloth can be used, followed by a dry cloth.
- Dust Protection: When not in use, cover the mixer to protect it from dust and debris.
- Storage: Store the mixer in a cool, dry place away from extreme temperatures and humidity.
- Cable Management: Ensure all cables are neatly organized and not under tension to prevent damage to connectors and ports.
8. Troubleshooting
If you encounter issues with your Kaschun CT-60S mixer, refer to the following common problems and solutions:
| Problem | Possible Cause | Solution |
|---|---|---|
| No sound output | Power off, incorrect connections, faders down, mute engaged. | Check power, ensure all cables are correctly connected, raise channel and main faders, check for mute buttons. |
| Distorted sound | Input gain too high, output level too high. | Reduce GAIN for individual channels or lower MAIN faders. Check CLIP indicators. |
| Microphone not working (condenser mic) | 48V phantom power not activated. | Activate the +48V phantom power switch. |
| Bluetooth not connecting | Device not in pairing mode, out of range, interference. | Ensure mixer is in Bluetooth mode, device is discoverable, and within 15 ft range. Try re-pairing. |
| USB drive not recognized | Unsupported file format, corrupted drive, incorrect mode. | Ensure files are MP3/WAV/WMA. Try a different USB drive. Check mixer's USB mode. |
If the problem persists after trying these solutions, please contact customer support.
9. Specifications
| Feature | Detail |
|---|---|
| Model Number | CT-60S |
| Number of Channels | 6 |
| Item Weight | 10.12 pounds (4.6 Kilograms) |
| Product Dimensions | 3.5"D x 10.9"W x 14"H |
| Package Dimensions | 17 x 15 x 4 inches |
| Power Source | Corded Electric |
| Connectivity Technology | Bluetooth, USB |
| Phantom Power | +48V (switchable) |
| EQ | 3-band (High, Mid, Low) per channel |
| MP3 Player | Built-in, supports MP3/WAV/WMA |
| USB Recording | Direct to computer |
10. Warranty and Customer Support
Kaschun products are designed for reliability and performance. For warranty information, please refer to the documentation included with your purchase or visit the official Kaschun website. If you require technical assistance, have questions about your product, or need to report an issue, please contact Kaschun customer support through the retailer where you purchased the product or via the contact information provided on the official Kaschun website.
Online Resources:
- Visit the Kaschun Store on Amazon for product updates and additional information.