1. Introduction
Thank you for choosing the Kaschun CT120S Professional Audio Mixer. This 12-channel mixer is designed for a wide range of audio applications, including DJing, studio recording, live streaming, and stage performances. It features 48V phantom power, USB recording, Bluetooth connectivity, and a built-in MP3 player, offering versatile control over your audio. This manual provides essential information for the proper setup, operation, and maintenance of your mixer to ensure optimal performance and longevity.
2. Safety Information
- Power Supply: Ensure the mixer is connected to a 110V AC power source with an American plug. Do not use incompatible power adapters.
- Ventilation: Place the mixer in a well-ventilated area. Do not block ventilation openings.
- Moisture: Keep the mixer away from water, moisture, and high humidity. Do not operate with wet hands.
- Heat: Avoid placing the mixer near heat sources such as radiators, heat registers, stoves, or other heat-producing apparatus.
- Cleaning: Disconnect power before cleaning. Use a dry, soft cloth. Do not use liquid cleaners or aerosol sprays.
- Servicing: Do not attempt to service this product yourself. Refer all servicing to qualified service personnel.
- Phantom Power: When using 48V phantom power for condenser microphones, ensure the microphone is connected before activating phantom power to prevent damage.
3. Product Overview
The Kaschun CT120S is a professional 12-channel audio mixer designed for clarity and control. Its ultra-thin metal body ensures durability and portability. Key features include:
- 12 Input Channels: Multiple microphone (XLR) and line inputs for diverse audio sources.
- 3-Band Equalization: Dedicated knobs for high, mid, and low frequencies on each channel for precise tone shaping.
- 48V Phantom Power: Essential for condenser microphones, available on XLR inputs.
- Bluetooth 5.0 Connectivity: Seamless wireless audio streaming from compatible devices.
- USB Recording & MP3 Player: Direct recording to USB and playback of MP3 files with an LED display.
- Effects Processor: Built-in effects for enhancing vocals and instruments.

Figure 3.1: Front view of the Kaschun CT120S Professional Audio Mixer, showcasing its 12 channels and control layout.
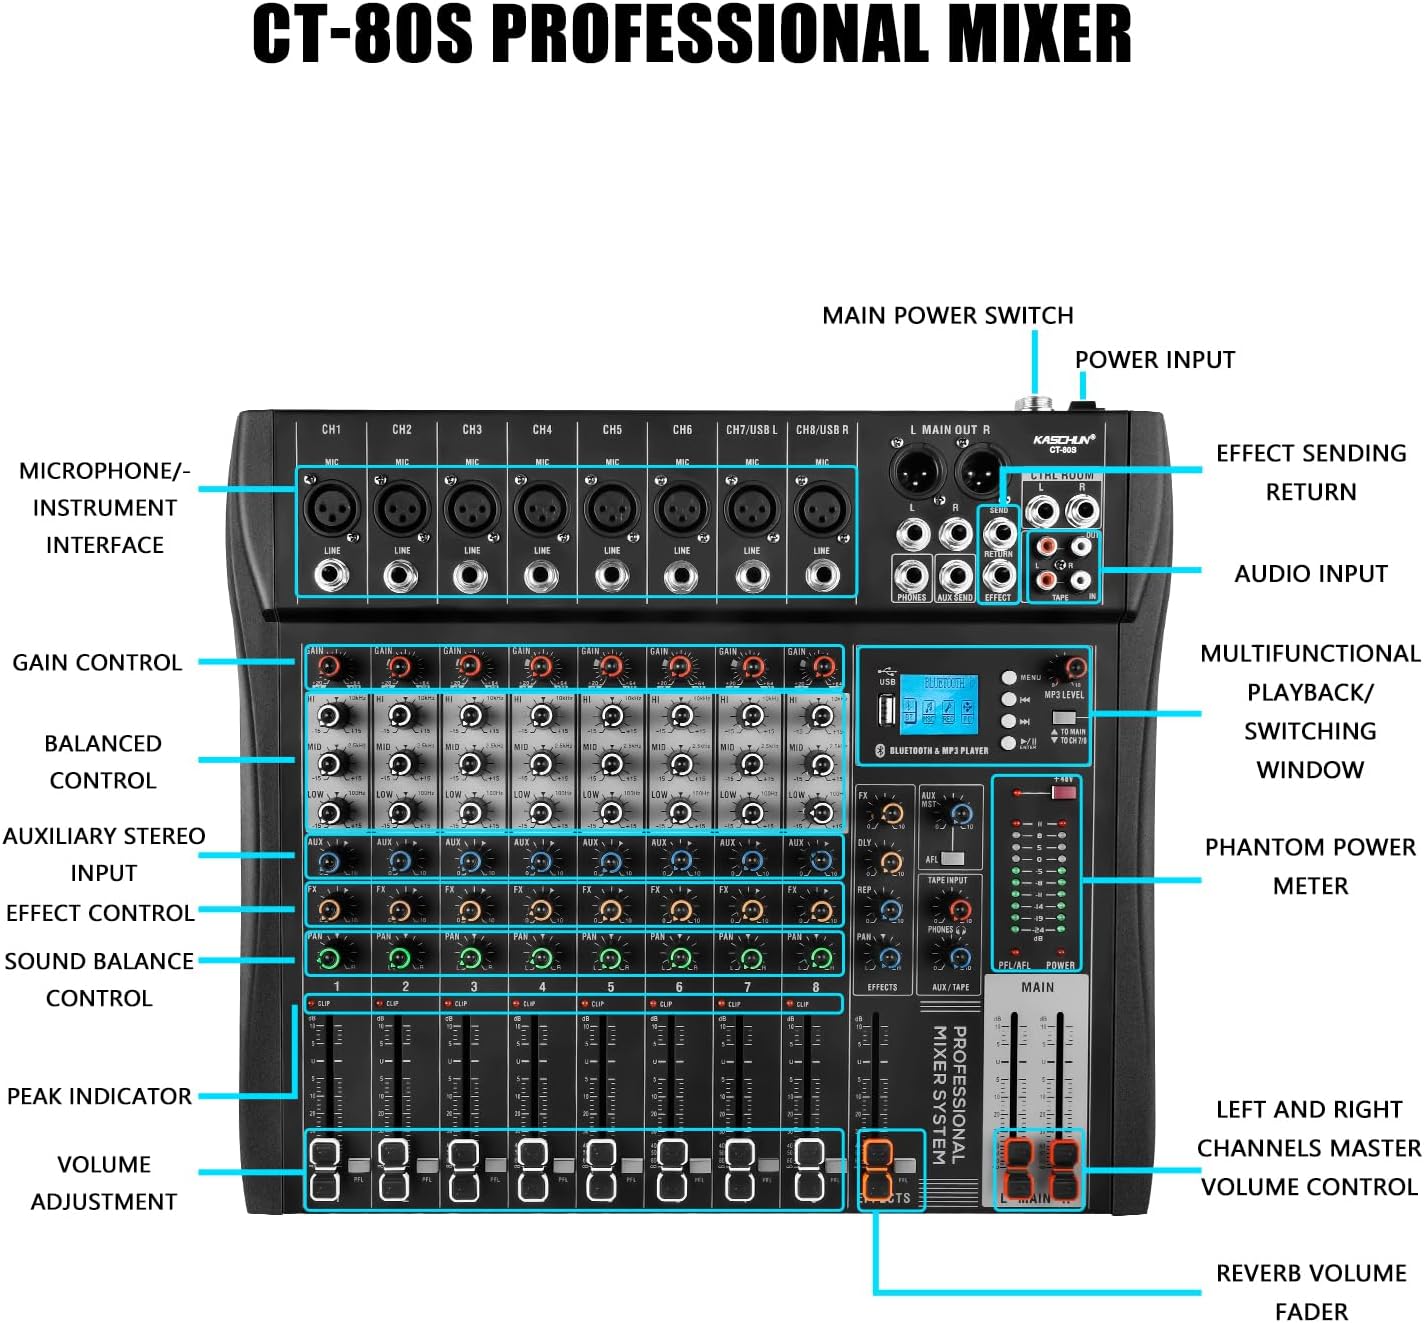
Figure 3.2: Detailed labeled diagram of the CT120S mixer, indicating the function of each control and input/output port.
4. Setup
Follow these steps to set up your Kaschun CT120S mixer:
- Unpacking: Carefully remove the mixer from its packaging. Inspect for any signs of damage.
- Placement: Place the mixer on a stable, flat surface, ensuring adequate ventilation around the unit.
- Power Connection: Connect the provided power cord to the mixer's power input and then to a standard 110V AC wall outlet. Do not power on yet.
- Input Connections:
- Microphones: Connect XLR microphones to the MIC inputs (CH1-CH12). If using condenser microphones, ensure 48V phantom power is off before connecting, then activate it once connected.
- Line-Level Devices: Connect instruments, keyboards, or other line-level devices to the LINE inputs using 1/4-inch TRS or TS cables.
- Output Connections: Connect the MAIN OUT (XLR or 1/4-inch) to your amplifier, powered speakers, or recording interface. Connect headphones to the PHONES output for monitoring.
- Initial Power On: Once all connections are secure, turn on the mixer's main power switch.
5. Operating Instructions
This section details the primary functions and controls of your CT120S mixer.
5.1 Channel Controls
- GAIN Control: Adjusts the input sensitivity for each channel. Set this to achieve a strong signal without clipping (indicated by the PEAK indicator).
- 3-Band EQ (HIGH, MID, LOW): Fine-tune the tonal characteristics of each channel. High controls frequencies above 10kHz, Mid around 2.5kHz, and Low below 100Hz. Adjust these to shape your sound.
- AUX Control: Sends a portion of the channel signal to the auxiliary output, typically used for monitor mixes or external effects.
- FX Control: Sends a portion of the channel signal to the internal effects processor.
- PAN Control: Adjusts the stereo position of the channel signal (left to right).
- VOLUME Adjustment (Fader): Controls the output level of each individual channel to the main mix.
- CLIP/PEAK Indicator: Lights up when the input signal is too high, indicating potential distortion. Reduce the GAIN if this light illuminates frequently.
5.2 Bluetooth Connectivity
The CT120S features built-in Bluetooth 5.0 for wireless audio playback.

Figure 5.1: Illustration of Bluetooth wireless connection to the CT120S mixer from a mobile device.
- Activate Bluetooth on your mobile device (smartphone, tablet, etc.).
- On the mixer's MP3 player section, select the Bluetooth mode. The LED display will show 'BT' or a similar indicator.
- On your device, search for available Bluetooth devices and select 'CT120S' (or similar name).
- Once paired, you can play audio from your device through the mixer. Adjust the MP3/USB channel volume on the mixer.
5.3 USB Recording and MP3 Playback
The mixer supports direct USB recording and MP3 playback.
- MP3 Playback: Insert a USB flash drive containing MP3 files into the USB port. The mixer will automatically detect and begin playing. Use the controls on the MP3 player section to navigate tracks and adjust volume. The LED display shows song names.
- USB Recording: To record your mix, ensure a USB flash drive is inserted. Press the 'REC' button on the MP3 player section. The mixer will record the main stereo output directly to the USB drive. Press 'REC' again to stop recording.
5.4 48V Phantom Power
The mixer provides 48V phantom power for condenser microphones.

Figure 5.2: Close-up of the 48V phantom power switch and graphical representation of the 3-stage adjustable balance (EQ curves).
- Locate the '+48V' switch on the mixer.
- Before activating, ensure all condenser microphones are properly connected to their respective XLR inputs.
- Flip the '+48V' switch to the ON position. An indicator light will confirm activation.
- Always turn off phantom power before disconnecting condenser microphones or connecting dynamic microphones.
6. Maintenance
Proper maintenance ensures the longevity and optimal performance of your mixer.
- Cleaning: Regularly wipe the mixer's surface with a soft, dry, lint-free cloth. For stubborn dirt, slightly dampen the cloth with water. Avoid abrasive cleaners or solvents.
- Dust Protection: When not in use, cover the mixer with a dust cover to prevent dust accumulation, especially in faders and knobs.
- Storage: Store the mixer in a cool, dry place away from direct sunlight and extreme temperatures.
- Cable Management: Ensure cables are neatly organized and not under strain to prevent damage to connectors and ports.
7. Troubleshooting
This section addresses common issues you might encounter.
| Problem | Possible Cause | Solution |
|---|---|---|
| No sound output | Main volume fader is down; input gain too low; output cables disconnected or faulty; speakers/amplifier off or muted. | Increase MAIN fader; adjust channel GAIN; check all cable connections; ensure speakers/amplifier are powered on and unmuted. |
| Distorted sound | Input signal too high (CLIP indicator on); output level too high; faulty cable. | Reduce channel GAIN; lower MAIN output level; try a different cable. |
| Bluetooth connection issues | Device not in pairing mode; mixer not in Bluetooth mode; interference. | Ensure both devices are in pairing mode; select Bluetooth mode on mixer; move closer to mixer; restart both devices. |
| Microphone not working (condenser mic) | 48V phantom power not activated; faulty microphone or cable. | Activate +48V phantom power; test with a different microphone or cable. |
| USB recording not working | USB drive not inserted or formatted incorrectly; drive full. | Ensure USB drive is properly inserted; check drive format (FAT32 recommended); delete old files or use a new drive. |
8. Specifications
| Feature | Specification |
|---|---|
| Model Number | CT120S |
| Number of Channels | 12 |
| Item Weight | 5.99 pounds |
| Package Dimensions | 22 x 17.27 x 4.5 inches |
| Power Source | Corded Electric |
| Voltage | 110 Volts (AC) |
| Connectivity Technology | USB, Bluetooth |
| Output Connector Type | XLR |
| Phantom Power | 48V |
9. Warranty and Support
For any issues encountered before purchase or during product usage, please do not hesitate to contact Kaschun customer service for assistance. We are committed to providing a response within 24 hours. Please refer to your purchase documentation for specific warranty terms and conditions.
For further support, visit the official Kaschun store or contact your retailer.


