1. Introduction
Thank you for choosing the Biorunn 9-inch Android Car Stereo. This manual provides detailed instructions for the installation, operation, and maintenance of your new car multimedia system. Please read this manual thoroughly before use to ensure proper functionality and to maximize your user experience. This unit is specifically designed for Kia Ceed models from 2018 to 2021.
2. Safety Information
- Professional Installation Recommended: Due to the complexity of car electrical systems, professional installation by a qualified technician is highly recommended.
- Power Supply: Ensure the unit is connected to a 12V DC power supply with negative grounding. Incorrect voltage can damage the device.
- Wiring: Double-check all wiring connections before powering on the unit to prevent short circuits or damage.
- Driving Safety: Do not operate the system in a way that distracts you from driving. Always prioritize road safety.
- Temperature: Avoid exposing the unit to extreme temperatures or direct sunlight for prolonged periods.
3. Package Contents
Please verify that all items listed below are included in your package:

Figure 3.1: Package Contents. This image displays the main head unit, a Canbus box, various cables including RCA, USB, and those for a reversing camera, along with a microphone, GPS antenna, and 4G antenna.
- Main Head Unit (Machine)
- Canbus Box
- RCA Cable
- Reversing Camera (Optional, check specific model)
- USB Cable(s)
- Microphone (MIC)
- GPS Antenna
- 4G Antenna (for models with 4G LTE support)
- Audio Out Cable (for specific models)
4. Installation
Before beginning installation, ensure the vehicle's battery is disconnected. Refer to your vehicle's service manual for specific dashboard removal instructions. It is crucial to verify compatibility with your car model and center console design. If unsure, consult a professional installer.
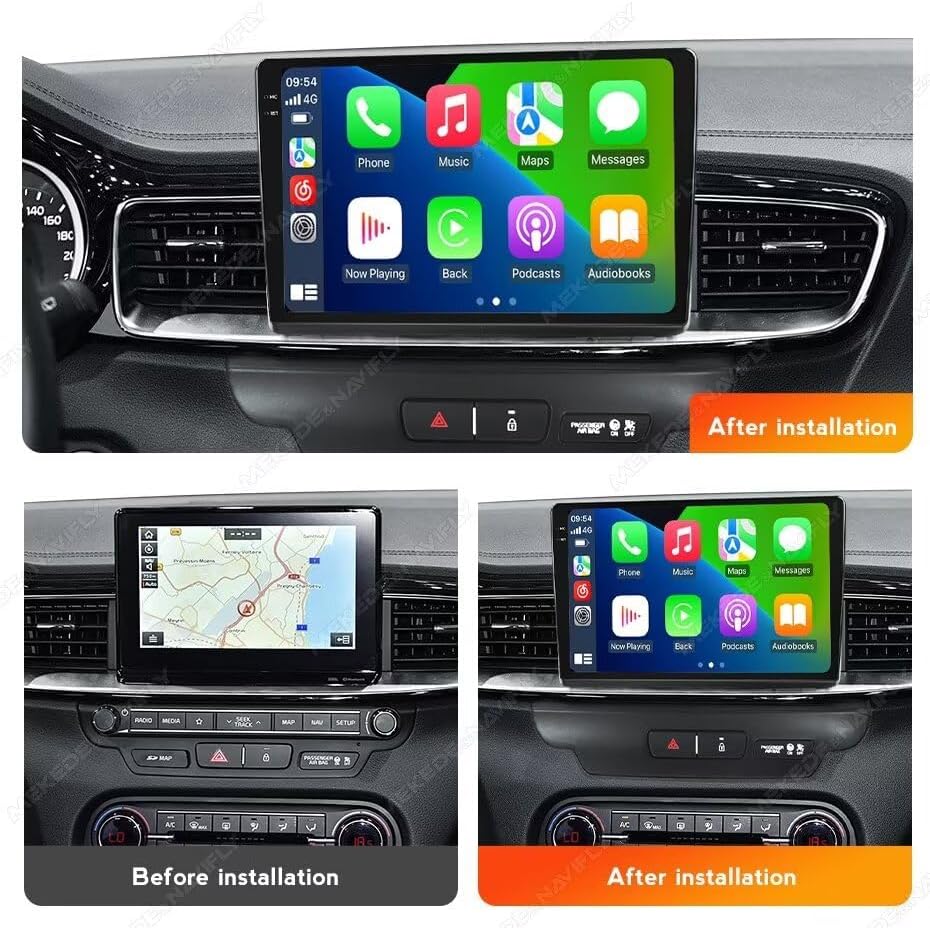
Figure 4.1: Before and After Installation. This image illustrates the visual transformation of the car's center console, highlighting the integration of the new 9-inch display.
4.1 General Installation Steps (Consult a professional)
- Disconnect Battery: Always disconnect the negative terminal of the car battery before starting any electrical work.
- Remove Original Unit: Carefully remove the existing car stereo and trim panels.
- Connect Wiring Harness: Connect the provided wiring harness to the car's factory harness. Ensure all connections are secure.
- Connect Peripherals: Connect the GPS antenna, 4G antenna (if applicable), USB cables, microphone, and reversing camera (if installed).
- Mount New Unit: Secure the Biorunn Android Car Stereo into the dashboard opening.
- Test Functionality: Reconnect the battery and perform a basic test of the unit's functions before reassembling the dashboard.
- Reassemble: Carefully reassemble all trim panels.
5. Setup
5.1 Initial Power-On
After installation, turn on your vehicle's ignition. The unit should power on automatically. Follow any on-screen prompts for initial setup, such as language selection and time zone.
5.2 Wi-Fi Connection
- From the main menu, navigate to Settings.
- Select Network & Internet, then Wi-Fi.
- Turn on Wi-Fi and select your desired network from the list.
- Enter the password if prompted and connect. The unit supports 5GHz Wi-Fi for faster speeds.
5.3 Bluetooth Pairing
- From the main menu, select the Bluetooth icon or navigate to Settings > Connected devices > Bluetooth.
- Ensure Bluetooth is enabled on both the car stereo and your mobile device.
- On your mobile device, search for available devices and select the car stereo (e.g., "Biorunn Car BT").
- Confirm the pairing code on both devices if prompted.
6. Operating Instructions
6.1 User Interface and Navigation
The unit features a responsive 9-inch IPS multi-touch screen. Navigate through applications by swiping and tapping. The home screen provides quick access to frequently used functions like Navigation, Radio, Bluetooth, and Media Player. You can customize the layout by dragging app icons.
6.2 Wireless CarPlay and Android Auto
The unit supports both wireless CarPlay and Android Auto, allowing seamless integration with your smartphone for navigation, music, calls, and messages.

Figure 6.1: Android Auto & CarPlay Interface. This image displays the user interface when connected to either Android Auto or Apple CarPlay, showing common app icons.
- Connect: Ensure your phone's Bluetooth and Wi-Fi are enabled. For wireless connection, simply open the CarPlay/Android Auto app on the head unit and follow the on-screen instructions to connect your phone.
- Functions: Once connected, you can use voice commands or the touchscreen to access phone calls, messages, music streaming, and navigation apps directly from the car stereo display.
6.3 FM/AM RDS Radio
The built-in radio tuner supports FM, AM, and RDS (Radio Data System) for enhanced information display.

Figure 6.2: FM/AM RDS Radio Interface. This image shows the radio application with frequency display and preset options.
- Access: Tap the 'Radio' icon on the home screen.
- Search: Use the automatic search function to scan for available stations or manually tune to a specific frequency.
- Presets: Save your favorite stations to the preset buttons for quick access. The unit supports 18 preset stations.
- RDS: When available, RDS will display station information such as program type, song title, or artist.
6.4 Bluetooth Function (BT)
Bluetooth 5.0 enables hands-free calling, phone book synchronization, and audio streaming (A2DP).

Figure 6.3: Bluetooth Dialer Interface. This image displays the on-screen keypad for making calls via Bluetooth.
- Hands-Free Calling: Once paired, you can make and receive calls directly from the unit. The phone book can be downloaded for easy contact access.
- Audio Streaming: Play music from your paired smartphone through the car's speakers.
6.5 GPS Navigation
The unit features a built-in global positioning system for accurate navigation, including real-time traffic conditions (requires internet connection).

Figure 6.4: GPS Navigation Display. This image shows a navigation map with route guidance and estimated arrival time.
- Map Access: Tap the 'Navigation' icon to launch the pre-installed mapping application.
- Route Planning: Enter your destination to receive turn-by-turn directions.
- Offline Maps: Some navigation apps allow downloading maps for offline use.
6.6 Steering Wheel Control (SWC)
The unit supports original steering wheel remote control functions, allowing you to manage music and calls safely while driving.

Figure 6.5: Steering Wheel Control Learning Interface. This image shows the screen used to program and map steering wheel buttons to specific functions.
- Configuration: Access the 'Steering Wheel Control' settings in the system menu.
- Learning Mode: Follow the on-screen instructions to assign functions to your vehicle's steering wheel buttons.
6.7 Multimedia Playback
The unit supports various audio and video formats for playback from USB drives or internal storage.
- Audio Formats: MP3, WMA, AAC, RM, FALC, etc.
- Video Formats: MPEG-1/2/4, H264, H263, VC1, RV, RMVB, DivX, Sorenson SparK, Spark, VP8, AVS Stream (supports 1080P full format).
- Photo Formats: JPG, BMP, JPEG, GIF, PNG.
6.8 Split Screen Function
The split-screen feature allows you to run two applications simultaneously, such as navigation and music player, on the same display.
6.9 4G LTE and 5GHz Wi-Fi Support
The unit supports 4G LTE connectivity (requires a compatible SIM card and data plan, not included) and 5GHz Wi-Fi for fast internet access and streaming.
6.10 Optional Accessories Support
The system supports integration with various external devices (not included):
- ADAS DVR: Anti-collision warning driving recorder.
- OBD II: On-Board Diagnostics for vehicle data.
- TPMS: Tire Pressure Monitoring System.
7. Maintenance
- Screen Cleaning: Use a soft, lint-free cloth to clean the screen. For stubborn marks, lightly dampen the cloth with water or a screen-safe cleaner. Avoid harsh chemicals.
- Software Updates: Periodically check for system software updates to ensure optimal performance and access to new features. Updates can usually be found in the system settings or on the manufacturer's website.
- Avoid Liquids: Prevent liquids from entering the unit, as this can cause severe damage.
- Temperature Control: Do not expose the unit to extreme heat or cold.
8. Troubleshooting
If you encounter issues, refer to the following common problems and solutions before contacting support.
| Problem | Possible Cause | Solution |
|---|---|---|
| Unit does not power on | Loose power connection, blown fuse, incorrect wiring. | Check power cables and fuse. Verify wiring connections. |
| No sound | Volume too low, speaker wires disconnected, incorrect audio settings. | Increase volume. Check speaker connections. Adjust audio output settings. |
| GPS signal loss or inaccuracy | GPS antenna not properly installed or obstructed, poor satellite reception. | Ensure GPS antenna is securely connected and has a clear view of the sky. Move to an open area. |
| Bluetooth connection issues | Device not in pairing mode, incorrect pairing code, interference. | Ensure both devices are in pairing mode. Re-pair the devices. Restart both devices. |
| Touchscreen unresponsive | System freeze, dirty screen. | Restart the unit. Clean the screen. |
9. Specifications
| Feature | Specification |
|---|---|
| Operating System | Android |
| Processor | 8-Core |
| RAM | 4GB |
| ROM (Internal Storage) | 64GB |
| Screen Size | 9 Inches |
| Display Resolution | 1280 x 720 IPS |
| Bluetooth Version | 5.0 |
| DSP Processor | Built-in |
| CarPlay / Android Auto | Wireless & Wired Support |
| Split Screen | Supported |
| 4G LTE | Supported |
| Wi-Fi | 5GHz Supported |
| Radio Tuner | FM/AM/RDS |
| GPS Navigation | Built-in Global Positioning System |
| USB Ports | USB1; USB2 |
| Supported Audio Formats | MP3, WMA, AAC, RM, FALC, etc. |
| Supported Video Formats | MPEG-1/2/4, H264, H263, VC1, RV, RMVB, DivX, Sorenson SparK, Spark, VP8, AVS Stream (1080P) |
| Supported Photo Formats | JPG, BMP, JPEG, GIF, PNG |
| Languages | Multiple languages including English, German, French, Spanish, Italian, Portuguese, Russian, Dutch, Polish, Japanese, Chinese, Arabic. |
10. Warranty and Support
For warranty information and technical support, please refer to the documentation provided with your purchase or contact the seller directly. Keep your proof of purchase for warranty claims.