1. Introduction
Thank you for purchasing the Upperizon 13.3-inch 2K Portable Monitor G-133Q. This monitor is designed to provide a high-resolution, portable display solution for various devices, enhancing your productivity and entertainment experience. Please read this manual carefully before use to ensure proper operation and to maximize the lifespan of your device.

Image: The Upperizon 13.3-inch 2K Portable Monitor G-133Q, showcasing its slim design and vibrant display.
2. Important Safety Warnings
- This product does not contain a built-in battery. A power supply from the connected device or a separate power source is required during use.
- Insufficient power supply may cause screen flickering or no display. For stable operation, we recommend using a power source of 5V 3A or higher.
- When connecting with a USB Type-C to Type-C cable, ensure the output device's Type-C port supports DisplayPort Alternate Mode (DP Alt Mode). Verify your device's interface before purchase.
- If the power supply from the terminal is unstable when connecting with a single Type-C cable, please provide a separate power source. A separate power source is also required for HDMI connections.
- The Nintendo Switch 2 does not support video output with a single Type-C cable; connection is only possible via the official dock. Older Nintendo Switch models support video output with a single Type-C cable that supports video transmission.
3. Package Contents
Please check that all items are present and in good condition:
- Upperizon 13.3-inch 2K Portable Monitor (G-133Q)
- USB Type-C to Type-C Cable (for video and power)
- USB Type-C to Type-A Cable (for power)
- Mini HDMI to HDMI Cable (for video)
- OTG Adapter
- Protective Carrying Case
- User Manual (this document)

Image: All items included in the Upperizon portable monitor package, including cables and protective case.
4. Product Features
- 2K WQXGA Resolution: Enjoy crisp, detailed visuals with a 2560x1600 resolution, offering approximately twice the workspace of Full HD.
- Non-Glare IPS Panel: The IPS panel provides wide 178-degree viewing angles and accurate color reproduction. The non-glare finish reduces reflections, making it comfortable for extended use.
- High Color Accuracy & Brightness: Features 100% sRGB color gamut and 350 nits brightness, ensuring vivid and true-to-life colors. A 1500:1 contrast ratio delivers deep blacks and bright whites.
- Lightweight & Slim Design: Weighing approximately 600g and with a minimum thickness of 8mm, this monitor is highly portable. Its compact size (approx. 295x195mm) is similar to A4 paper.
- Integrated Self-Standing Design: The monitor features a built-in stand that allows for stepless angle adjustment, providing stability and immediate usability without additional tools.
- VESA Mount Compatible: Supports VESA mounting (75mm pitch, 2 holes, M4x6mm) for flexible setup with monitor arms or wall mounts.
- Versatile Connectivity: Equipped with USB Type-C and Mini HDMI ports. A single Type-C cable can transmit both video and power (for compatible devices).
- Built-in Speakers: Integrated speakers provide audio output without the need for external devices.
- Low Blue Light Technology: Designed to reduce eye strain during prolonged use.

Image: Overview of the monitor's key features including 2K resolution, non-glare IPS, 350 nits, 1500:1 contrast, 600g weight, and self-standing design.

Image: Visual representation of the monitor's 600g weight and 8mm thinness, highlighting its portability.
5. Ports and Controls
Familiarize yourself with the monitor's ports and control buttons:

Image: Diagram showing the location of VESA holes, built-in speakers, power button, menu button, earphone jack, Type-C ports, and Mini HDMI port.
- Type-C Ports (x2): For video signal input and power supply.
- Mini HDMI Port: For video signal input.
- Power Button: To turn the monitor on/off and for OSD menu navigation.
- Menu Button: To access the On-Screen Display (OSD) menu for settings adjustments.
- Earphone Jack: For connecting headphones or external speakers.
- VESA Holes: For mounting the monitor to a VESA-compatible stand or arm.
- Built-in Speakers: For audio output.
6. Setup
6.1 Power Requirements
The monitor requires external power. Ensure you have a stable power source (5V 3A or higher recommended) connected to one of the Type-C ports using the provided USB Type-C to Type-A cable and a power adapter (not included), or directly from a compatible device via a Type-C to Type-C cable.
6.2 Connecting via USB Type-C
- Ensure your device's Type-C port supports DisplayPort Alternate Mode (DP Alt Mode).
- Connect one end of the provided USB Type-C to Type-C cable to your device (e.g., laptop, smartphone).
- Connect the other end of the Type-C to Type-C cable to one of the Type-C ports on the monitor.
- If your device cannot provide sufficient power, connect a separate power adapter to the other Type-C port on the monitor using the USB Type-C to Type-A cable.

Image: A laptop connected to the portable monitor via a single USB Type-C cable, demonstrating video and power delivery.
6.3 Connecting via Mini HDMI
- Connect one end of the provided Mini HDMI to HDMI cable to the Mini HDMI port on the monitor.
- Connect the other end of the cable to the HDMI port on your device (e.g., PC, gaming console).
- Connect a separate power adapter to one of the Type-C ports on the monitor using the USB Type-C to Type-A cable, as HDMI does not supply power.

Image: A laptop connected to the portable monitor via an HDMI cable, with a separate power connection.
6.4 Using the Integrated Stand
The monitor features a built-in, stepless adjustable stand. Simply unfold the stand from the back of the monitor and adjust it to your desired viewing angle. The stand is designed for both horizontal and vertical orientations without requiring tools.

Image: The monitor's integrated stand in use, showing its adjustable angles for various setups.
6.5 VESA Mounting
For alternative mounting options, the monitor is VESA compatible. Use the 75mm pitch, 2-hole, M4x6mm VESA mounting points on the back of the monitor to attach it to a compatible monitor arm or wall mount (sold separately).

Image: The portable monitor mounted vertically on a VESA arm next to a desktop monitor, demonstrating flexible placement.
7. Operating the Monitor
7.1 Power On/Off
Press the Power button to turn the monitor on. Press and hold the Power button for a few seconds to turn it off.
7.2 On-Screen Display (OSD) Menu
Press the Menu button to access the OSD menu. Use the Power and Menu buttons to navigate through the options and adjust settings such as brightness, contrast, color temperature, and input source.
7.3 Display Modes
The monitor supports various display modes when connected to a computer:
- Duplicate Mode: Mirrors your primary display.
- Extend Mode: Extends your desktop, providing additional screen space.
- Portrait Mode: Allows for vertical display, ideal for reading documents or coding.
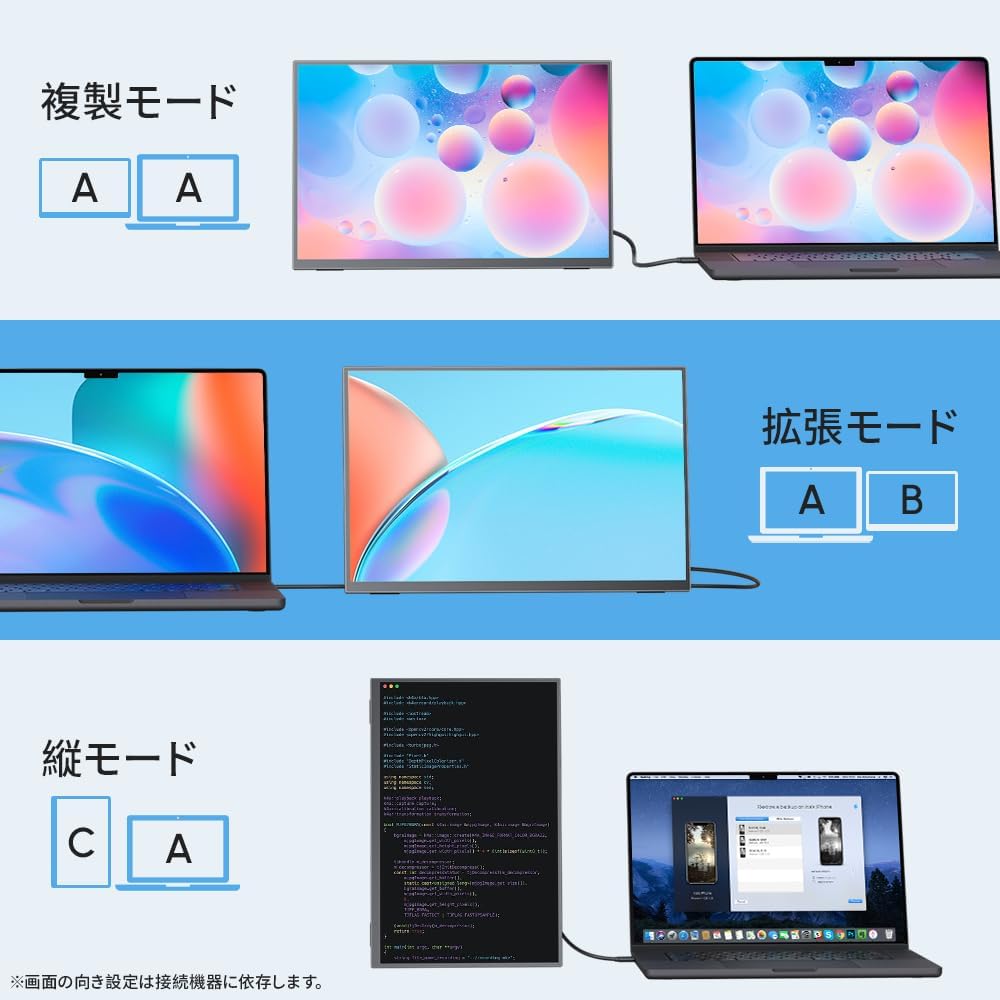
Image: Illustration of Duplicate, Extend, and Portrait display modes when connecting the portable monitor to a laptop.
7.4 Gaming Console Connection
Connect your gaming console (e.g., PlayStation, Xbox, Nintendo Switch) via Mini HDMI for a larger display. For Nintendo Switch, ensure you are using a compatible model or the official dock as per safety warnings.
Video: A user playing a game on a portable monitor, demonstrating its compatibility with gaming consoles. This video is titled "Pramie Mobile Monitor 13.5-inch" by CHUWI-Store.

Image: A gaming console connected to the portable monitor, showing a game being played on the larger screen.
8. Maintenance
8.1 Cleaning the Screen
To clean the screen, gently wipe it with a soft, lint-free cloth. For stubborn smudges, slightly dampen the cloth with water or a screen-cleaning solution. Avoid using harsh chemicals, abrasive materials, or spraying liquid directly onto the screen.
8.2 General Care
- Avoid exposing the monitor to extreme temperatures, humidity, or direct sunlight.
- Do not place heavy objects on the monitor.
- Store the monitor in its protective carrying case when not in use or during transport to prevent scratches and damage.
9. Troubleshooting
If you encounter issues with your monitor, please refer to the following common problems and solutions:
| Problem | Possible Cause | Solution |
|---|---|---|
| No display / Screen flickering | Insufficient power supply. Incompatible Type-C port. Loose cable connection. | Ensure a 5V 3A or higher power source is connected. Verify your device's Type-C port supports DP Alt Mode. Check all cable connections are secure. Try a different cable. |
| No audio | Volume too low. Muted. Incorrect audio output selected on source device. | Adjust monitor volume via OSD menu. Unmute audio. Select the monitor as the audio output device on your computer/console. |
| Image distorted / Incorrect aspect ratio | Incorrect display settings on source device. | Adjust resolution and aspect ratio settings on your connected device. The monitor supports automatic aspect ratio adaptation. |
| Monitor does not turn on | No power. Faulty cable. | Ensure power is connected and the power button is pressed. Try a different power cable or adapter. |
If the problem persists after trying these solutions, please contact customer support.
10. Specifications
| Feature | Specification |
|---|---|
| Brand | Upperizon |
| Model Series | G-133Q |
| Product Model Number | Z-135Q |
| Screen Size | 13.3 inches |
| Resolution | 2560 x 1600 (WQXGA) |
| Aspect Ratio | 16:10 |
| Panel Type | Non-glare IPS |
| Color Gamut | 100% sRGB |
| Brightness | 350 nits |
| Contrast Ratio | 1500:1 |
| Product Dimensions (W x H x D) | 29.5 x 19.5 x 1.6 cm (approx.) |
| Product Weight | 600 g |
| Connectivity | 2x USB Type-C, 1x Mini HDMI |
| Audio | Built-in speakers, 3.5mm earphone jack |
| VESA Compatibility | 75mm (2 holes, M4x6mm) |
11. Warranty and Support
11.1 Warranty Information
- This product comes with a 2-year manufacturer warranty.
- In case of malfunction within the warranty period (excluding damage due to improper use, verification may be required), accessories or the main unit will be replaced free of charge.
- Enjoy 30-day free returns from the date of purchase.
11.2 Customer Support
If you have any questions or require assistance during use, please contact us via Amazon message. Email and phone support are also available. Our professional support team is ready to help you.
Video: An unboxing video of a portable monitor, showing the contents and initial setup. This video is titled "Pramie Mobile Monitor 13.5-inch 3K" by CHUWI-Store.


