1. Introduction
This manual provides detailed instructions for the installation, operation, and maintenance of your BAFANG G062 48V 750W Fat Tire Ebike Conversion Kit. Please read this manual thoroughly before installation and use to ensure safe and correct operation.
2. Package Contents
Before beginning installation, please verify that all components listed below are present and undamaged:
- Rear rim with BAFANG G062 48V 750W motor
- Display unit
- PAS (Pedal Assist System) sensor
- Thumb throttle
- Brake levers (cut-off sensored)
- Headlight
- Controller + Bag
- Wiring harness
- Mounting hardware
- User manual
- Battery (if selected)
- Cut-off Sensor Cables (if selected, for hydraulic brakes)
Video: Unboxing and Installation Guide for the 20 Inch Fat Tire Ebike Conversion Kit. This video demonstrates the contents of the kit and provides a visual guide for the installation process.
3. Setup and Installation
3.1 Pre-Installation Checks
- Hub Spacing: Ensure your bicycle frame has a rear dropout spacing (Over-Lock-nut Dimension/O.L.D.) of 170-175 mm. The motor hub is 175 mm.
- Tire Compatibility: This kit requires a 20 × 4" tire (not included).
- Sprocket Compatibility: Compatible with cassette sprockets (not included).
- Brake System: Only works with disc brakes; rim brakes are not supported.

Image: Guide for measuring the rear dropout size of your bike frame. Ensure your frame's dropout is 170-175mm for fat bikes.

Image: Detailed motor data including position (Rear Motor), wheel diameter (20"), rated power (750W), max torque (80 N.m), and installation width (175mm O.L.D.).
3.2 Handlebar Component Installation
- Remove existing handlebar grips and brake levers.
- Install the new cut-off sensored brake levers. If your bike has hydraulic brakes, use the provided cut-off sensor cables instead of replacing the entire lever.
- Mount the thumb throttle next to the right brake lever.
- Secure the display unit onto the handlebar in a comfortable viewing position.
3.3 PAS Sensor Installation
- Remove the left crank arm from the bottom bracket.
- Install the PAS sensor onto the bottom bracket spindle.
- Reattach the left crank arm, ensuring it is securely tightened.
3.4 Rear Wheel Assembly
- Remove the existing rear wheel from your bike.
- Remove the freewheel from your existing wheel.
- Install your disc rotor onto the BAFANG motor hub.
- Attach your cassette sprocket (freewheel) onto the motor hub.
- Install the 20 × 4" inner tube and outer tire onto the motor wheel hub.
3.5 Motor Wheel and Controller Installation
- Mount the assembled motor wheel onto the rear dropouts of your bike frame. Tighten the mounting screws securely and adjust the chain tension properly.
- Find a suitable position on your bike frame to install the controller box. Place the controller inside its bag and secure it with straps or screws.
3.6 Wiring Connections
Refer to the wiring diagram below for all electrical connections. Ensure all connectors are aligned correctly (arrow face to arrow) and securely fastened to prevent loose connections and water ingress.

Image: Comprehensive wiring diagram illustrating connections between the hub motor controller, headlight, left-hand PAS sensor, display, brake levers, throttle, and rear wheel motor.
4. Operating Instructions
4.1 Power On/Off
To power on the system, press and hold the power button on the display unit. Repeat to power off.
4.2 Pedal Assist System (PAS)
The PAS function provides motor assistance as you pedal. Use the '+' and '-' buttons on the display to adjust the assist level (typically 0-5 or 0-9, depending on display model). Higher levels provide more assistance.
4.3 Thumb Throttle
The thumb throttle allows for on-demand power without pedaling. Gently press the throttle to engage the motor. Release to disengage. Both PAS and throttle functions can be used simultaneously or independently.
4.4 Display Functions
The display provides essential riding information:
- Speed Indicator: Shows current speed (KM/H or MPH).
- Battery Value/Percent: Indicates remaining battery charge.
- PAS Level: Shows the current pedal assist level.
- TRIP/ODO: Displays trip distance and total odometer reading.
- Walk Assistance: Provides low-speed assistance for walking the bike.
- Error Code: Alerts to system malfunctions.

Image: Overview of different display models (DZ40, L02, B02, K5351, B04) and their screen types, sizes, mounting sizes, and features like battery percentage, USB-C charge, Bluetooth, APP, and GPS.

Image: Close-up of a 3.5" TFT HD large screen display, highlighting speed indicator, WATT, speed value (KMH or MPH), error code, PAS level, walk assistance, trip distance, and ODO.
5. Maintenance
5.1 General Care
Regularly inspect all electrical connections for tightness and signs of wear. Keep the motor, controller, and display clean and dry. Avoid high-pressure washing directly on electrical components.
5.2 Battery Recommendations
For optimal performance, a 48V 10-20Ah battery with a BMS (Battery Management System) of ≥ 30A is recommended. Ensure the battery is charged according to its manufacturer's instructions.

Image: Specifications for a 48V 16Ah Ebike Frame Battery, including BMS protection, drop protection, waterproof/dustproof features, 1000+ cycle life, 768Wh power, 30A BMS current, and 6-7 hours full charge time.

Image: Specifications for a 48V 20Ah Ebike Down-tube Battery, including BMS protection, drop protection, waterproof/dustproof features, 1000+ cycle life, 960Wh power, 30A BMS current, and 6-7 hours full charge time.
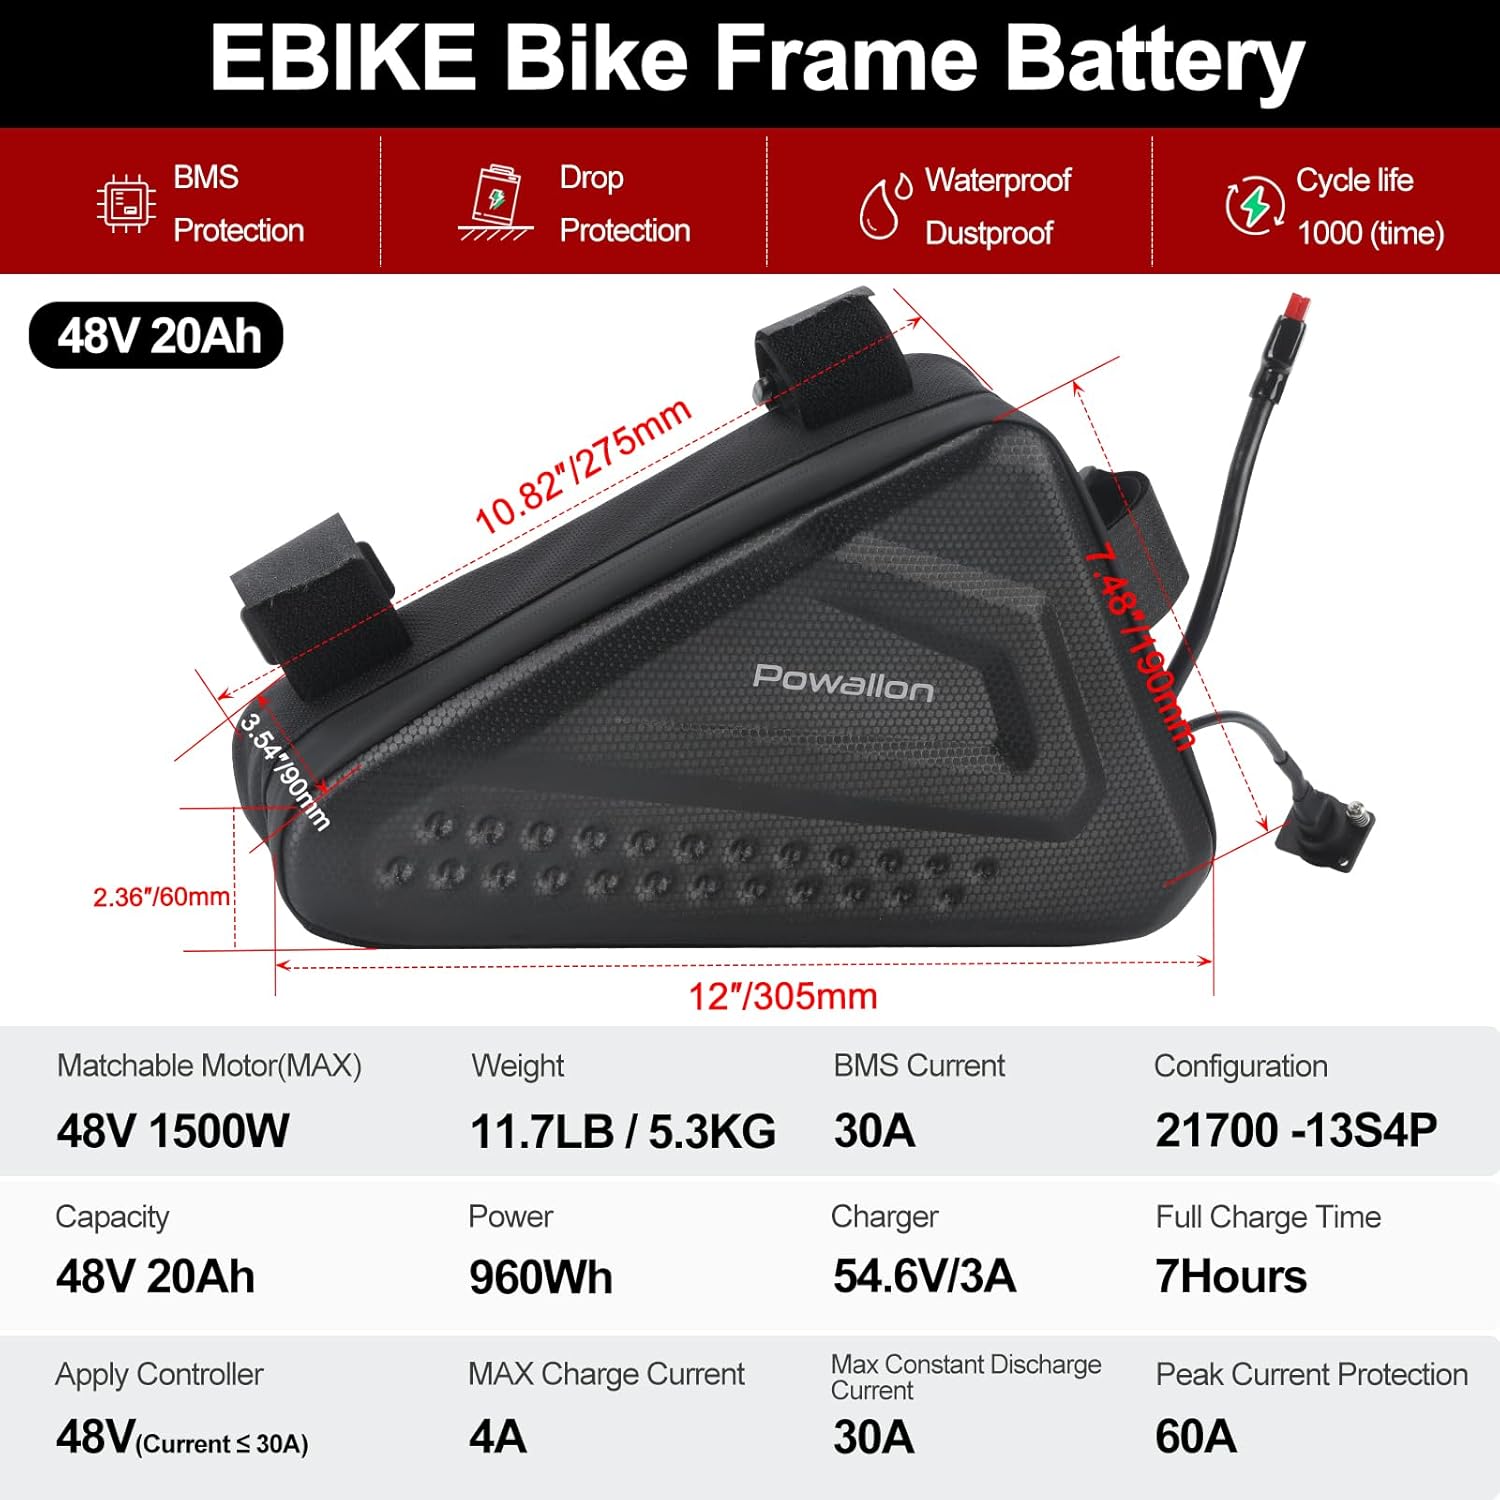
Image: Specifications for a 48V 20Ah Ebike Bike Frame Battery (bag type), including BMS protection, drop protection, waterproof/dustproof features, 1000+ cycle life, 960Wh power, 30A BMS current, and 7 hours full charge time.
5.3 Brake System
Regularly check the disc brakes for wear and proper function. Ensure brake levers are responsive and cables are not frayed. Adjust as necessary.
5.4 Chain
Keep the bicycle chain clean and lubricated. Periodically check for proper tension and adjust if it is too loose or too tight.
6. Troubleshooting
If you encounter issues with your ebike conversion kit, please follow these general troubleshooting steps:
- No Power: Check all electrical connections, especially the battery connection and main power cable. Ensure the battery is charged.
- Motor Not Engaging: Verify that the display is on and showing a PAS level. Check throttle and PAS sensor connections. Ensure brake levers are not engaged, as they cut off motor power.
- Error Codes: Refer to your display's specific manual for interpretation of any displayed error codes.
- Intermittent Power: Inspect all wiring for loose connections or damage.
If problems persist, please contact customer support for further assistance.
7. Specifications
| Feature | Specification |
|---|---|
| Motor | BAFANG G062 48V 750W (brushless geared) |
| Max Torque | 80 N.m |
| Max Speed | 28 mph (adjustable via display) |
| Hub Spacing (O.L.D.) | 175 mm |
| Hub Type | Freehub - compatible with cassette sprocket |
| Compatible Tire Size | 20 × 4" (not included) |
| Compatible Sprocket | Cassette (not included) |
| Brake Style | Disc (rim brake not supported) |
| Electric Assist Type | PAS and Throttle |
| Recommended Battery | 48V 10-20Ah battery, BMS ≥ 30A (not included) |
8. Warranty and Support
8.1 Warranty Information
This BAFANG G062 Ebike Conversion Kit comes with a 1 Year Limited Warranty. Please note that this warranty excludes the battery, if purchased separately or from a third party. For specific warranty terms and conditions, refer to your purchase documentation.
8.2 Customer Support
For technical assistance, troubleshooting, or warranty claims, please contact the seller or BAFANG customer support directly. Have your product model and purchase information ready when contacting support.


