
1. Introduction
Thank you for choosing the Zeerkeer Wireless Video Doorbell with 4.3-inch Monitor. This manual provides detailed instructions for the proper installation, operation, and maintenance of your device. Please read this manual thoroughly before use to ensure optimal performance and safety.
2. Product Overview
2.1 Package Contents
The package includes the following items:
- 1x Doorbell Host
- 1x 4.3-inch Monitor
- 1x 3M Adhesive Sticker
- 1x USB Cable
- 1x Base Plate
- 1x Screw Pack
- 1x User Manual
2.2 Key Features
- Wireless Connectivity: 2.4G Bluetooth interconnection for easy pairing without a network or app.
- High-Definition Camera: 800W HD camera with a 170° wide-angle fisheye lens.
- 4.3-inch IPS Display: Clear indoor monitor with 640x480 resolution.
- Two-Way Audio: Enables communication with visitors at the door.
- Night Vision: LED fill light for clear visibility in low-light conditions.
- Automatic Recording: Supports integrated storage and external TF card (8G-32G) for video and photo capture upon doorbell press.
- Weatherproof Design: IP65 rated for rain resistance.
- Rechargeable Batteries: Doorbell host (1000mAh) with 3-4 months standby, Monitor (400mAh) with USB charging.
2.3 Product Components

Image Description: This image displays the various components of the Zeerkeer Wireless Video Doorbell system. It includes a detailed diagram of the outdoor doorbell unit, highlighting its 170° wide-angle camera, environmental sensors, LED fill light, doorbell button, and speaker. Below it, the indoor monitor is shown with its power button, Type-C charging port, and TF card slot. The image also illustrates the front, side, and back views of the doorbell unit, along with how the monitor can be placed on a surface or mounted on a wall.
The doorbell unit features a 170° wide-angle camera, environmental sensors, an LED fill light for night vision, a doorbell button, and a speaker. The indoor monitor includes a power button, a Type-C charging port, and a TF card slot for storage.
3. Setup and Installation
3.1 Initial Charging
Before first use, fully charge both the doorbell host and the indoor monitor. Use the provided USB cable and a 5V/1A charger. Charging typically takes 2-3 hours for a full charge.

Image Description: This image illustrates the Type-C charging ports on both the outdoor doorbell unit and the indoor monitor. It shows a USB-C cable being inserted into each device, indicating how they are charged. The text emphasizes that both devices use Type-C charging.
3.2 Placement Recommendations
Important: Before permanent installation, test the signal reception between the doorbell and the monitor at your desired locations to ensure a strong connection.
- Monitor: Place the monitor in a convenient location within your living room, office, or near the door, ensuring it has access to a 5V power source (e.g., a mobile phone charger or a USB power port). For continuous use, the monitor needs to be plugged in. Without continuous power, the monitor's battery provides approximately 2-3 hours of use.
- Doorbell:
- For wooden or glass doors: Clean the installation area thoroughly. Use the provided 3M adhesive sticker to attach the doorbell.
- For iron doors: It is recommended to install the doorbell at the upper end of the door handle, approximately 1.5 to 1.6 meters (59 to 63 inches) from the ground. Adjust height as needed.
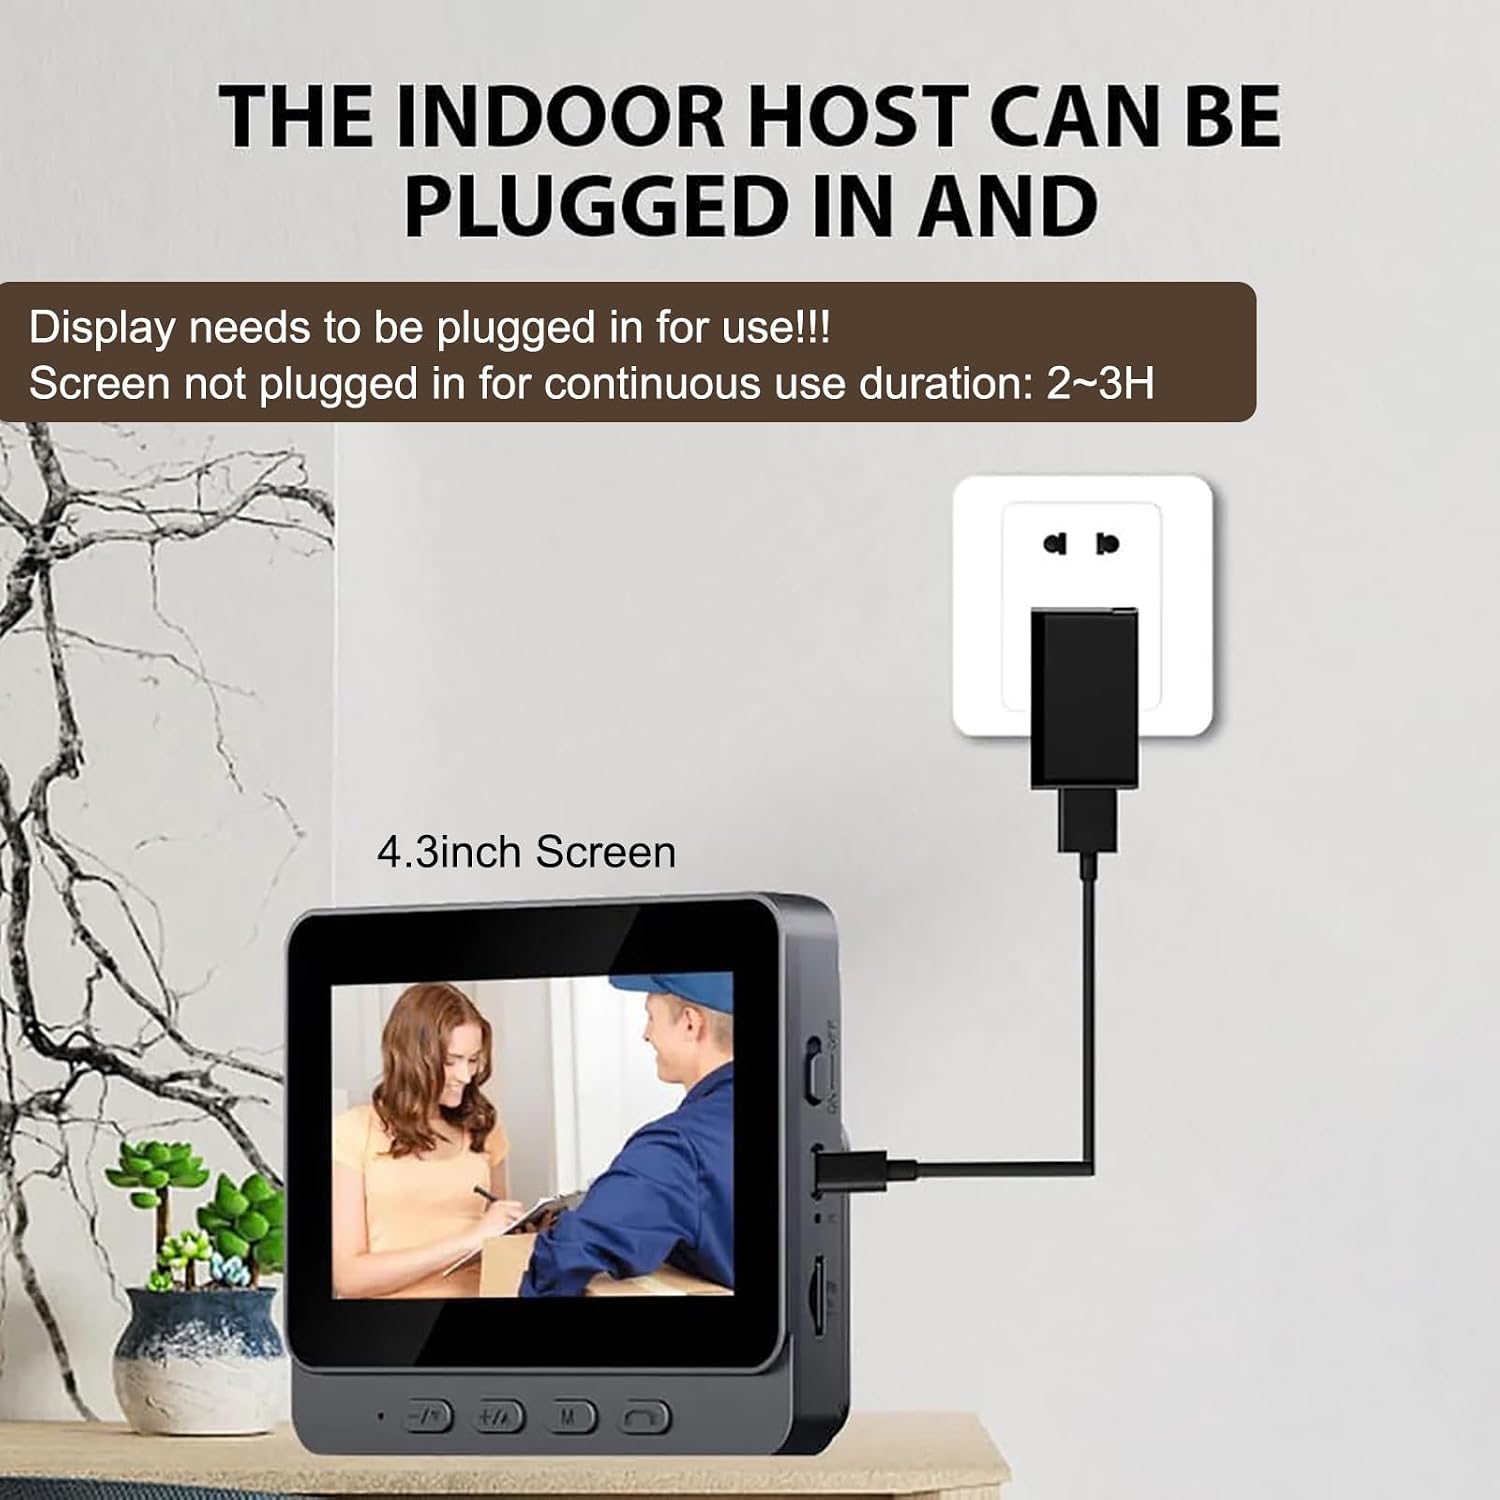
Image Description: This image shows the indoor monitor connected to a wall outlet via a USB power adapter, illustrating the recommendation for continuous power supply for extended use. The monitor displays a live view of a person at the door. Text indicates that the display needs to be plugged in for use and provides battery duration if not plugged in.


Image Description: Two separate images showing the indoor monitor and the outdoor doorbell unit. The monitor has a screen and control buttons, while the doorbell unit features a camera lens, a doorbell button, and a speaker grille. These images provide a clear view of each component.
3.3 Wireless Pairing
The doorbell and monitor are designed for easy, one-touch pairing via 2.4G Bluetooth. No complex network setup or application download is required. Ensure both devices are powered on and within range for automatic connection.
4. Operating Instructions
4.1 Basic Operation
- Power On: Ensure the indoor monitor is plugged into an external power supply for constant use, then power it on.
- Visitor Alert: When a visitor presses the doorbell button, the indoor monitor will immediately display the camera's image.
- Two-Way Communication:
- To speak with the visitor, press the answer button on the monitor to establish a connection.
- Hold down the answer button to speak, and release it to listen.
- If you do not answer, the screen image will close automatically after a few seconds.
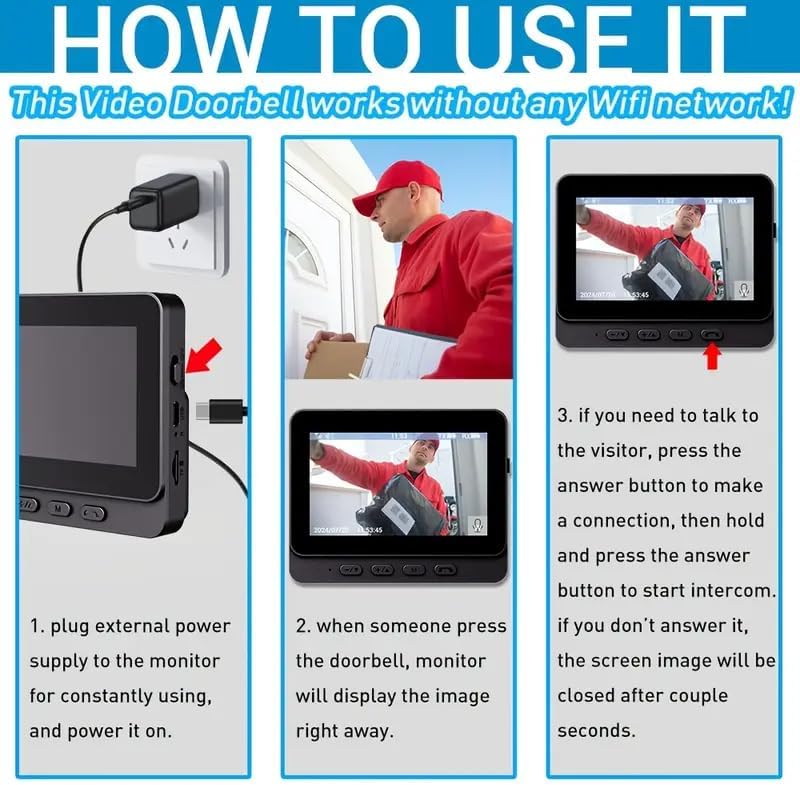
Image Description: This image provides a visual, three-step guide on how to use the video doorbell. Step 1 shows plugging in the monitor. Step 2 shows the monitor displaying the image when the doorbell is pressed. Step 3 explains how to use the answer button for two-way communication, emphasizing holding the button to speak. It clarifies that the system works without Wi-Fi.

Image Description: This image demonstrates the two-way audio feature. It shows a person at the door speaking into the doorbell and a person indoors viewing the monitor and speaking back. A speech bubble indicates a conversation, and a note highlights that the indoor user must hold down a button to hear the conversation.
4.2 Automatic Recording and Storage
When the doorbell is pressed, the system can be configured to automatically record video and capture snapshots. The indoor monitor will automatically capture photos and begin recording. The system supports both integrated storage and external TF card storage (8G-32G). It can record photos, manage loop recordings, and save the latest photos and videos.
4.3 Night Vision
The doorbell is equipped with built-in infrared lighting, providing clear vision even in dark environments. This ensures that visitors can be seen clearly at night.

Image Description: This image illustrates the clear night vision feature. It shows two scenarios: one in daylight with a delivery person, and another in a dark environment with a person approaching a door, both captured clearly by the doorbell camera. The text confirms that built-in infrared lighting enables clear shooting even at night.
5. Maintenance
- Cleaning: Use a soft, dry cloth to clean the doorbell camera lens and the monitor screen. Avoid using abrasive cleaners or solvents.
- Battery Life: The doorbell host battery (1000mAh) offers a long standby time of 3-4 months on a full charge. The monitor's 400mAh battery provides 2-3 hours of continuous use if not plugged in. Regularly charge both units as needed.
- Weather Protection: The doorbell unit is IP65 rain-resistant. While it can withstand rain, avoid submerging it in water or exposing it to extreme weather conditions for prolonged periods.
- Storage: If storing the device for an extended period, ensure both units are fully charged and stored in a cool, dry place.
6. Troubleshooting
| Problem | Possible Cause | Solution |
|---|---|---|
| Monitor screen does not turn on. | Low battery; not plugged in; power button not pressed. | Charge the monitor. Ensure it is plugged into a 5V power source for continuous use. Press the power button. |
| No image on monitor when doorbell is pressed. | Doorbell battery low; out of wireless range; pairing issue. | Charge the doorbell. Move the monitor closer to the doorbell. Re-pair the devices if necessary (refer to setup section). |
| Two-way audio is unclear or not working. | Microphone/speaker obstruction; signal interference; button not held correctly. | Ensure no obstructions. Check for strong signal. Remember to hold the answer button to speak and release to listen. |
| Night vision is poor. | LED fill light obstructed; extreme darkness beyond range. | Clear any obstructions from the LED light. Ensure the area is within the effective night vision range. |
| Doorbell frequently disconnects. | Weak signal due to distance or obstacles; interference. | Relocate the monitor or doorbell to improve signal strength. Avoid placing near large metal objects or other wireless devices. |
7. Specifications
| Feature | Detail |
|---|---|
| Model Number | 24A08016 (M15S) |
| Main Control Chip | Jianrong |
| Lens Module | GC1084, Fisheye lens |
| Screen | 4.3-inch IPS display |
| Resolution | 640 x 480 (HD) |
| Wide Angle | 170° |
| Night Vision Type | LED fill light |
| Waterproof Rating | IP65 (rain resistant) |
| Monitor Battery | 400mAh (USB plug use) |
| Doorbell Battery | 1000mAh (3-4 months standby) |
| Charging Time | 2-3 hours with 2A charger |
| Transmission Protocol | 2.4G Bluetooth, 433MHz |
| Connection Distance | 50-80 meters (barrier-free environment) |
| Storage Mode | Integrated storage + external TF card (8G-32G) |
| Operating Voltage | DC5V/1A |
| Power Interface | USB/Type-C |
| Dimensions (L x W x H) | 19.5 x 2 x 15.3 cm |
| Weight | 450 grams |
| Installation Type | Standalone (3M adhesive or screws) |
8. Warranty and Support
Zeerkeer offers a 24-month warranty for this product. For any questions or support needs regarding your purchase, please contact Zeerkeer customer service. We are committed to providing a professional and detailed response within 24 hours.
For further assistance, please refer to the contact information provided with your product packaging or visit the official Zeerkeer website.