1. Introduction
This manual provides essential information for the safe and efficient operation of your Kenmore 8.0 cu. ft. Front Load Electric Dryer, Model 2682272. Please read all instructions carefully before use and retain this manual for future reference.
The Kenmore 8.0 cu. ft. Front Load Electric Dryer is designed for large loads, featuring 12 drying cycles and 8 options for customized fabric care. It incorporates Accela Steam technology to reduce wrinkles, odors, and static, along with a Smart Sensor Drying System to prevent over-drying. This ENERGY STAR certified appliance is equipped with user-friendly LED light-touch controls.

Image 1.1: The Kenmore 8.0 cu. ft. Electric Dryer, showcasing its modern design and advanced technology for efficient drying.

Image 1.2: The Kenmore dryer drum, illustrating its capacity and smart drying capabilities for various fabric types.
2. Safety Information
Always follow basic safety precautions when using this appliance to reduce the risk of fire, electric shock, or injury to persons.
- Read all instructions before using the dryer.
- Do not dry articles that have been previously cleaned in, washed in, soaked in, or spotted with gasoline, dry-cleaning solvents, or other flammable or explosive substances, as they emit vapors that could ignite or explode.
- Do not allow children to play on or in the appliance. Close supervision of children is necessary when the appliance is used near children.
- Before the appliance is removed from service or discarded, remove the door to the drying compartment.
- Do not reach into the appliance if the drum is moving.
- Do not install or store this appliance where it will be exposed to the weather.
- Do not tamper with controls.
- Do not repair or replace any part of the appliance or attempt any servicing unless specifically recommended in this manual or in published user-repair instructions that you understand and have the skills to carry out.
- Do not use fabric softeners or products to eliminate static unless recommended by the manufacturer of the fabric softener or product.
- Do not use heat to dry articles containing foam rubber or similarly textured rubber-like materials.
- Clean lint screen before or after each load.
- Keep the area around the exhaust opening and adjacent surrounding areas free from the accumulation of lint, dust, and dirt.
- The interior of the appliance and exhaust duct should be cleaned periodically by qualified service personnel.
- Do not place items exposed to cooking oils in your dryer. Items contaminated with cooking oils may contribute to a chemical reaction that could cause a load to catch fire.
- Always contact Kenmore customer support for any service or repair needs not covered in this manual.
3. Setup & Installation
3.1 Unpacking and Placement
Ensure the dryer is placed on a level surface. Allow adequate clearance around the unit for proper ventilation and access. The dryer can be installed side-by-side with a matching washer or stacked using a compatible stacking kit (sold separately).

Image 3.1: Installation options for the Kenmore dryer, showing both stacked and side-by-side configurations. A stacking kit is required for vertical installation.
Video 3.1: This video demonstrates how the Kenmore dryer can be integrated into small spaces, highlighting its compact design and flexible installation options.
3.2 Tools and Parts Required
Before beginning installation, gather the following tools and ensure you have the necessary parts. It is advisable to replace the installation kit with every new dryer installation for proper ventilation and continued safety.

Image 3.2: A visual guide to the tools required for installation, along with parts needed, optional accessories, and components included with your dryer. Ensure all transit bolts are removed prior to first use.
Parts Included:
- Y Connector
- Short Inlet Hose
- Rubber Washer
- Instruction Manual (this document)
Optional Accessories (Sold Separately):
- Long Inlet Hose
- Stacking Kit (No. 26-51132)
- LP Kit (No. 1293820000475)
Ventilation Requirements:
Proper ventilation is critical for dryer performance and safety. Use a rigid or UL-listed flexible metal 4-inch duct. Ensure the exhaust duct is clear and free of obstructions. For optimal performance, keep the duct run as short and straight as possible.
4. Operating Instructions
4.1 Control Panel Overview
The dryer features an intuitive control panel with LED light-touch controls and a digital display. This allows for easy selection of cycles and options.

Image 4.1: The control panel, showing the LED display for cycle status and time remaining, along with touch controls for various settings like Dry Temp, Dry Level, Timed Dry, and Energy Saver.
Video 4.1: An overview of the Kenmore 8.0 cu. ft. Front Load Electric Dryer, demonstrating its features and ease of use.
4.2 Drying Cycles and Options
Your dryer offers 12 drying cycles and 8 options to provide optimal care for various fabric types and load sizes. Select the appropriate cycle and options based on your laundry needs.

Image 4.2: This image highlights the dryer's versatile drying capabilities, including 12 cycles, Accela Steam, Sani Dry, and Energy Saver features.

Image 4.3: A detailed list of available dry cycles for different fabric types and load requirements.

Image 4.4: Additional specialized dry cycles such as Steam Refresh, Sanitize, Express, Timed Dry, and Air Dry.

Image 4.5: Available options to customize your drying experience, including temperature, dryness level, Wrinkle Guard, Accela Steam, and Energy Saver.
Key Features:
- Accela Steam Technology: Reduces wrinkles, static, and odors in approximately 15 minutes using the Steam Refresh cycle.
- Wrinkle Guard: Tumbles clothes intermittently after the cycle ends to prevent wrinkles from setting in.
- Smart Sensor Drying System: Detects moisture levels and adjusts drying time to prevent over-drying, protecting fabrics.
- Sani Dry Cycle: Helps clean hard-to-dry items like pillows and plush toys without washing.
- Energy Saver: Reduces energy consumption by up to 8.2% compared to a Normal cycle with more dry level and medium dry temperature using an 8-lb load.
- Extra Large Capacity: 8.0 cu. ft. drum accommodates large loads and bulky items like bedding.

Image 4.6: Smart Moisture Detection automatically adjusts drying time to prevent over-drying, ensuring clothes come out just right.

Image 4.7: The Sani Dry Cycle helps clean hard-to-dry items like pillows and plush toys, no wash needed.

Image 4.8: Accela Steam technology reduces wrinkles, odors, and static cling, making ironing a thing of the past.

Image 4.9: Wrinkle Guard tumbles clothes intermittently after the cycle ends to help prevent wrinkles from setting in.
Video 4.2: This video demonstrates the "Ready To Wear" feature, showcasing how the dryer's cycles and options prepare clothes for immediate use.
Video 4.3: Learn about the energy efficiency features of the Kenmore dryer and how they contribute to reduced energy consumption.
Video 4.4: This video highlights the dryer's effectiveness in removing pet hair from clothing and other items.
Video 4.5: A demonstration of the dryer's capacity and features, suitable for handling laundry needs of a large family.
5. Maintenance
5.1 Cleaning the Lint Filter
For optimal drying performance and to prevent fire hazards, clean the lint filter before or after every load. Pull the lint filter straight up and out. Remove any accumulated lint by hand. Do not wash the lint filter.
5.2 Cleaning the Dryer Interior
Periodically wipe the interior of the dryer drum with a damp cloth. For stubborn stains, use a mild, non-abrasive cleaner. Ensure the drum is dry before operating the dryer. The aluminized steel drum is designed for durability.
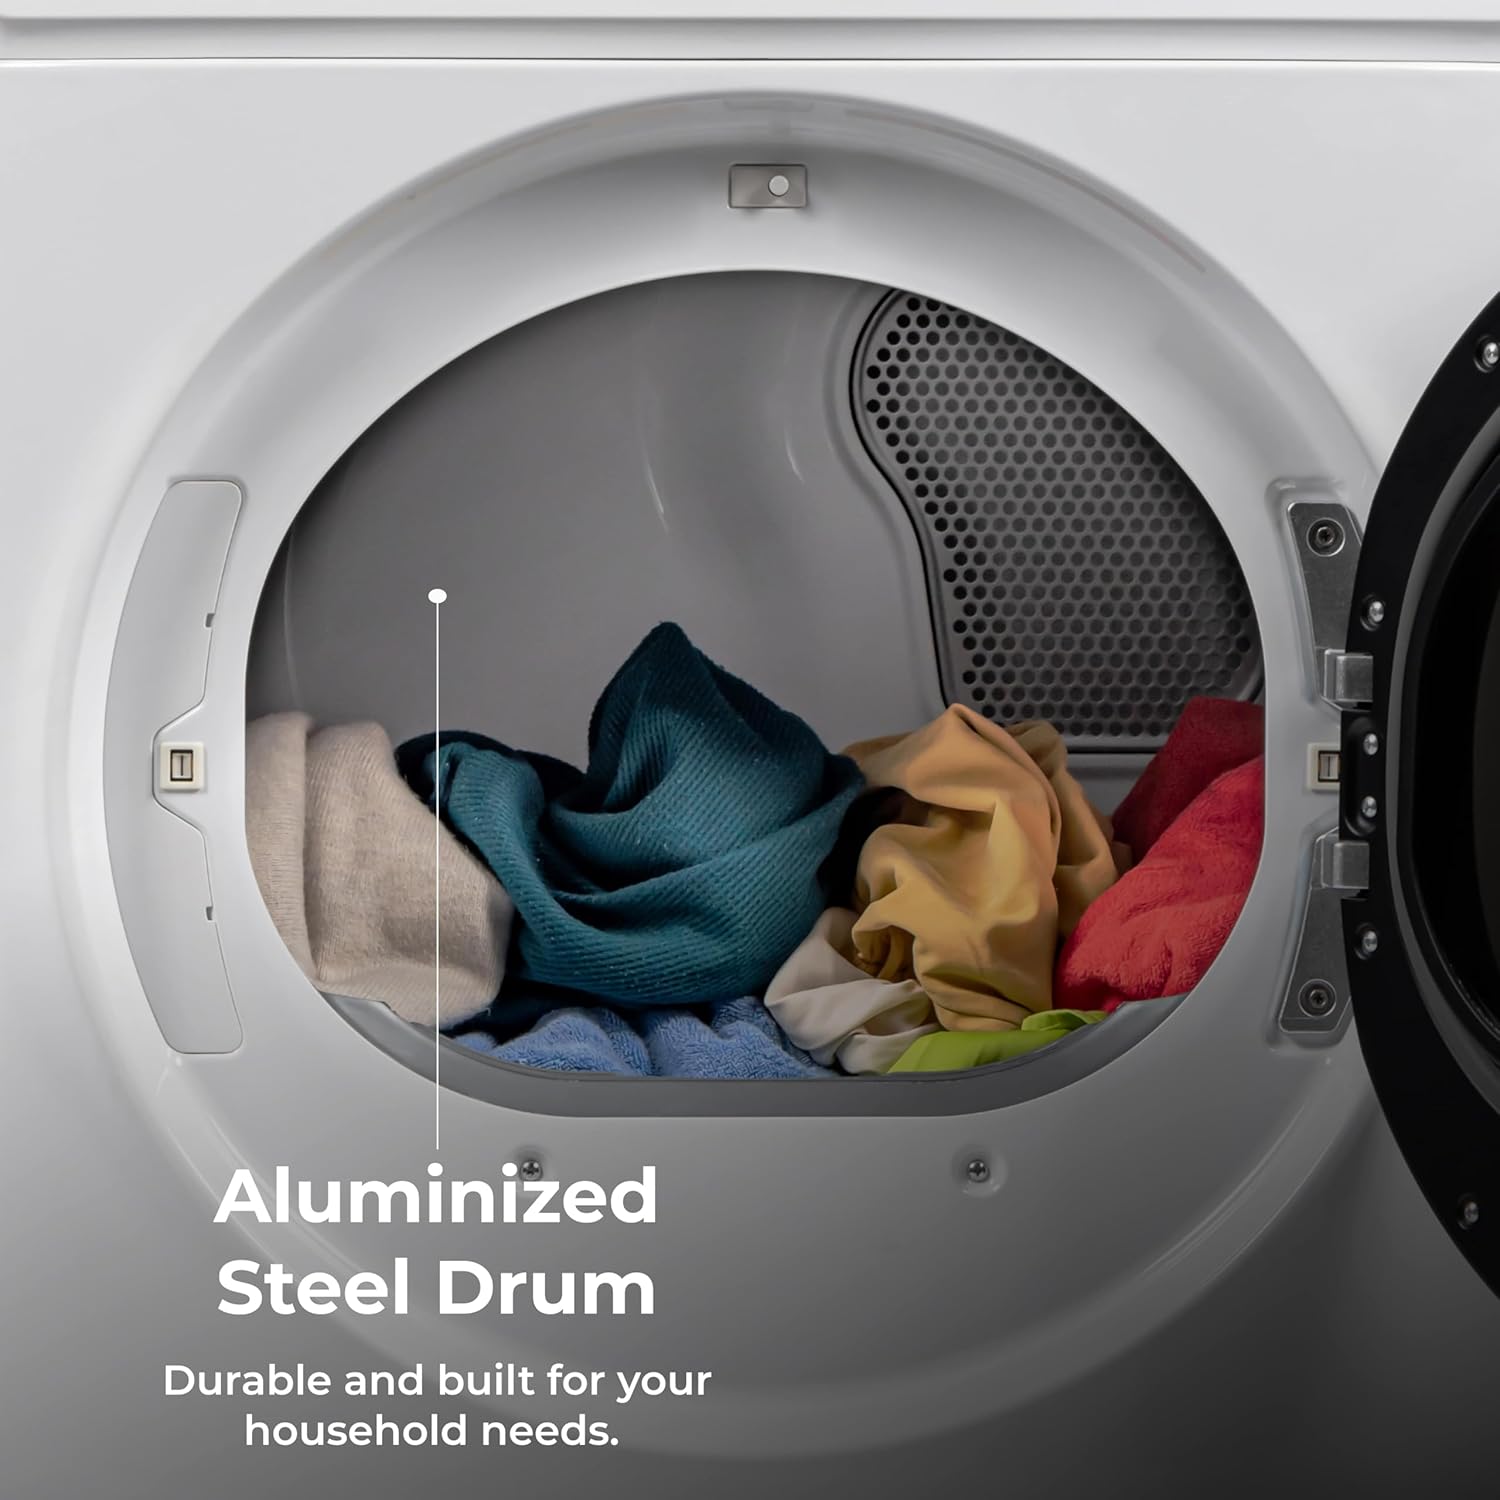
Image 5.1: The durable aluminized steel drum of the Kenmore dryer, built for long-lasting performance.
5.3 Cleaning the Exterior
Wipe the exterior surfaces of the dryer with a soft, damp cloth. Avoid using abrasive cleaners or solvents that could damage the finish. For stainless steel surfaces (if applicable to your model), use a stainless steel cleaner.
5.4 Exhaust Duct Maintenance
The exhaust duct should be inspected and cleaned periodically by qualified service personnel to prevent lint buildup, which can reduce efficiency and pose a fire risk. Keep the area around the exhaust opening free from lint, dust, and dirt.
6. Troubleshooting
Before contacting service, review the following common issues and solutions:
| Problem | Possible Cause | Solution |
|---|---|---|
| Dryer does not start | Power cord unplugged; circuit breaker tripped; door not fully closed; Start button not pressed firmly. | Check power connection; reset breaker; ensure door is latched; press Start button firmly. |
| Clothes are not drying completely | Lint filter clogged; exhaust duct restricted; incorrect cycle selected; overloaded dryer. | Clean lint filter; check and clear exhaust duct; select appropriate cycle; reduce load size. |
| Dryer is noisy | Foreign objects in drum; dryer not level; worn drum rollers or idler pulley. | Check drum for loose items; ensure dryer is level; contact service for internal component issues. |
| Excessive lint on clothes | Lint filter clogged; improper sorting of fabrics; overloaded dryer. | Clean lint filter before each load; sort lint-producing fabrics separately; avoid overloading. |
| Wrinkles in clothes | Clothes left in dryer too long after cycle; dryer overloaded; incorrect cycle/temperature. | Remove clothes promptly; do not overload; use Wrinkle Guard option or Steam Refresh cycle. |
If the problem persists after attempting these solutions, please refer to the Warranty & Support section for assistance.
7. Specifications
| Feature | Detail |
|---|---|
| Brand | Kenmore |
| Model Number | 2682272 |
| Form Factor | Front Load |
| Capacity | 8.0 cubic feet |
| Color | White |
| Dimensions (D x W x H) | 33.67"D x 27"W x 39.75"H |
| Item Weight | 138.6 Pounds |
| Material Type | Alloy Steel, Plastic |
| Door Orientation | Reversible |
| Smart Home Compatibility | Not Smart Home Compatible |
| ENERGY STAR Certified | Yes |
| UPC | 843086124082 |

Image 7.1: Dimensional drawing of the Kenmore 8.0 cu. ft. Front Load Electric Dryer, including height, width, and depth measurements.
8. Warranty & Support
8.1 Product Warranty
This Kenmore appliance comes with a One Year Warranty on Appliance from the date of purchase. This warranty covers defects in materials or workmanship under normal household use. For specific terms and conditions, please refer to the warranty card included with your product or contact Kenmore customer service.
8.2 Customer Support
For technical assistance, service scheduling, or to order replacement parts, please contact Kenmore Customer Support. Have your model number (2682272) and serial number ready when you call.
You can find more information and support resources on the official Kenmore website: www.kenmore.com