Denash Denashkfny6shdpu-12
Denash 12-Key Mechanical Gaming Macro Keypad User Manual
Model: Denashkfny6shdpu-12
Introduction
This manual provides instructions for the Denash 12-Key Mechanical Gaming Macro Keypad. Please read this manual thoroughly before using the product to ensure proper operation and to maximize its features.
The Denash 12-Key Mechanical Gaming Macro Keypad is a compact, wired mini keyboard designed for various applications including gaming, office work, and multimedia control. It features hot-swappable mechanical switches, customizable shortcuts, and RGB lighting.
Package Contents
- 1 x Denash 12-Key Mini Mechanical Keyboard
- 1 x Type-C USB Cable
- 1 x Keycap Puller
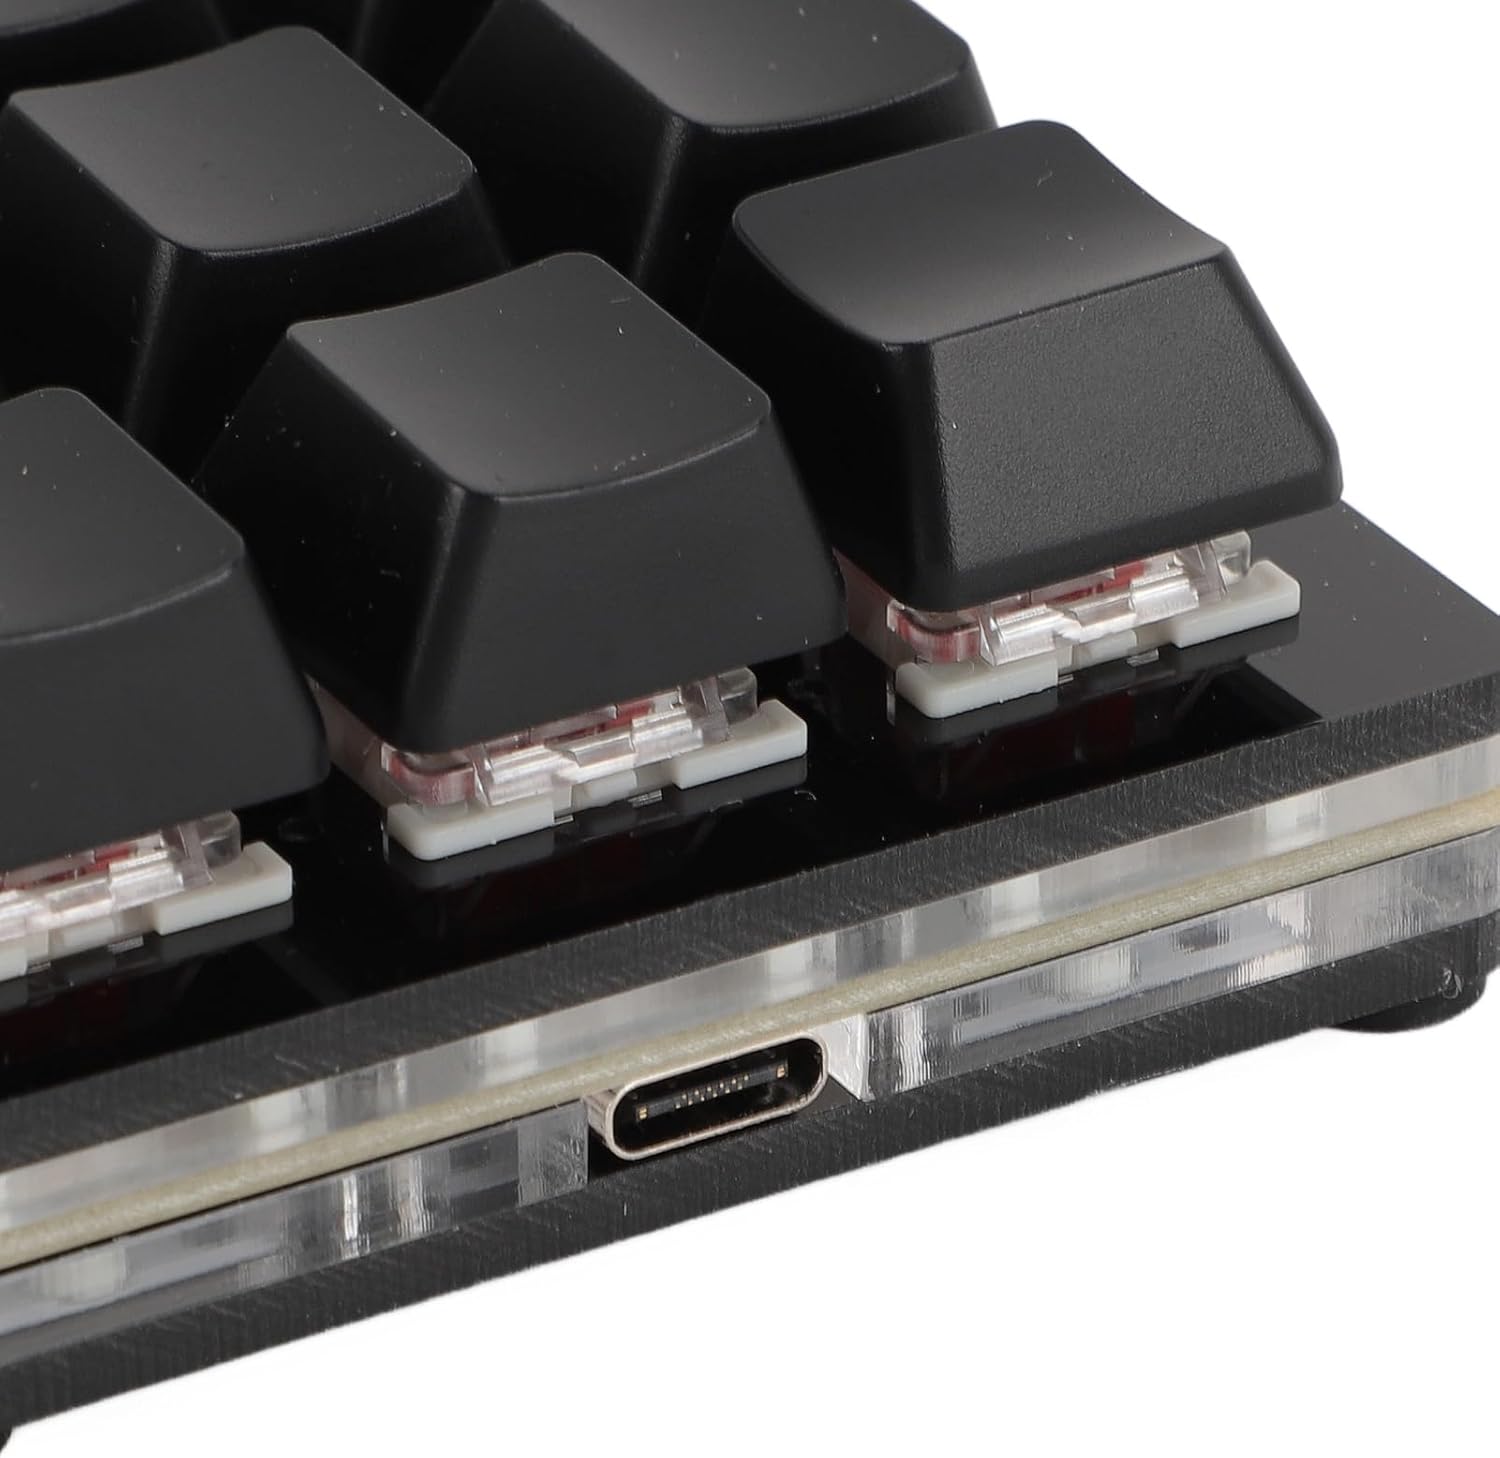
Image: The package includes the 12-key macro keypad, a Type-C USB cable, and a keycap puller tool.
Setup
- Connect the Keypad: Insert the Type-C end of the provided USB cable into the Type-C port on the back of the keypad.
- Connect to Computer: Insert the standard USB-A end of the cable into an available USB port on your computer.
- Plug and Play: The keypad is plug-and-play. Your operating system (Windows, macOS, Linux, Raspberry Pi) should automatically detect and install the necessary drivers. No additional software installation is typically required for basic functionality.

Image: The Type-C USB interface on the keypad, ready for connection to a computer.
Operating Instructions
Basic Functionality
The keypad functions as a standard input device upon connection. Each of the 12 keys can be programmed for various functions.
Customizing Key Functions (Macro Programming)
The Denash 12-Key Macro Keypad supports customizable shortcuts and macro definitions. While specific software for programming is not detailed in the product description, macro keypads typically require dedicated software for advanced customization. Please refer to the manufacturer's website or included documentation for software download and programming instructions.
Common programmable functions include:
- Keyboard Functions: Assign single keys or key combinations (e.g., Ctrl+C, Alt+Tab).
- Mouse Functions: Assign mouse clicks (left, right, middle), scroll up/down, or specific mouse movements.
- Multimedia Functions: Control volume, play/pause, next/previous track.
- String Functions: Input predefined text strings.
- Game Functions: Assign complex in-game commands or sequences.
- Macro Definition: Record and assign a sequence of keystrokes and mouse actions.

Image: An illustration of the six main types of functions that can be assigned to the keypad's keys: Keyboard, Mouse, Multimedia, String, Game, and Macro Definition.
RGB Lighting
The keypad features RGB lighting with adjustable modes. Specific instructions for changing lighting modes are typically found within the customization software or via specific key combinations (if hardware-controlled). Refer to the manufacturer's documentation for detailed instructions on RGB lighting customization.
Maintenance
Cleaning
- Disconnect the keypad from your computer before cleaning.
- Use a soft, dry cloth to wipe the surface of the keypad.
- For stubborn dirt, lightly dampen the cloth with water or a mild, non-abrasive cleaner. Avoid excessive moisture.
- Use compressed air to remove dust and debris from between the keycaps.
Hot-Swappable Switches
This keypad features hot-swappable mechanical switches, allowing you to change switches without soldering. This enables customization of typing feel and easy replacement of faulty switches.
- Remove Keycap: Use the provided keycap puller to gently remove the desired keycap.
- Remove Switch: Use a switch puller (not included, but often comes with replacement switches) to carefully pull the switch straight up from its socket.
- Install New Switch: Align the pins of the new switch with the holes in the PCB. Gently press the switch down until it clicks into place. Ensure the pins are not bent.
- Replace Keycap: Press the keycap onto the new switch stem.

Image: A close-up view of a mechanical switch with its keycap removed, illustrating the hot-swappable nature of the keypad's switches.
Troubleshooting
- Keypad not recognized by computer:
- Ensure the USB cable is securely connected to both the keypad and the computer.
- Try connecting the keypad to a different USB port on your computer.
- Test the keypad on another computer to rule out a computer-specific issue.
- Restart your computer.
- Keys not responding:
- Check for physical obstructions under the keycap.
- If the switch is hot-swappable, try reseating the switch or replacing it with a known working switch.
- Ensure no software conflicts are present if using custom macro software.
- RGB lighting not working or incorrect:
- Verify that the keypad is properly connected and receiving power.
- If using customization software, ensure lighting settings are correctly configured.
- Consult the manufacturer's documentation for specific RGB control instructions.
Specifications
| Item Type | Mini Mechanical Keyboard |
| Material | Acrylic + ABS |
| Key Number | 12 keys |
| Switch Type | Red Mechanical Switch (Hot-Swappable) |
| Connection Type | Type-C Wired |
| Compatible with | Universal for computer (Windows, macOS, Linux, Raspberry Pi) |
| Model Number | Denashkfny6shdpu-12 |
| Dimensions | 7.09 x 5.12 x 1.57 inches (Package) |
| Item Weight | 5.9 ounces |
Warranty and Support
For warranty information and technical support, please refer to the documentation included with your product or visit the official Denash website. Keep your purchase receipt for warranty claims.
Manufacturer: Denash
Ask a question about this manual
Ask about setup, troubleshooting, compatibility, parts, safety, or missing instructions. Manuals+ will review the question and use this page’s manual context to help answer it.