PHOVOLT WiFi Smart Stromzähler
PHOVOLT WiFi Smart Electricity Meter User Manual
Model: WiFi Smart Stromzähler
1. Introduction
The PHOVOLT WiFi Smart Electricity Meter is a dual-channel smart home energy monitor designed to provide real-time electricity consumption data. Equipped with two 80A CT clamps, it allows for independent monitoring of two separate circuits. This device integrates seamlessly with the Tuya Smart Life App, offering remote control, long-term data storage, and calibration functions to help users manage energy usage efficiently and prevent costly repairs.

Figure 1.1: PHOVOLT WiFi Smart Electricity Meter with its components and app interface.
2. Safety Information
Please read all safety warnings and instructions carefully before installing or operating this device. Failure to follow these instructions may result in electric shock, fire, or serious injury.
- Installation should only be performed by qualified personnel in accordance with local electrical codes and regulations.
- Ensure the power supply is completely disconnected before performing any wiring or installation.
- Do not exceed the maximum rated current of 80A per channel.
- Do not expose the device to moisture, extreme temperatures, or corrosive environments.
- Use only the provided CT clamps and ensure they are correctly installed around the live wire.
- Keep the device out of reach of children.
3. Package Contents
Verify that all items listed below are included in your package:
- 1 x PHOVOLT WiFi Smart Electricity Meter
- 2 x 80A CT Clamps
- 1 x User Manual (this document)
4. Product Overview
The PHOVOLT Smart Electricity Meter consists of the main meter unit and two current transformer (CT) clamps. The main unit processes the data from the clamps and communicates with your WiFi network. The CT clamps are designed for non-invasive current measurement.
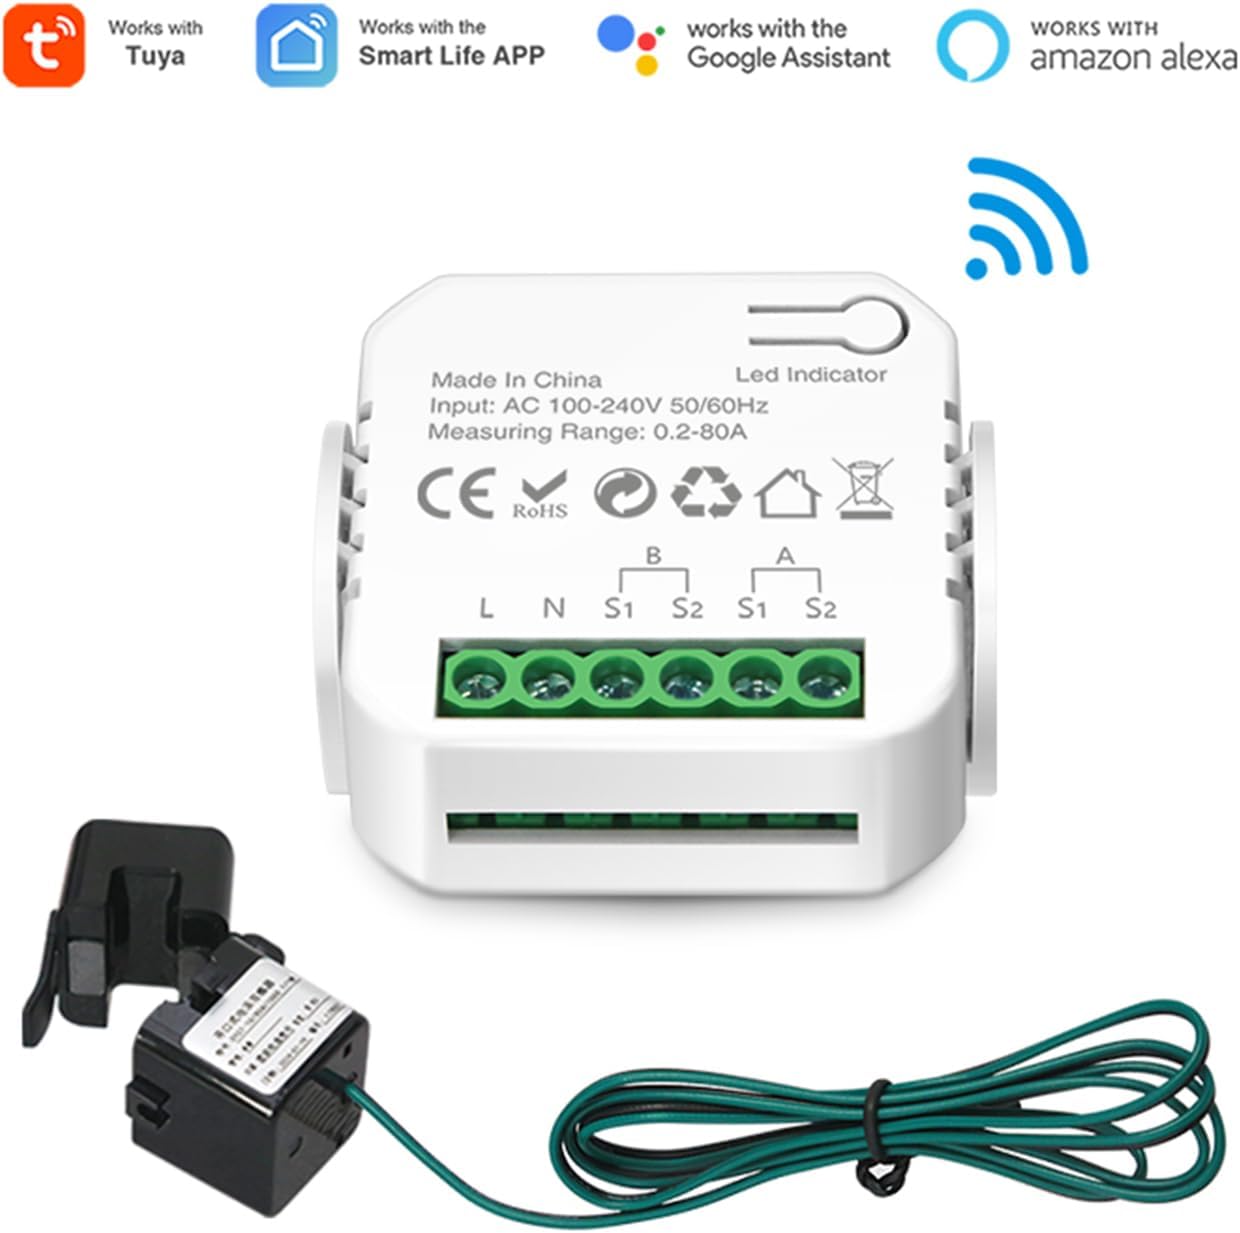
Figure 4.1: The meter unit highlighting its compatibility with various smart home platforms.

Figure 4.2: The meter and CT clamp, illustrating its capacity to monitor various household appliances up to 80A.
5. Setup and Installation
Follow these steps to install and set up your PHOVOLT WiFi Smart Electricity Meter.
5.1 Wiring the Meter
- Power Supply Connection: Connect the power supply wires to the "L" (Live) and "N" (Neutral) terminals on the meter. Ensure the wires are securely tightened using a screwdriver. The meter supports AC 100-240V, 50/60Hz input.
- CT Clamp Connection: Connect the two CT clamps to the meter. Each clamp has two wires (S1 and S2). Insert the wires from the first clamp into the "A (S1 S2)" terminals and the wires from the second clamp into the "B (S1 S2)" terminals. Tighten the screws to secure the connections.
- Clamping the Wires: Once the meter is wired, open the CT clamps and place them around the live wire of the circuit you wish to monitor. For dual-channel monitoring, place each clamp around a separate live wire. The clamps are designed for snap-on installation, requiring no disconnection of existing wiring.

Figure 5.1: Detailed wiring diagram for the meter and CT clamps.

Figure 5.2: Example of product wiring, showing how to clamp the CT around the live wire for load monitoring.

Figure 5.3: The CT clamp design allows for quick, non-invasive installation without disconnecting wires.
5.2 App Pairing and Network Configuration
The meter connects to your home WiFi network (2.4GHz only) via the Tuya Smart Life App. Follow these steps to pair the device:
- Power On and Enter Pairing Mode: After connecting the meter to the power supply, press and hold the LED Indicator button for 5 seconds. The indicator light will flash rapidly, indicating it has entered network configuration state.
- Enable Bluetooth: On your smartphone, ensure Bluetooth is enabled.
- Open Tuya Smart Life App: Launch the Tuya Smart Life App on your smartphone.
- Add Device: Click the "+" icon in the upper right corner of the app to add a new device. The app should automatically discover the "Smart meters" device.
- Connect to WiFi: Select the discovered device. You will be prompted to enter your 2.4GHz WiFi network password. Enter the password and confirm.
- Completion: Once successfully added, the app will confirm the device has been added. Click "Done" to proceed to the device interface.
Video 5.1: A demonstration of the wiring and app pairing process for the PHOVOLT WiFi Smart Electricity Meter. This video shows how to connect the power supply and CT clamps, then guides through the steps of pairing the device with the Tuya Smart Life app, including enabling Bluetooth, adding the device, and entering WiFi credentials.
6. Operating Instructions
Once installed and connected, the PHOVOLT Smart Electricity Meter provides comprehensive energy monitoring through the Tuya Smart Life App.
6.1 Real-Time Monitoring
The app displays real-time data for both Channel A and Channel B, including:
- Voltage (V)
- Current (A)
- Power Factor
- Active Power (W)
- Frequency (Hz)
- Forward Total Charge (kWh)
- Reverse Total Charge (kWh)

Figure 6.1: App interface showing real-time energy consumption data.
6.2 Data Storage and Analysis
The app stores energy consumption records for over a year, allowing you to view historical data by hour, day, month, and year. This feature helps in identifying energy usage patterns and optimizing consumption.
6.3 Multi-Functionality and Automation
The meter can measure power for channels A and B independently, providing clear insights into the power consumption of each monitored circuit. It also supports automation with other Tuya devices, enabling smart energy management scenarios.

Figure 6.2: The meter can be integrated into various home energy setups, including those with solar panels, for comprehensive monitoring.
7. Maintenance
The PHOVOLT WiFi Smart Electricity Meter requires minimal maintenance. Follow these guidelines to ensure optimal performance:
- Cleaning: Wipe the device with a soft, dry cloth. Do not use abrasive cleaners or solvents.
- Firmware Updates: Periodically check the Tuya Smart Life App for available firmware updates to ensure your device has the latest features and security enhancements.
- Connection Check: Occasionally verify that all wiring connections are secure and that the CT clamps are properly seated on the wires.
8. Troubleshooting
If you encounter issues with your PHOVOLT WiFi Smart Electricity Meter, refer to the following common problems and solutions:
| Problem | Possible Cause | Solution |
|---|---|---|
| Device not connecting to app/WiFi. | Incorrect WiFi password, 5GHz WiFi network, device not in pairing mode, weak WiFi signal. | Ensure you are using a 2.4GHz WiFi network. Re-enter WiFi password carefully. Press and hold the LED indicator for 5 seconds until it flashes rapidly to enter pairing mode. Move the device closer to your WiFi router. |
| No power readings or incorrect readings. | CT clamps not properly installed, loose wiring connections, faulty CT clamp or meter. | Verify that the CT clamps are securely closed around the live wire and that the S1/S2 connections are tight. Check L/N power supply connections. If issues persist, contact customer support. |
| App shows "Offline". | Loss of WiFi connection, power outage to the meter. | Check your home WiFi network. Ensure the meter has continuous power. If WiFi is stable, try restarting the meter by unplugging and re-plugging it. |
9. Specifications
| Feature | Detail |
|---|---|
| Model Number | WiFi Smart Stromzähler |
| Input Voltage | AC 100-240V |
| Frequency | 50/60Hz |
| Measuring Range | 0.2-80A (per channel) |
| CT Clamps | 2 PCS 80A |
| Connectivity | WiFi (802.11 B/G/N20, 2.4GHz) |
| App Compatibility | Tuya Smart Life App |
| Product Dimensions | 1.77 x 1.77 x 1.97 inches |
| Item Weight | 5.3 ounces |
| Manufacturer | PHOVOLT |
| Country of Origin | China |
10. Warranty and Support
PHOVOLT products are designed and manufactured to the highest quality standards. For warranty information and technical support, please refer to the contact details provided on the product packaging or visit the official PHOVOLT website. Please retain your proof of purchase for warranty claims.
Ask a question about this manual
Ask about setup, troubleshooting, compatibility, parts, safety, or missing instructions. Manuals+ will review the question and use this page’s manual context to help answer it.