1. Introduction
This manual provides essential information for the safe and efficient operation of your new VESTEL WMI 89341 washing machine. Please read these instructions carefully before installation, use, and maintenance. Keep this manual for future reference.
The VESTEL WMI 89341 is an 8 kg front-loading washing machine designed for medium-sized households. It features a 1400 rpm spin speed, an Inverter Motor for quiet and energy-efficient operation, a steam function for wrinkle reduction and hygiene, and an AquaStop system for water damage protection. Its built-in design allows for flexible integration into your home.
2. Safety Information
General Safety:
- Ensure the washing machine is properly installed and leveled before first use.
- Do not allow children to play with or operate the appliance.
- Keep packaging materials out of reach of children.
- Do not touch the plug with wet hands.
- Unplug the appliance before cleaning or maintenance.
- Do not open the detergent drawer or door during a wash cycle, especially at high temperatures.
- In case of malfunction, switch off the appliance and disconnect it from the power supply. Do not attempt to repair it yourself.
Electrical Safety:
- Connect the appliance to a grounded outlet with the correct voltage (220 Volts).
- Do not use extension cords or multiple adapters.
- Ensure the power cord is not trapped or damaged.
Water Safety:
- The AquaStop system provides protection against water damage. Regularly check hoses for wear and tear.
- Ensure water inlet and drain hoses are securely connected to prevent leaks.
3. Product Overview
3.1 Dimensions
The VESTEL WMI 89341 washing machine has the following dimensions:
- Depth: 55.7 cm
- Width: 59.7 cm
- Height: 84.5 cm
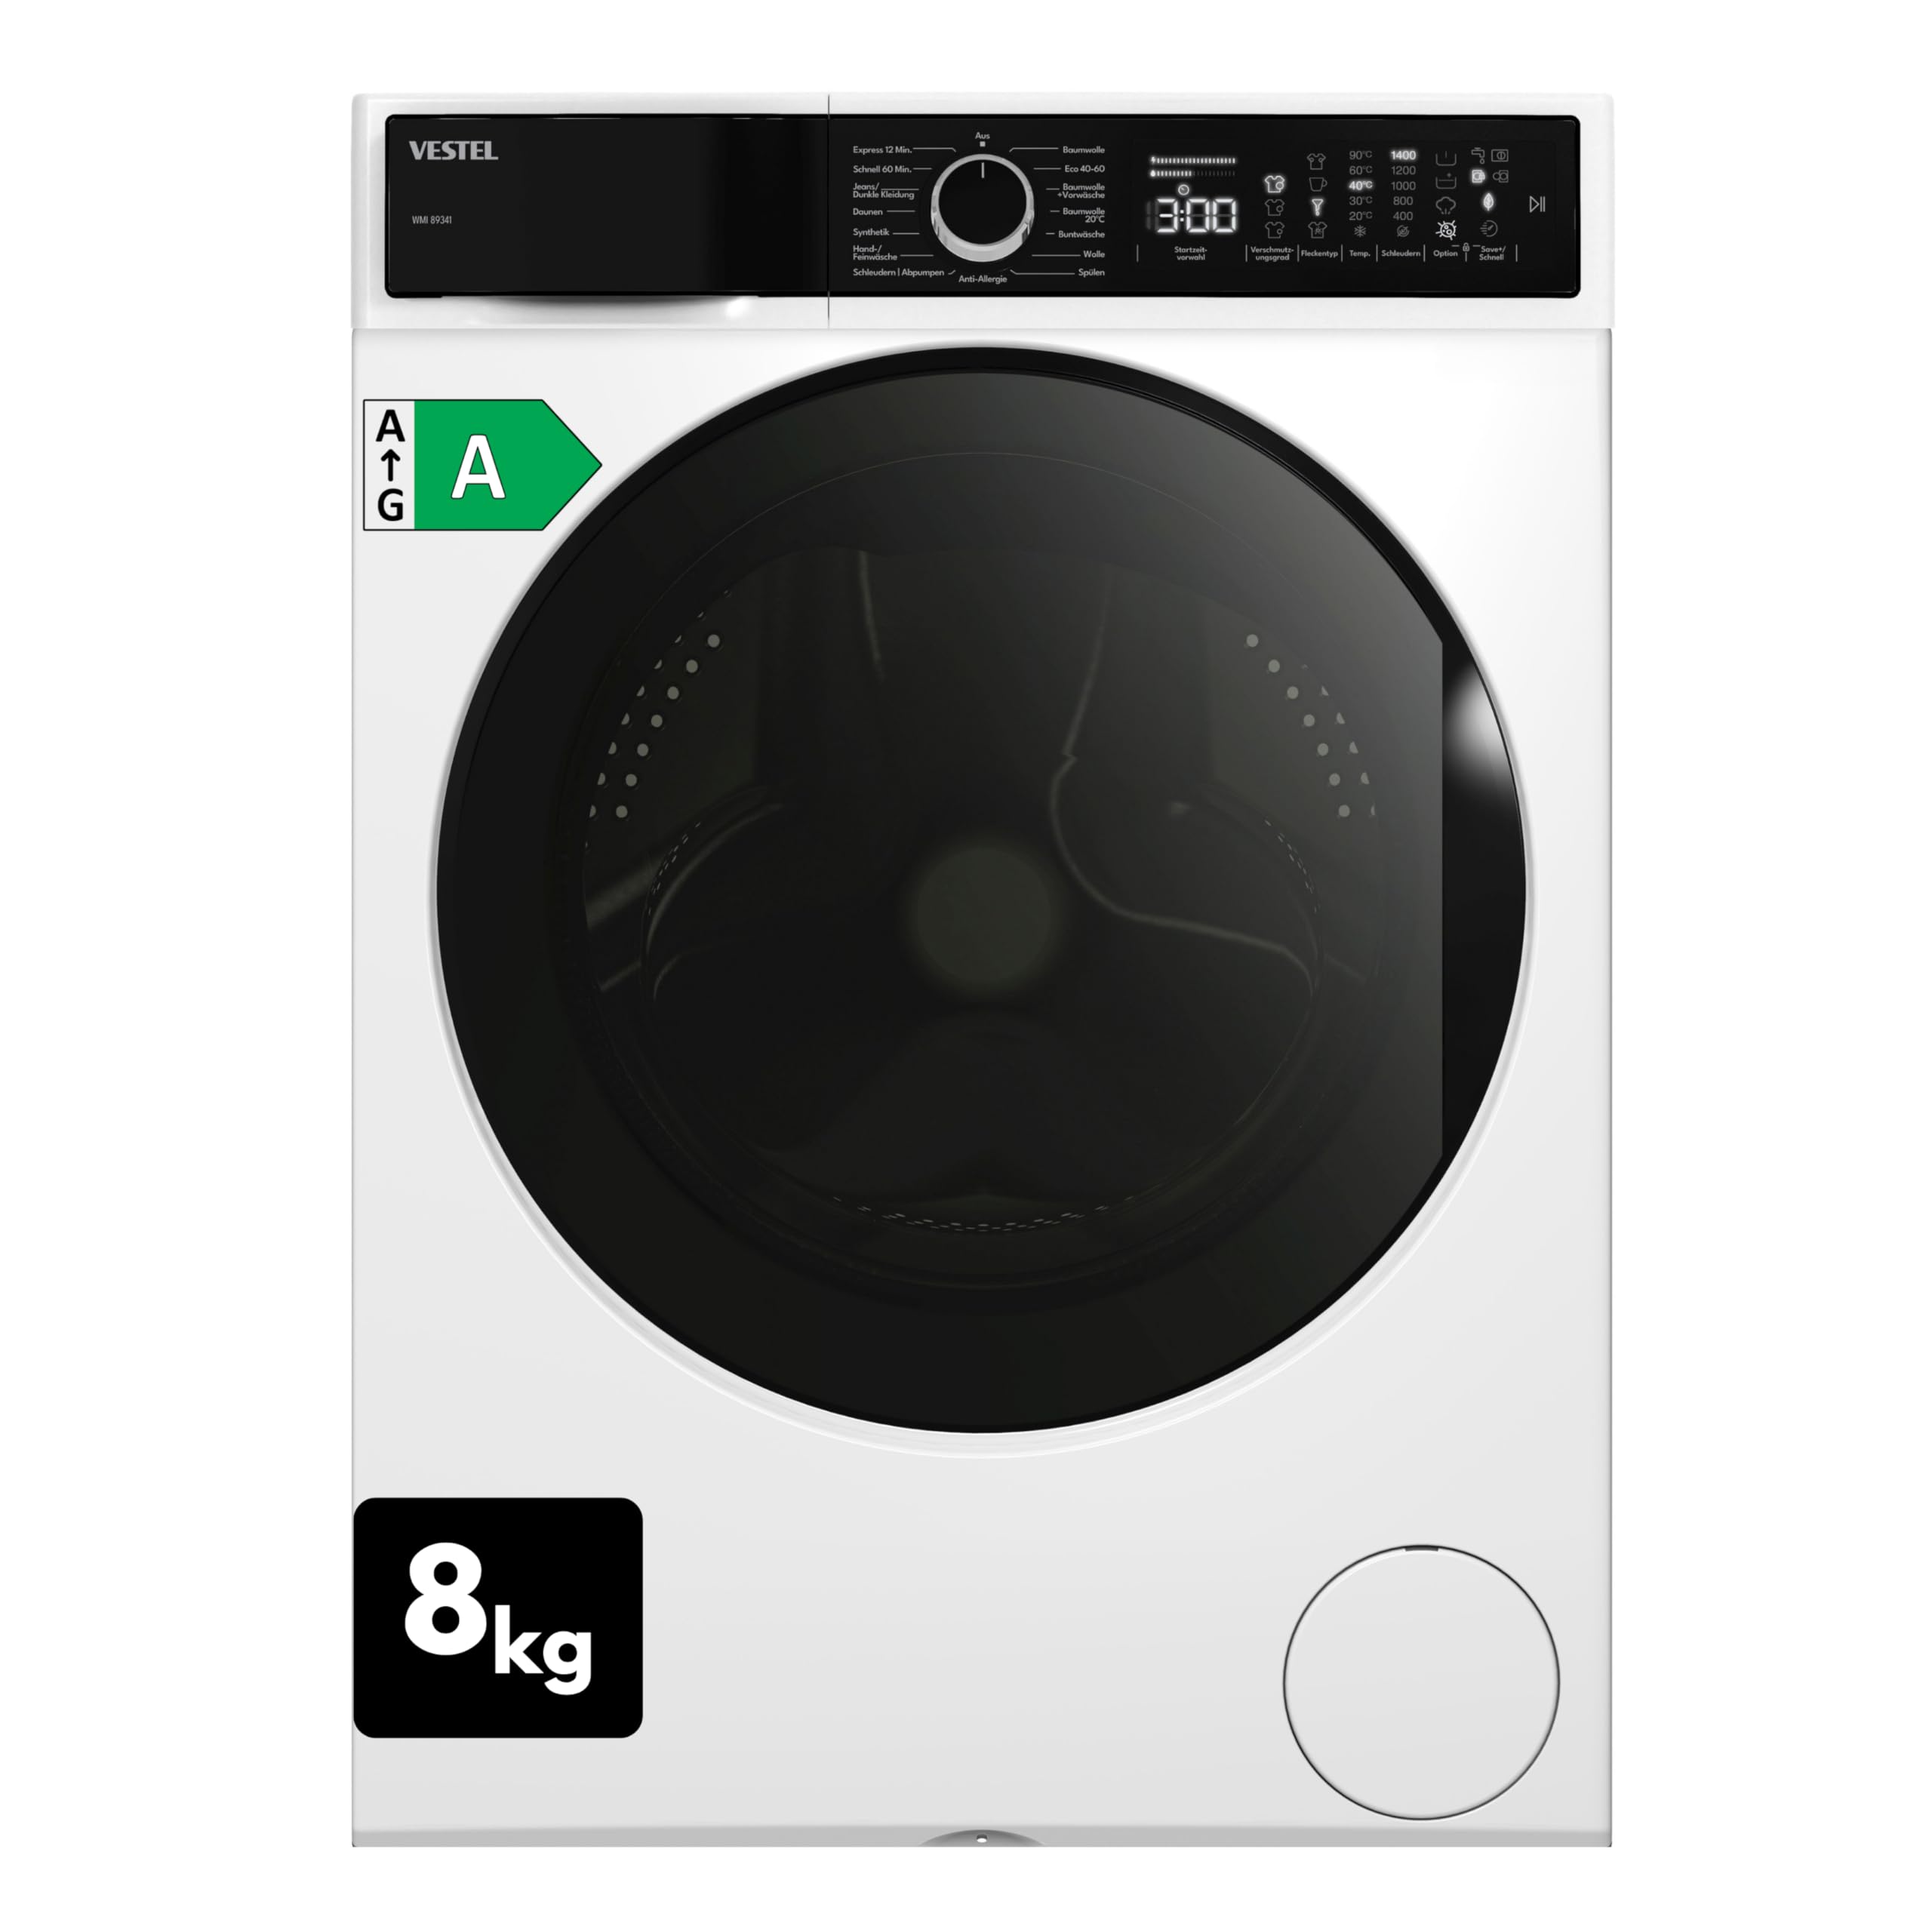
3.2 Key Features
- 8 kg Capacity: Ideal for medium-sized households.
- 1400 rpm Spin Speed: Ensures efficient water extraction for shorter drying times.
- Inverter Motor: Provides energy-efficient, quiet, and durable operation.
- Steam Function: Reduces wrinkles and eliminates bacteria for hygienic laundry.
- AquaStop System: Integrated safety system to protect against water damage.
- Delayed Start: Allows scheduling wash cycles up to 23 hours in advance.
- Twin Jet System: Improves washing performance through direct water and detergent injection via a circulation system and two nozzles.
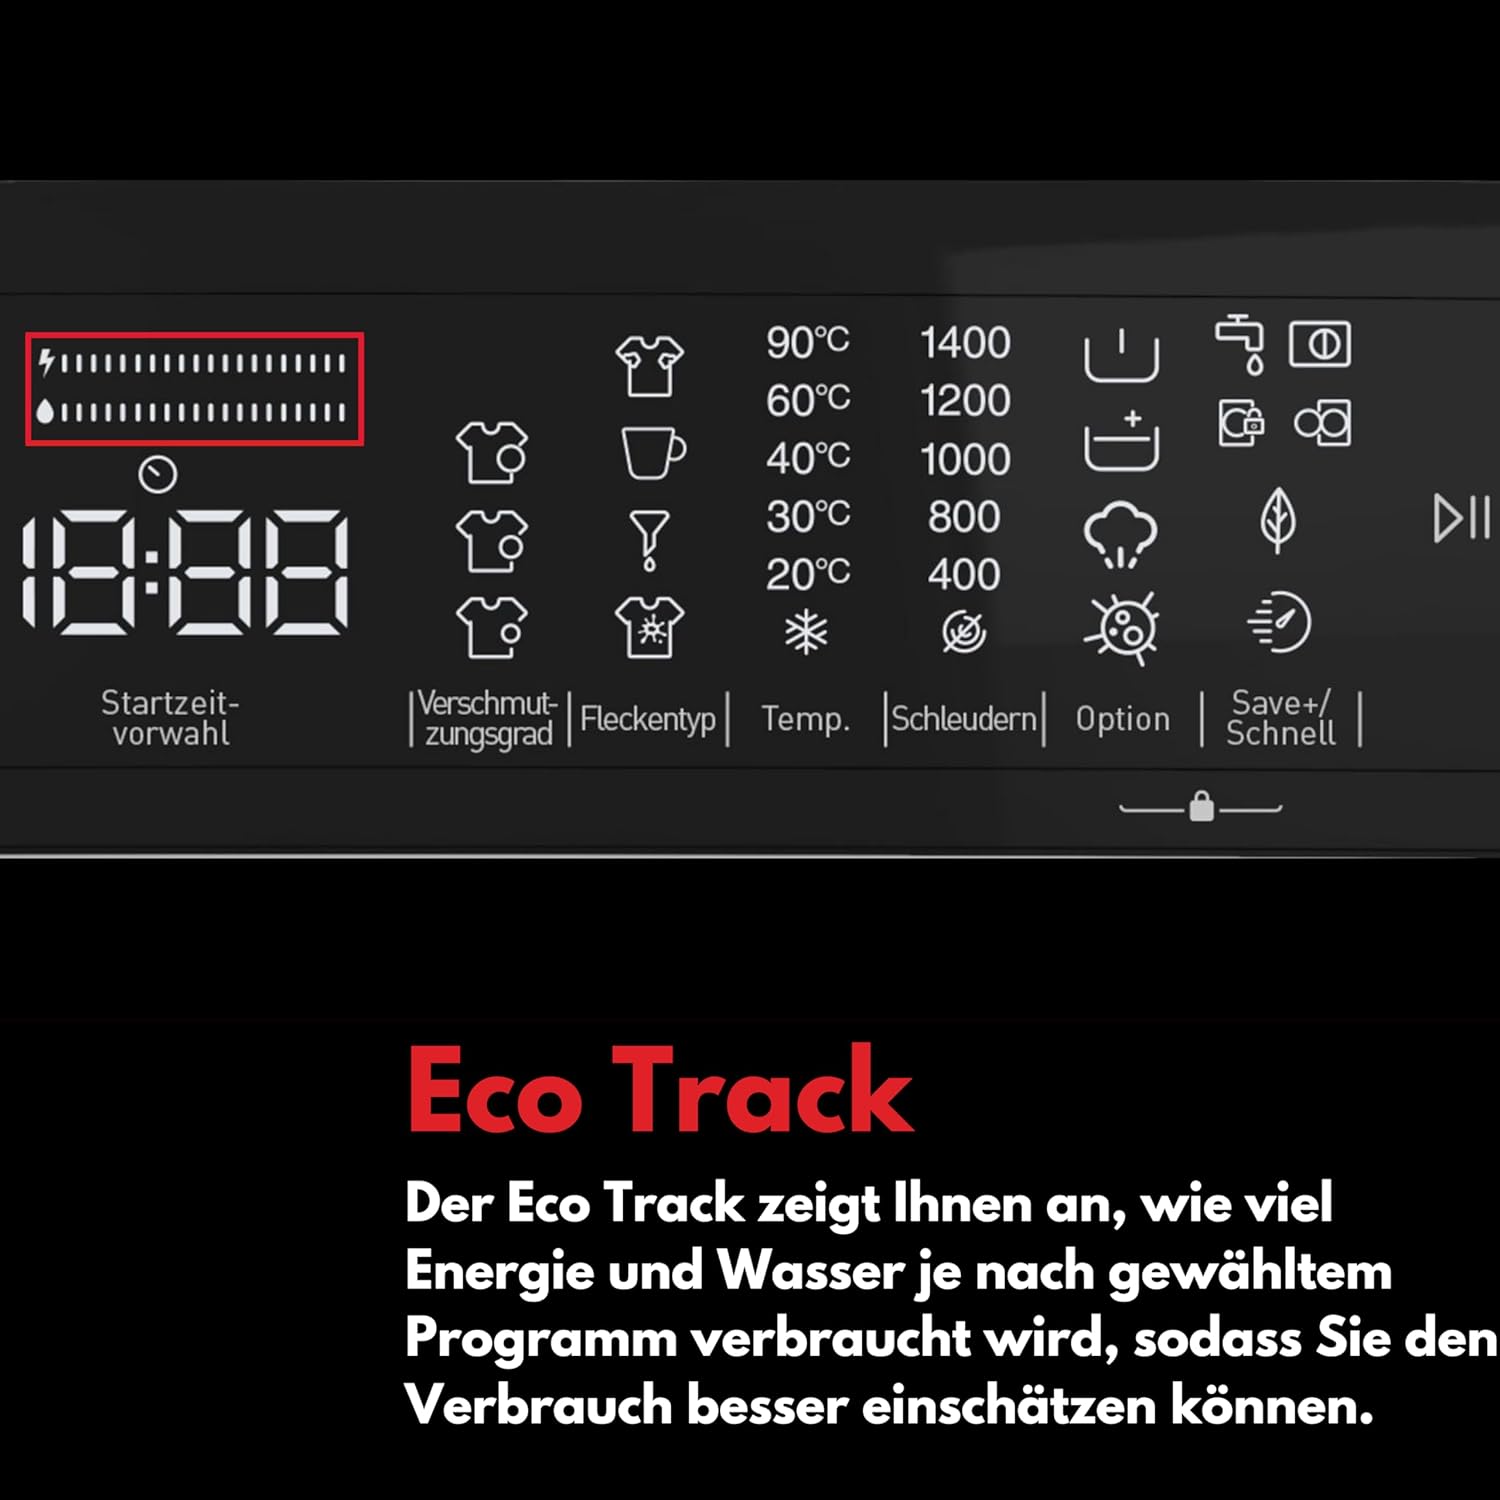
- Eco Track: Displays energy and water consumption for selected programs.


4. Setup and Installation
4.1 Unpacking
- Carefully remove all packaging materials.
- Remove all transport bolts from the rear of the machine. Keep them for future transport.
- Check for any damage during transit. If damaged, do not install and contact your retailer.
4.2 Positioning
- Place the washing machine on a firm, level surface.
- Adjust the leveling feet to ensure the machine is stable and does not wobble. Proper leveling reduces vibration and noise.
- Ensure there is adequate space around the machine for ventilation and maintenance.
- This model is designed for built-in installation. Ensure the dimensions match your cabinet space.
4.3 Water Connection
- Connect the water inlet hose (AquaStop hose included) to a cold water tap with a 3/4" thread. Ensure the connection is tight to prevent leaks.
- Place the other end of the inlet hose securely to the water inlet valve at the back of the washing machine.
- Connect the drain hose to a standpipe or a sink trap, ensuring it is securely fixed and positioned at an appropriate height (between 60 cm and 100 cm from the floor).
4.4 Electrical Connection
- Plug the power cord into a grounded electrical outlet (220V).
- Ensure the socket is easily accessible after installation.
5. Operating Instructions
5.1 Control Panel Overview
The control panel features a program selection dial, a digital display, and various option buttons.


5.2 Loading Laundry
- Sort laundry by fabric type, color, and degree of soiling.
- Open the door and load the laundry without overfilling the drum. Leave enough space for clothes to move freely.
- Close the door firmly.
5.3 Adding Detergent and Additives
- Pull out the detergent drawer.
- Add detergent to the main wash compartment.
- Add fabric softener or other additives to their respective compartments.
- Push the detergent drawer back in completely.
5.4 Program Selection
Turn the program selection dial to choose one of the 15 available wash programs. The display will show the default settings for the selected program.

Available Programs:
- Cotton: For durable cotton items.
- Eco 40-60: Energy-efficient program for normally soiled cotton laundry washable at 40°C or 60°C.
- Cotton + Prewash: For heavily soiled cotton items.
- Cotton 20°: For lightly soiled cotton items at low temperature.
- Mixed Laundry: For mixed loads of cotton and synthetic fabrics.
- Wool: Gentle program for woolens and delicate items.
- Rinse: Additional rinse cycle.
- Anti-Allergy: Program designed to remove allergens.
- Spin: Drains water and spins laundry.
- Hand/Delicate Wash: For very delicate items requiring hand wash care.
- Synthetics: For synthetic or mixed fabric items.
- Down: For items filled with down or feathers.
- Jeans/Dark Clothes: Specific program for jeans and dark-colored garments.
- Quick 60 Min.: A fast wash program for lightly soiled items.
- Express 12 Min.: Very quick refresh cycle for minimal soiling.
5.5 Program Options
After selecting a program, you can customize it using the option buttons:
- Startzeit (Delayed Start): Set a delay for the wash cycle to start from 1 to 23 hours.
- Verschmutzungsgrad (Soil Level): Adjust the wash intensity based on the degree of soiling.
- Fleckentyp (Stain Type): Select from specific stain types (oil, sweat, coffee, or mixed stains) for optimized cleaning.
- Temperatur (Temperature): Adjust the wash temperature. Cold wash is also possible.
- Schleudern (Spin): Adjust the spin speed or select no spin.
- Optionen (Options): Access additional options like prewash, extra rinse, steam, and anti-allergy for individual care.
- Öko/Schnell (Eco/Quick): Choose between an eco-friendly wash (lower water/energy) or a quick wash (higher water/energy).
5.6 Starting a Wash Cycle
- After loading laundry, adding detergent, selecting a program, and choosing desired options, press the Start/Pause button to begin the cycle.
- The display will show the remaining time.
5.7 Ending a Wash Cycle
- Once the cycle is complete, the machine will signal with an audible alert (if enabled) and the display will indicate "End".
- Open the door and remove the laundry.
- Leave the door slightly ajar to allow the drum to air dry and prevent odors.
6. Maintenance
Regular maintenance ensures the longevity and optimal performance of your washing machine.
6.1 Cleaning the Detergent Drawer
- Pull out the detergent drawer completely.
- Remove any residue from the compartments under running water.
- Clean the drawer housing with a brush.
- Reinsert the detergent drawer.
6.2 Cleaning the Drum
- Run a maintenance wash cycle (e.g., a hot cotton cycle with no laundry and a descaling agent or washing machine cleaner) periodically to prevent odor and limescale buildup.
- Wipe the inside of the door seal with a damp cloth after each wash to remove lint and residue.
6.3 Cleaning the Pump Filter
- The pump filter should be cleaned regularly (e.g., every 3 months) to prevent blockages.
- Locate the filter cover at the bottom front of the machine.
- Place a shallow container underneath to catch any residual water.
- Carefully open the cover and unscrew the filter.
- Remove any lint, coins, or foreign objects.
- Clean the filter under running water and screw it back in securely. Close the cover.
6.4 Cleaning the Exterior
- Wipe the exterior surfaces with a soft, damp cloth.
- Do not use abrasive cleaners or solvents.
7. Troubleshooting
Before contacting customer service, please check the following common issues and solutions:
| Problem | Possible Cause | Solution |
|---|---|---|
| Machine does not start. | Power cord not plugged in; door not closed properly; program not selected; Start/Pause button not pressed. | Check power connection; ensure door is latched; select a program; press Start/Pause. |
| No water intake. | Water tap closed; inlet hose kinked or blocked; water pressure too low. | Open water tap; straighten hose; check water supply. |
| Water not draining. | Drain hose kinked or blocked; pump filter clogged. | Straighten drain hose; clean pump filter (see Maintenance section). |
| Excessive vibration/noise. | Machine not level; transport bolts not removed; uneven load. | Adjust leveling feet; remove transport bolts; redistribute laundry in the drum. |
| Detergent residue in drawer. | Insufficient water pressure; detergent clumping; drawer not cleaned. | Check water pressure; use less detergent or liquid detergent; clean detergent drawer. |
If the problem persists after checking these points, please contact Vestel customer service.
8. Specifications
| Feature | Value |
|---|---|
| Brand | Vestel |
| Model Number | WMI 89341 (10829496) |
| Capacity | 8 kg |
| Maximum Spin Speed | 1400 rpm |
| Dimensions (D x W x H) | 55.7 cm x 59.7 cm x 84.5 cm |
| Weight | 69 kg |
| Color | White |
| Access Location | Front Load |
| Control Type | Knob |
| Voltage | 220 Volts |
| Drum Material | Stainless Steel |
| Special Features | Remaining Time Display, Delayed Start, Steam Function, Inverter Motor, AquaStop System |
| Included Components | Aqua-Stop Hose, Drain Hose |


For detailed energy information, refer to the EU product database: https://eprel.ec.europa.eu/qr/2049336
9. Warranty and Support
Your VESTEL WMI 89341 washing machine comes with a manufacturer's warranty of 24 months from the date of purchase.
This warranty covers manufacturing defects and material faults under normal use. It does not cover damage caused by improper installation, misuse, neglect, or unauthorized repairs.
For warranty claims, technical support, or spare parts, please contact your retailer or Vestel customer service. Please have your model number (WMI 89341) and proof of purchase ready.