1. Product Overview
The BAKON BK8586D is a versatile 2-in-1 workstation integrating a soldering iron station and a hot air rework station. Designed for electronics repair, DIY projects, and professional applications, it offers precise temperature control and efficient operation for various soldering and desoldering tasks.

Figure 1: BAKON BK8586D Soldering Station and included accessories.
Key Features:
- Dual Functionality: Combines a soldering iron and a hot air gun in one compact unit.
- Independent Control: Separate power switches, LED displays, and temperature/airflow adjustments for each function.
- Precise Temperature Control: Built-in PID program for stable and accurate temperature regulation for both soldering iron and hot air gun.
- Automatic Sleep Mode: Extends heating element lifespan and enhances safety for the soldering iron.
- Hot Air Standby: Automatic cool-down function for the hot air gun when placed in its holder, improving safety and longevity.
- Comprehensive Kit: Includes various soldering tips, hot air nozzles, desoldering tools, and cleaning accessories.
2. Safety Instructions
Read and understand all safety warnings and instructions before operating this device. Failure to follow these instructions may result in electric shock, fire, or serious injury.
- Always operate the unit in a well-ventilated area to avoid inhaling fumes from solder and flux.
- Wear appropriate personal protective equipment, including safety glasses, to protect against splashes of molten solder.
- The soldering iron tip and hot air nozzle reach very high temperatures. Avoid direct contact with skin or flammable materials.
- Always place the hot air gun in its holder and the soldering iron in its stand when not in use.
- Ensure the power cord is securely connected and the unit is properly grounded.
- Do not use the unit near water or in damp conditions.
- Unplug the unit from the power outlet before cleaning or performing maintenance.
- Keep out of reach of children.
- This product is designed for 110V US power supply only.
3. Package Contents
Verify that all items are present in the package:
- BAKON BK8586D Soldering and Hot Air Rework Station
- Soldering Iron with Stand
- Hot Air Gun with Holder
- 5 Soldering Tips (I/B/K/2.4D/3C)
- 2 Hot Air Nozzles
- Desoldering Pump
- Tin Wire
- Brass Cleaner
- Sponge
- Solder Sucker Tape
- Power Cord
- User Manual
4. Product Diagram
Familiarize yourself with the components and controls of the BK8586D workstation.

Figure 2: Front panel and component identification.
- Wind Gun Mouth
- Heat Gun Handle
- Air Gun Bracket
- Temperature Control Key (Up/Down)
- Display Screen
- Display Switchover
- °C/°F Indicator
- Stainless Steel Tip Enclosure
- Heat-Resistant Anti-Slip Handle (Soldering Iron)
- Heat-Resistant Bakelite Threaded Sleeve
- Soldering Iron Stand
- Cleaning Ball
- Sponge
- Lead-Free Soldering Iron Tip
- Hot Air Blower Switch
- Soldering Heating Switch
- Hot Air Volume Knob
5. Setup Instructions
Follow these steps to set up your BAKON BK8586D workstation.
5.1 Unpacking and Initial Inspection
- Carefully remove all components from the packaging.
- Inspect the unit and accessories for any signs of damage. If damage is found, do not operate the unit and contact customer support.
- Ensure all transit screws (if any, typically on the bottom for pump protection) are removed before operation. Refer to the specific instructions for your model.
5.2 Installing the Hot Air Gun Bracket
The hot air gun bracket can be mounted on either side of the main unit.
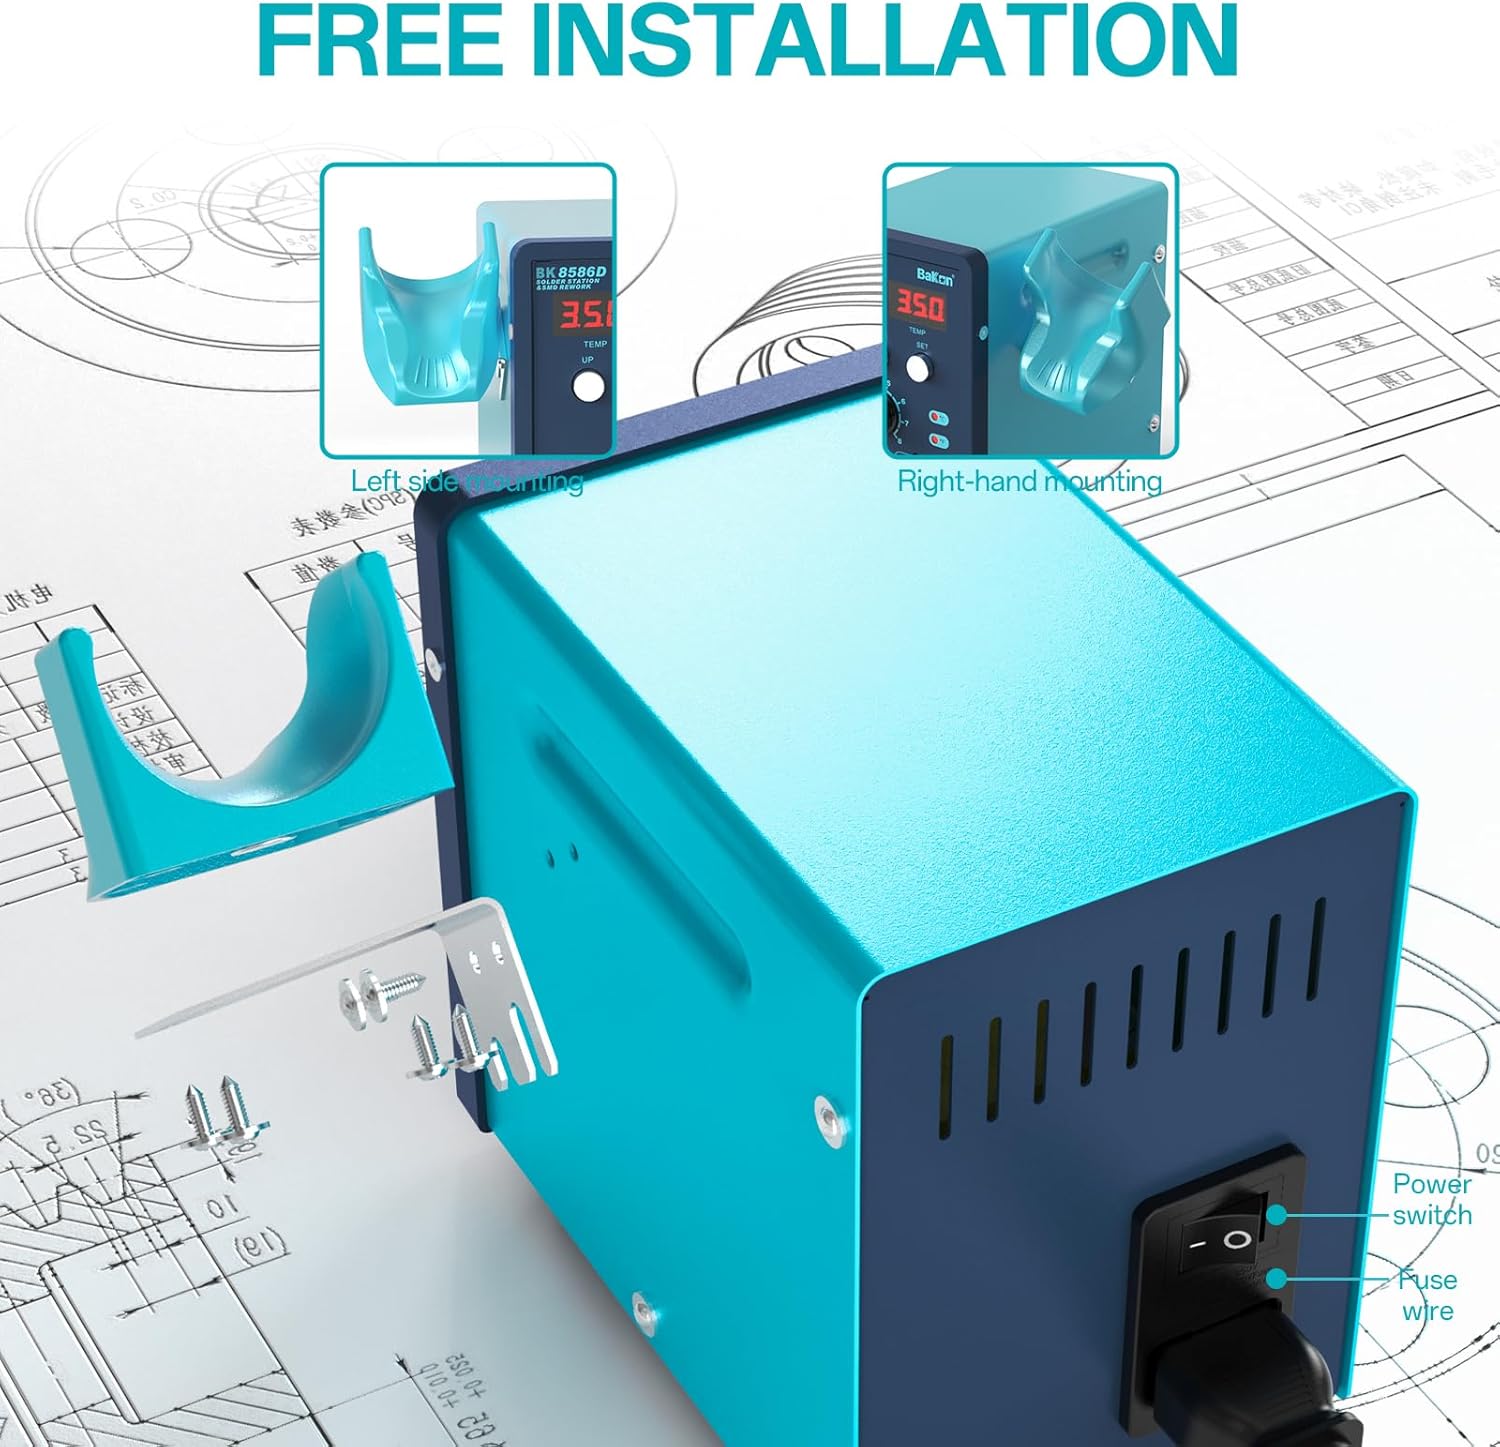
Figure 3: Hot air gun bracket installation.
- Identify the mounting holes on the side of the main unit where you wish to attach the bracket.
- Align the bracket with the holes and secure it using the provided screws.
- Place the hot air gun into the installed bracket when not in use.
5.3 Connecting Components
- Connect the soldering iron cable to the designated port on the front panel (labeled 'SOLDER').
- Connect the hot air gun cable to the designated port on the front panel (labeled 'REWORK').
- Place the soldering iron into its stand, ensuring the sponge is moistened and the brass cleaner is in place.
5.4 Power Connection
- Ensure both the 'REWORK' and 'SOLDER' switches on the front panel are in the OFF position.
- Connect the power cord to the power inlet on the rear of the unit.
- Plug the power cord into a standard 110V AC power outlet.
6. Operating Instructions
6.1 Powering On/Off
- To power on the unit, flip the main power switch located on the rear of the unit to the 'ON' position.
- To activate the soldering iron, flip the 'SOLDER' switch on the front panel to 'ON'.
- To activate the hot air gun, flip the 'REWORK' switch on the front panel to 'ON'.
- To power off, reverse these steps. Always turn off individual functions before turning off the main power.
6.2 Soldering Iron Operation

Figure 4: Soldering iron in use with key features.
- Temperature Adjustment: Use the 'UP' and 'DOWN' buttons next to the 'SOLDER' display to set the desired temperature (range: 356-896°F / 180-480°C). The display will show the set temperature and then the actual temperature.
- Automatic Sleep Mode: The soldering iron will automatically enter sleep mode after a period of inactivity (typically 1-99 minutes, adjustable). This reduces tip oxidation and extends heater life. To wake it, simply pick up the iron.
- Changing Tips: Ensure the iron is cool or use a heat-resistant tool. Unscrew the retaining sleeve and carefully pull out the tip. Insert the new tip and secure the sleeve.
6.3 Hot Air Gun Operation

Figure 5: Hot air gun in use with key features.
- Temperature Adjustment: Use the 'UP' and 'DOWN' buttons next to the 'REWORK' display to set the desired temperature (range: 212-932°F / 100-500°C).
- Airflow Adjustment: Use the 'Hot Air Volume Knob' to adjust the airflow rate. Start with a lower setting and increase as needed for your application.
- Hot Air Standby Mode: When the hot air gun is placed in its holder, it will automatically cool down and enter standby mode, preserving the heating element and ensuring safety. It will resume operation when removed from the holder.
- Changing Nozzles: Ensure the hot air gun is cool. Select the appropriate nozzle size and attach it securely to the gun's outlet.
6.4 Temperature Unit Conversion (°C/°F)
To switch between Celsius and Fahrenheit, press and hold both the 'UP' and 'DOWN' buttons for the respective function (SOLDER or REWORK) simultaneously for a few seconds until the unit changes.
7. Maintenance
Regular maintenance ensures optimal performance and extends the lifespan of your workstation.
7.1 Soldering Iron Tip Maintenance
- Cleaning: Regularly clean the soldering tip using the brass cleaner or a damp sponge. This removes oxidized solder and flux residue.
- Tinning: After cleaning and before storage, always tin the tip with a small amount of fresh solder to prevent oxidation.
- Replacement: Replace tips when they become excessively pitted or corroded, as this affects heat transfer and soldering quality.
7.2 Hot Air Nozzle Maintenance
- Ensure nozzles are free from debris or blockages. Clean with a soft brush if necessary.
- Allow the hot air gun to cool completely before handling nozzles.
7.3 General Unit Cleaning
- Disconnect the unit from power before cleaning.
- Wipe the exterior of the unit with a soft, dry cloth. Do not use abrasive cleaners or solvents.
- Keep ventilation openings clear of dust and debris.
8. Troubleshooting
If you encounter issues with your BAKON BK8586D, refer to the following common problems and solutions.
| Problem | Possible Cause | Solution |
|---|---|---|
| Unit does not power on. | No power from outlet; power cord loose; main power switch off. | Check power outlet; ensure power cord is securely connected; verify main power switch is ON. |
| Soldering iron not heating. | 'SOLDER' switch off; temperature set too low; faulty heating element/tip. | Turn 'SOLDER' switch ON; increase temperature setting; inspect/replace soldering tip. |
| Hot air gun not heating or no airflow. | 'REWORK' switch off; temperature/airflow set too low; nozzle blocked; faulty heating element/fan. | Turn 'REWORK' switch ON; increase temperature/airflow; check for nozzle blockages; ensure gun is not in standby if removed from holder. |
| Temperature display erratic. | Sensor issue; loose connection. | Ensure connections are secure. If problem persists, contact support. |
If the problem persists after attempting these solutions, please contact BAKON customer support.
9. Specifications
| Feature | Specification |
|---|---|
| Model | BK8586D |
| Power Source | AC |
| Voltage | 110 Volts (AC) |
| Total Wattage | 640 watts |
| Soldering Iron Wattage | Up to 90W |
| Soldering Iron Temperature Range | 356-896°F (180-480°C) |
| Hot Air Gun Wattage | Up to 550W |
| Hot Air Gun Temperature Range | 212-932°F (100-500°C) |
| Display Type | LED |
| Item Weight | 4.29 pounds |
| Package Dimensions | 11.34 x 10 x 4.88 inches |
| Special Features | 2-in-1 Soldering Iron and Hot Air Rework Station |
10. Warranty and Support
This BAKON BK8586D workstation comes with a 1-year US technical support warranty. Our dedicated team is available to provide 24-hour assistance for any questions or issues you may encounter.
For technical support or warranty claims, please contact BAKON customer service through the retailer where the product was purchased or visit the official BAKON website for contact information.


