1. Introduction
This user manual provides detailed instructions for the safe and effective operation, maintenance, and troubleshooting of your Scttomon Professional Grooming Kit. Please read this manual thoroughly before first use and retain it for future reference.

Image 1: Overview of the Scttomon Professional Grooming Kit, showing the main hair clipper, T-blade trimmer, foil shaver, and a selection of guide combs and accessories.
2. Important Safety Information
- Ensure the device is turned off and the travel lock is engaged when changing attachments or cleaning the trimmer.
- Always follow manufacturer instructions for safe use and maintenance.
- Keep the appliance dry. Do not immerse in water unless specifically stated as waterproof for cleaning.
- Do not use the appliance if it is damaged.
- Keep out of reach of children.
- Use only the charging cable provided with the kit.
3. Package Contents
Your Scttomon Professional Grooming Kit (28 Piece Set) includes the following components:
- Hair Clipper with adjustable blade
- T-blade Trimmer
- Foil Shaver with ultra-thin cutter head net
- Nose Hair Trimmer attachment
- Body Hair Trimmer attachment
- Precision Dial for beard trimming
- Multiple Guide Combs (for hair clipper and T-blade trimmer)
- Cleaning Brush
- USB Charging Cable
- Lubricating Oil
- Storage Pouch
- Comb
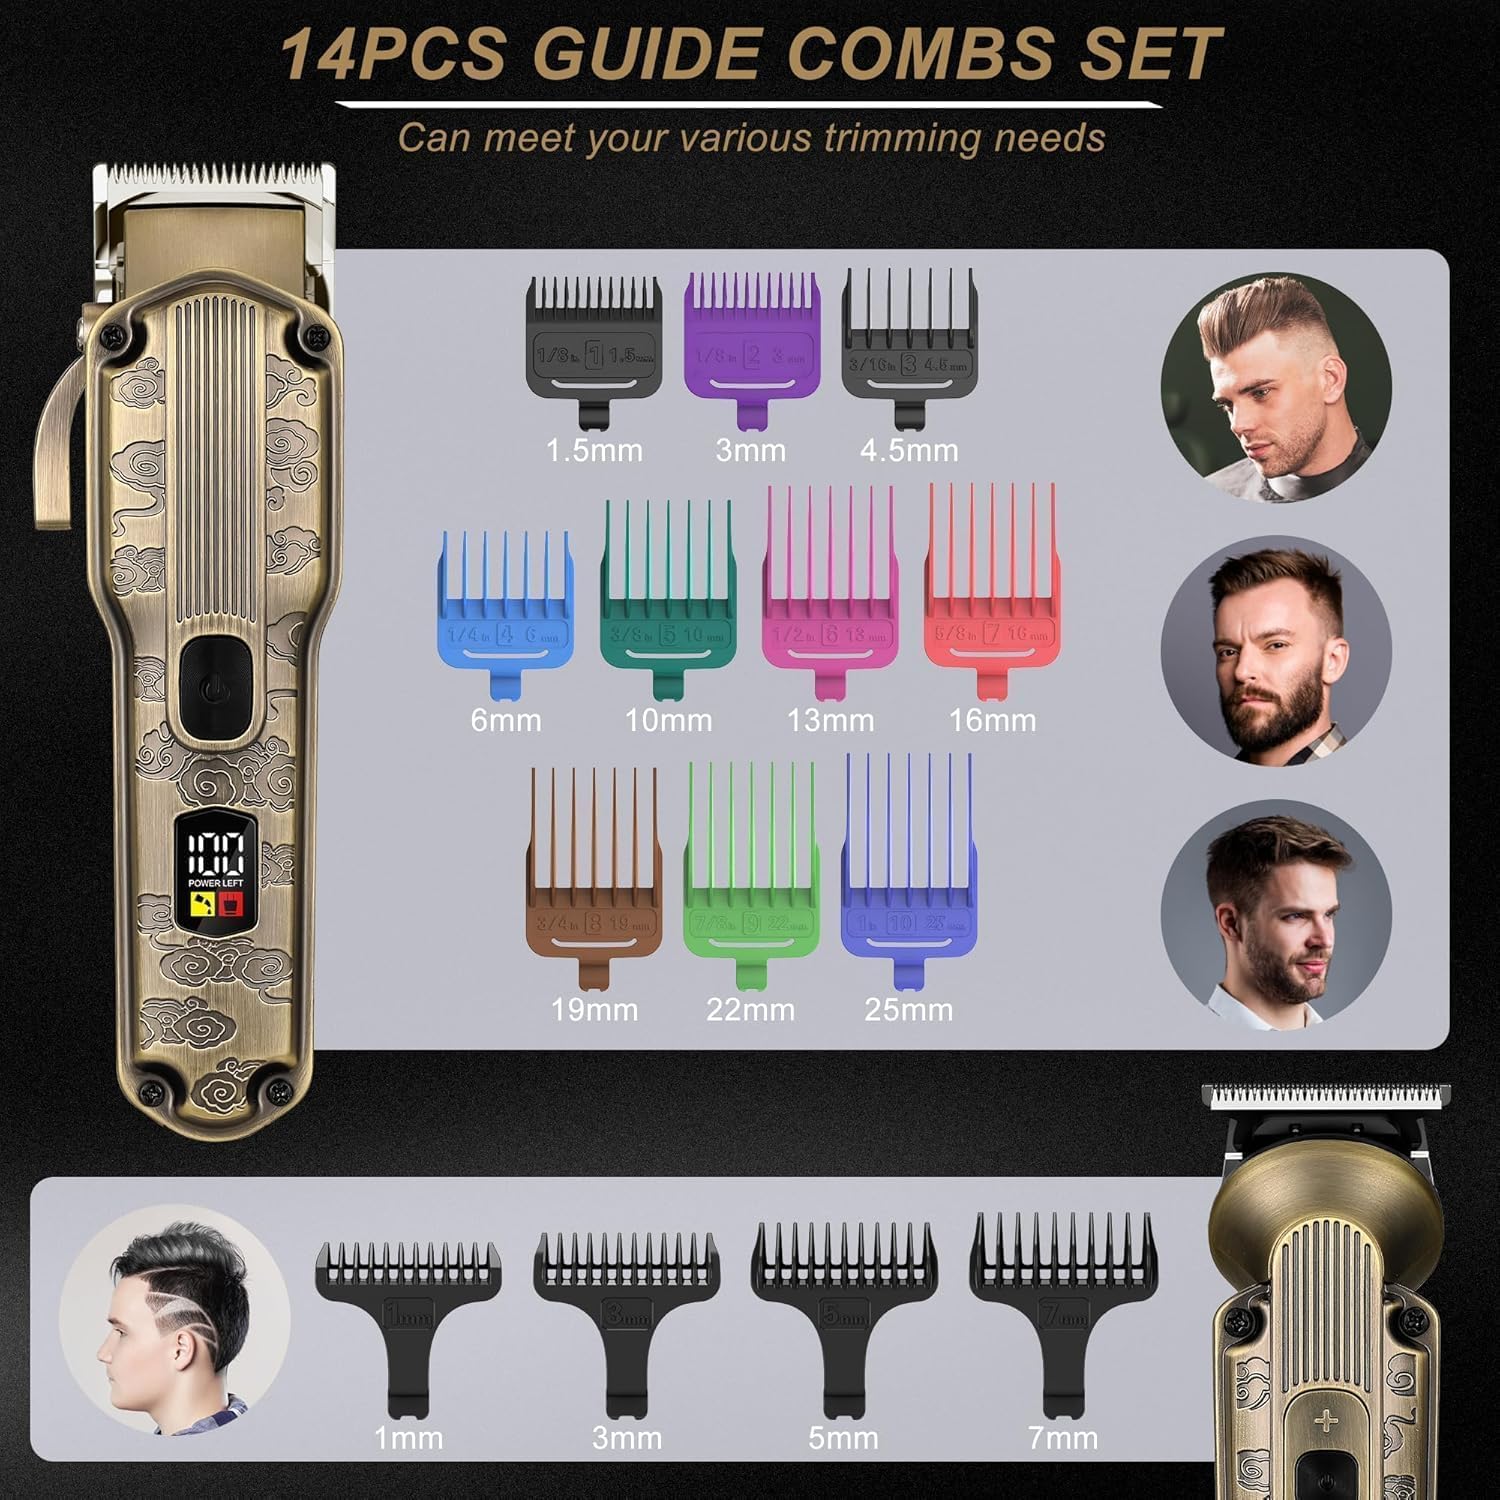
Image 2: A detailed view of the 14-piece guide comb set, illustrating various lengths for both the main hair clipper and the T-blade trimmer.
4. Setup and Initial Charging
4.1 Initial Charging
Before first use, fully charge each device. Connect the USB charging cable to the device and a suitable USB power source (e.g., computer, mobile power adapter, USB panel). The LED display will indicate charging status and battery percentage.
- Hair Clipper: Approximately 3 hours for a full charge, providing up to 200 minutes of runtime.
- T-blade Trimmer: Approximately 1.5 hours for a full charge, providing 120-150 minutes of runtime.
- Foil Shaver: Approximately 1.5 hours for a full charge, providing 75 minutes of runtime.

Image 3: Illustration of the charging times and corresponding runtimes for the hair clipper, T-blade trimmer, and foil shaver.
4.2 Attaching and Detaching Accessories
Ensure the device is turned off before attaching or detaching any accessories. Align the desired attachment with the device head and press firmly until it clicks into place. To remove, gently pull the attachment away from the device head.
5. Operating Instructions
Each grooming tool is designed for specific purposes. Select the appropriate tool and attachment for your desired grooming task.
5.1 Hair Clipper
- Adjustable Blade: The hair clipper features an adjustable lever for blade length settings from 0.8mm to 2mm.
- Guide Combs: Attach one of the ten guide combs to achieve desired hair lengths.
- Power Options: The clipper offers 2-speed power options. Press the power button to cycle through speeds.
- Usage: Move the clipper against the direction of hair growth for an even cut.

Image 4: A person using the hair clipper with a guide comb to trim hair, demonstrating its primary function.
5.2 T-blade Trimmer
- Precision Trimming: Ideal for precise trimming, artwork, hard or soft lining, fading, and blending.
- Motor Speeds: Features adjustable motor speeds of 6000/6500/7000 RPM.
- Usage: Use without a comb for close detailing or with smaller guide combs for beard and stubble maintenance.

Image 5: Close-up view highlighting the sharp cutting blade and 3-speed power option of the detail trimmer, and the 0.8-2mm adjustable lever with 2-speed power option of the main clipper.
5.3 Foil Shaver
- Close Shave: Designed with a double-layer floating mesh and independent dual cutting blades for a close shave.
- Pop-up Trimmer: Includes a pop-up trimmer blade for pre-trimming longer hairs or shaping.
- Turbo Mode: Offers 2-speed turbo mode (7000RPM/8000RPM) for efficient shaving.
- Usage: For best results, use on short, dry hair. If hair is thick and long, pre-trim with the clipper or T-blade trimmer.

Image 6: Detailed view of the ultra-thin foil shaver, showing its double-layered blades, quick release button, and sliding trimmer blade.
5.4 Nose Hair Trimmer
- Usage: Gently insert the trimmer tip into the nostril or ear canal. Move in a circular motion to trim unwanted hair.

Image 7: A person using the nose trimmer attachment to remove unwanted nose hair.
5.5 Body Hair Trimmer
- Usage: Attach the body hair trimmer head. Use with or without guide combs (3mm, 6mm, 9mm) for safe trimming of body hair on legs, armpits, chest, etc.

Image 8: A person using the body trimmer attachment to trim chest hair, showing the device's versatility for body grooming.
6. Cleaning and Maintenance
Proper cleaning and maintenance ensure the longevity and optimal performance of your grooming kit.
- Waterproof Design: The trimmer is IPX6 waterproof, allowing for easy cleaning under running water.
- Detachable Attachments: All attachments are detachable for thorough cleaning.
- Cleaning Procedure:
- Turn off the device and engage the travel lock.
- Remove the attachment.
- Use the included cleaning brush to remove any loose hairs from the blades and inside the attachment.
- Rinse the blades and attachments under running water. Do not immerse the main body of the device unless specifically designed for full immersion (the main units are IPX6, meaning they can withstand powerful water jets, but full submersion is not explicitly stated for all parts).
- Allow all parts to air dry completely before reattaching or storing.
- After drying, apply a few drops of the provided lubricating oil to the blades to maintain their sharpness and smooth operation.
- Storage: Store the grooming kit and its accessories in a dry, cool place, preferably in the provided storage pouch.

Image 9: The grooming kit components displayed with water droplets, illustrating their IPX6 waterproof rating for easy cleaning.
7. Troubleshooting
If you encounter issues with your grooming kit, refer to the following common problems and solutions:
| Problem | Possible Cause | Solution |
|---|---|---|
| Device does not turn on. | Low battery or device is locked. | Charge the device fully. Check the LED display for battery status. If a travel lock is engaged, press and hold the power button for a few seconds to unlock. |
| Poor cutting performance or pulling hair. | Blades are dull, dirty, or not lubricated. Hair is too long for the attachment. | Clean the blades thoroughly and apply lubricating oil. If hair is long, pre-trim with a larger comb or the main clipper before using the shaver or detail trimmer. Consider replacing blades if they are excessively dull (contact manufacturer for availability). |
| Device stops working suddenly. | Battery depleted or internal malfunction. | Recharge the device. If the issue persists after charging, contact customer support. |
| LED display not working. | Device is off or malfunction. | Turn on the device. If the display remains off while the device is operating, contact customer support. |
8. Product Specifications
| Feature | Detail |
|---|---|
| Model Number | RFC-6081FX |
| Brand | Scttomon |
| Power Source | Battery Powered |
| Battery Type | Lithium-Ion (3 AA batteries included) |
| Hair Clipper Charging Time | 3 Hours |
| Hair Clipper Runtime | 200 Minutes |
| T-blade Trimmer Charging Time | 1.5 Hours |
| T-blade Trimmer Runtime | 120-150 Minutes |
| Foil Shaver Charging Time | 1.5 Hours |
| Foil Shaver Runtime | 75 Minutes |
| Waterproof Rating | IPX6 |
| Package Dimensions | 10.39 x 8.82 x 3.86 inches |
| Item Weight | 3.79 Pounds |
9. Warranty and Support
Specific warranty details are not provided within this manual. For information regarding warranty coverage, product support, or replacement parts, please refer to the documentation included with your purchase or contact Scttomon customer service directly.
You may also visit the official Scttomon website for further assistance.


