1. Introduction
This manual provides detailed instructions for assembling your MiniCity Public Library DIY Book Nook Kit. This kit allows you to construct a miniature replica of a public library, complete with intricate details, LED lighting, and a protective dust cover. Please read all instructions carefully before beginning assembly.

Figure 1: MiniCity Public Library Book Nook Kit Product Overview. Displays product dimensions (9.1"x7.1"x4.3"), assembly time (6-10 hours), wood pieces (604 pcs), age of use (14+), material (wooden), audiences (teens, adults), and accessories (dustcover, tweezers, glue, LED lights).
2. Safety Information
- This kit contains small parts and is not suitable for children under 14 years of age due to choking hazards.
- Exercise caution when handling sharp tools like tweezers or craft knives (if used, not included).
- Ensure proper ventilation when using glue. Avoid contact with eyes and skin.
- Keep electrical components (LED lights) away from water.
3. Package Contents
Verify that all components listed below are present in your kit before starting assembly:
- Pre-cut Wooden Boards (Interior and Exterior)
- Instruction Manual
- Dust Cover
- Adhesive Paper (for miniature books and decorations)
- LED Light Kit with wiring
- Glue (B-7000 type recommended)
- Tweezers
- Frosted Rod
- Small Hammer (for fitting pieces)
- Accessory Pack (various small decorative elements)

Figure 2: Overview of all included package contents, showing wooden boards, manual, dust cover, adhesive paper, LED lights, glue, tweezers, frosted rod, hammer, and accessory pack.
4. Assembly Instructions (Setup)
Follow the step-by-step instructions provided in the included color manual. The assembly process typically takes 6-10 hours.
- Preparation: Unpack all components. Organize the wooden pieces by their designated letters/numbers as indicated in the manual.
- Punching Out Pieces: Carefully punch out the wooden pieces from their sheets. Use the provided hammer gently for stubborn pieces.
- Applying Stickers: Use the adhesive paper to create miniature books and other decorative elements. Apply them to the designated shelves and areas as shown in the manual.
- Constructing Sub-assemblies: Begin by assembling smaller sections, such as bookshelves and furniture, before integrating them into the main structure.
- Main Structure Assembly: Connect the larger wooden panels to form the core structure of the book nook. Ensure all joints are secure.
- Wiring LED Lights: Install the LED light kit according to the manual's diagrams. Ensure all connections are correct before securing them.
- Final Decorations: Place all remaining miniature items and decorations to complete the scene.

Figure 3: The clear 3D color manual provides step-by-step diagrams for assembly.

Figure 4: An exploded view illustrating the various components and their assembly points.
Video 1: Official product video demonstrating the assembly process and features of the MiniCity Public Library Book Nook Kit.
5. Operating Instructions
5.1 LED Light Operation
The MiniCity Public Library Book Nook Kit includes an integrated LED lighting system to illuminate your miniature scene. The lights are typically controlled by a touch switch.
- Power Connection: Ensure the LED light kit is correctly connected to its power source as per the assembly instructions.
- Activating Lights: Locate the touch switch, usually integrated into the top or side panel of the book nook. Gently touch the designated area to turn the lights on or off.
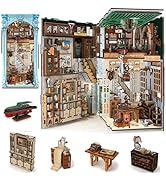
Figure 5: A hand demonstrating how to activate the LED light using the integrated touch switch.
6. Maintenance
6.1 Dust Cover Installation and Care
The included dust cover is designed to protect your assembled book nook from dust and environmental elements, preserving its intricate details.
- Installation: Carefully slide the dust cover into the designated grooves on the top of the assembled book nook. Ensure it fits snugly.
- Cleaning: To clean the dust cover, use a soft, dry cloth. For stubborn marks, a slightly damp cloth can be used, followed by immediate drying. Avoid abrasive cleaners.
- Handling: Handle the dust cover with care to prevent scratches or breakage.

Figure 6: Illustration of the dust cover being inserted into the top of the book nook for protection.
7. Troubleshooting
If you encounter any issues during assembly or operation, refer to the following common solutions:
- Pieces Not Fitting: Ensure you are using the correct pieces as indicated by the manual's numbering. Apply gentle, even pressure. If a piece is too tight, lightly sand the edges. Do not force pieces, as this may cause breakage.
- LED Lights Not Working: Check all wire connections to ensure they are secure. Verify that the power source is correctly connected and functional. If using batteries (not included), ensure they are new and correctly inserted.
- Missing Parts: Double-check the package contents against the list in Section 3. If parts are genuinely missing, contact MiniCity customer support.
- Fragile Parts: Handle small and delicate pieces with the provided tweezers. Apply glue sparingly to avoid excess.
8. Specifications
| Feature | Detail |
|---|---|
| Product Dimensions | 4.3 x 7 x 9 inches (11 x 18 x 23 cm) |
| Item Weight | 3.89 pounds |
| Material | Wood |
| Assembly Time | 6-10 hours (approx.) |
| Recommended Age | 14 years and up |
| Included Accessories | Dust cover, tweezers, glue, LED lights, small hammer |
9. Warranty and Support
MiniCity products are designed for quality and enjoyment. For any questions, missing parts, or support needs, please refer to the contact information provided with your purchase or visit the official MiniCity website. Please retain your proof of purchase for warranty claims.