ZBULAR AL10 Pistol Light (950Lm white led large Slide Racker Jacker Flashlight)
ZBULAR AL10 Pistol Light User Manual
Model: AL10 (950Lm white led large Slide Racker Jacker Flashlight)
Introduction
The ZBULAR AL10 Pistol Light is a high-performance tactical flashlight designed for home defense and various tactical operations. It features a powerful 950 lumen LED, Type-C rechargeable capability, and an integrated slide racker jacker for improved slide grip. This manual provides essential information for the safe and effective use, installation, and maintenance of your AL10 Pistol Light.

Figure 1: ZBULAR AL10 Pistol Light mounted on a handgun, showcasing its design and integration.
Safety Information
Always handle firearms and accessories with extreme care. Read and understand all instructions before operating the AL10 Pistol Light. Failure to follow these instructions may result in injury or damage to the product or firearm.
- Ensure the firearm is unloaded and safe before installing or removing the light.
- Do not look directly into the light beam, as it can cause temporary vision impairment.
- Keep the device away from water and extreme temperatures.
- Use only the provided charging cable and a compatible 5V power source.
- Do not attempt to disassemble or modify the light, as this will void the warranty and may cause damage.
Setup
Installation
The AL10 Pistol Light is designed for easy installation on compatible handgun models, including Glock 17, 19, 19X, 23 (Gens 1-4 Only), 25, 26, 28, 30S, 34, 36, 41, 45, 47, and 49. Ensure your firearm is unloaded and safe before proceeding.
Step 1: Position the Light
Push the AL10 Pistol Light down onto the gun body's rail system. Ensure it aligns correctly with the rail grooves.

Figure 2: Initial positioning of the AL10 Pistol Light on the firearm's rail.
Step 2: Adjust and Secure
Slightly adjust the elastic screws on both sides of the light to maintain stability and balance. It is recommended to adjust both screws to ensure a secure fit and prevent wobbling. The inner wall of the light is a smooth module, requiring careful adjustment of the knobs on both sides for proper installation and balance.

Figure 3: Adjusting the internal screws for a secure and balanced fit.

Figure 4: Hands-on demonstration of securing the light to the firearm.
Charging
The AL10 Pistol Light features a built-in magnetic USB rechargeable function for convenient and safe charging. Use the included USB charging cable and a standard 5V power adapter (not included).
- Locate the charging port on the side of the light.
- Connect the magnetic end of the USB charging cable to the charging port.
- Plug the other end of the USB cable into a 5V power source (e.g., wall adapter, computer USB port).
- The cue light will indicate charging status:
- Red Light: Indicates charging in progress or low power.
- Green Light: Indicates charging is complete.
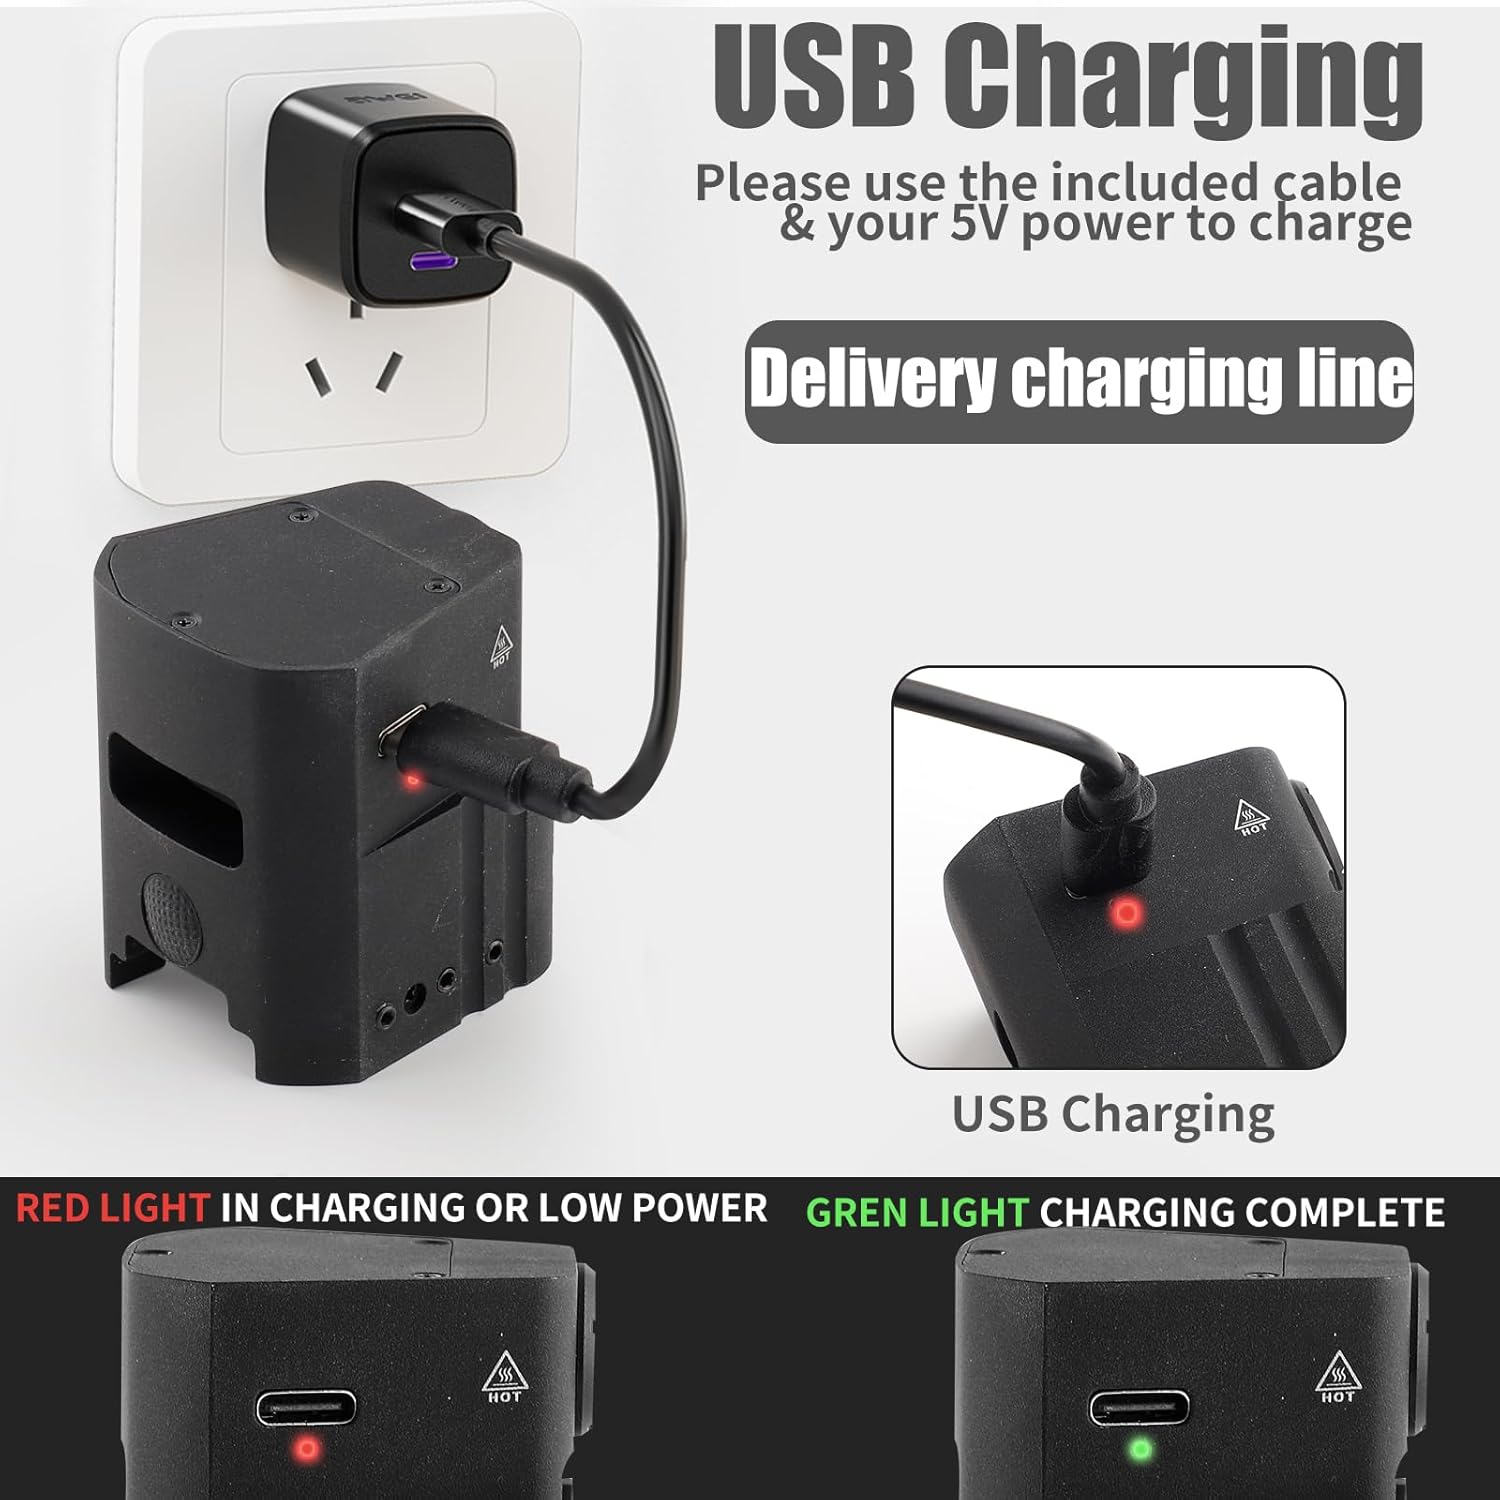
Figure 5: USB charging connection and status indicators.
Operating Instructions
The AL10 Pistol Light offers multiple lighting modes and an easy-to-use pressure pad switch for tactical operations.
Light Modes and Activation
- Pressure Pad Switch: The switch is located at the rear of the light for quick, one-handed operation.
- Momentary Activation: Press and hold the switch for temporary illumination. Release to turn off.
- Constant Activation: Press and release the switch quickly to turn the light on constantly. Press and release again to turn off.
- Strobe Mode: (Specific activation method not detailed in provided data, typically double-tap or press-and-hold for a longer duration). Refer to the product packaging for exact strobe activation.
Brightness Levels
The AL10 Pistol Light features two brightness levels to suit different scenarios:
- High Mode: Maximum output of 950 lumens, providing powerful illumination for clear visibility. Battery life: approximately 55 minutes.
- Low Mode: Output of 500 lumens, suitable for less intense lighting needs or to conserve battery. Battery life: approximately 65 minutes.

Figure 6: Comparison of High (950 Lumens) and Low (500 Lumens) brightness modes.
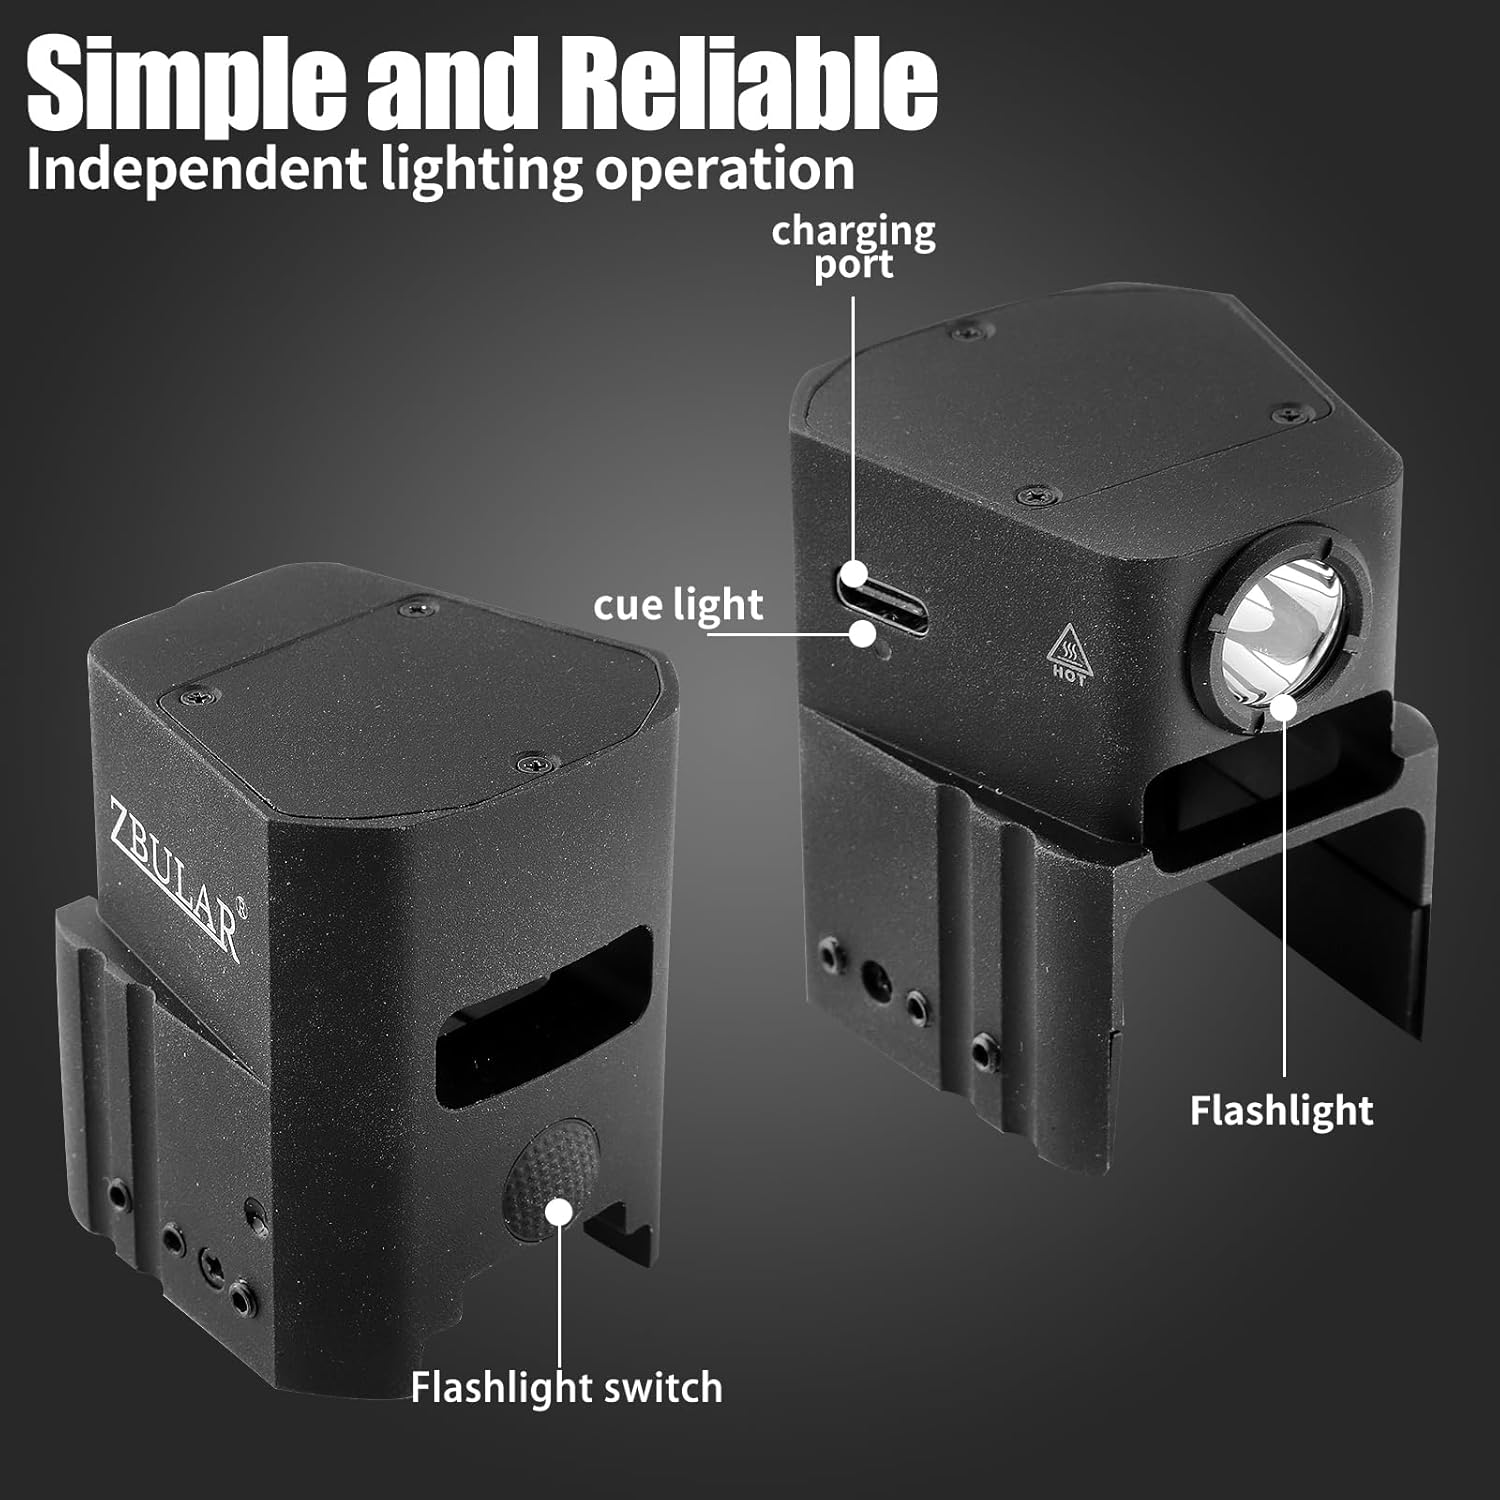
Figure 7: Overview of the AL10 Pistol Light's functional components.
Maintenance
Proper maintenance ensures the longevity and reliable performance of your AL10 Pistol Light.
- Cleaning: Wipe the light with a soft, damp cloth to remove dirt and debris. Do not use harsh chemicals or abrasive cleaners.
- Charging: Recharge the battery regularly, especially if the light has not been used for an extended period, to maintain battery health.
- Storage: Store the light in a cool, dry place away from direct sunlight and extreme temperatures.
- Inspection: Periodically check the mounting screws for tightness to ensure the light remains securely attached to the firearm.
Troubleshooting
If you encounter issues with your AL10 Pistol Light, refer to the following common problems and solutions:
| Problem | Possible Cause | Solution |
|---|---|---|
| Light does not turn on. | Battery is depleted. | Charge the light using the provided USB cable. |
| Light flickers or is dim. | Low battery or poor contact. | Recharge the battery. Ensure the light is securely mounted. |
| Light is loose on the firearm. | Mounting screws are loose. | Tighten the elastic screws on both sides of the light. Refer to the installation section. |
| Cannot activate strobe mode. | Incorrect activation sequence. | Refer to the product packaging or manufacturer's website for specific strobe activation instructions. |
Specifications
Key specifications for the ZBULAR AL10 Pistol Light:
- Model: AL10
- Light Output: Max 950 Lumens (High), 500 Lumens (Low)
- Light Source Type: LED
- Power Source: Battery Powered (Rechargeable via Type-C USB)
- Material: Precision machined from lightweight, high-strength aircraft aluminum with Mil-Spec hard-anodized finish
- Special Features: Durable, Dustproof, Integrated Slide Racker Jacker
- Color: 950Lm white led
- Compatibility: Glock 17, 19, 19X, 23 (Gens 1-4 Only), 25, 26, 28, 30S, 34, 36, 41, 45, 47, 49
Official Product Videos
No official product videos from the seller were found in the provided data. Please refer to the product listing on Amazon or the ZBULAR brand store for any available video content.
Warranty and Support
Information regarding product warranty and customer support was not available in the provided data. For warranty details or technical assistance, please contact ZBULAR customer service directly or visit their official website. You can often find contact information on the product packaging or through the seller's page on Amazon.
For additional support, visit the ZBULAR Store on Amazon.
Ask a question about this manual
Ask about setup, troubleshooting, compatibility, parts, safety, or missing instructions. Manuals+ will review the question and use this page’s manual context to help answer it.