1. Product Overview
The Brace Direct IcedHeat Digital Hot & Cold Therapy Machine (Model CTY408) is designed to provide targeted hot and cold therapy for post-operative recovery, chronic pain relief, and sports injuries. This versatile device offers continuous circulation for consistent temperature delivery, aiding in swelling control and pain management.

Image 1.1: The IcedHeat Digital Hot & Cold Therapy Machine with its universal pad.
Key Features:
- Continuous Circulation Therapy: A quiet pump ensures steady water movement, delivering consistent hot or cold temperatures.
- Dual Hot & Cold Relief: Capable of providing both cryotherapy and heat therapy by adding appropriately tempered water.
- Universal Pad: The soft, flexible pad conforms to various body areas including the knee, hip, shoulder, ankle, and back.
- Easy-to-Use Digital Display: Features controls for water temperature, therapy timer, and flow rate.
2. Included Components
Carefully unpack your IcedHeat Digital Hot & Cold Therapy Machine and ensure all components are present:
- Digital IcedHeat Therapy Machine Unit
- Universal Therapy Pad with connectors
- Insulated Tubing
- AC Power Adaptor
- Elastic Bands (16, 27, and 47 inches)
- Product User Manual (this document)

Image 2.1: Overview of all components included with your IcedHeat system.
3. Setup Instructions
Follow these steps to prepare your IcedHeat therapy machine for use:
- Place the Unit: Position the therapy machine on a stable, flat surface near an electrical outlet. Ensure it is below the level of the body part being treated to facilitate proper water circulation.
- Fill with Water: Open the lid of the machine. Fill the reservoir with water. For cold therapy, add cold water and ice cubes or a frozen water bottle to maintain temperature. For hot therapy, add warm water. Note: The unit does not heat or cool water automatically; the temperature is determined by the water you add. Fill to the indicated fill line.
- Secure the Lid: Close the lid firmly to prevent leaks.
- Connect Tubing: Connect one end of the insulated tubing to the therapy machine and the other end to the universal pad. Ensure connections are secure to prevent leaks. You should hear a click when properly connected.
- Plug in Power: Connect the AC power adaptor to the machine and then plug it into a standard electrical outlet.
- Apply Pad: Place the universal pad on the desired body area. Use the provided elastic bands to secure the pad comfortably but firmly against the body. Ensure there is a thin layer of clothing or a barrier between the cold pad and your skin to prevent skin damage during cold therapy.
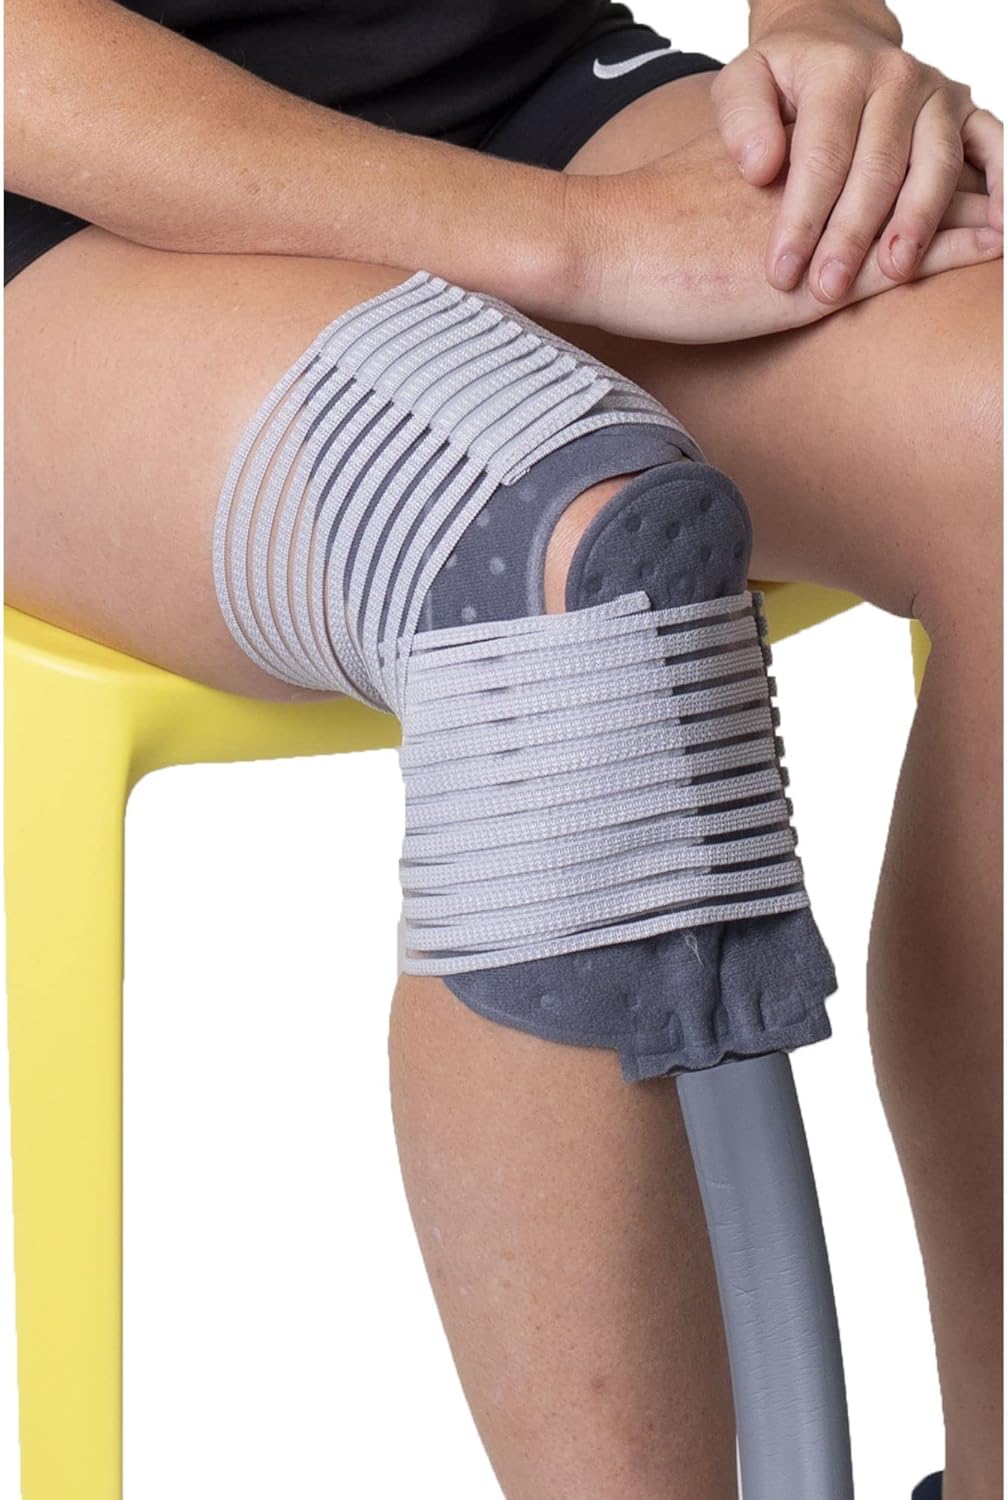
Image 3.1: Proper application of the universal pad to the knee using elastic bands.
4. Operating Instructions
Once the unit is set up, you can begin your therapy session:
Digital Display Controls:
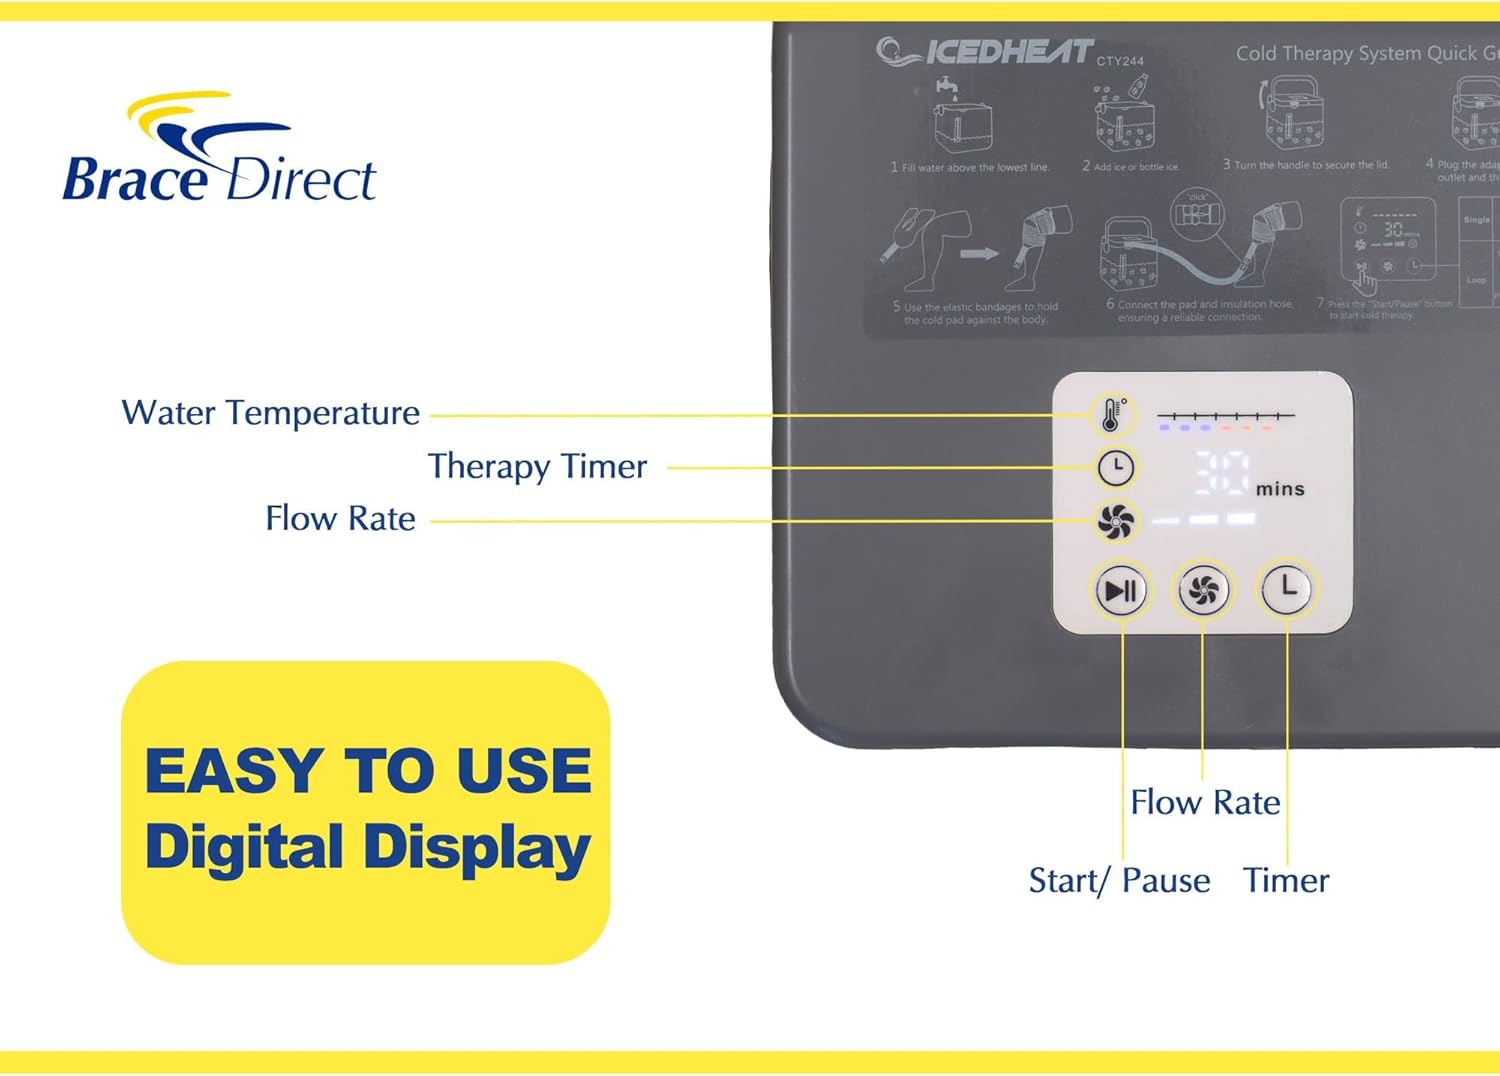
Image 4.1: The digital display panel of the IcedHeat machine.
- Power Button: Press to turn the unit ON/OFF.
- Temperature Indicator: Displays the water temperature. Blue bars indicate cold, red bars indicate hot.
- Therapy Timer: Set the duration of your therapy session. Options typically include 30, 60, 90, and 120 minutes.
- Flow Rate: Adjust the water circulation speed.
- Start/Pause Button: Initiates or pauses the therapy session.
- Loop Setting (L): Activates a cycle of 30 minutes ON, 30 minutes OFF, repeating up to 10 times.
Starting a Therapy Session:
- Press the Power button to turn on the unit.
- Select your desired therapy duration using the Timer button.
- Adjust the Flow Rate if necessary.
- Press the Start/Pause button to begin the circulation.
- Monitor the temperature indicator to ensure the water temperature is appropriate for your therapy. Add more ice or warm water to the reservoir as needed to maintain the desired temperature.
- To end the session early, press the Start/Pause button, then the Power button.
Important Considerations:
- Always use a barrier (e.g., thin cloth, leggings) between the therapy pad and your skin, especially during cold therapy, to prevent frostbite or skin irritation.
- Consult with a healthcare professional regarding appropriate therapy durations and temperatures for your specific condition.
5. Maintenance
Proper maintenance ensures the longevity and hygiene of your IcedHeat therapy machine:
- After Each Use: After completing a session, the pad will partially drain itself. Disconnect the tubing from the machine and the pad. Empty any remaining water from the reservoir.
- Cleaning: Clean the reservoir and tubing with mild soap and water. Rinse thoroughly.
- Drying: Ensure all components, especially the reservoir and tubing, are completely dry before storing to prevent mold or mildew growth. Air dry or wipe with a clean cloth.
- Storage: Store the unit in a cool, dry place away from direct sunlight.
6. Troubleshooting
If you encounter issues with your IcedHeat therapy machine, refer to the following common problems and solutions:
| Problem | Possible Cause | Solution |
|---|---|---|
| Unit is leaking. | Loose tubing connections or damaged O-rings. | Ensure all tubing connections are securely clicked into place. Check O-rings for damage and replace if necessary. |
| Water is not circulating. | Low water level, kinked tubing, or pump issue. | Check water level and refill if low. Ensure tubing is not kinked. If problem persists, contact customer support. |
| Water temperature is not maintained. | Insufficient ice for cold therapy or warm water for heat therapy. | Add more ice or a frozen water bottle for cold therapy. Replenish with warm water for heat therapy. The unit does not actively heat or cool water. |
| Unit is noisy. | Air in the system or pump malfunction. | Ensure the reservoir is adequately filled with water. If the noise is excessive or unusual, contact customer support. |
| Digital display is not working. | Power issue or internal malfunction. | Check power connection. Ensure the unit is plugged into a working outlet. If still unresponsive, contact customer support. |
7. Specifications
- Model Number: CTY408
- Package Dimensions: 16.57 x 15.86 x 12.83 inches
- Item Weight: 8.07 Pounds
- Manufacturer: Brace Direct
- First Available: August 22, 2024
8. Support & Warranty
Brace Direct is committed to providing excellent customer service and support for your product.
Customer Support:
For any questions, assistance with fitting, or troubleshooting not covered in this manual, please contact Brace Direct. As an American-owned company, Brace Direct offers USA-based support.
- Personalized Support: Schedule a free video fitting and adjustment session with a fitting professional.
- Contact Information: Refer to the contact details provided on the Brace Direct website or product packaging.
Product Warranty:
Your IcedHeat Digital Hot & Cold Therapy Machine is backed by a 1-Year Warranty, ensuring lasting confidence in your purchase. Please retain your proof of purchase for warranty claims.


