Coolski IM-55BS
Coolski 15" W Commercial Under Counter Ice Maker Machine
Model: IM-55BS
Brand: Coolski
Introduction
This manual provides detailed instructions for the installation, operation, and maintenance of your Coolski 15" W Commercial Under Counter Ice Maker Machine. Please read this manual thoroughly before using the appliance to ensure safe and efficient operation. Retain this manual for future reference.
Safety Information
Important Safety Instructions:
- Ensure the appliance is properly grounded.
- Do not operate the ice maker with a damaged power cord or plug.
- Keep ventilation openings clear of obstruction.
- Do not store explosive substances such as aerosol cans with a flammable propellant in this appliance.
- Only connect to a potable water supply.
- Allow the unit to stand upright for at least 24 hours before initial use to allow refrigerants to settle.
- Disconnect power before performing any maintenance or cleaning.
Product Overview
The Coolski IM-55BS is a versatile under-counter ice maker designed for both home and commercial use, capable of producing up to 80 pounds of ice per day with a 30-pound storage capacity. It features a stainless steel exterior, customizable ice thickness, and a user-friendly digital control panel.

Figure 1: Front view of the Coolski 15" W Commercial Under Counter Ice Maker Machine. This unit features a sleek stainless steel door and a front-vented design for efficient heat dissipation.

Figure 2: Illustration showing the ice maker's capacity to produce 80 lbs of ice per day and store up to 30 lbs. It is suitable for both home and business environments.
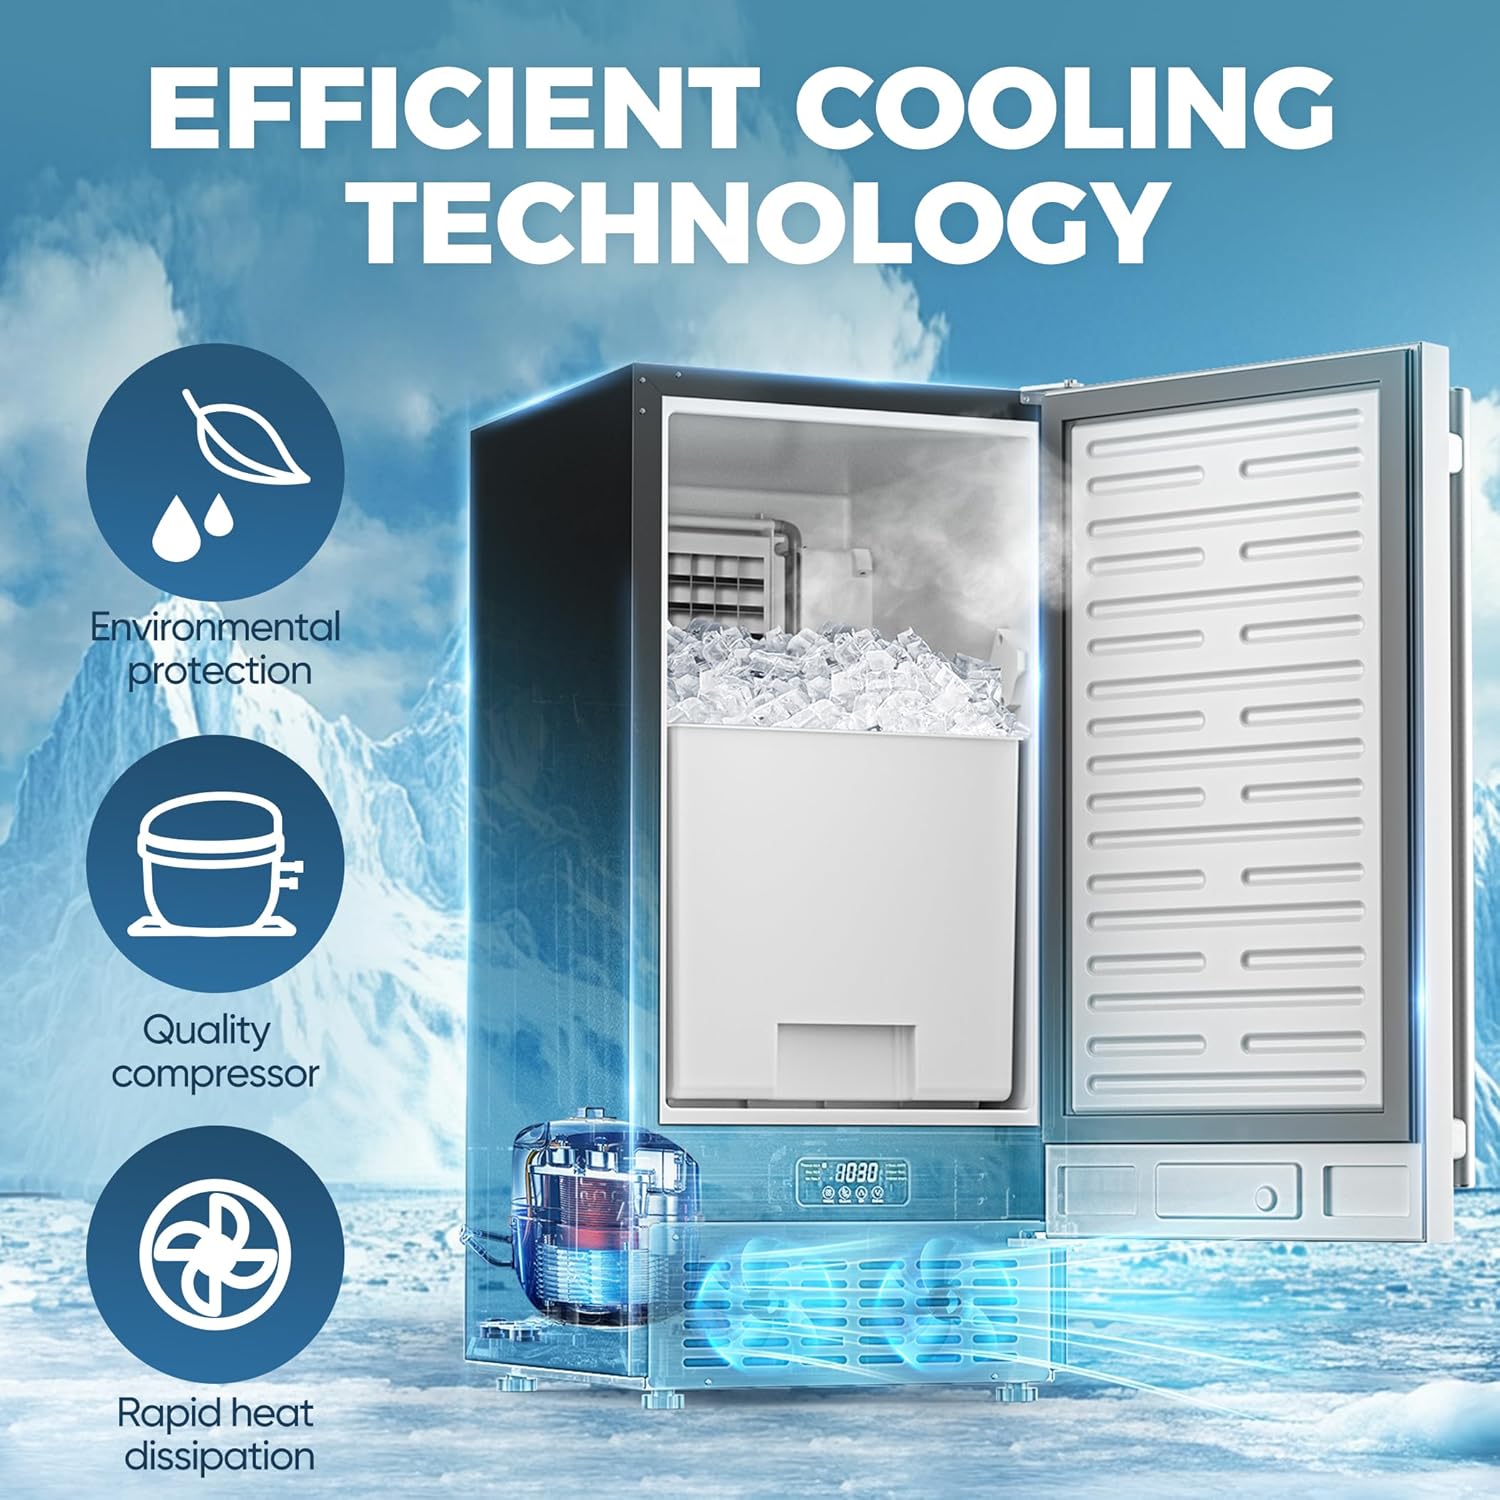
Figure 3: Diagram highlighting the efficient cooling technology of the ice maker, including environmental protection features, a quality compressor, and rapid heat dissipation for optimal performance.
Setup and Installation
Unpacking
Carefully remove the ice maker from its packaging. Inspect the unit for any shipping damage. Keep all packaging materials until you are satisfied with the product's condition and operation.
Placement Options
This ice maker is designed for versatile installation, including built-in, freestanding, or under-counter placement. Ensure adequate ventilation around the unit, especially for the front vent.
- Built-in: Requires specific cabinet dimensions to fit snugly.
- Freestanding: Can be placed anywhere with proper water and power connections.
- Under Counter: Designed to fit standard counter heights.

Figure 4: Detailed product dimensions (L: 21" x W: 15" x H: 33") for planning installation space. Also shown are the included water outlet hoses, water inlet hose, and ice scoop.
Water Connection
Connect the ice maker to a potable water supply using the provided water inlet hose. Ensure all connections are secure to prevent leaks. The unit includes a water filter to improve ice quality.
For drainage, connect the drain hose to the unit's drain outlet. This model features a gravity drain system. Ensure the drain hose is routed to a floor drain or a suitable drainage system that is below the level of the ice machine to allow for proper gravity flow. If a gravity drain is not feasible, an external drain pump (not included) may be required.
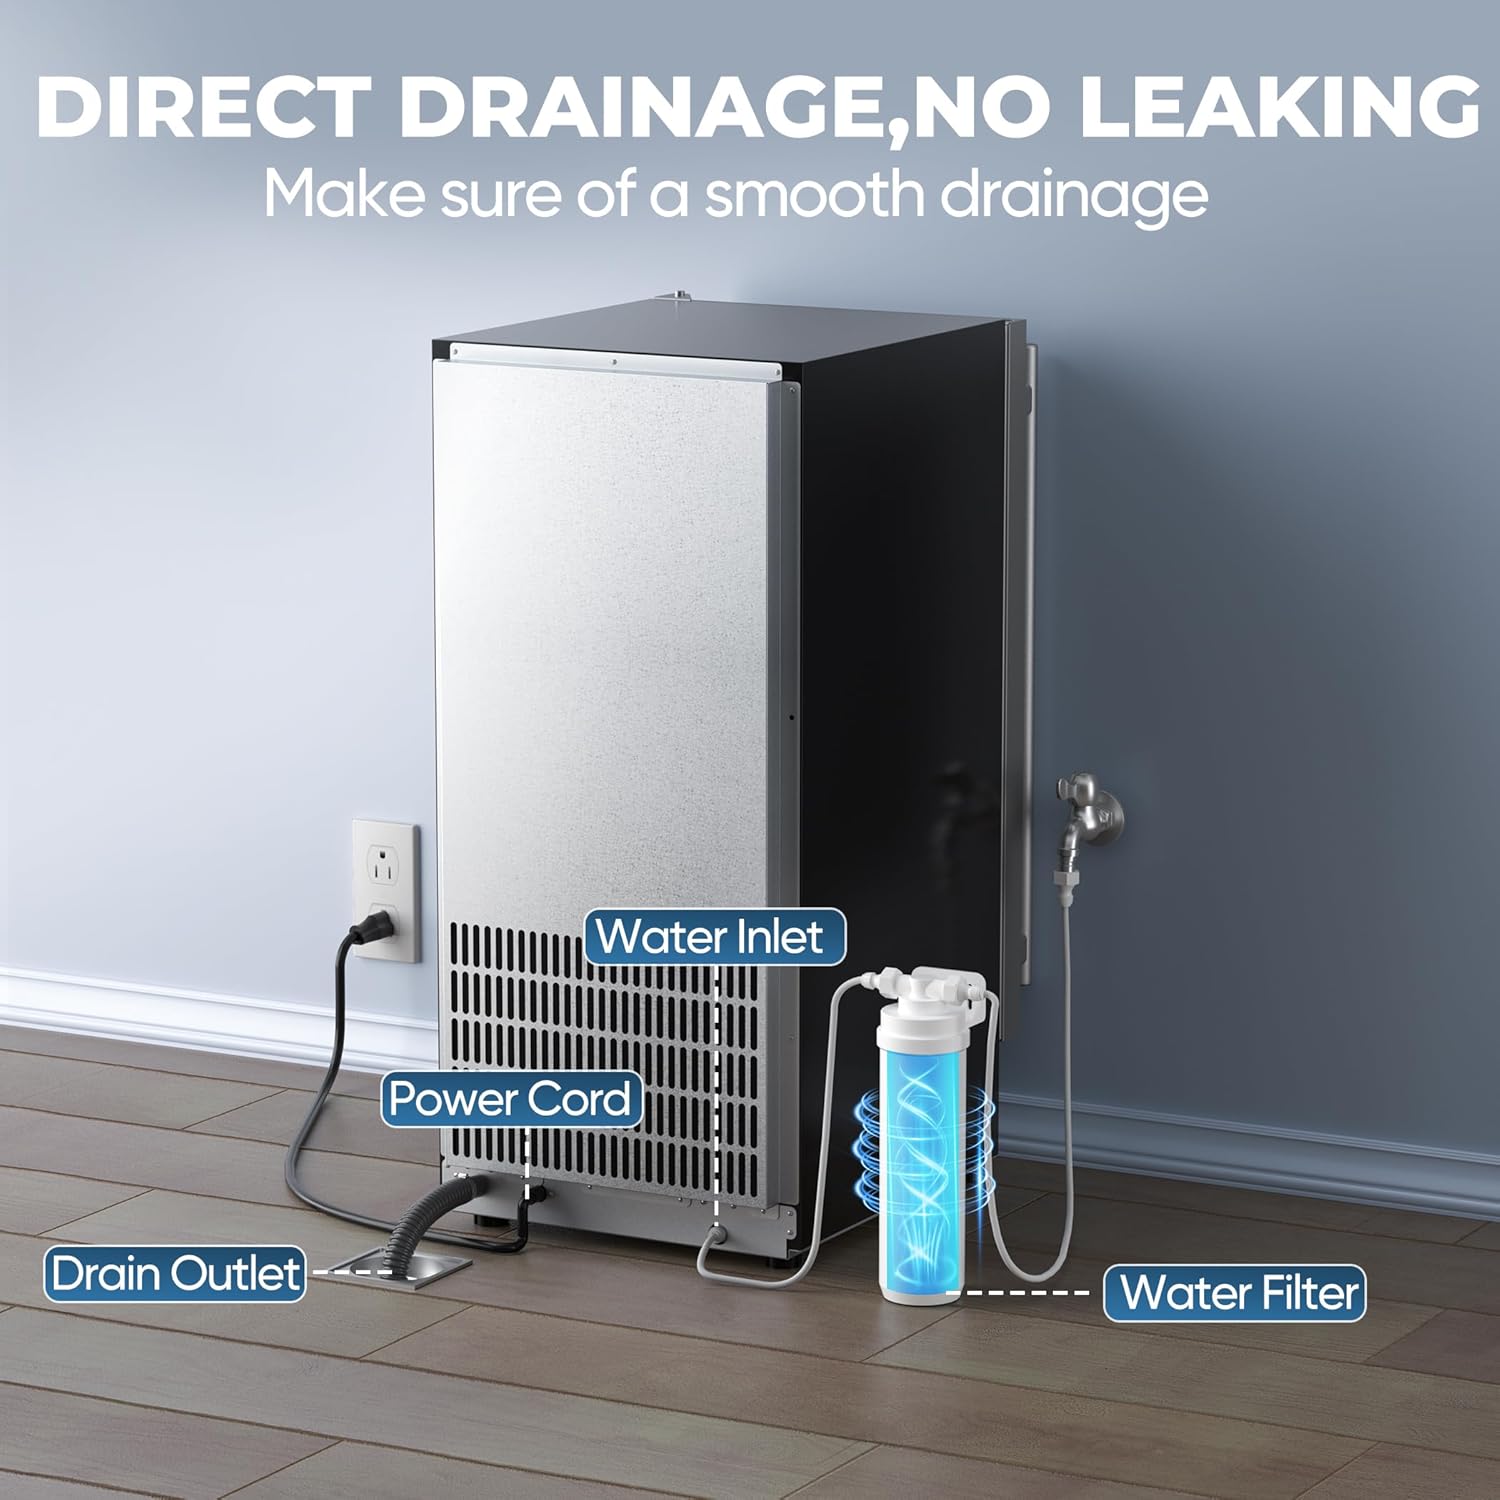
Figure 5: Diagram illustrating the direct drainage setup, including the water inlet, power cord, drain outlet, and the inline water filter. Proper connection ensures no leaking.
Electrical Connection
Plug the ice maker into a grounded electrical outlet. Refer to the product specifications for voltage and amperage requirements. Do not use extension cords.
Initial Startup
After installation, allow the unit to stand upright for at least 24 hours before plugging it in. This allows the refrigerant to settle, preventing potential damage to the compressor. Once settled, plug in the unit and follow the operating instructions to begin ice production.
Operating Instructions
Control Panel
The ice maker is equipped with an LCD digital control panel for easy operation. The panel displays various indicators and allows for mode selection and ice thickness adjustment.

Figure 6: Close-up view of the LCD Digital Control Panel, showing buttons for Mode, Clean, Up (ice thickness), and Down (ice thickness), along with indicators for Making Ice, Fall Ice, Ice Full, Temp/Mode, High Temp, and Water Short.
- MODE Button: Switches between different operation modes.
- CLEAN Button: Initiates the self-cleaning cycle (press for 3 seconds).
- UP/DOWN Buttons: Adjusts the ice cube thickness.
- Indicators: Displays status such as "Making Ice," "Fall Ice," "Ice Full," "Water Short," and temperature/mode.
Ice Production
Once connected and powered on, the ice maker will begin its ice production cycle. The time per cycle can vary based on ambient temperature and water temperature.
Customizing Ice Thickness
You can adjust the thickness of the ice cubes to suit your preference using the UP and DOWN buttons on the control panel. Thinner ice cubes are ideal for smoothies, medium for drinks, and larger cubes for cooling seafood or packing coolers.

Figure 7: Visual representation of the three customizable ice cube sizes: Thin (approx. 8 mins per cycle, suitable for smoothies), Medium (approx. 12 mins per cycle, suitable for drinks), and Large (approx. 16 mins per cycle, suitable for seafood).
Maintenance
Self-Cleaning Function
The ice maker features an "Ultra Clean Mode" for convenient self-cleaning. This function helps maintain hygiene and ice quality.
- To activate, press and hold the "CLEAN" button on the control panel for 3 seconds.
- The unit will automatically perform a cleaning cycle.
- It is recommended to perform a self-cleaning cycle regularly, especially if the unit is used frequently.

Figure 8: Image showing the ice-making tray during the "Ultra Clean Mode" operation. This mode is activated by pressing the "Clean" button for 3 seconds.
Water Filter Replacement
The inline water filter helps remove sediment and improve the taste and smell of the ice. Replace the water filter periodically as recommended by the manufacturer or when ice quality deteriorates.
Regular Cleaning
In addition to the self-cleaning function, it is advisable to manually clean the ice storage bin and exterior surfaces regularly with a mild detergent and warm water. Ensure the unit is unplugged before manual cleaning.
For optimal performance and hygiene, clean the ice maker at least once every six months.
Troubleshooting
Before contacting customer support, please refer to the following common issues and their solutions:
| Problem | Possible Cause | Solution |
|---|---|---|
| Ice maker not producing ice. | No water supply; clogged water filter; unit not powered on; high ambient temperature. | Check water connection and supply valve; replace water filter; ensure unit is plugged in and power is on; ensure proper ventilation and ambient temperature. |
| Ice production is slow or ice cubes are small. | Water temperature too high; dirty condenser; low refrigerant; ice thickness setting. | Ensure cold water supply; clean condenser coils; contact qualified technician for refrigerant issues; adjust ice thickness setting on control panel. |
| Water leaking from the unit. | Loose water connections; clogged drain hose; improper drain hose routing. | Check and tighten all water inlet and drain hose connections; clear any obstructions in the drain hose; ensure drain hose is properly sloped for gravity drainage or that external pump is functioning correctly. |
| Unit is noisy. | Unit not level; loose components; normal operational sounds. | Ensure unit is level using adjustable feet; check for any loose parts; some operational sounds (e.g., water circulating, ice dropping) are normal. |
| "Water Short" indicator is on. | No water supply; water inlet valve closed; float switch obstruction. | Check water supply and ensure inlet valve is open. Inspect the float switch in the water circulation bucket for any obstructions preventing it from moving freely. |
Specifications
| Feature | Detail |
|---|---|
| Model Number | IM-55BS |
| Product Dimensions (D x W x H) | 14.9" x 20.7" x 33" |
| Daily Ice Production Capacity | 80 Pounds |
| Ice Storage Capacity | 30 Pounds |
| Wattage | 280 kWh |
| Manufacturer | Coolski |
| Installation Type | Built-in, Freestanding, Under Counter |
What's in the Box
- Coolski Ice Maker Machine
- Water Filter
- Water Hose
- Drain Hose
- Ice Scoop
Warranty and Support
For warranty information and customer support, please refer to the documentation included with your purchase or visit the official Coolski website. For any technical assistance or service inquiries, please contact Coolski customer service.
You can visit the Coolski Store on Amazon for more information: Coolski Store
Ask a question about this manual
Ask about setup, troubleshooting, compatibility, parts, safety, or missing instructions. Manuals+ will review the question and use this page’s manual context to help answer it.