Introduction
This manual provides detailed instructions for the installation, operation, and maintenance of your Navycrest Q7 4K Dash Cam. This device is designed to enhance your driving safety by recording road events from both the front and rear of your vehicle in high resolution. Please read this manual thoroughly before use to ensure proper functionality and longevity of the product.

Image: The Navycrest Q7 dash cam system, showing the main front camera unit, the smaller rear camera, the included 64GB memory card, and a smartphone displaying the companion app interface.
What's in the Box
Upon unboxing your Navycrest Q7 Dash Cam, please verify that all the following items are included:
- Navycrest Q7 Dash Cam (Front Unit)
- Rear Camera
- 64GB Micro SD Card (pre-inserted)
- Car Charger (with extra USB port)
- Wiring Trim Tool
- Electrostatic Film
- Cable Management Clips
- Adhesive Pad
- User Manual
- Quick Start Guide

Image: Visual representation of all items included in the Navycrest Q7 Dash Cam package, such as the main camera, rear camera, 64GB card, car charger, and installation tools.
Product Features
4K Stunning Sharp Video Quality
The Navycrest Q7 dash cam features both front and rear cameras, equipped with an industry-leading SONY IMX sensor. In dual-channel mode, it records road events from both the front and rear of your vehicle at a 4K (2160P) + 1080P resolution, ensuring clear and detailed video evidence.
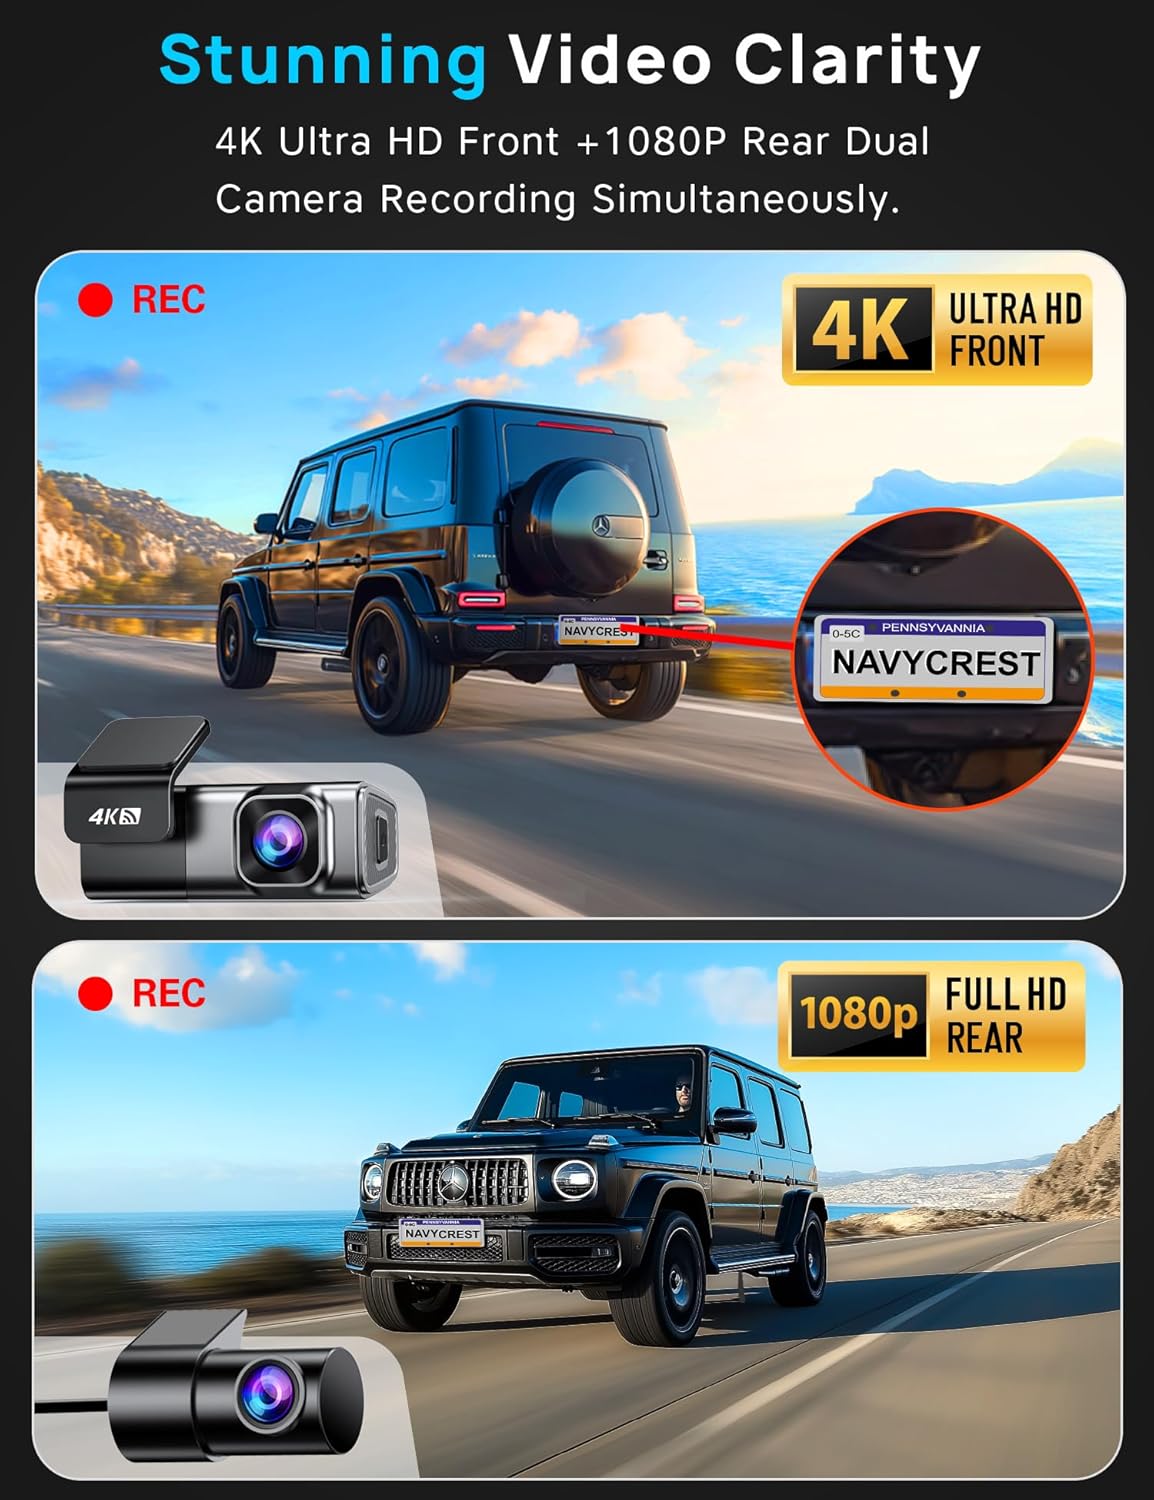
Image: A split image demonstrating the 4K Ultra HD resolution from the front camera and 1080P Full HD resolution from the rear camera, capturing road details.
5G WiFi & App Control
Equipped with a cutting-edge 5G WiFi module, the Q7 allows for 4x faster download speeds (up to 8 MB/s) compared to other 2.4G dash cams. Easily connect to the Q7 dash camera via the dedicated app to view live video, adjust settings, download albums, edit, and share on social media.

Image: A visual showing the Q7 dash cam connected to a smartphone via 5G WiFi, highlighting faster download speeds and the convenience of app-based control for viewing, sharing, and downloading videos.
24/7 Parking Mode Support
For continuous 24/7 parking mode functionality, an extra hardwire kit (ASIN: B0BN829V8D, not included) is required. Once installed, the Q7 dash cam will enter parking mode after your car is off. You can set the parking mode preference to either parking monitor (auto-start recording on collision) or Time-Lapse Recording (continuous low-power recording), providing around-the-clock protection.

Image: A scene illustrating the 24/7 Parking Mode, with a dash cam monitoring a parked car at night, indicating protection against suspicious events. A note about the required hardwire kit is included.
Super Night Vision
With the combination of a SONY IMX sensor and a 6-Glass Lens, along with Wide Dynamic Range (WDR) Technology, the Q7 car camera performs exceptionally well in color precision and clarity, ensuring clear videos even in low light conditions or at night.

Image: A visual comparison of day and night recording quality, highlighting the superior clarity and detail captured by the Q7 dash cam's Super Night Vision feature, thanks to its SONY IMX sensor and 6-layer lens.
Loop Recording & Gravity Sensor
The Q7 dash cam supports seamless loop recording, automatically overwriting the oldest videos with the latest ones when the memory card reaches its maximum storage. Additionally, the built-in 3-axis gravity sensor (G-Sensor) automatically triggers and locks video recordings when unusual collisions are detected, saving them as evidence.

Image: A graphic explaining the seamless loop recording feature, showing how the dash cam continuously records and overwrites old files. It also highlights the inclusion of a free 64GB SD card.

Image: A visual representation of the G-Sensor automatically locking video upon collision detection, and a manual lock button for immediate event saving.
Compact Size & Voice Notification
Thanks to its discreet size, the Q7 dash cam won't obstruct your view while driving. The simplified wiring design and included wiring tool make installation easy. The device also provides voice notifications to keep you informed about the camera's working status, allowing you to drive with full concentration.

Image: A view from inside a car showing the compact Q7 dash cam mounted discreetly, with visual cues for voice notifications like "Video Locked," "Start Recording," and "Mute ON/OFF."
Setup Guide
1. Installation
- Clean the windshield area where the dash cam will be mounted. Apply the electrostatic film to the chosen location on the windshield.
- Attach the front dash cam to the electrostatic film using its adhesive pad. Ensure it is securely mounted and does not obstruct your driving view.
- Route the power cable from the front dash cam to your car's cigarette lighter port. Use the included wiring trim tool to neatly tuck the cable along the car's interior trim.
- Connect the rear camera cable to the front dash cam's AV-in port. Route the rear camera cable to the back of your vehicle, securing it along the trim.
- Mount the rear camera on your rear windshield using its adhesive pad. Ensure the lens has a clear view of the road behind.
- Plug the car charger into your vehicle's cigarette lighter socket.

Image: A simplified diagram illustrating the installation steps for the front and rear dash cams, showing cable routing and power connection points within a car.
2. Initial Setup & App Connection
- Turn on your car's ignition to power on the dash cam. The dash cam's Wi-Fi hotspot will activate.
- Download the "Pezzio" app from your smartphone's app store (available on App Store and Google Play).
- On your smartphone, go to Wi-Fi settings and connect to the dash cam's Wi-Fi network (e.g., "Pezzio-Q7-XXXX"). The default password is "12345678".
- Open the Pezzio app. It will automatically detect your Q7 dash cam. Tap "Connect Camera" to establish the connection.
- Once connected, you can view the live feed from both cameras, adjust settings, and manage recordings directly from the app.
- Format the included 64GB Micro SD card through the app for first-time use. This ensures optimal performance.
Operating Instructions
Basic Operation
- Automatic Recording: The dash cam will automatically start recording when your vehicle's ignition is turned on.
- Manual Recording/Lock: Press the power button on the dash cam to manually start/stop recording or to lock the current video segment, protecting it from being overwritten.
- Microphone Control: You can mute or unmute the microphone via the app or a dedicated button on the device (if available) to record or silence in-cabin audio.
- Viewing Recordings: Access recorded videos and snapshots through the Pezzio app. You can download files to your phone's photo library for easy sharing or backup.
Advanced Settings (via App)
- Video Resolution: Adjust between 4K (front only) or 4K+1080P (dual channel) and other available resolutions.
- Loop Record Options: Set the duration of each recorded file (e.g., 1, 2, 3, or 5 minutes).
- Anti-Flicker: Adjust to 50Hz or 60Hz based on your region to prevent video flickering.
- Time Stamp & 24-Hour Time: Enable or disable time and date stamps on your recordings.
- Collision Sensing (G-Sensor): Adjust sensitivity (Off, Low, Medium, High). Higher sensitivity means the camera will lock video files more easily upon detecting impacts.
- Automatic Screen Off Time: Configure the screen to turn off after a set period (e.g., 10, 30 seconds, 1 minute, or Off) to avoid distraction while driving. Recording will continue in the background.
Maintenance
- Memory Card: Regularly format the Micro SD card (at least once a month) to ensure optimal performance and prevent data corruption. Use a high-quality Class 10, U3 speed Micro SD card up to 256GB.
- Cleaning: Gently wipe the camera lenses and body with a soft, dry cloth to remove dust or smudges. Avoid using abrasive cleaners or solvents.
- Temperature: Operate the dash cam within the specified temperature range (-4°F to 167°F) to prevent damage. Avoid prolonged exposure to direct sunlight in extreme heat.
- Firmware Updates: Check the manufacturer's website or the Pezzio app periodically for firmware updates to ensure your device has the latest features and bug fixes.
Troubleshooting
| Problem | Possible Cause | Solution |
|---|---|---|
| Dash cam not powering on. | No power supply; loose connection. | Ensure the car charger is securely plugged into the cigarette lighter socket. Check vehicle's power supply. |
| "No Internet" message on phone app. | Phone connected to dash cam's Wi-Fi, but no internet access. | This is normal. The dash cam's Wi-Fi is for direct connection only. Disconnect from dash cam Wi-Fi to use internet. |
| Rear camera video not showing. | Rear camera cable not fully inserted. | Ensure the rear camera cable is fully and securely plugged into the main camera's AV-in port. |
| Dash cam stops recording in parking mode. | Insufficient power supply for 24-hour monitoring. | A dedicated hardwire kit (ASIN: B0BN829V8D) is required for 24-hour parking mode. |
| Video quality is poor. | Dirty lens; incorrect resolution setting. | Clean the lenses. Check video resolution settings in the app and ensure it's set to 4K/1080P. |
Specifications
| Feature | Detail |
|---|---|
| Video Resolution | 4K-2160P Front + 1080P Rear Dual Lens; 4K-2160P Single Front |
| WiFi Info | Built-in 5GHz WiFi, 4X download speed (8MB/s) compared to 2.4G WiFi |
| Video Playback Method | From Cellphone App or PC (VLC Player) |
| Included Memory Disk | 64GB (pre-inserted into the Dash Cam) |
| Max Memory Disk Support | Support 256GB Max, Class 10, U3 speed Micro SD Card |
| Parking Mode | Support, Record Video at Low Fps, Dedicated Type C Hardwire Kit Required |
| Battery & Charging | NO battery; Cigarette Lighter or Hard Wire, DC5V/2A |
| Mounting Type | Stick Mount on the Front Windshield, Removable Base |
| Operating Temperature | -4°F to 167°F |
| Product Dimensions | 2.76 x 6.3 x 2.36 inches |
| Item Weight | 10.6 ounces |
Warranty & Support
Every Navycrest Q7 Dash Cam is covered by a one-year quality guarantee. For any technical support or inquiries, our customer care team is available 24/7 and aims to respond within 12 hours. You can email our customer care for assistance.
For product registration and warranty activation, please refer to the Quick Start Guide or the information provided on the product packaging.
For further assistance, please visit: pezio.com/apps/product-registration
Email support: support@pezio.com


