Tenpmas Tire Pressure Monitoring System-240824
Tenpmas Wireless Solar TPMS Tire Pressure Monitoring System User Manual
Model: Tire Pressure Monitoring System-240824
Introduction
This manual provides detailed instructions for the installation, operation, and maintenance of your Tenpmas Wireless Solar Tire Pressure Monitoring System (TPMS). This system is designed to enhance driving safety by providing real-time tire pressure and temperature data, alerting you to potential tire issues. Please read this manual thoroughly before using the product to ensure proper function and safety.
Important Safety Information
- Always prioritize safe driving. Do not attempt to operate or adjust the TPMS while driving.
- Ensure all sensors are securely installed to prevent detachment during vehicle operation.
- Regularly check tire pressure with a calibrated gauge, as the TPMS is an assistance system and not a substitute for manual checks.
- If an alarm sounds, safely pull over and inspect your tires.
- Keep the monitor and sensors away from extreme temperatures or direct sunlight for prolonged periods when not in use.
Package Contents
Please verify that all items listed below are included in your package:
- 1 x Tenpmas Tire Pressure Monitor
- 4 x External Sensors
- 4 x Anti-lost Nuts
- 1 x Portable Tool (Wrench)
- 1 x TYPE-C Charging Cable
- 1 x Removable Bracket
- 2 x Installation Stickers
- 1 x User Manual

A comprehensive list of all components included in the Tenpmas TPMS package, such as the monitor, sensors, anti-lost nuts, wrench, and charging cable.
Product Overview
The Tenpmas TPMS consists of a main monitor unit and four external wireless sensors. The monitor displays real-time tire pressure and temperature, while the sensors are installed on the tire valves to collect data.

The Tenpmas TPMS monitor with its detachable bracket and four external tire pressure sensors.
Setup Guide
1. Charging the Monitor
Before first use, fully charge the monitor for at least 2 hours using the provided Type-C USB cable. The monitor also features a solar panel for continuous charging during daylight hours.
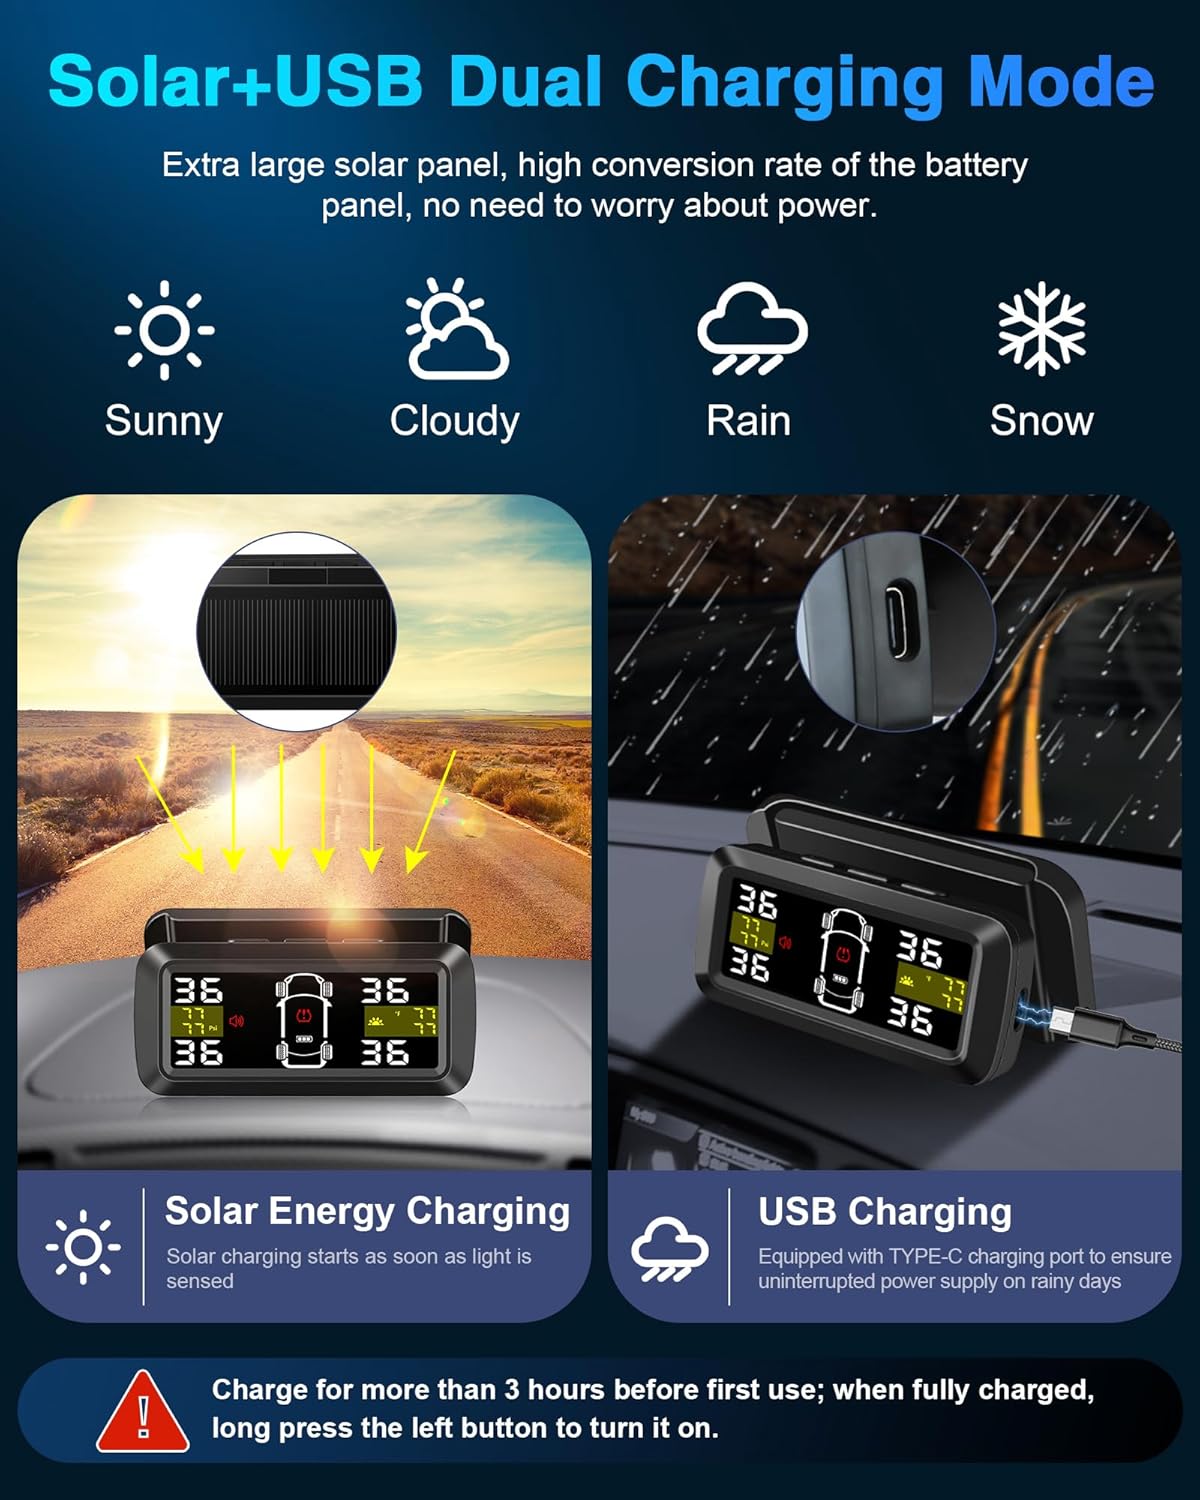
Diagram showing the dual charging capabilities of the Tenpmas TPMS monitor, featuring both solar panel charging and a USB Type-C port for continuous power.
2. Mounting the Monitor
The monitor comes with a detachable bracket for flexible placement on your dashboard or windshield. Choose a location that does not obstruct your view and allows the solar panel to receive sunlight.
- Attach the removable bracket to the monitor.
- Clean the desired mounting surface on your dashboard or windshield.
- Use the provided adhesive stickers to secure the bracket to the surface.
- Adjust the monitor angle for optimal viewing without obstructing your driving vision.

Images illustrating the unique detachable design of the monitor and its large screen, which can be positioned to avoid obstructing the driver's view.
3. Installing the External Sensors
The four external sensors are labeled for specific tire positions (FL: Front Left, FR: Front Right, RL: Rear Left, RR: Rear Right). Ensure correct placement for accurate readings.
- Unscrew the original valve cap from the tire valve.
- Screw on one of the anti-lost nuts onto the valve stem.
- Screw the corresponding sensor (e.g., FL for Front Left) onto the valve stem until it is hand-tight.
- Using the provided wrench, tighten the anti-lost nut against the sensor to secure it in place and prevent theft.
- Repeat for all four tires.
Note: The sensors are IP67 waterproof and designed for quick installation without removing the tires.

Images showcasing the IP67 waterproof rating of the external sensors, their resistance to various environmental conditions, and the quick, tool-assisted installation process.
Operating Instructions
1. Power On/Off
- Power On: Long press the left button on the monitor to turn it on. The monitor will also automatically power on when it detects vibration (e.g., when you open the car door or start the engine).
- Power Off: Long press the left button to turn it off manually. The monitor will automatically enter sleep mode after 5 minutes of no vibration detection to save power.

Illustrations demonstrating the vibration sensing feature that automatically activates the monitor upon vehicle movement and its automatic sleep mode for power saving.
2. Display Overview
The 3.5-inch large screen displays real-time pressure and temperature for all four tires, along with battery status and alarm indicators.

Visual representation of the six real-time alarm modes, including sensor connection failure, high temperature, high pressure, low pressure, low battery, and leak alarms.
3. Setting Alarm Values
The system allows for separate high and low pressure alarm values for front and rear wheels, with an accuracy of 0.01 bar.
- Enter setting mode by long-pressing the 'Menu' button (refer to monitor buttons for exact labeling).
- Navigate through options using the 'Up'/'Down' buttons.
- Select 'High Pressure Alarm' or 'Low Pressure Alarm' for front or rear wheels.
- Adjust the desired pressure value using the 'Up'/'Down' buttons.
- Confirm and exit setting mode.

Comparison highlighting the upgraded features of the Tenpmas TPMS, such as 0.01 bar accuracy and the ability to set separate high/low pressure alarm values for front and rear wheels.
4. Unit Selection
You can switch between different pressure and temperature units:
- Pressure Units: PSI / Bar (default range: 1.5-6.0 Bar / 22-87 Psi)
- Temperature Units: ℃ / ℉
Refer to the monitor's menu settings to change these units.
5. 2/4 Wheel Mode
The system supports both 2-wheel (for trailers) and 4-wheel (for cars, SUVs, MPVs) configurations. If only two sensors are installed, the system will adapt without triggering an alarm.

Illustration demonstrating the Tenpmas TPMS support for both 2-wheel (trailer) and 4-wheel (car) configurations, highlighting its superior accuracy compared to older systems.
Maintenance
1. Sensor Battery Replacement
Each external sensor uses a CR1632 button cell battery. When a sensor battery low alarm is triggered, replace the battery promptly.
- Unscrew the sensor from the tire valve.
- Carefully open the sensor casing.
- Remove the old CR1632 battery and insert a new one, ensuring correct polarity.
- Close the sensor casing securely and re-install the sensor on the tire valve, tightening the anti-lost nut.
2. Cleaning
Wipe the monitor and sensors with a soft, damp cloth. Do not use abrasive cleaners or solvents.
Troubleshooting
| Problem | Possible Cause | Solution |
|---|---|---|
| Monitor not turning on | Low battery; Manual power off | Charge the monitor via USB; Long press the left button to power on. |
| No sensor data displayed | Sensor not installed correctly; Sensor battery low; Distance too far | Re-install sensor securely; Replace sensor battery; Ensure monitor-sensor distance is within 6m/19.7ft. |
| Inaccurate pressure readings | Sensor not fully tightened; Incorrect unit setting | Ensure sensors are tightly secured; Check and adjust pressure unit (PSI/Bar) in settings. |
| Alarm sounds frequently | Alarm thresholds set too narrow; Actual tire issue | Adjust high/low pressure alarm values; Inspect tires for leaks or damage. |
| Monitor not charging via solar | Insufficient sunlight; Solar panel obstructed | Ensure monitor is placed in direct sunlight; Clean solar panel. |
Specifications
- Brand: Tenpmas
- Model: Tire Pressure Monitoring System-240824
- Voltage: 2.1~3.6V
- Working Temperature: -30℃~80℃ / -22℉~176℉
- Weight: 230g
- Sensor Battery Type: CR1632
- Temperature Monitoring Range: -50℃~90℃ / 122℉~194℉
- Waterproof Rating (Sensors): IP68
- Pressure Range: 1.5-6.0 BAR (22-87 Psi)
- Pressure Accuracy: 0.01 Bar
- Charging: Solar Power & USB Type-C
- Display: 3.5-inch Large Screen
- Compatibility: Sedans, SUV, MPV, and vehicles with tire pressure less than 6.0 Bar. Supports 2/4 wheel modes.
Warranty and Support
For any issues or inquiries regarding your Tenpmas TPMS, please refer to the contact information provided with your purchase or visit the official Tenpmas support website. Please retain your proof of purchase for warranty claims.
Ask a question about this manual
Ask about setup, troubleshooting, compatibility, parts, safety, or missing instructions. Manuals+ will review the question and use this page’s manual context to help answer it.