1. Introduction
Thank you for purchasing the Generic HY300 Portable Ultra HD Projector. This device is designed to provide a versatile and powerful projection solution for various needs, including business presentations, home entertainment, and multimedia content display. Its compact design and broad compatibility make it an ideal choice for use in different environments.
This manual provides essential information on the setup, operation, and maintenance of your projector. Please read it thoroughly before using the product to ensure proper function and to maximize your viewing experience.

Figure 1.1: The compact design of the HY300 projector, highlighting its portability.
2. Safety Information
To ensure safe operation and prolong the life of your projector, please observe the following safety guidelines:
- Ventilation: Do not block the ventilation openings. Ensure adequate airflow around the projector to prevent overheating.
- Dust and Dirt: Place the projector in a location free of dust or dirt. Dust can contaminate the internal lenses and affect image quality.
- Power Supply: Use only the provided power cable and ensure the voltage matches the projector's requirements (110V/220V compatible).
- Liquid Exposure: Keep the projector away from water or other liquids. Do not operate with wet hands.
- Eye Protection: Do not look directly into the projector lens when the lamp is on, as the bright light can cause eye strain or damage.
- Handling: Handle the projector with care. Avoid dropping or subjecting it to strong impacts.
3. Package Contents
Verify that all items are present in the package:
- Generic HY300 Projector
- Power Cable
- Remote Control
- User Manual (this document)
4. Product Overview
Familiarize yourself with the various ports and features of your HY300 projector:
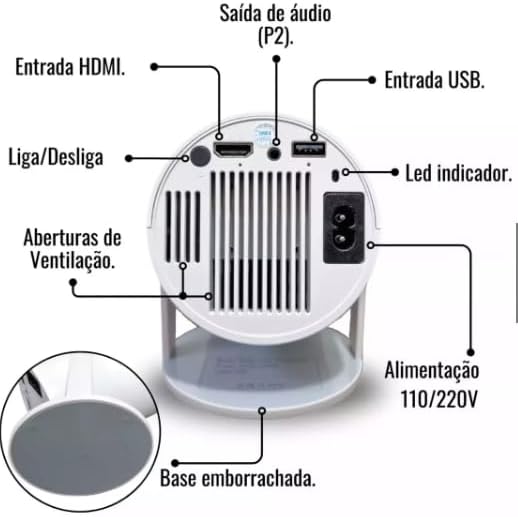
Figure 4.1: Rear panel and connections of the HY300 Projector.
- HDMI Input: Connect to devices such as laptops, game consoles, or TV boxes.
- USB Input: Connect USB drives for media playback.
- Audio Output (P2): Connect external speakers or headphones.
- Power Input (110V/220V): Connect the power cable to an electrical outlet.
- Power Button: Turns the projector on or off.
- Indicator LED: Displays the power status of the projector.
- Ventilation Openings: Essential for heat dissipation. Do not obstruct.
- Rubberized Base: Provides stability and prevents slipping.
5. Setup
5.1 Placement
Position the projector on a stable, flat surface. The HY300 features a 180-degree flexible projection angle, allowing you to adjust the body to project onto a wall or even the ceiling.
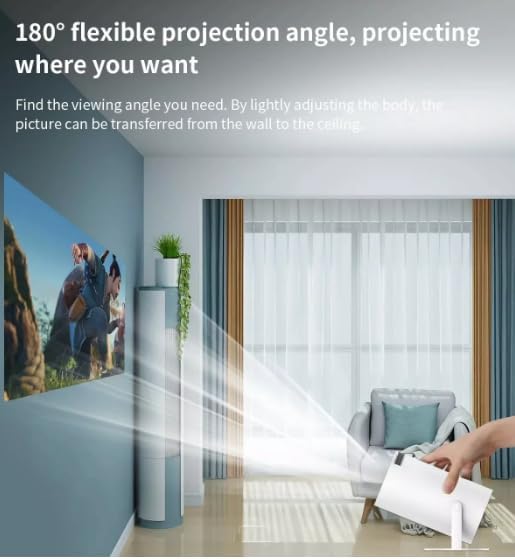
Figure 5.1: Adjusting the projection angle for flexible viewing.
5.2 Power Connection
- Connect the power cable to the projector's power input.
- Plug the other end of the power cable into a 110V or 220V electrical outlet. The projector is bivolt compatible.
5.3 Initial Power On
Press the Power Button on the projector or the remote control to turn on the device. The indicator LED will illuminate.
6. Operating Instructions
6.1 Basic Navigation
The HY300 projector runs on an Android system, allowing for intuitive navigation using the remote control. Use the directional buttons to move through menus and the OK button to select.

Figure 6.1: The projector's smart interface with various applications.
6.2 Adjusting Projection
- Focus: Adjust the focus ring on the projector lens until the image is clear.
- Keystone Correction: The projector features automatic image correction to adjust for distorted images when the projector is not perfectly perpendicular to the screen.
- Zoom: The projector has a 1.35x zoom capability, allowing for minor adjustments to the image size without moving the projector.
7. Connectivity
The HY300 projector offers multiple connectivity options:
- HDMI: Connect to external devices such as TV boxes, laptops, game consoles (PlayStation), or other HDMI-enabled media players.
- USB: Insert a USB flash drive to play media files directly from the drive.
- Bluetooth: Connect to external Bluetooth speakers for enhanced audio output. The projector also has a built-in speaker.
- Audio Output (P2): Connect wired headphones or external speakers.
8. Screen Mirroring
The projector supports convenient screen mirroring, allowing you to display content from your smartphone or tablet wirelessly via Wi-Fi.
- Ensure your projector and mobile device are connected to the same Wi-Fi network.
- On the projector's interface, select the screen mirroring application (e.g., 'Miracast' or 'AirPlay' equivalent).
- On your smartphone or tablet, enable screen mirroring/casting (e.g., 'Smart View' on Android, 'Screen Mirroring' on iOS).
- Select the projector from the list of available devices.
- Your device's screen will now be mirrored on the projector.
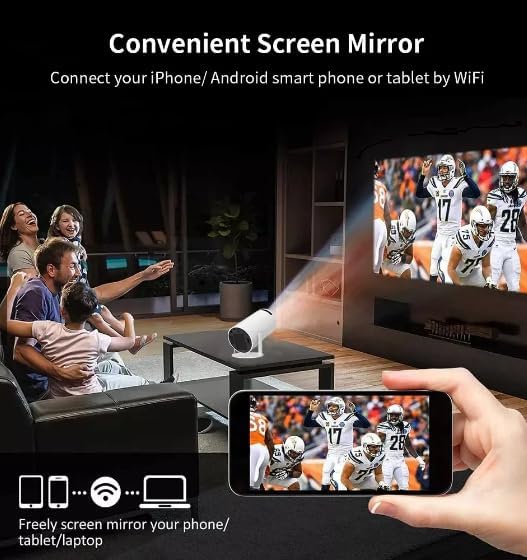
Figure 8.1: Screen mirroring from a smartphone to the projector.
9. Maintenance
Proper maintenance ensures optimal performance and longevity of your projector:
- Cleaning the Lens: Gently wipe the projector lens with a soft, lint-free cloth specifically designed for optical surfaces. Do not use abrasive cleaners.
- Dust Prevention: As mentioned in the safety section, always place the projector in a clean, dust-free environment to prevent internal lens contamination.
- Ventilation: Regularly check that the ventilation openings are clear of dust and debris. Use a soft brush or compressed air to clean them if necessary.
- Storage: When not in use for extended periods, store the projector in a cool, dry place, ideally in its original packaging or a protective case.
10. Troubleshooting
If you encounter issues with your projector, refer to the following common problems and solutions:
- No Image:
- Ensure the power cable is securely connected and the projector is turned on.
- Check the input source (HDMI, USB) and ensure it is correctly selected.
- Verify that the connected device (laptop, TV box) is powered on and outputting a signal.
- Adjust the focus ring.
- No Sound:
- Check the volume settings on both the projector and the connected source device.
- If using external speakers, ensure they are properly connected and powered on.
- If using Bluetooth speakers, ensure they are paired correctly.
- Blurred Image:
- Adjust the focus ring on the projector lens.
- Ensure the projection surface is flat and smooth.
- Check for dust on the lens.
- Overheating Warning:
- Ensure the ventilation openings are not blocked.
- Operate the projector in a well-ventilated area.
11. Specifications
Detailed technical specifications for the Generic HY300 Projector:
| Feature | Specification |
|---|---|
| Brand | Generic |
| Model | HY300 |
| Optical Resolution | 1280 x 720 (Ultra HD) |
| Brightness | 8000 Lumens (200 ANSI Lumens) |
| Contrast Ratio | 3001:1 - 4000:1 |
| Projection Technology | LED |
| Light Source Life | 50,000 Hours |
| Projection Size | 40-150 inches |
| Projection Distance | 1.2 meters to 4 meters |
| Screen Scale | 4:3 / 16:9 |
| Zoom | 1.35x |
| Operating System | Android |
| Hardware Interface | Bluetooth, HDMI, USB |
| Connectivity Technology | HDMI, Wi-Fi, Bluetooth |
| Compatible Devices | Speakers, Laptops, Game Consoles, Smartphones, Tablets, Televisions |
| Special Features | Portable, Automatic Image Correction, Built-in Speaker, Screen Mirroring |
| Voltage | 110 Volts / 220 Volts (Bivolt) |
| DC Input | 19V 3A & OTG |
| Weight | 900g |
| Refresh Rate | 60 Hz |
| Mounting Type | Freestanding, Tabletop Mount |
12. Warranty and Support
The Generic HY300 Projector comes with a manufacturer's warranty of 30 days from the date of purchase. Please retain your proof of purchase for any warranty claims.
For technical support or warranty inquiries, please contact your retailer or the manufacturer's customer service. Refer to the product packaging or purchase documentation for specific contact information.


