Y&H BL912-100A-SA
Y&H Solar Panel Charge Controller User Manual
Model: BL912-100A-SA | Brand: Y&H
Product Overview
The Y&H BL912-100A-SA MPPT Solar Charge Controller is designed to efficiently manage power flow from your solar panels to your battery bank and connected loads. It features advanced Maximum Power Point Tracking (MPPT) technology to optimize charging efficiency, providing 10%-30% better performance compared to conventional PWM controllers. This controller ensures your battery is charged safely and prevents overcharging, over-discharging, and reverse current flow from the battery to the solar panels at night. It is equipped with a clear LCD display and dual USB ports for convenient device charging.

Figure 1: Front view of the Y&H BL912-100A-SA Solar Charge Controller, showing the LCD display, control buttons, and dual USB ports.
Key Features
- Advanced MPPT Technology: Maximizes power harvest from solar panels, improving charging efficiency by 10%-30%.
- Battery Compatibility: Suitable for various battery types including OPEN, AGM, GEL, Ni-MH, and Li-ion batteries.
- Comprehensive Protections: Includes battery reverse polarity protection, solar panel reverse polarity protection, short-circuit protection, over-heating protection, over-current protection, and lightning protection.
- Automatic Load Management: Automatically disconnects load when battery voltage is low and reconnects when voltage recovers.
- Intelligent Charge Management: Features ideal State of Charge (SOC) function, charge current control, and prevents overcharge/over-discharge.
- Dual USB Ports: Provides 5V 2A output for charging mobile devices, tablets, and cameras.
- LCD Display: Clear display for monitoring system parameters and settings.
- Automatic Temperature Compensation: Adjusts charging voltage based on ambient temperature for optimal battery health.
Setup and Installation
Proper installation is crucial for the safe and efficient operation of your solar charge controller. Please follow these steps carefully:
- Connect Battery First: Connect the battery to the charge controller. Ensure correct polarity (+ to + and - to -). The controller will detect the battery voltage (12V or 24V) automatically.
- Connect Solar Panels: Connect the solar panels to the charge controller. Again, ensure correct polarity. The working voltage of the solar panel should be within 17V-23V for a 12V battery system and 36V-46V for a 24V battery system. Connecting panels with voltage outside this range may damage the controller.
- Connect Load (Optional): Connect your DC loads to the charge controller's load terminals. Ensure the total current of the loads does not exceed the controller's rated current.
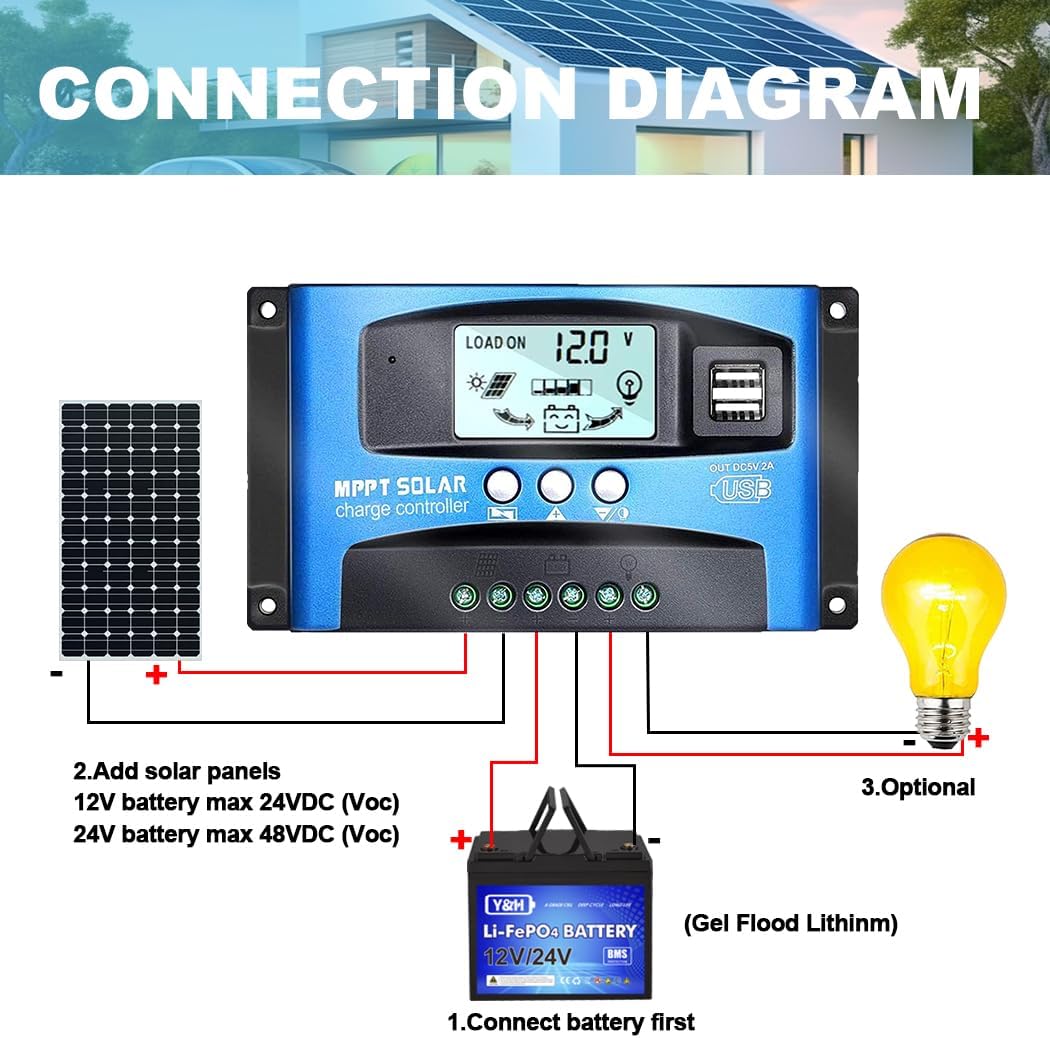
Figure 2: Connection diagram illustrating the proper sequence for connecting the battery, solar panels, and optional load to the charge controller.
Important Safety Note: Always connect the battery to the controller first before connecting solar panels or loads. Disconnect in the reverse order: load, then solar panels, then battery.
Operating Instructions
LCD Display and Interface
The controller features an LCD display that shows various system parameters. Press the MENU button to browse through different interfaces.

Figure 3: Illustration of the LCD display interfaces, showing main display, float voltage, discharge reconnect, discharge stop, load work mode, battery type, and work parameter display.
Setting Parameters
To set parameters, navigate to Interface 2 (or other relevant interfaces) and press the MENU button to enter the setting mode. Use the UP and DOWN buttons to adjust the parameter values. The controller's default parameters are locked by the CPU and cannot be modified.
Load Working Modes
The controller supports different load working modes:
- Manual Mode (24H): The load is continuously on for 24 hours.
- Solar Light Control Mode (Sunset-Sunrise): The load turns on at sunset and turns off at sunrise.
- Solar Light Time Control: The load turns on at sunset and stays on for a set duration.
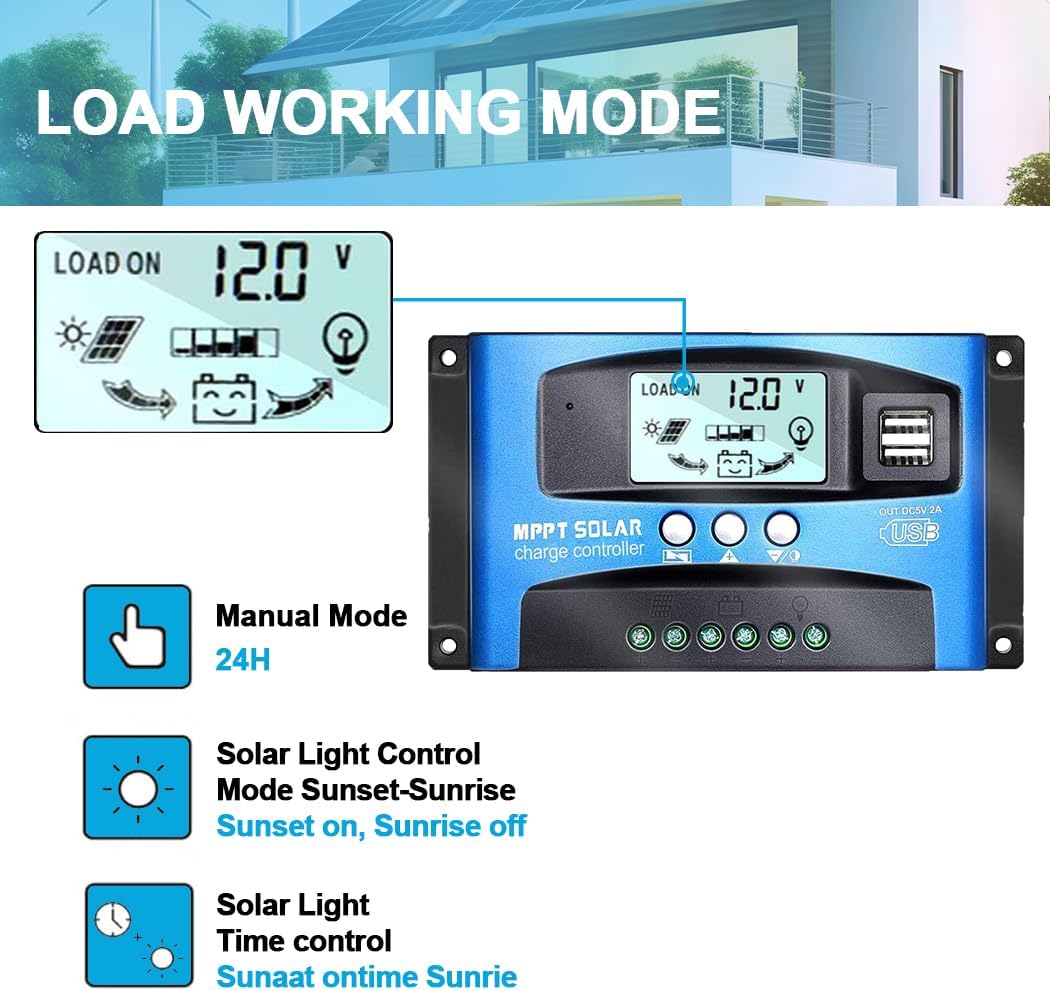
Figure 4: Visual representation of the different load working modes available on the controller.
USB Charging Ports
The controller is equipped with dual USB ports (5V 2A) for charging various electronic devices.

Figure 5: Close-up of the dual USB ports on the controller, demonstrating their use for charging devices like smartphones.
Safety and Protection Features
The Y&H Solar Charge Controller incorporates multiple protection mechanisms to ensure safe and reliable operation of your solar system:
- Short-circuit Protection: Protects the system from damage due to short circuits.
- Over-Heating Protection: Prevents the controller from overheating during operation.
- Reverse Connection Protection: Safeguards against damage from incorrect battery or solar panel polarity connections.
- Over Current Protection: Limits current to prevent damage to connected components.
- Overcharge Protection: Prevents battery damage from excessive charging.
- Over-discharge Protection: Prevents battery damage from being discharged too deeply.
- Lightning Protection: Offers protection against lightning strikes.

Figure 6: Icons representing the various security protection features integrated into the controller.
Battery Compatibility
The controller is compatible with a wide range of battery types, including:
- OPEN Lead-Acid Batteries
- AGM Lead-Acid Batteries
- GEL Lead-Acid Batteries
- Ni-MH Batteries
- Li-ion Batteries
- Other battery types (ensure voltage compatibility)

Figure 7: Visual representation of the controller's compatibility with GEL, Flooded (OPEN), and Lithium battery types.
While the controller is versatile, ensure that the maximum panel current and battery capacity are appropriately matched. For example, if your solar panel provides 5 Amps, a 50 Amp-hour battery is preferable. For a 10 Amp panel, a 100 Amp-hour battery is recommended. Using a very large panel to charge a very small battery can be dangerous and is not advised.
Specifications
| Feature | Detail |
|---|---|
| Model Number | BL912-100A-SA |
| Brand | Y&H |
| Product Dimensions | 17 x 10 x 5 cm |
| Weight | 300 grams |
| Voltage | 12V / 24V Auto-sensing |
| Max. Solar Panel Input (12V System) | 1200W |
| Max. Solar Panel Input (24V System) | 2400W |
| Display Type | LCD |
| USB Output | Dual USB Type-A, 5V 2A |
| Material | Plastic |
| Color | Blue |
| UPC | 704334854888 |
Troubleshooting (Common Questions)
- Q: How many watts of solar panels can be connected to this controller?
- A: For a 12V battery system, the maximum solar panel input is 1200W. For a 24V battery system, the maximum input is 2400W. This is based on a 100 Amp controller rating.
- Q: My solar panel is 36V 200W. Can I use it to charge a 12V battery with this controller?
- A: To charge a 12V battery, the working voltage of your solar panel should ideally be between 17V and 23V. For a 24V battery, the working voltage should be between 36V and 46V. A 36V panel is too high for a 12V battery system and could damage the controller. Always ensure the solar panel's working voltage is within the recommended range for your battery system voltage.
- Q: Does the controller require a specific battery capacity?
- A: While there isn't a strict capacity requirement, it's important that the maximum current from your solar panel is appropriately matched with your battery's capacity. For example, if your solar panel provides 5 Amps, a 50 Amp-hour battery is preferable. For a 10 Amp panel, a 100 Amp-hour battery is recommended. Using a very large solar panel with a very small battery can be dangerous and is not advised.
Maintenance
To ensure the longevity and optimal performance of your solar charge controller, consider the following maintenance tips:
- Regular Cleaning: Keep the controller clean and free from dust and debris. Use a dry, soft cloth for cleaning.
- Check Connections: Periodically inspect all wiring connections to ensure they are tight and free from corrosion. Loose connections can lead to power loss or overheating.
- Ventilation: Ensure the controller is installed in a well-ventilated area to prevent overheating. Do not block the ventilation holes.
- Environmental Conditions: Avoid exposing the controller to direct sunlight, rain, or excessive humidity. Install it in a dry, cool environment.
- Battery Health: Monitor your battery's health regularly. A healthy battery contributes to the overall efficiency and lifespan of your solar system.
Package Contents
Upon opening the package, you should find the following items:
- 1 x Y&H MPPT Solar Charge Controller (Model: BL912-100A-SA)
- 1 x English User Manual
Warranty and Support
For any issues or inquiries regarding your Y&H Solar Charge Controller, please contact our customer support. We are committed to resolving your problems and ensuring your satisfaction within 24 hours.
Please refer to your purchase documentation for specific warranty terms and contact information.
Related Documents - BL912-100A-SA
 |
Y&H BL912 MPPT Solar Charge Controller Wiring Tutorial A comprehensive guide on wiring the Y&H BL912 MPPT Solar Charge Controller, covering battery connection, solar panel connection, and load connection with detailed instructions and safety precautions. |
 |
ECGSOLAX SY Series MPPT Solar Charge Controller User Manual User manual for the ECGSOLAX SY Series 100A MPPT Solar Charge Controller, detailing specifications, operation modes, display functions, protection features, and important safety notes. |
 |
Solar Charge Controller SA Series User Manual User manual for SA Series Solar Charge Controller (60A/80A/100A). Includes installation instructions, wiring diagrams, charging modes, and technical specifications for 12V, 24V, 36V, and 48V systems. |
 |
Solar Charge Controller User Manual User manual for the 10A-100A Solar Charge Controller, covering installation, operation, troubleshooting, and technical specifications. |
 |
Y&H SY Series Solar Charge Controller: Wiring and Setting Guide Comprehensive guide for wiring and setting up Y&H SY series MPPT solar charge controllers. Covers battery and solar panel connection, load connection, voltage settings, and load mode functions. |
 |
Aideepen Intelligent Solar Charge Controller | 12V/24V, 10A-100A, LED Display, Dual USB Comprehensive overview of the Aideepen Intelligent Solar Charge Controller. Details features, specifications (10A, 30A, 60A, 100A models), 12V/24V compatibility, LED display, dual USB ports, and protection systems for solar power applications. |
Ask a question about this manual
Ask about setup, troubleshooting, compatibility, parts, safety, or missing instructions. Manuals+ will review the question and use this page’s manual context to help answer it.