QPKING CT160
QPKING CT160 Fuel Injector Cleaner & Tester
Instruction Manual
Introduction
The QPKING CT160 Fuel Injector Cleaner and Tester is a versatile diagnostic and maintenance tool designed for automotive fuel systems. It features 11 functions for comprehensive cleaning and testing of fuel injectors, including ultrasonic cleaning and various testing modes for idle speed, medium speed, high speed, accelerating, variable speed, leakage, and spray patterns. This 4-cylinder unit is capable of heating the cleaning fluid for enhanced effectiveness and includes a digital display for real-time monitoring.
Key Features
- 11 Functions: This new generation CT160 offers a wide range of functions for thorough injector analysis and maintenance.
- Ultrasonic Cleaning: Capable of simultaneously cleaning single or multiple injectors, effectively removing blockages from injector accessories and internal components.
- Heated Cleaning Fluid: The unit can heat the cleaning fluid in the ultrasonic tank to approximately 45°C, significantly improving the cleaning effect.
- 9 Kinds of Fuel Injector Tests: Includes comprehensive testing modes such as idle speed test, medium speed test, high speed test, accelerating test, variable speed test, leakage test, idle spray test, medium spray test, and high spray volume test.
- Compact and Portable Design: Weighing only 8kg, the CT160 is designed for ease of transport and storage, featuring a large 2000ml ultrasonic cleaning tank.
- Drain Valve System: Equipped with a convenient drain valve for easy recovery of used cleaning and testing fluids.
- Wide Application: Simulates various engine working conditions, suitable for cleaning and inspecting fuel injectors of most cars and motorcycles.
- Digital Display: Microcomputer-controlled digital display for automatic cleaning, testing, and real-time monitoring of dynamic values.
Product Overview
Familiarize yourself with the components of the QPKING CT160 Fuel Injector Cleaner and Tester.

Figure 1: Labeled diagram of the CT160 unit. Key components include (1) Pressure Gauge, (2) Lock Nut, (3) Top Oil Inlet Connector, (4) Glass Measuring Cylinder, (5) Oil Drain Handle, (6) Operation Panel, (7) Lock Pole, (8) Oil Outlet Pipe, (9) Signal Wire, (10) Pressure Regulating Knob, (11) Heating Switch, (12) Ultrasonic Switch, (13) Power Switch, (14) Power Socket, (15) Cleaning Agent Drain Valve, (16) Testing Agent Drain Valve, (17) Testing Agent Liquid Level, (18) Oil Rail, (19) Ultrasonic Cleaning Tank.
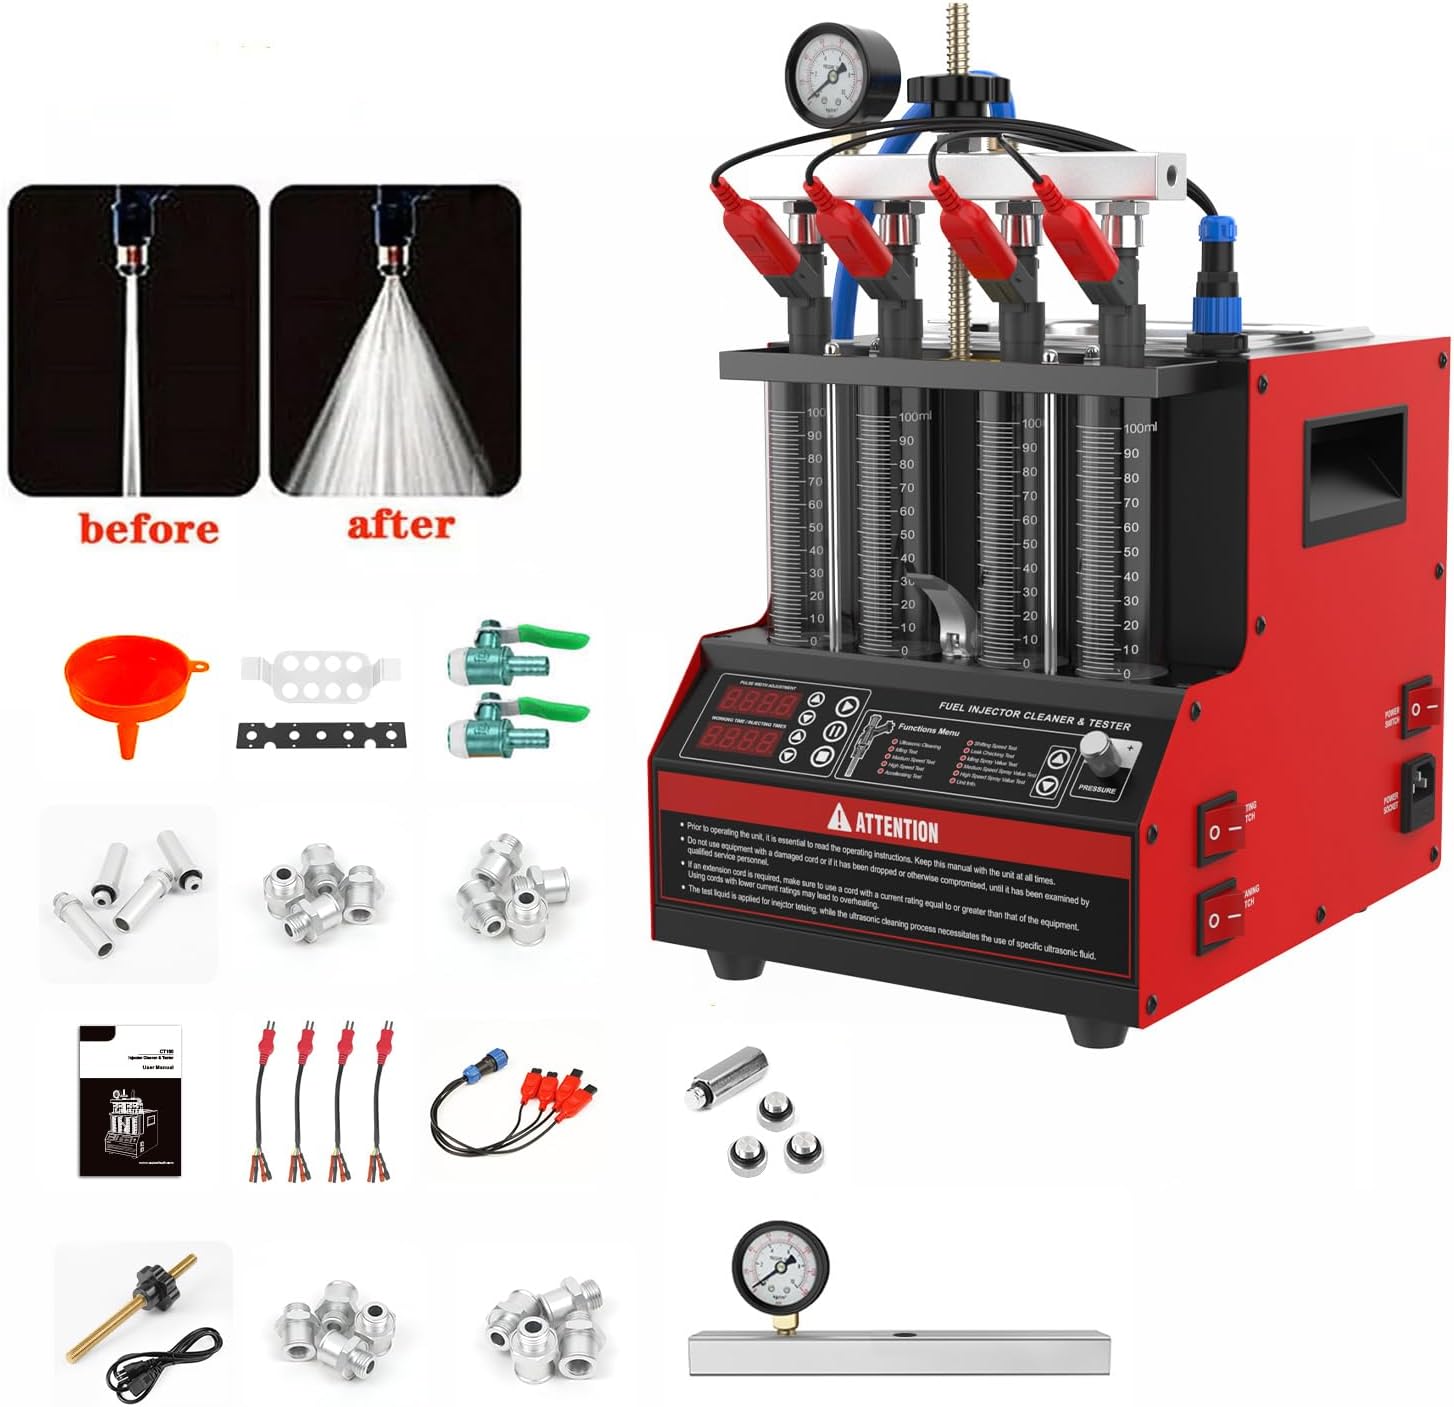
Figure 2: The CT160 unit shown with its various accessories, including different adapters, signal wires, and a funnel.
Setup and Operation
This section details the steps for setting up and operating your CT160 unit for both cleaning and testing fuel injectors.
Video Guide: CT160 4-Cylinders Fuel Injector Cleaner Machine
Official product video demonstrating the setup, ultrasonic cleaning, heating, and fuel injector testing functions of the QPKING CT160 Fuel Injector Cleaner and Tester.
1. Initial Setup
- Install Drain Valves: Securely install the cleaning/testing agent discharge valves (15, 16) at the bottom of the unit.
- Prepare Ultrasonic Tank: Place the injector holder tray into the ultrasonic cleaning tank (19).
- Connect Signal Wire: Connect the main signal wire (9) to the designated port on the unit.
- Power Connection: Ensure the unit is connected to a stable 110V power supply via the power socket (14).
2. Ultrasonic Cleaning Process
- Prepare Injectors: Connect the signal wires to the fuel injectors.
- Place Injectors: Carefully place the injectors into the ultrasonic cleaning tank (19) using the provided holder.
- Add Cleaning Fluid: Pour appropriate ultrasonic cleaning fluid into the tank, ensuring the injectors are submerged.
- Activate Power: Turn on the main power switch (13).
- Start Ultrasonic Cleaning: Press the Ultrasonic Switch (12) and select the ultrasonic cleaning function on the operation panel (6) to begin the cleaning cycle. Observe the fluid for cavitation bubbles, indicating the cleaning action.
- Heating Mode (Optional): For enhanced cleaning, activate the Heating Switch (11) to warm the cleaning fluid to approximately 45°C.

Figure 3: Fuel injectors undergoing ultrasonic cleaning in the CT160's tank.

Figure 4: The heating function in action, warming the cleaning fluid for improved effectiveness.
3. Fuel Injector Testing Process
- Install Injectors: After cleaning, install the fuel injectors onto the oil rail (18) and secure them using the lock pole (7) and lock nuts (2).
- Connect Fuel Lines: Connect the blue fuel line from the top oil inlet connector (3) to the oil rail.
- Add Test Fluid: Pour appropriate test fluid into the main reservoir through the top oil inlet connector (3) using the provided funnel. Ensure the fluid level is within the indicated range on the testing agent liquid level (17).
- Connect Signal Wires: Reconnect the signal wires (9) to the injectors.
- Select Test Function: On the operation panel (6), select the desired test function (e.g., Idle Speed Test, Leakage Test, Spray Volume Test).
- Adjust Pressure: Use the pressure regulating knob (10) to adjust the system pressure as required for the selected test, monitoring the pressure gauge (1).
- Observe Results: Observe the spray pattern and volume in the glass measuring cylinders (4) during the test. The digital display will show working time and injecting times.
- Drain Test Fluid: After testing, use the oil drain handle (5) and the testing agent drain valve (16) to recover the test fluid.

Figure 5: Visual guide for ultrasonic cleaning and fuel injector testing operations.

Figure 6: Overview of the various fuel injector test types available on the CT160.

Figure 7: Detailed view of the pressure gauge, graduated glass tubes, and pressure adjustment knob during testing.
Maintenance
Proper maintenance ensures the longevity and optimal performance of your QPKING CT160 unit.
- Fluid Management: Always drain used cleaning and testing fluids after each use. The drain valve design (15, 16) facilitates easy recovery. Dispose of fluids according to local regulations.
- Cleaning the Unit: Regularly wipe down the exterior of the unit with a soft, damp cloth. Avoid using abrasive cleaners or solvents that could damage the surface or internal components.
- Ultrasonic Tank Care: Clean the ultrasonic tank (19) periodically to prevent residue buildup. Ensure no corrosive liquids are used in the tank.
- Injector Adapters and Seals: Inspect injector adapters and O-rings regularly for wear and tear. Replace them if they show signs of damage to ensure proper sealing during testing.
- Storage: Store the unit in a clean, dry environment away from direct sunlight and extreme temperatures.

Figure 8: The convenient drain valve system for fluid recovery.
Troubleshooting
This section provides solutions to common issues you might encounter with your CT160 unit.
| Problem | Possible Cause | Solution |
|---|---|---|
| Unit does not power on. | Power cable disconnected; Power switch off; No power from outlet. | Check power cable connection; Ensure power switch is ON; Test power outlet. |
| Pump does not circulate fluid. | Insufficient fluid level; Clogged filter; Pump malfunction. | Ensure fluid level is adequate; Check and clean fluid filters; Contact support if pump is faulty. |
| Fluid leakage during operation. | Loose connections; Damaged O-rings/seals; Improperly installed injectors. | Tighten all connections; Inspect and replace worn O-rings/seals; Reinstall injectors correctly. |
| Ultrasonic cleaning not effective. | Incorrect cleaning fluid; Insufficient fluid level; Tank too dirty; Injectors not properly submerged. | Use recommended ultrasonic cleaning fluid; Ensure proper fluid level; Clean tank; Submerge injectors fully. |
| Inconsistent spray patterns or volume during testing. | Air in system; Incorrect pressure setting; Partially clogged injectors; Loose injector connections. | Bleed air from the system; Adjust pressure accurately; Perform ultrasonic cleaning; Secure injector connections. |
Specifications
Technical specifications for the QPKING CT160 Fuel Injector Cleaner and Tester.
| Parameter | Value |
|---|---|
| Manufacturer | QPKING |
| Model | CT160 Heated Injector Cleaning Tester (4-Cylinders Ultrasonic Wave Injector Cleaner Tester) |
| Power Supply | 110V / 220V ±10% |
| Frequency | 50Hz / 60Hz |
| Relative Humidity | <85% |
| Environment Temperature | 0°C ~ 40°C |
| External Magnetic Field Strength | <400A/m |
| Range of Rotation | 0 ~ 7500r/min |
| PWM Pulse Width | 0 ~ 20.0ms step 0.1ms |
| Working Time Settings | 0 ~ 10min |
| Cleaning Frequency | 28KHz |
| Cylinder Volume | 100ml |
| Injection Times | 0 ~ 9900 times, step 100ms |
| System Pressure | 0 ~ 0.6Mpa |
| Ultrasonic Cleaning Power | 70W |
| Item Weight | 16.66 pounds (approx. 8kg net) |
| Main Unit Dimensions | 292 x 260 x 273mm |
| Package Dimensions | 340 x 295 x 360mm |
Warranty and Support
QPKING stands behind the quality of the CT160 Fuel Injector Cleaner and Tester.
- 3-Year Warranty: For damages caused by non-human factors, QPKING promises to resend parts for free within 3 years from the date of purchase.
- Lifetime Maintenance: The product is supported with lifetime maintenance.
- Customer Support: If you have any questions or require assistance, please do not hesitate to contact QPKING customer service. They are available to resolve your questions 24 hours a day.
Ask a question about this manual
Ask about setup, troubleshooting, compatibility, parts, safety, or missing instructions. Manuals+ will review the question and use this page’s manual context to help answer it.