1. Introduction
This manual provides detailed instructions for the installation, operation, and maintenance of your ASRock DeskMini B760 Series Ultra-Compact Mini-PC Barebone System. The DeskMini B760 is designed to offer a powerful computing solution in a compact form factor, supporting 14th, 13th, and 12th Gen Intel Core processors. Please read this manual thoroughly before proceeding with any installation or operation to ensure proper setup and to maximize the performance and longevity of your system.

Figure 1: ASRock DeskMini B760 Series Mini-PC (Angled Front View)
2. What's in the Box
Your ASRock DeskMini B760 package should contain the following items:
- ASRock DeskMini B760 Barebone System (Chassis and Motherboard)
- 1 x Audio Header
- 1 x Internal Speaker Header
- 2 x 4-Pin fan connectors
- 1 x Front Panel Header
- 1 x USB 2.0 Header
- Quick Installation Guide (this document)
- Accessory pack (screws, cables, etc. - contents may vary)
Note: This is a barebone system. You will need to provide your own CPU, CPU cooler, DDR4 SO-DIMM memory, storage devices (M.2 SSDs, 2.5" SATA drives), and operating system.
3. Setup Instructions
Follow these steps to assemble and prepare your DeskMini B760 for first use. Ensure the system is unplugged from any power source before beginning.
3.1. Installing the CPU
- Carefully open the CPU socket retention arm.
- Align the notches on your 12th, 13th, or 14th Gen Intel LGA1700 CPU with the socket.
- Gently place the CPU into the socket without forcing it.
- Close the retention arm to secure the CPU.
3.2. Installing the CPU Cooler
Install a compatible CPU cooler (up to 65W TDP) according to its manufacturer's instructions. Ensure proper thermal paste application for optimal cooling.
3.3. Installing DDR4 SO-DIMM Memory
- Locate the two DDR4 SO-DIMM slots on the motherboard.
- Align the notch on the memory module with the key in the slot.
- Insert the module firmly at an angle, then push down until the side clips snap into place.
- Repeat for the second module if installing dual channel memory.
3.4. Installing M.2 SSDs
The DeskMini B760 supports one Blazing M.2 PCIe Gen5 x4 slot and one Hyper M.2 PCIe Gen4 x4 slot.
- Locate the M.2 slots on the motherboard.
- Remove the retaining screw/standoff.
- Insert the M.2 SSD into the slot at an angle.
- Gently push down the SSD and secure it with the retaining screw.
3.5. Installing 2.5" SATA Drives
The system includes two 2.5" drive bays.
- Mount your 2.5" SATA SSD/HDD into the designated drive bays using the provided screws.
- Connect the SATA data and power cables to the drive and the motherboard.
3.6. Connecting Peripherals and Power
- Connect your monitor(s) to the DisplayPort, HDMI, or VGA outputs.
- Connect your keyboard, mouse, and other USB devices to the available USB ports.
- Connect an Ethernet cable for wired network access, or install a compatible M.2 Key-E WiFi/Bluetooth module for wireless connectivity.
- Connect the external power adapter to the system and then to a power outlet.
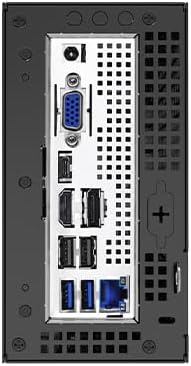
Figure 2: Rear I/O Ports of ASRock DeskMini B760
4. Operating Instructions
4.1. Powering On/Off
- Power On: Press the power button located on the front panel.
- Power Off:
- Standard Shutdown: Use the operating system's shutdown function.
- Forced Shutdown: Press and hold the power button for 5-7 seconds until the system powers off. Use this only when the system is unresponsive.
4.2. Initial Boot and OS Installation
Upon first power-on, the system will typically enter the BIOS/UEFI setup utility or attempt to boot from an installed operating system.
- To enter BIOS/UEFI, press Del or F2 during startup.
- Install your preferred operating system (e.g., Windows 10, Windows 11) from a bootable USB drive or other media. Refer to your operating system's installation guide for detailed steps.
- Install all necessary drivers, which can be found on the ASRock support website for your specific model.
4.3. Multi-Display Setup
The DeskMini B760 supports triple display output via DisplayPort, HDMI, and VGA.
- Connect up to three monitors to the available ports.
- Configure display settings within your operating system to extend or duplicate your desktop.
5. Maintenance
5.1. Cleaning
- Regularly clean the exterior of the system with a soft, dry cloth.
- Use compressed air to clear dust from ventilation openings and internal components (when powered off and unplugged) to maintain optimal airflow and cooling.
- Avoid using liquid cleaners directly on the system.
5.2. Software Updates
- Keep your operating system, drivers, and BIOS/UEFI firmware updated to ensure system stability, security, and performance.
- Visit the official ASRock website for the latest BIOS/UEFI updates and drivers for your DeskMini B760.
5.3. Environmental Considerations
- Operate the system in a well-ventilated area.
- Avoid exposing the system to extreme temperatures, direct sunlight, or high humidity.
6. Troubleshooting
If you encounter issues with your DeskMini B760, refer to the following common troubleshooting steps:
- No Power:
- Ensure the power adapter is securely connected to both the system and a working power outlet.
- Verify the power button is functioning correctly.
- No Display:
- Check all monitor cable connections (DisplayPort, HDMI, VGA).
- Ensure the monitor is powered on and set to the correct input source.
- Verify that the CPU and RAM are correctly installed.
- Operating System Not Booting:
- Check if your storage drive (M.2 SSD, 2.5" SATA) is properly installed and connected.
- Enter BIOS/UEFI setup to confirm the boot order is correct and the drive is detected.
- If recently installed, ensure the operating system installation was successful.
- System Instability/Crashes:
- Ensure all components (CPU, RAM, SSDs) are seated correctly.
- Check CPU cooler installation and thermal paste application to prevent overheating.
- Update drivers and BIOS/UEFI firmware.
For persistent issues, refer to the ASRock support website or contact technical support.
7. Specifications
Key technical specifications for the ASRock DeskMini B760 Series:
| Feature | Detail |
|---|---|
| Brand | ASRock |
| Model Name | DESKMINI B760W |
| CPU Socket | LGA 1700 |
| Supported Processors | 14th, 13th, 12th Gen Intel Core Processors (up to 65W TDP) |
| Memory Type | DDR4 SO-DIMM |
| Memory Slots | 2 (Dual Channel) |
| Max Memory Capacity | 64 GB |
| Memory Speed | DDR4-3200MHz |
| M.2 Storage Slots | 1 x Blazing M.2 (PCIe Gen5 x4), 1 x Hyper M.2 (PCIe Gen4 x4) |
| 2.5" Drive Bays | 2 (with RAID 0/1 support) |
| Graphics | Integrated Intel UHD Graphics (CPU dependent) |
| Video Outputs | DisplayPort, HDMI, D-Sub (VGA) |
| USB Ports | USB 3.2 Gen2x2 Type-C (20Gb/s), USB 3.2 Gen2 Type-C (10Gb/s with Alt Mode), USB 3.2 Gen2 Type-A, USB 2.0 |
| Network | Ethernet, M.2 Key-E slot for WiFi/Bluetooth module |
| Operating System Support | Windows 10, Windows 11 |
| Dimensions (Approx.) | Ultra-compact Mini PC form factor |
| Weight (Approx.) | 3.93 Pounds |
8. Warranty Information
The ASRock DeskMini B760 Series Barebone System comes with a 90-day warranty from the date of purchase. This warranty covers defects in materials and workmanship under normal use. For full warranty terms and conditions, please refer to the documentation included with your product or visit the official ASRock website.
9. Support
For technical assistance, driver downloads, BIOS updates, or further inquiries regarding your ASRock DeskMini B760, please utilize the following resources:
- ASRock Official Website: Visit www.asrock.com for product support pages, FAQs, and downloads.
- Amazon Support: For product questions or assistance related to your purchase, you may contact ASRock directly through Amazon.
- Online Forums/Communities: Engage with other users and ASRock representatives in online communities for shared knowledge and solutions.