1. Product Overview
The MiOYOOW XY-SA30 is an advanced 30A electronic thermostat controller designed for precise temperature management. This digital control module supports both heating and cooling modes, offering automatic control, Celsius and Fahrenheit display options, and simultaneous temperature detection. It is suitable for a wide range of applications including smart homes, industrial control, automatic irrigation, indoor ventilation, and protection equipment.
Key Features:
- Heating/Cooling Automatic Control
- Celsius and Fahrenheit Switch Display
- Automatic Control Output Status
- Simultaneous Temperature Detection
- Automatic Recognition Working Mode
- High and Low Temperature Automatic Alarm
- Automatic Data Saving
- High Temperature Measuring Range: -40°C to 110°C (-40°F to 166°F)
- ABS Standard Size Housing
- 30A Relay Voltage Output
- HD LCD Display Screen
- Power Saving Mode
- Programmable Display Temperature Calibration
2. Product Components and Dimensions
The XY-SA30 controller features a compact design with clearly labeled components for easy installation and operation. Below are visual representations and key dimensions.

Figure 2.1: MiOYOOW XY-SA30 Thermostat Controller with overall dimensions. The module measures 79mm in length, 43mm in width, and 39mm in height. The mounting cut-out is 71mm x 25mm.

Figure 2.2: Front panel of the XY-SA30 controller. It features an HD LCD display, four control buttons (SET, Up, Down, Power), and indicators for heating, cooling, high/low temperature alarms, button lock, buzzer, and unit selection (C/F).

Figure 2.3: Detailed view of the display interface, showing the current measured temperature, along with the set start and stop temperatures for precise control.

Figure 2.4: System parameters menu, illustrating options for High Temp Alarm (OTP), Low Temp Alarm (LTP), Delay Start Time (DLY), Calibration Temp (OFE), ON/OFF Buzzer (BEP), and Temperature Unit (F-C). A dashed line indicates the function is turned OFF.
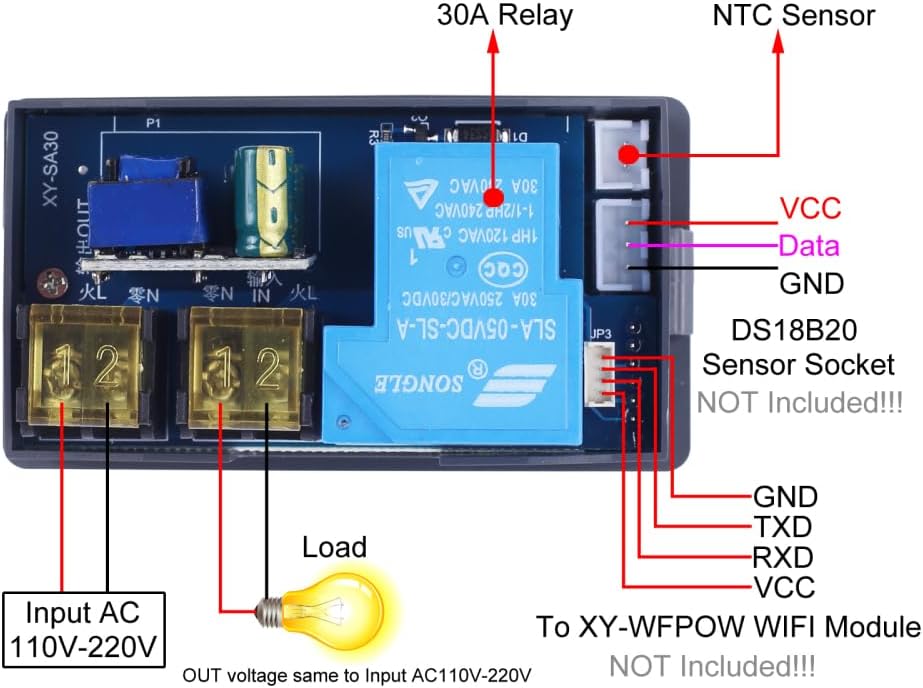
Figure 2.5: Wiring diagram for the XY-SA30 controller. It shows connections for AC 110V-220V input, the load (output voltage is the same as input voltage), the integrated 30A relay, the NTC sensor, and an optional DS18B20 sensor socket (sensor not included).
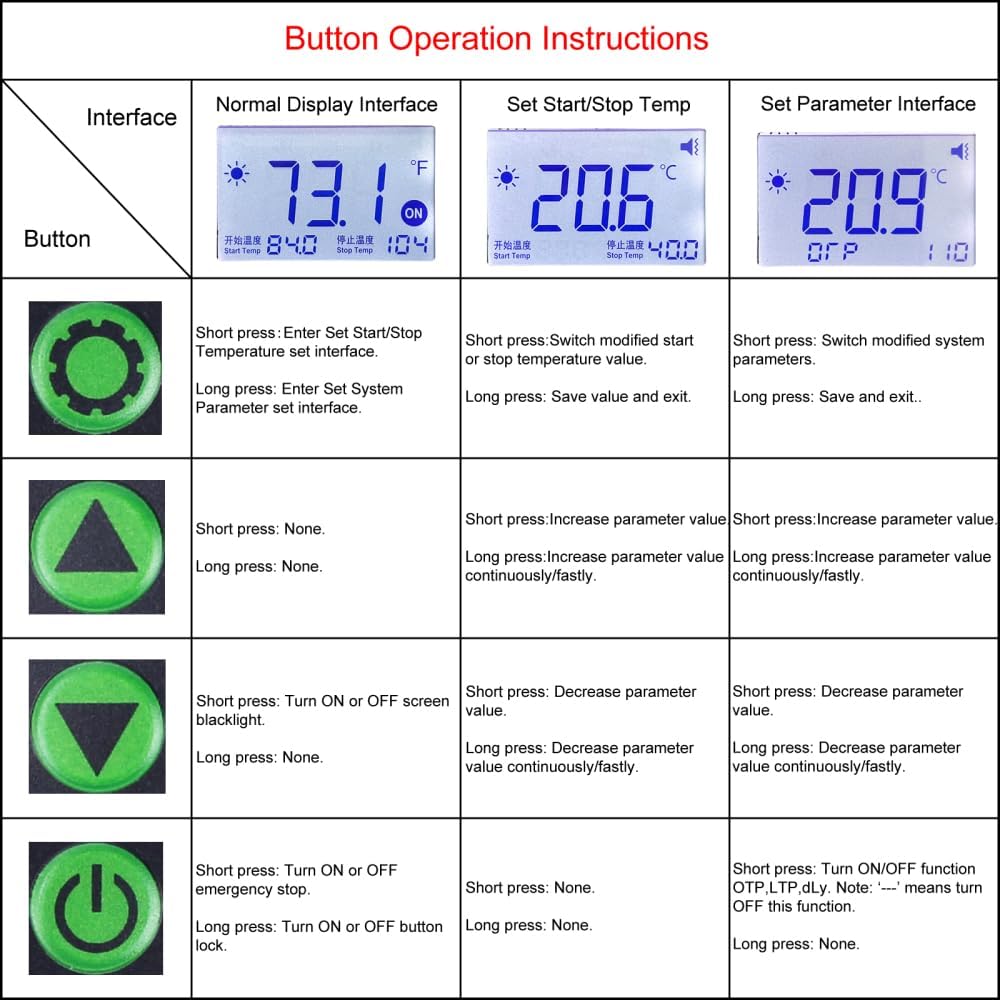
Figure 2.6: Button operation instructions table, providing guidance on short and long presses for each button across different interface modes (Normal Display, Set Start/Stop Temp, Set Parameter Interface).
3. Specifications
| Parameter | Value |
|---|---|
| Working Voltage | AC 110V-220V |
| Control Type | Button |
| Sensor (Included) | NTC 10K 3980B (2 meter) |
| Sensor (Supported, Not Included) | DS18B20 |
| Temperature Range | -40°C to 110°C (-40°F to 166°F) |
| Temperature Control Precision | 0.1°C/F |
| Output Type | Voltage Output (Same as input voltage) |
| Load Power | <4000W |
| Additional Function | Buzzer Alarm |
| PCB Working Temperature Range | -40°C to 85°C |
| Working Humidity Range | 5%-95%RH |
| Module Size | 79mm * 43mm * 39mm |
4. Setup and Wiring
Proper setup and wiring are crucial for the safe and effective operation of your XY-SA30 controller. Refer to the wiring diagram below and follow these steps carefully.
Figure 4.1: Detailed wiring diagram for the XY-SA30. Ensure all connections are secure and correctly matched to avoid damage or malfunction.
Wiring Steps:
- Power Input (AC 110V-220V): Connect your AC power source to the designated input terminals (marked 'IN' or similar). Ensure the voltage matches the controller's specifications.
- Load Connection: Connect your heating or cooling device (load) to the output terminals (marked 'OUT' or similar). The output voltage will be the same as the input voltage.
- NTC Sensor: Plug the included NTC 10K 3980B temperature sensor into its dedicated port. This sensor is essential for accurate temperature readings.
- Optional DS18B20 Sensor: If using a DS18B20 sensor (not included), connect it to the DS18B20 sensor socket according to its pinout (VCC, Data, GND).
- Safety Check: Before applying power, double-check all connections to ensure they are tight and correctly wired.
5. Operating Instructions
The XY-SA30 controller is designed for user-friendly operation. Familiarize yourself with the buttons and display to effectively manage your temperature settings.
Figure 5.1: Button operation guide for various modes.
Basic Operation:
- Power On/Off: Press and hold the Power button (⏻) to turn the device on or off.
- Normal Display Interface: In this mode, the display shows the current measured temperature, along with the set start and stop temperatures.
- Setting Start/Stop Temperature:
- Short press the SET button (⚙) to enter the Set Start/Stop Temperature interface.
- Use the Up (▲) and Down (▼) buttons to adjust the values. Long press for continuous/fast adjustment.
- Short press SET again to switch between Start Temp and Stop Temp.
- Long press SET to save settings and exit.
- Setting System Parameters:
- Long press the SET button (⚙) to enter the System Parameter Set interface.
- Short press SET to switch between parameters (OTP, LTP, DLY, OFE, BEP, F-C).
- Use the Up (▲) and Down (▼) buttons to adjust parameter values.
- Long press SET to save settings and exit.
- Celsius/Fahrenheit Switch: In the System Parameter Set interface, navigate to 'F-C' and use the Up/Down buttons to select your preferred unit.
- Buzzer Alarm: The buzzer will alarm if no sensor is connected. You can enable/disable the buzzer in the System Parameter Set interface ('BEP' parameter).
6. Maintenance
To ensure the longevity and accurate performance of your XY-SA30 thermostat controller, follow these maintenance guidelines:
- Cleaning: Regularly wipe the device with a soft, dry cloth. Avoid using abrasive cleaners or solvents that could damage the casing or display.
- Sensor Care: Handle the temperature sensor with care. Avoid bending or kinking the cable excessively. Ensure the sensor tip is clean and free from debris for accurate readings.
- Environmental Conditions: Operate the controller within its specified working temperature and humidity ranges to prevent damage.
- Connection Checks: Periodically inspect all wiring connections to ensure they remain secure and free from corrosion.
7. Troubleshooting
If you encounter issues with your XY-SA30 controller, refer to the following common problems and solutions:
- Buzzer Alarm Sounds Continuously: This typically indicates that the temperature sensor is not connected or is faulty. Check the sensor connection and ensure it is properly plugged in. If the issue persists, the sensor may need replacement.
- Display Not Lighting Up: Verify that the AC 110V-220V power input is correctly connected and receiving power. Check for loose wires or tripped circuit breakers.
- Incorrect Temperature Readings: Ensure the sensor is placed in the area where temperature needs to be measured and is not directly exposed to heat sources or drafts. Check the sensor cable for damage. Consider performing a temperature calibration via the system parameters if you suspect inaccuracy.
- Load Not Activating (Heating/Cooling): Confirm that the load device is properly connected to the output terminals and is functional. Check your set start and stop temperatures to ensure they are configured to activate the load under current conditions.
- Buttons Unresponsive: Check if the button lock function is active (indicated by a lock icon on the display). If so, long press the Power button to unlock.
8. Applications
The MiOYOOW XY-SA30 is a versatile temperature controller suitable for various environments and uses:
- Control cabinets
- Production workshops
- Hatching aquaculture control
- Tobacco industry
- Printing houses
- Aquarium temperature control
- Wood-fired boilers
- RV battery compartment temperature management (as demonstrated in a user video)
Video 8.1: A user demonstrates how a temperature controller (similar in function to the XY-SA30, though the video shows a 12V model) can be used to manage the temperature in an RV battery compartment, activating a fan for cooling or a heater for warming to protect lithium batteries. This video is provided by an Influencer.
Video 8.2: An overview of an electronic temperature controller, demonstrating its basic functionality and components. This video is provided by a Seller and shows a device with similar operational principles to the XY-SA30, although the specific model and voltage (12V in the video title) may differ from the XY-SA30's AC 110V-220V input.
Video 8.3: A user review of a temperature controller (similar in function to the XY-SA30), highlighting its use for maintaining safe temperatures for seedlings in a greenhouse. This video is provided by an Influencer.
9. Warranty and Support
MiOYOOW is committed to providing high-quality products and customer satisfaction. If you have any questions, concerns, or require support regarding your XY-SA30 Electronic Thermostat Controller, please do not hesitate to contact us. We are dedicated to assisting you and ensuring the best possible experience with our product.
For assistance, please refer to the contact information provided with your purchase or visit the official MiOYOOW store on Amazon.