Winsome 10521
Winsome Halifax Bins & Drawers Mobile Cabinet (Model 10521) - Assembly and Use Manual
Brand: Winsome
1. Introduction
This manual provides detailed instructions for the assembly, operation, and maintenance of your Winsome Halifax Bins & Drawers Mobile Cabinet, Model 10521. Designed for versatile storage in various home environments, this unit features a compact design with convenient cut-out handles, two removable storage bins, two easy-glide drawers, and a lower cabinet compartment. Please read these instructions thoroughly before beginning assembly to ensure correct setup and safe use.

Figure 1: Winsome Halifax Bins & Drawers Mobile Cabinet, White (Model 10521)
2. Safety Information
Please observe the following safety precautions during assembly and use:
- Keep all small parts and packaging materials away from children and pets to prevent choking hazards.
- Assemble the unit on a soft, clean surface to prevent scratches.
- Ensure all screws and fasteners are securely tightened before use. Periodically check and re-tighten as needed.
- Do not overload drawers or shelves. Refer to the "Specifications" section for weight capacities.
- Use caution when moving the cabinet, especially on uneven surfaces. Lock the casters when the cabinet is in its desired position.
- Do not stand or climb on the cabinet.
- If any parts are missing or damaged, do not proceed with assembly. Contact customer support for replacement parts.
3. Package Contents
Your Winsome Halifax Mobile Cabinet is shipped in one box and includes all necessary hardware for assembly. Before beginning, verify that all components are present and undamaged. Refer to the included parts list in your package for specific identification of each piece.
Typical components include:
- Cabinet panels (top, bottom, sides, back)
- Drawer fronts, sides, and bottoms
- Removable storage bins
- Casters (wheels), including locking casters
- Drawer slides
- Assembly hardware (screws, dowels, cam locks, etc.)
4. Assembly Instructions
Assembly is required for this product. A Phillips head screwdriver is the primary tool needed. An electric screwdriver or drill on a low-speed, low-torque setting may assist, but exercise caution to prevent splitting wood. A rubber mallet can also be helpful for seating pieces.
General Tips for Assembly:
- Unpack all components and lay them out on a soft, clean surface.
- Identify and separate all hardware. While not explicitly labeled with stickers, parts often have printed identifiers on their raw edges.
- Review the entire instruction manual before starting.
- Do not fully tighten screws until all associated pieces are correctly aligned and seated.
Step-by-Step Guide:
- Prepare Side Panels: Attach the drawer slides (pieces M and N) to the main side panels (B and C). Ensure the wheel end of the slide is positioned towards the front and in the lower position as indicated in your specific diagram.
- Assemble Main Frame:
- Attach cam lock screws (V) and large dowels (Q2) to the top panel (A).
- Carefully align and insert the top panel (A) into the side panels. Secure with cam locks.
- Slide the back panel into the grooves from the bottom upwards after the top is secured. This may be easier than sliding from the top.
- Attach Bottom Panel: Insert the remaining large dowels into the bottom panel (D). Push it into the side pieces and secure with long screws from the bottom.
- Install Casters: Attach the four casters to the bottom of the cabinet. Two of these casters are designed to lock, providing stability. Note that pre-drilled holes for casters may require firm pressure to start the screws.
- Assemble Drawers and Bins: This is the most detailed step.
- For each drawer, connect the side and back pieces. Ensure the slot for the drawer bottom is at the bottom, two holes are at the back, and the cam lock hole is at the front top.
- Slide the drawer bottom into the grooves. Do not fully tighten side screws until the bottom is completely seated to allow for minor adjustments.
- Attach small dowels and cam screws to the drawer fronts. Then, add cam locks, push the drawer fronts onto the assembled drawer boxes, and lock the cams.
- Attach the drawer wheels/runners to the sides of the assembled drawers.
- The two top bins are removable and function as drawers when inserted. Assemble them similarly if they require it, or simply place them into the top compartment.
- Final Check: Once all components are assembled, ensure all screws are tightened and the cabinet is stable. Test all drawers and bins for smooth operation.
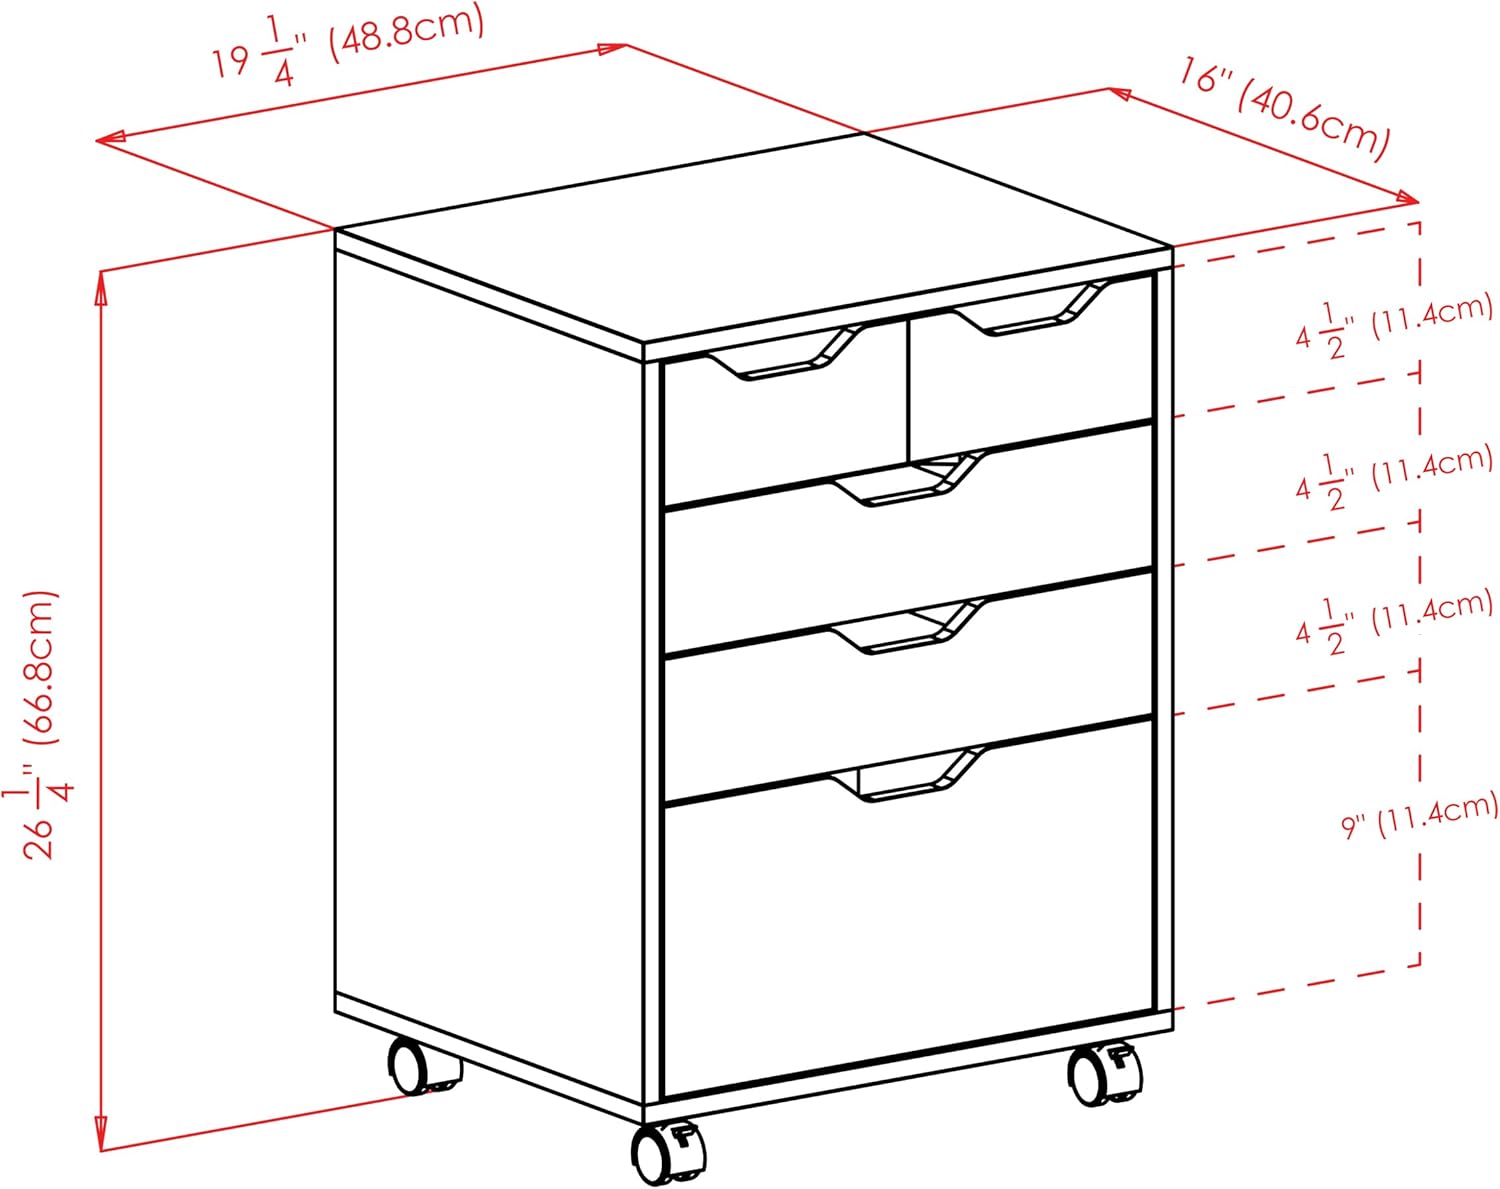
Figure 2: Product Dimensions (19.21"W x 15.98"D x 26.30"H)

Figure 3: Cabinet with all drawers and bins open, showing internal structure.
5. Operation
The Winsome Halifax Mobile Cabinet is designed for flexible storage and easy mobility.
- Drawers: The two middle drawers feature easy-glide mechanisms for smooth opening and closing. Use the integrated cut-out handles for access.
- Removable Bins: The two top bins can be used as standard drawers or removed entirely to create an open top-tier space for larger items or quick access.
- Lower Cabinet: The bottom compartment provides ample space for larger items and is accessed via a hinged door.
- Mobility: The cabinet is equipped with four casters for easy movement. Two of these casters have locking mechanisms. To secure the cabinet in place, press down on the locking levers on the two front casters. To move, release the locks.

Figure 4: Cabinet in use, demonstrating open drawer and lower cabinet door.

Figure 5: Cabinet with the two top bins removed, creating an open storage area.
6. Maintenance
To ensure the longevity and appearance of your Winsome Halifax Mobile Cabinet, follow these maintenance guidelines:
- Cleaning: Wipe surfaces with a damp cloth. Avoid using harsh chemicals, abrasive cleaners, or furniture polish that may damage the finish.
- Hardware Check: Periodically inspect all screws and fasteners to ensure they remain tight. Re-tighten as necessary to maintain stability.
- Caster Care: Keep casters free of debris to ensure smooth movement.
- Avoid Extreme Conditions: Do not expose the cabinet to excessive moisture, direct sunlight, or extreme temperature changes, as this can cause warping or discoloration.
7. Troubleshooting
If you encounter issues during or after assembly, refer to the following common problems and solutions:
| Problem | Possible Cause | Solution |
|---|---|---|
| Drawers do not slide smoothly or are misaligned. |
|
|
| Cabinet feels wobbly or unstable. |
|
|
| Casters do not roll freely. |
|
|
| Parts do not align during assembly. |
|
|
8. Specifications
| Feature | Detail |
|---|---|
| Brand | Winsome |
| Model Name | Halifax |
| Model Number | 10521 |
| Color | White |
| Product Dimensions (Overall) | 19.21"W x 15.98"D x 26.30"H (48.8cm W x 40.6cm D x 66.8cm H) |
| Small Drawer/Storage Bin (Inside) | 7.95"W x 14.29"D x 3.86"H |
| Regular Drawer (Inside, x2) | 16.06"W x 11.73"D x 2.56"H |
| Lower Cabinet Compartment | 17.95"W x 14.76"D x 9.17"H |
| Item Weight | 42.9 Pounds (19.46 kg) |
| Frame Material | Engineered Wood |
| Special Feature | Wheeled (with locking casters) |
| Assembly Required | Yes |
| Care Instructions | Wipe with Damp Cloth |
| Static Weight Capacity - Top | 35 lbs (16 kg) |
| Static Weight Capacity - Small Drawer/Bin | 5 lbs (2 kg) each |
| Static Weight Capacity - Regular Drawer | 12 lbs (5 kg) each |
| Static Weight Capacity - Lower Compartment | 25 lbs (11 kg) |

Figure 6: Weight capacities for different sections of the cabinet.
9. Warranty & Support
Replacement Parts: A replacement part request can be submitted directly to the manufacturer within 60 days from the date of purchase. Please retain your proof of purchase.
Customer Service: For further assistance, questions, or to report missing/damaged parts, please contact Winsome customer service. Refer to the contact information provided in your product packaging or visit the official Winsome website for support details.
Winsome is committed to providing quality lifestyle furniture and customer satisfaction.
Ask a question about this manual
Ask about setup, troubleshooting, compatibility, parts, safety, or missing instructions. Manuals+ will review the question and use this page’s manual context to help answer it.