1. Introduction
This manual provides comprehensive instructions for the safe and efficient installation and use of your Howonder HD-618 All Metal Speaker Wall Mount. Designed for small speakers, this mount offers swivel and tilt adjustments to optimize your audio experience. Please read all instructions carefully before installation.
2. Product Features
- Heavy-duty All Metal Construction: Ensures durability and can securely hold speakers up to 30 lbs.
- Multi-Angle Adjustment: Allows vertical adjustment by 90° and horizontal rotation by 150° for optimal listening angles.
- Versatile Use: Suitable for both indoor and outdoor environments, with an estimated 30-year service life.
- Wide Wall Compatibility: Can be installed on drywall, brick walls, concrete walls, and wooden walls.
- Universal Compatibility: Stylish design compatible with most speaker brands on the market.
- US Patented Product: All rights reserved.

Figure 2.1: Multi-angle adjustment capabilities of the HD-618 mount.
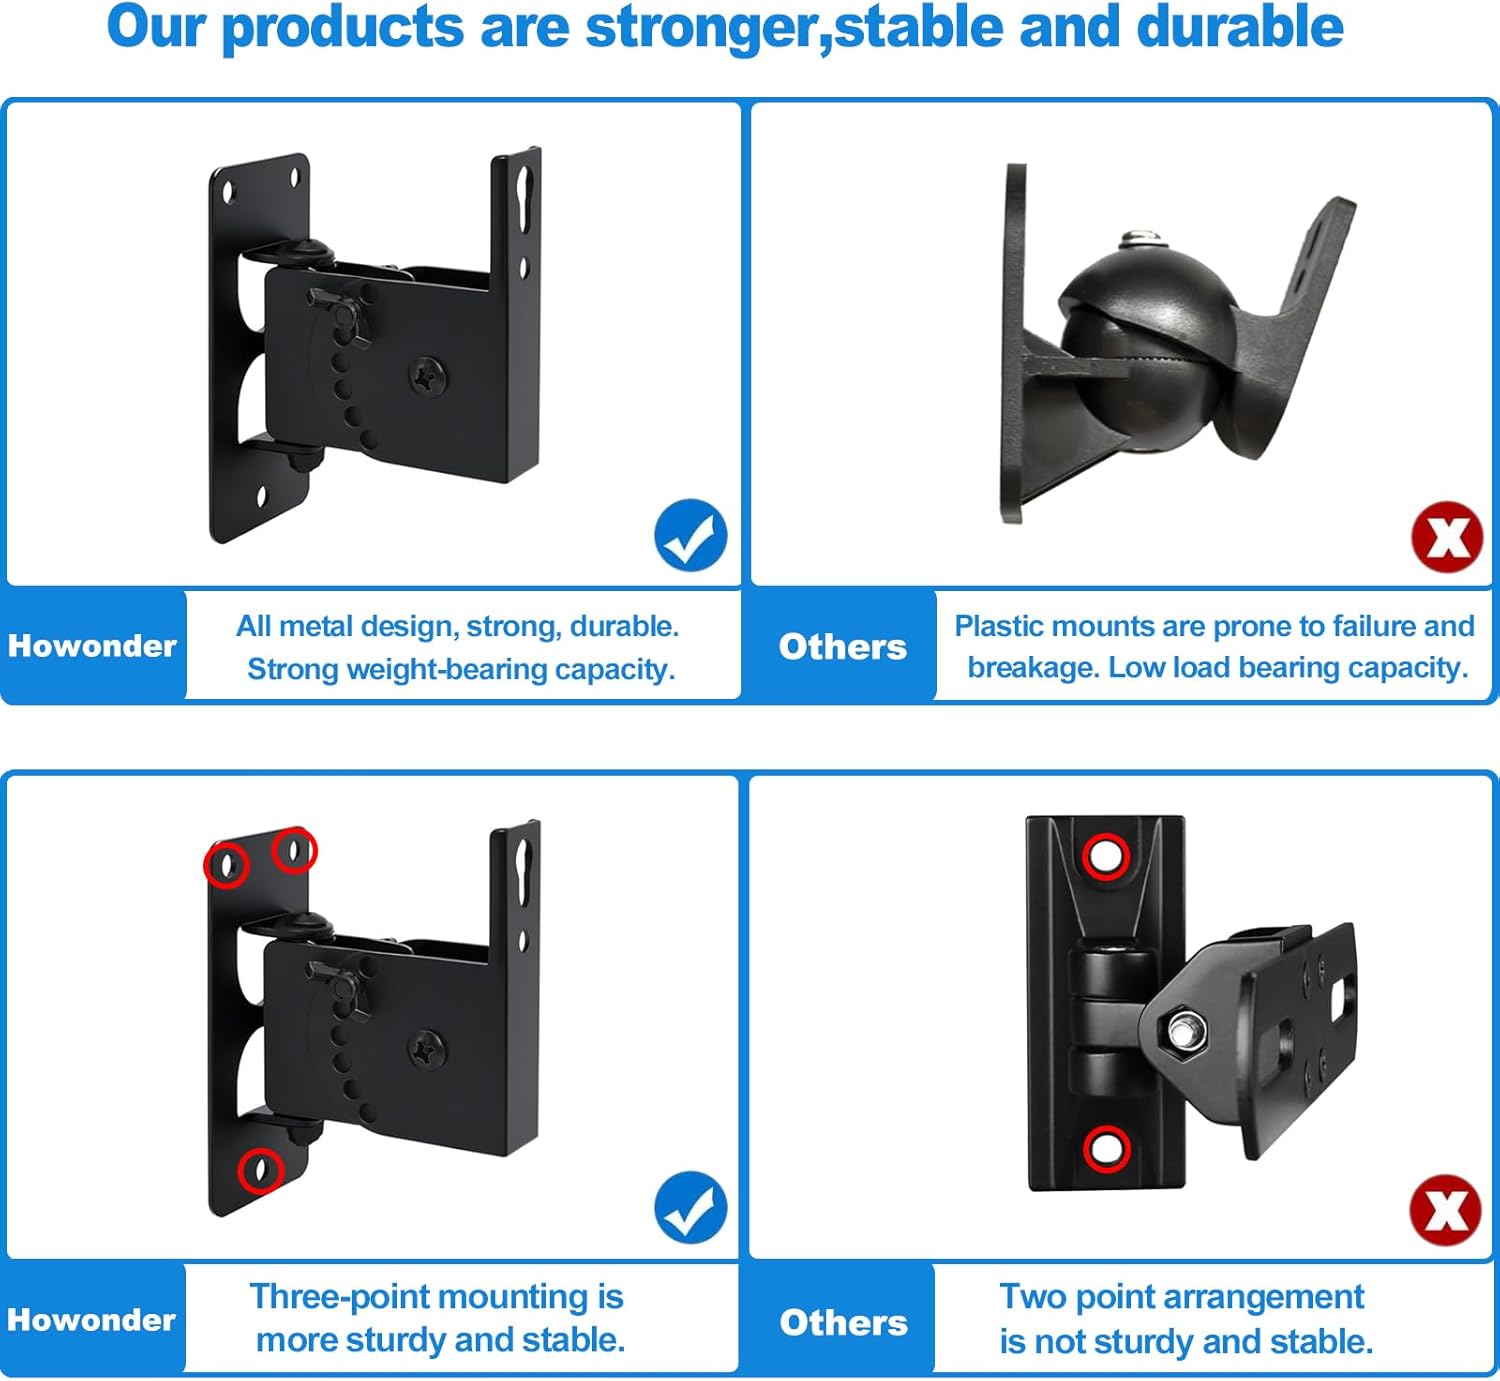
Figure 2.2: All-metal construction ensures superior strength and stability compared to plastic alternatives.
3. Package Contents
Please verify that all components listed below are included in your package:
- Speaker Mount x2
- Instruction Manual x1
- Screw Tube x6
- M5*40 Screws x6
- I-Beam Iron x2
- M5*16 Screws x4
- M5*20 Screws x2
- M6*20 Screws x2
- M5 Nuts x2

Figure 3.1: Contents of the Howonder HD-618 Speaker Wall Mount package.
4. Specifications
| Brand | Howonder |
| Model Number | HD-618 |
| Material | Metal |
| Color | Black |
| Mounting Type | Wall Mount |
| Maximum Weight Capacity | 30 Pounds (13.6 kg) |
| Item Weight | 2.07 pounds (0.94 kg) |
| Package Dimensions | 11.81 x 4.72 x 2.72 inches |
| Special Features | Rotatable (90° vertical, 150° horizontal) |

Figure 4.1: Detailed dimensions and load capacity of the HD-618 mount.
5. Installation Guide
Follow these steps for proper installation of your speaker wall mount. Ensure you have the necessary tools and safety equipment.
5.1 Tools Needed
- Drill with 10mm drill bit (for brick/concrete walls) or appropriate bit for wood/drywall.
- Hammer
- Screwdriver (Phillips head recommended)
- Pencil
- Level (mini spirit level included in some packages)
5.2 Wall Mounting Steps
- Mark Drill Holes:
Position the speaker mount on the desired wall location. Use a pencil to mark the positions for the drill holes. Ensure the mount is level using a spirit level.

Figure 5.1: Marking the wall for drilling.
- Drill Holes:
For brick or concrete walls, use a 10mm drill bit to drill holes to a depth of 50mm. For drywall or wooden walls, use appropriate drill bits and anchors as needed.

Figure 5.2: Drilling the marked holes.
- Insert Wall Plugs (if applicable):
For brick or concrete walls, insert the provided wall plugs into the drilled holes and gently tap them flush with a hammer.

Figure 5.3: Inserting wall plugs.
- Secure the Mount to the Wall:
Align the mount with the drilled holes and secure it using the appropriate screws. Tighten firmly with a screwdriver.

Figure 5.4: Attaching the mount to the wall.
5.3 Attaching the Speaker
The Howonder HD-618 mount supports multiple speaker attachment methods:
- M5 or M6 Screw Holes (Detachable Mounting):
If your speaker has M5 or M6 screw holes, use the provided M5 or M6 screws to attach the speaker directly to the adjustable part of the mount. This method allows for easy detachment.

Figure 5.5: Detachable mounting using M5/M6 screws.
- I-Beam Iron Installation:
For speakers compatible with I-beam iron installation, attach the I-beam iron to the speaker first, then slide it onto the mount.

Figure 5.6: I-Beam iron installation method.
- Hoist Hole Installation:
If your speaker has a hoist hole, use the appropriate screw to secure the speaker to the mount via the hoist hole.

Figure 5.7: Hoist hole installation method.
- Direct Hanging (M5 or M6 Screws):
For speakers with M5 or M6 holes, you can also hang the speaker directly onto the mount using the provided screws, ensuring a secure fit.

Figure 5.8: Direct hanging method.
5.4 Adjusting Speaker Angle
Once the speaker is securely mounted, you can adjust its angle:
- Vertical Adjustment: Loosen the adjustment knob/screw on the mount to tilt the speaker vertically up to 90°. Tighten to secure.
- Horizontal Adjustment: Loosen the adjustment knob/screw to rotate the speaker horizontally up to 150°. Tighten to secure.
Video 5.1: Official Howonder HD-618 Speaker Wall Mount installation and adjustment guide. This video demonstrates the unpacking, assembly, wall mounting, and speaker attachment processes, including how to adjust the swivel and tilt for optimal speaker positioning.
6. Operating Instructions
The Howonder HD-618 speaker wall mount is a passive device designed to securely hold your speakers. No specific operational steps are required beyond proper installation and adjustment of the speaker's position. Ensure all screws are tightened to prevent movement and maintain the desired angle.
7. Maintenance
To ensure the longevity and safe operation of your speaker wall mount:
- Regular Inspection: Periodically check all screws and connections to ensure they remain tight. Loose connections can compromise stability.
- Cleaning: Wipe the mount with a soft, dry cloth to remove dust. Avoid using abrasive cleaners or solvents that could damage the finish.
- Weight Limit: Do not exceed the maximum weight capacity of 30 lbs (13.6 kg) to prevent damage or injury.
8. Troubleshooting
If you encounter any issues with your speaker wall mount, please refer to the following common solutions:
- Mount feels loose: Re-tighten all mounting screws on the wall and the adjustment screws on the mount. Ensure wall anchors (if used) are properly seated.
- Speaker is not holding its angle: Ensure the adjustment knob/screw for tilt and swivel is fully tightened. If the issue persists, check for any wear on the internal mechanisms.
- Difficulty installing on a specific wall type: Refer to section 5.2 for guidance on different wall types. Ensure you are using the correct drill bit size and wall anchors for your wall material.
9. Warranty and Support
Howonder provides a 12-month quality guarantee for this product. If you experience any quality problems, please contact Howonder customer support for assistance.
For further support or inquiries, please visit the official Howonder website or contact their customer service department.