1. Introduction
This manual provides detailed instructions for the operation and maintenance of your Hidden Camera USB Charger. This device functions as both a standard USB wall charger and a discreet security camera, designed for home surveillance without the need for Wi-Fi.

Image 1.1: The Hidden Camera USB Charger. This compact device appears as a standard black USB wall charger, designed to blend seamlessly into any environment.
2. Product Features
- Advanced Technology: Compact USB charger that records HD video with a wide viewing angle.
- Home Security: Ideal for monitoring babysitters, nannies, caregivers, or employees.
- Quick Plug and Play: No Wi-Fi required for recording. Simply insert a Micro SD card and plug into an outlet.
- Advanced Motion Detection: Records HD video automatically when movement is detected.
- Loop Recording: Automatically overwrites the oldest files for continuous recording when the SD card is full.
- SD Card Protection: Ensures continuous recording without interruption.
- No Audio Recording: This device does not record audio.
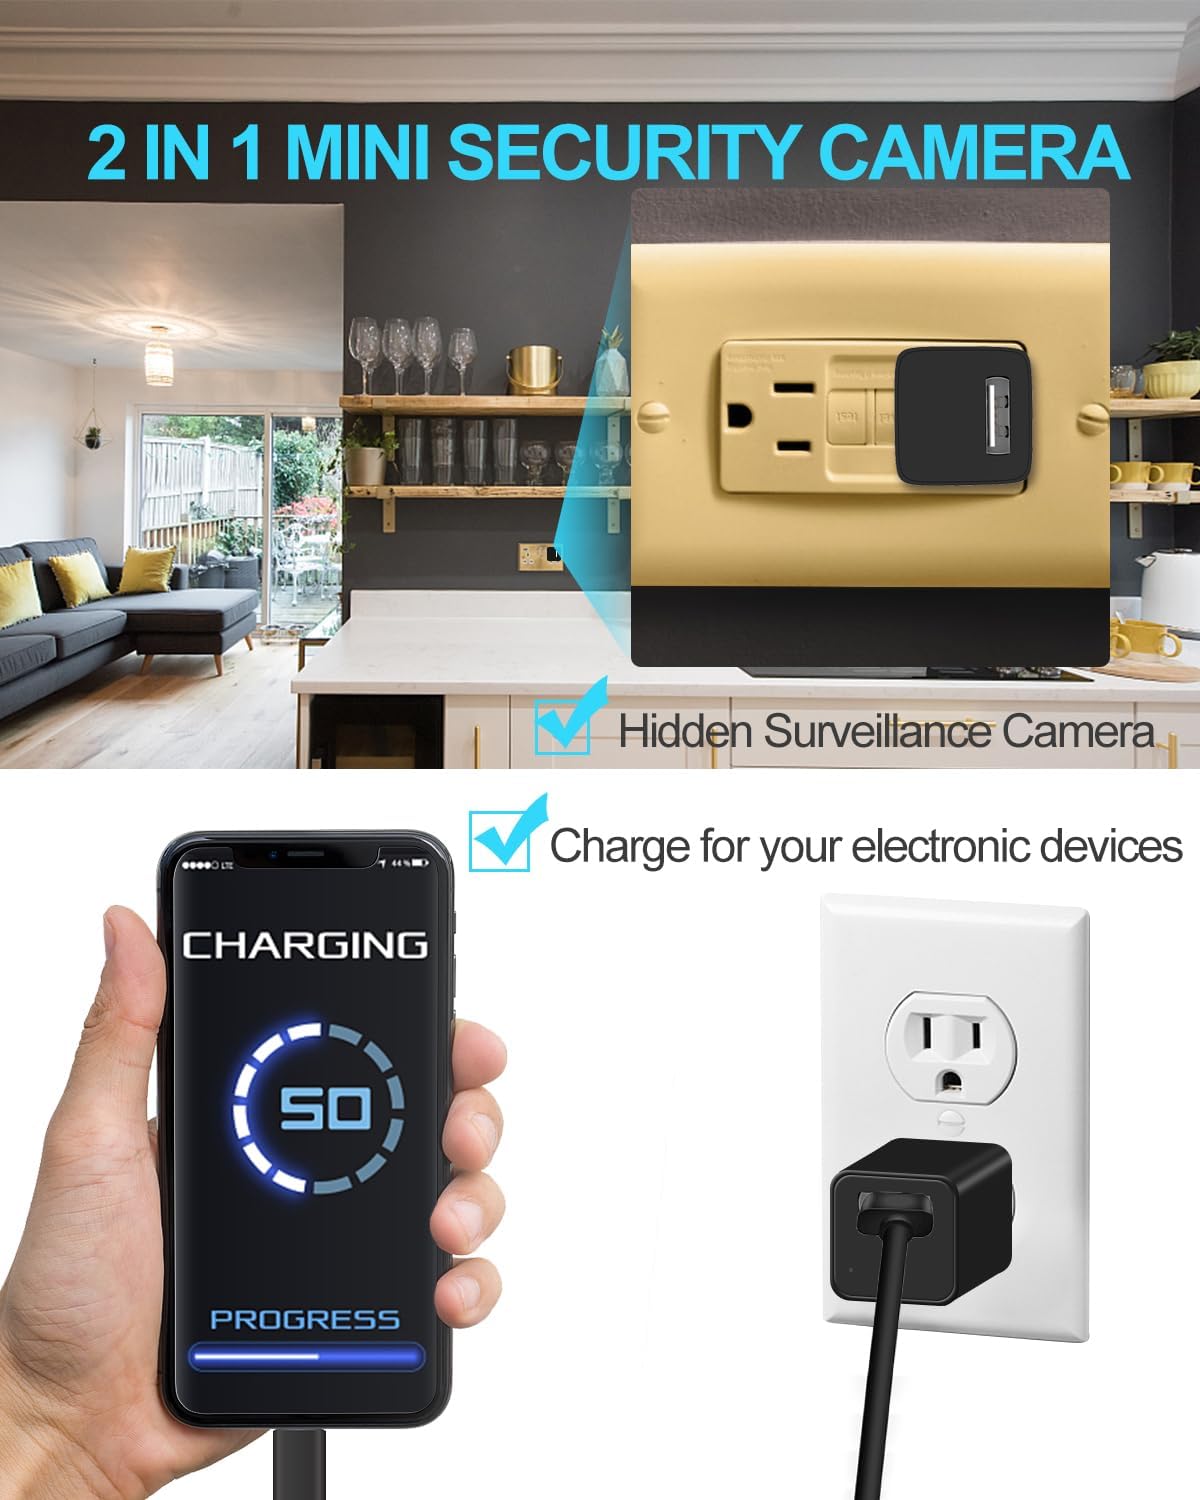
Image 2.1: Illustration of the 2-in-1 functionality. The device is shown plugged into a wall outlet, simultaneously functioning as a hidden surveillance camera and charging a mobile phone, demonstrating its dual purpose.
3. Package Contents
Please check the package for the following items:
- 1x Hidden Camera USB Charger
- 1x User Manual
- 2x USB Cables (for charging other devices or data transfer)
4. Setup Guide
4.1 Inserting the Micro SD Card
- Locate the Micro SD card slot on the side or back of the device.
- Gently insert a Class 10 speed Micro SD card (up to 64 GB, not included) into the slot until it clicks into place. Ensure the card is inserted in the correct orientation.
- To remove the card, gently push it in again until it clicks, then release, and it will spring out.
4.2 Powering On and Initial Recording
- Plug the Hidden Camera USB Charger into a standard wall outlet.
- The device will automatically power on and begin recording. A small indicator light may flash briefly to confirm operation, then turn off to remain discreet.
- Ensure the device is securely plugged in for continuous power and recording.
5. Operating Instructions
5.1 Automatic Recording
Once plugged into a power outlet with a Micro SD card inserted, the camera will automatically begin continuous video recording.
5.2 Motion Detection Recording
The camera is equipped with advanced motion detection. When movement is detected within its field of view, the camera will automatically initiate recording. This feature helps conserve storage space and makes reviewing footage more efficient.
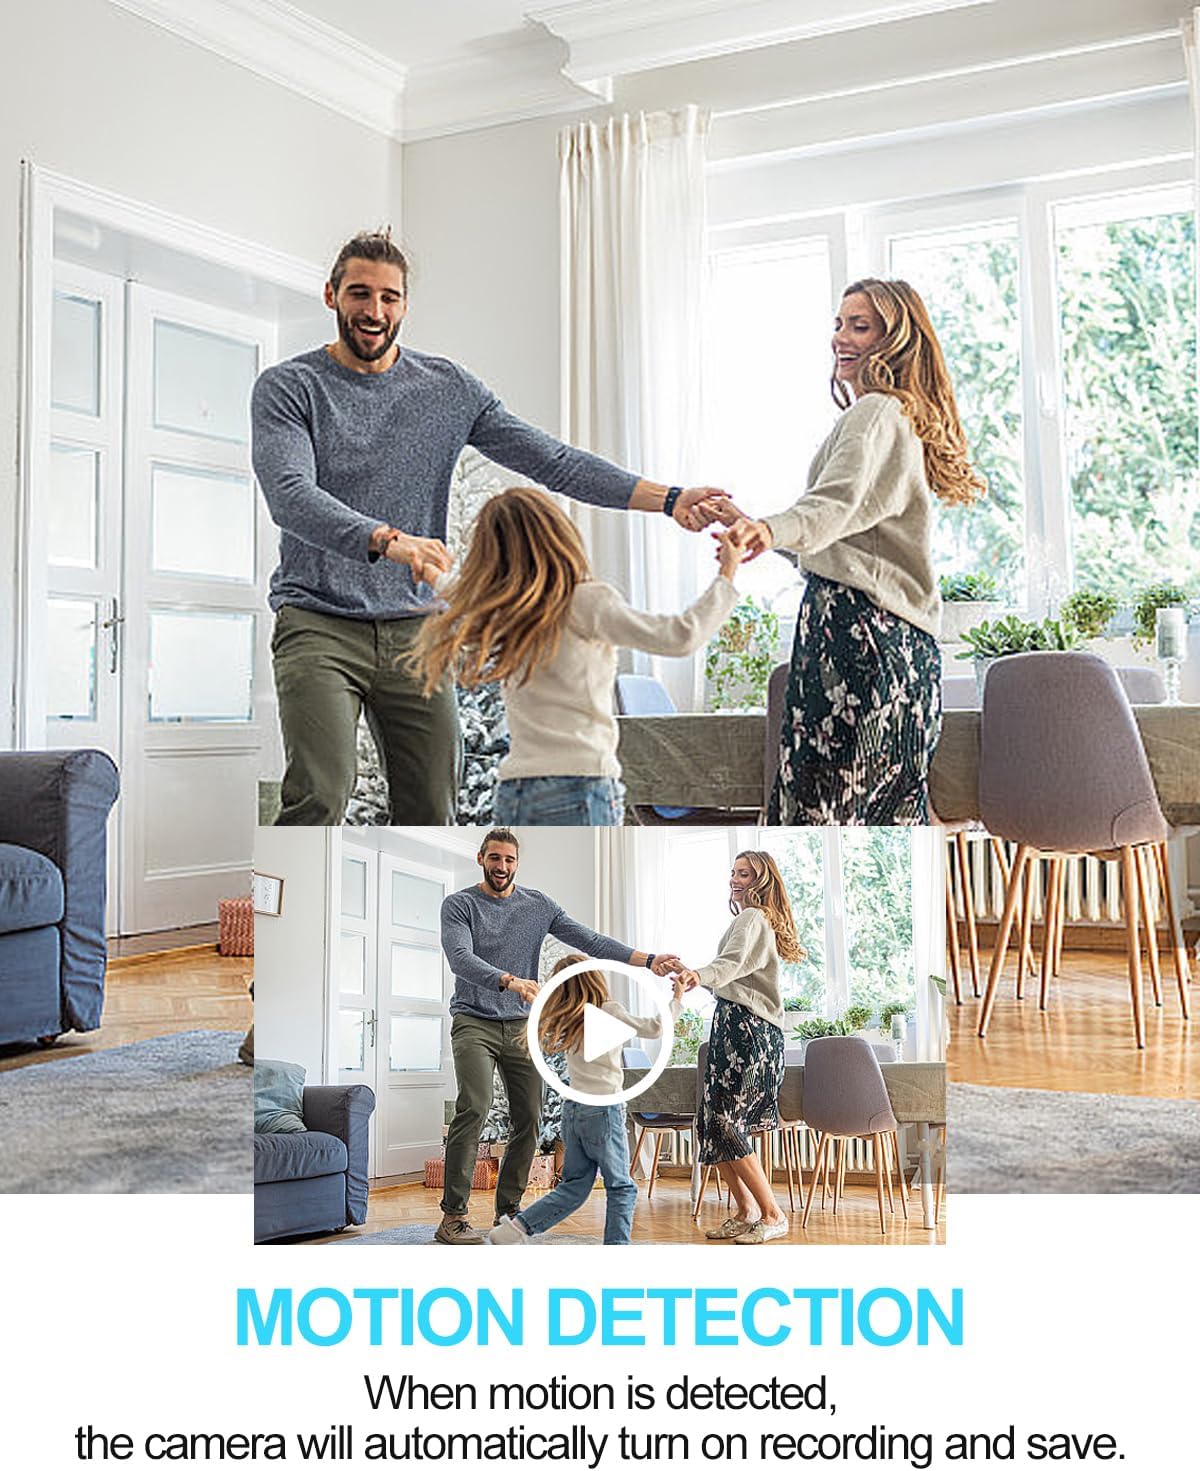
Image 5.1: Representation of motion detection in action. A family is shown in a living room setting, indicating that when motion is detected, the camera automatically begins recording and saving the footage.
5.3 Loop Recording
When the Micro SD card reaches its full capacity, the loop recording function will automatically overwrite the oldest video files with new ones. This ensures uninterrupted recording without the need for manual deletion of old footage.
5.4 Using as a USB Charger
The device functions as a standard USB wall charger. Simply connect your mobile phone or other USB-powered device to the USB port on the camera using a compatible USB cable to charge it.

Image 5.2: The Hidden Camera USB Charger shown with various mobile phones. This illustrates its capability to charge different types of smartphones (Apple/Android) while discreetly performing its surveillance function.
5.5 Accessing Recorded Files
- Unplug the device from the wall outlet.
- Carefully remove the Micro SD card from its slot.
- Insert the Micro SD card into a computer's card reader or a compatible USB card reader.
- Access the files on the Micro SD card. Video files will typically be in AVI format.
6. Placement Recommendations
For optimal surveillance, consider the following placement tips:
- Place the charger in a common area where it can capture a wide view of the room.
- Ensure the camera lens is not obstructed by furniture or other objects.
- Consider placing it at eye level or slightly higher for a better perspective.
- Avoid direct sunlight or strong light sources facing the lens, as this can affect video quality.

Image 6.1: Examples of suitable placement. The camera is shown discreetly plugged into wall outlets in various settings such as an office, a home workspace, and a living area, highlighting its versatility for placement in any room.
7. Maintenance
- Cleaning: Use a soft, dry cloth to clean the exterior of the device. Do not use liquid cleaners or abrasive materials.
- SD Card Management: It is recommended to format the Micro SD card periodically (e.g., once a month) to maintain optimal performance and prevent data corruption. Back up important recordings before formatting.
- Storage: When not in use, store the device in a cool, dry place away from direct sunlight and extreme temperatures.
8. Troubleshooting
- Device not recording:
- Ensure the device is securely plugged into a live power outlet.
- Verify that a Micro SD card is properly inserted.
- Check if the Micro SD card is full. If so, the loop recording should overwrite old files, but formatting might be necessary if issues persist.
- Ensure the Micro SD card is Class 10 speed and not larger than 64 GB.
- Poor video quality:
- Ensure the camera lens is clean and free from dust or smudges.
- Avoid placing the camera in areas with extreme backlighting or low light conditions.

Image 8.1: An example of 1080P HD video quality. The image displays a clear, high-definition view of a living room, demonstrating the expected visual fidelity of recordings from the camera.
- Device not charging other devices:
- Ensure the device is plugged into a live power outlet.
- Try a different USB cable or a different device to rule out cable or device issues.
- Indicator light behavior: The indicator light is designed to be discreet. It may flash briefly upon power-on or during certain operations, then turn off. If it remains on or flashes erratically, try unplugging and re-plugging the device.
9. Specifications
| Feature | Detail |
|---|---|
| Brand | isekurity |
| Model Name | USB charger camera, Nanny camera, Security camera |
| Recommended Uses | Baby Monitoring, Indoor Security |
| Connectivity Technology | Wired |
| Special Feature | Motion Sensor |
| Video Resolution | 1080P HD |
| Storage | Micro SD Card (Class 10, up to 64 GB, not included) |
| Audio Recording | No |
10. Safety Information
- Do not expose the device to water, moisture, or extreme temperatures.
- Avoid dropping or subjecting the device to severe impacts.
- Do not attempt to disassemble or modify the device, as this will void the warranty and could cause damage or injury.
- Keep out of reach of children.
- Use only in accordance with local laws and regulations regarding surveillance.
11. Warranty and Support
For warranty information, technical support, or any inquiries regarding your Hidden Camera USB Charger, please refer to the manufacturer's official website or contact their customer service directly. Contact details are typically provided on the product packaging or the manufacturer's website.