1. Introduction
This manual provides instructions for the proper use, care, and maintenance of your Flaygo GM-953 Rechargeable Hearing Aids. Please read this manual thoroughly before using the device to ensure optimal performance and longevity.
The Flaygo GM-953 hearing aids are designed to amplify sound for individuals with hearing loss, featuring noise cancellation and adjustable volume levels. They are compact, rechargeable, and designed for comfortable, discreet wear.
2. Product Overview
Familiarize yourself with the components of your Flaygo GM-953 hearing aids and charging case.

Figure 2.1: Flaygo GM-953 Rechargeable Hearing Aids and Charging Case. The image displays two beige hearing aids placed within an open black charging case. The case features an LED display indicating '100' for battery level and 'L' and 'R' for left and right hearing aid status.
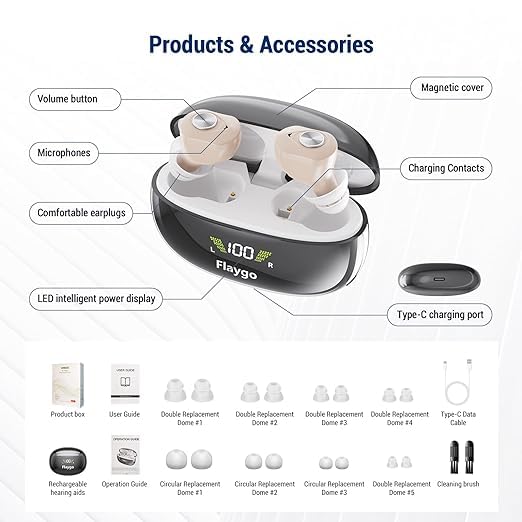
Figure 2.2: Components and Accessories. This diagram labels various parts of the hearing aid and items included in the package. Key components include the volume button, microphones, comfortable earplugs, magnetic cover, charging contacts, LED intelligent power display, and Type-C charging port. Accessories shown are the product box, user guide, multiple sizes of replacement domes, Type-C data cable, and a cleaning brush.
Package Contents:
- Flaygo GM-953 Rechargeable Hearing Aids (Left and Right)
- Charging Case
- Type-C Charging Cable
- Multiple sizes of Replacement Domes (Earplugs)
- Cleaning Brush
- User Guide
3. Setup and First Use
3.1 Charging the Hearing Aids and Case
Before first use, fully charge the hearing aids and the charging case.
- Connect the Type-C charging cable to the charging port on the case and to a suitable USB power adapter (not included).
- Place the hearing aids into their respective slots in the charging case. Ensure the charging contacts align.
- The LED display on the charging case will indicate the charging status. A full charge for the hearing aids takes approximately 1.5 hours. The charging case provides up to 3 full charges for the hearing aids, offering up to 15 hours of continuous use per charge.
- Once fully charged, disconnect the charging cable.

Figure 3.1: Charging Case Display. This image illustrates the intelligent digital display of the charging case, showing the remaining power for the left hearing aid ('L'), the right hearing aid ('R'), and the charging case itself. It also highlights key charging specifications: 1.5 hours ultra-fast charging time, 15 hours long continuous use time, and 3 times charges from the charging case.
3.2 Fitting the Hearing Aids
Proper fit is essential for comfort and sound quality.
- Select the appropriate size of ear dome that provides a comfortable and secure fit in your ear canal. Experiment with different sizes if necessary.
- Gently insert the hearing aid into your ear canal until it sits securely and comfortably. The half-in-ear design is intended for a discreet and stable fit.
- Ensure there is no whistling sound (feedback). If whistling occurs, adjust the position of the hearing aid or try a different size ear dome.
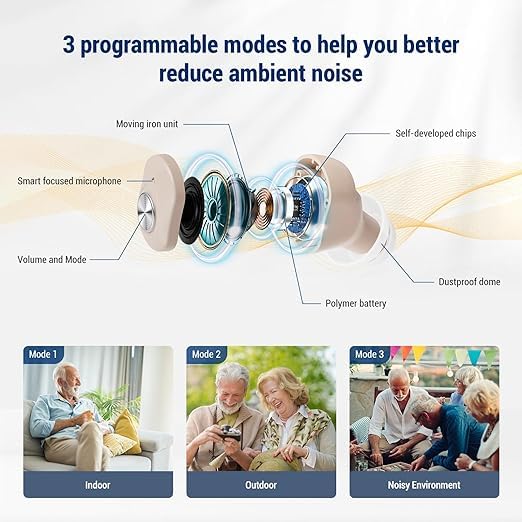
Figure 3.2: Half-in-Ear Design. This image demonstrates the compact and lightweight nature of the hearing aids, showing their dimensions (0.6in x 0.9in) and weight (2.3g). It also illustrates how the hearing aids provide a secure and discreet fit when worn in the ear.
4. Operation
4.1 Power On/Off
- Automatic On/Off: The hearing aids are designed to automatically power on when removed from the charging case and power off when placed back into the charging case.
- Manual On/Off: Refer to the specific instructions on the volume button for manual power control if available.
4.2 Volume Adjustment
The hearing aids feature 5 levels of volume adjustment.
- Locate the volume button on the hearing aid (refer to Figure 2.2).
- Press the volume button briefly to cycle through the 5 volume levels. Start with a lower volume and gradually increase until a comfortable listening level is achieved.
4.3 Mode Selection (Noise Cancellation)
The Flaygo GM-953 offers 3 programmable modes to reduce ambient noise, optimized for different listening environments.

Figure 4.1: Flaygo Chip Technology. This image compares Flaygo's self-developed 16-channel digital chip and integrated AI dynamic noise reduction with generic single-channel analog circuits, highlighting the advanced processing capabilities for clear sound.
Figure 4.2: Programmable Modes. This image details the internal components of the hearing aid, including the moving iron unit, smart focused microphone, volume and mode control, self-developed chips, polymer battery, and dustproof dome. It also illustrates three distinct listening modes: Mode 1 (Indoor), Mode 2 (Outdoor), and Mode 3 (Noisy Environment), each depicted with a corresponding scenario.
- To switch between modes, press and hold the volume button for a few seconds (refer to Figure 2.2 for button location). The hearing aid will indicate the mode change (e.g., via a beep sound).
- Mode 1: Indoor - Optimized for quiet indoor environments.
- Mode 2: Outdoor - Suitable for outdoor settings with moderate ambient sounds.
- Mode 3: Noisy Environment - Designed for situations with significant background noise, utilizing AI dynamic noise reduction.
5. Maintenance and Care
5.1 Cleaning
Regular cleaning helps maintain performance and hygiene.
- Use the provided cleaning brush to gently remove earwax or debris from the ear domes and microphone ports daily.
- Wipe the hearing aids and charging case with a soft, dry cloth. Do not use water, cleaning solvents, or abrasive materials.
- Ensure the charging contacts on both the hearing aids and the case are clean and dry.
5.2 Storage
- When not in use, store the hearing aids in their charging case to protect them and keep them charged.
- Store in a cool, dry place away from direct sunlight and extreme temperatures.
6. Troubleshooting
If you experience issues with your hearing aids, refer to the following common solutions:
| Problem | Possible Cause | Solution |
|---|---|---|
| No sound or weak sound |
|
|
| Whistling or feedback sound |
|
|
| Sound is unclear or distorted |
|
|
| Charging issue |
|
|
7. Specifications
| Feature | Detail |
|---|---|
| Model Number | GM-953 |
| Brand | Flaygo |
| Dimensions (each aid) | Approximately 0.86 x 0.59 x 0.04 inches |
| Weight (total) | 6.38 ounces (including packaging/case) |
| Material | Plastic, Resin |
| Power Source | Battery Powered (Rechargeable) |
| Charging Time | Approx. 1.5 hours (hearing aids) |
| Continuous Use Time | Up to 15 hours per charge |
| Charging Case Capacity | Provides up to 3 full charges for hearing aids |
| Volume Adjustment | 5 levels |
| Noise Cancellation | AI Dynamic Noise Reduction with 3 programmable modes |
8. Warranty and Support
For warranty information or technical support, please refer to the contact details provided with your purchase documentation or visit the official Flaygo website. Keep your purchase receipt as proof of purchase.
For additional assistance, you may contact the seller directly through the platform where the product was purchased.


