1. Introduction
This manual provides essential information for the proper installation, operation, and maintenance of the Baumer Photoelectric Sensor, model 0300.GR-11110414. Please read this manual thoroughly before using the device to ensure safe and efficient operation. Retain this manual for future reference.
2. Safety Information
Always observe the following safety precautions to prevent personal injury and damage to the sensor or connected equipment.
- Electrical Safety: Ensure power is disconnected before installation, wiring, or maintenance. Only qualified personnel should perform electrical connections.
- Operating Environment: Do not expose the sensor to conditions outside its specified operating temperature or protection class (IP67).
- Proper Use: Use the sensor only for its intended purpose as a photoelectric sensor with background suppression.
- Modifications: Do not modify the sensor. Unauthorized modifications can lead to malfunction and void the warranty.
3. Product Overview
The Baumer Photoelectric Sensor 0300.GR-11110414 is a Swiss-made device designed for reliable object detection using background suppression technology. It features a compact design and robust construction suitable for various industrial applications.
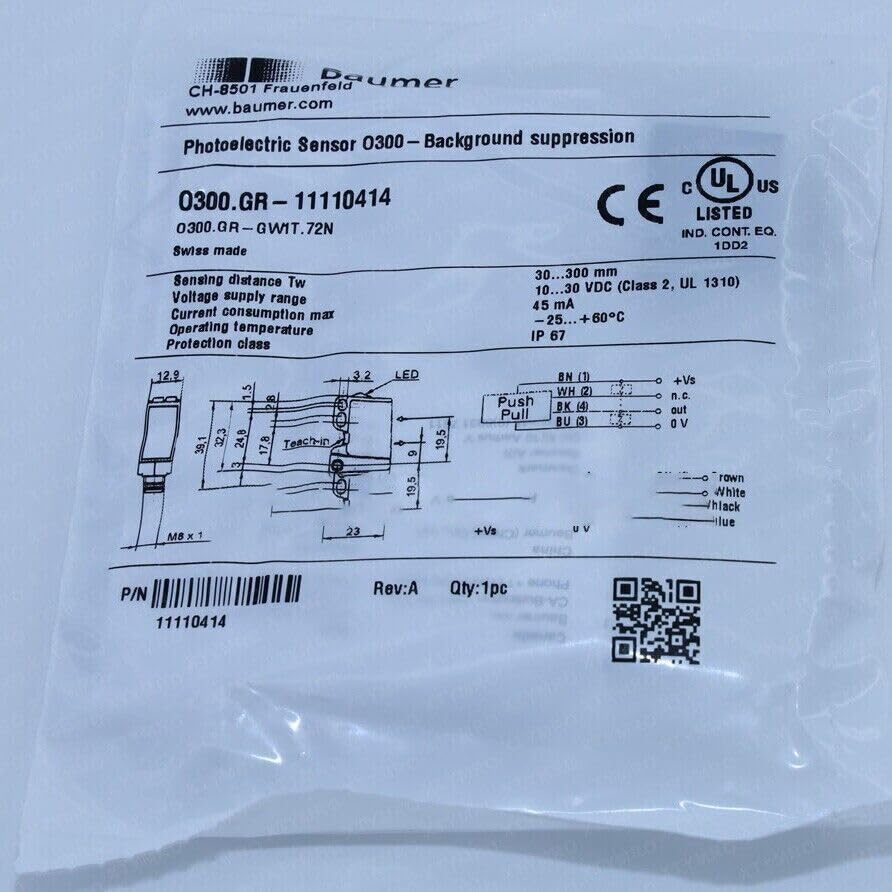
Figure 3.1: Product label for the Baumer Photoelectric Sensor 0300.GR-11110414. This image displays key specifications such as sensing distance (30-300 mm), voltage supply (10-30 VDC), current consumption (45 mA), operating temperature (-25 to +60°C), and protection class (IP67). It also shows the UL and CE certifications, the model number (0300.GR-11110414), and a detailed wiring diagram with color codes (BN, WH, BK, BU) and their functions (+Vs, n.c., out, 0V). Dimensions and the M8 x 1 thread size are also visible, along with the "Teach-in" button and LED indicator.
Key Features:
- Model: 0300.GR-11110414 (0300.GR-GW1T.72N)
- Sensing Distance: 30...300 mm
- Voltage Supply: 10...30 VDC (Class 2, UL 1310)
- Current Consumption: Max 45 mA
- Operating Temperature: -25...+60°C
- Protection Class: IP67
- Certifications: CE, UL US LISTED (IND. CONT. EQ. 1DD2)
- Origin: Swiss made
4. Setup
4.1. Mounting
The sensor features an M8 x 1 thread for secure mounting. Ensure the mounting surface is stable and free from vibrations. Position the sensor such that its optical axis is clear of obstructions and aligned with the target detection area.
4.2. Wiring
Connect the sensor according to the following pin assignments. Refer to Figure 3.1 for the visual wiring diagram.
| Pin No. | Wire Color | Function |
|---|---|---|
| 1 | Brown (BN) | +Vs (Supply Voltage) |
| 2 | White (WH) | n.c. (Not Connected) |
| 3 | Blue (BU) | 0V (Ground) |
| 4 | Black (BK) | Out (Output) |
Ensure all connections are secure and insulated to prevent short circuits.
4.3. Teach-in Function
The sensor features a "Teach-in" button for easy adjustment of the sensing range. This function allows the sensor to learn the background and the target, optimizing its performance for specific applications.
- To Teach Background: Position the background object (or no object if teaching for object presence) in front of the sensor. Press and hold the "Teach-in" button until the LED indicates successful teaching (refer to product-specific documentation for LED patterns).
- To Teach Object: Position the target object in front of the sensor. Press and hold the "Teach-in" button until the LED indicates successful teaching.
Consult the detailed Baumer product datasheet for specific teach-in procedures and LED feedback patterns for optimal configuration.
5. Operating
Once properly installed and configured, the sensor operates automatically. The integrated LED provides visual feedback on the sensor's status:
- LED ON: Indicates the sensor is detecting an object within its configured sensing range.
- LED OFF: Indicates no object is detected or the object is outside the sensing range.
The output signal (BK wire) will change state based on object detection, providing a signal to your control system.
6. Maintenance
The Baumer Photoelectric Sensor 0300.GR-11110414 is designed for low maintenance. However, regular inspection and cleaning are recommended to ensure optimal performance.
- Cleaning: Periodically clean the sensor's optical surfaces with a soft, lint-free cloth. If necessary, use a mild, non-abrasive cleaning solution. Do not use harsh chemicals or abrasive materials that could scratch the lens.
- Inspection: Check wiring connections for looseness or damage. Inspect the sensor housing for any signs of physical damage.
- Environmental Check: Ensure the operating environment remains within the specified temperature and humidity ranges.
7. Troubleshooting
If the sensor is not functioning as expected, refer to the following common issues and solutions:
| Problem | Possible Cause | Solution |
|---|---|---|
| Sensor LED is off, no output. | No power supply or incorrect wiring. | Check power connections (+Vs and 0V). Ensure correct voltage (10-30 VDC). |
| Sensor constantly detects (LED always on) or never detects (LED always off). | Incorrect teach-in, dirty lens, or object/background too close/far. | Clean the optical surfaces. Re-perform the teach-in procedure. Adjust sensor position relative to target/background. |
| Intermittent detection. | Unstable mounting, vibrations, or external light interference. | Securely mount the sensor. Shield from strong external light sources if necessary. |
If the problem persists after attempting these solutions, contact technical support.
8. Specifications
Detailed technical specifications for the Baumer Photoelectric Sensor 0300.GR-11110414:
- Model Number: 0300.GR-11110414 (also known as 0300.GR-GW1T.72N)
- Sensing Principle: Photoelectric Sensor with Background Suppression
- Sensing Distance (Tw): 30...300 mm
- Voltage Supply Range: 10...30 VDC (Class 2, UL 1310)
- Current Consumption Max: 45 mA
- Operating Temperature: -25...+60°C
- Protection Class: IP67
- Thread Size: M8 x 1
- Certifications: CE, UL US LISTED (IND. CONT. EQ. 1DD2)
- Origin: Swiss made
- Part Number (P/N): 11110414
9. Warranty and Support
This product is sold by NEMAYING. For warranty information and technical support, please refer to the seller's policies or contact NEMAYING customer service directly. Keep your purchase receipt as proof of purchase.
No official product videos were provided for this specific model by the seller. If available, relevant videos would be embedded here with detailed descriptions to assist with setup or operation.


