1. Introduction
This manual provides detailed instructions for the BUTXET iScan Portable Document and Photo Scanner. This device is designed for digitizing various physical documents, photographs, and texts with ease and portability. It supports multiple resolutions and offers convenient file transfer options, including built-in Wi-Fi and USB connectivity.
2. Product Overview
The BUTXET iScan is a compact, handheld scanner capable of scanning documents up to A4 size. It features an LCD display for immediate viewing of scanned images and various control buttons for operation.

Image 2.1: The BUTXET iScan Portable Scanner shown with an included 16GB Micro SD card. This image displays the overall design and compact nature of the device.
2.1 Device Components

Image 2.2: A detailed diagram illustrating the various components of the BUTXET iScan Portable Scanner, including the LCD display, control buttons, USB port, and memory card slot. Dimensions are also indicated.
- LCD Display: Shows scanning resolution, battery status, and allows preview of scanned images.
- Power/Scan Button: Used to power the device on/off and initiate scanning.
- Settings Button: Accesses resolution, file format, and other device settings.
- Up/Down Buttons: Navigate through menus and adjust settings.
- USB Port: For charging and connecting to a computer.
- Memory Card Slot: For inserting a Micro SD card (up to 32GB).
- Rest Indicator: Indicates device status.
3. Package Contents
Before using your scanner, please verify that all items listed below are present in the package:

Image 3.1: An overview of all items included in the BUTXET iScan Portable Scanner package, featuring the scanner unit, Micro SD card, USB cable, cleaning cloth, user manual, and software CD.
- BUTXET iScan Portable Scanner
- 16GB Micro SD Card
- USB Cable
- Cleaning Cloth
- User Manual
- Software CD (for OCR functionality)
- Small Carrying Bag
4. Setup
4.1 Charging the Scanner
Before initial use, fully charge the scanner's built-in 850mAh Lithium-polymer battery. Connect the scanner to a USB power source (e.g., computer USB port or USB wall adapter) using the provided USB cable. The charging process typically takes approximately 2 hours.
4.2 Inserting the Micro SD Card
Locate the memory card slot on the scanner. Gently insert the provided 16GB Micro SD card into the slot until it clicks into place. Ensure the card is inserted in the correct orientation. The scanner supports Micro SD cards up to 32GB.
4.3 Powering On/Off
To power on the scanner, press and hold the "SCAN" button for approximately 2 seconds. The LCD display will illuminate. To power off, press and hold the "SCAN" button again until the display turns off. The device also features an auto-power-off function after 3 minutes of inactivity.
5. Operating Instructions
5.1 Adjusting Scan Settings
After powering on, use the Settings button and Up/Down buttons to navigate through options such as:
- Resolution: Select from 1050DPI, 600DPI, or 300DPI. Higher DPI provides more detail but results in larger file sizes.
- File Format: Choose between JPG (default for images) or PDF (suitable for multi-page documents).
- Color Mode: Select between Color or Mono (black and white) scanning.
5.2 Performing a Scan
Place the document or photo you wish to scan on a flat, stable surface. Hold the scanner firmly and position it at the top edge of the item. Press the "SCAN" button once to begin scanning. Slowly and steadily glide the scanner downwards over the entire surface of the document. Ensure consistent speed and pressure for optimal results. Press the "SCAN" button again to stop the scan.

Image 5.1: A user demonstrating the scanning process with the BUTXET iScan Portable Scanner, highlighting the double roller design for stable performance and high-resolution scanning capabilities for documents and images.
5.3 Viewing Scanned Images
Scanned images can be previewed directly on the scanner's HD LCD display. Use the navigation buttons to scroll through your saved scans.
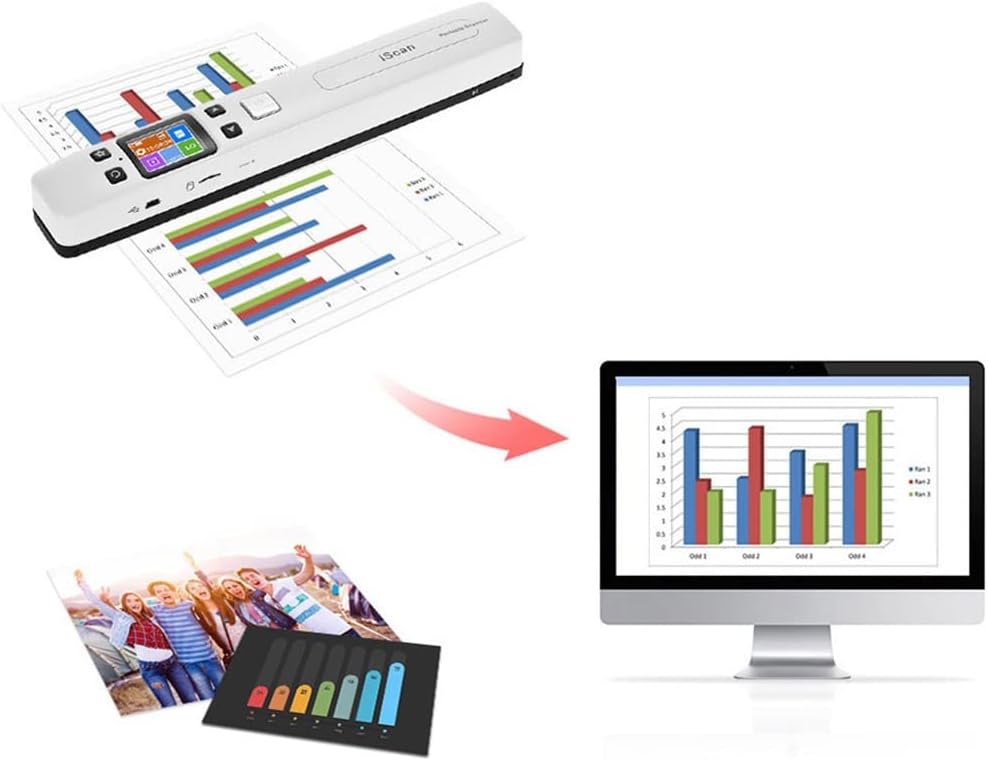
Image 5.2: An illustration showing a document being scanned by the BUTXET iScan Portable Scanner, with the resulting digital image displayed on a computer monitor, demonstrating the clarity of the scanned output.
5.4 Transferring Files
The scanner offers two methods for transferring scanned files to other devices:
- Wi-Fi Connection: The scanner has built-in Wi-Fi. Activate Wi-Fi on the scanner via the settings menu. On your smartphone, tablet, or computer, connect to the scanner's Wi-Fi network (SSID will be displayed on the scanner's LCD). Once connected, you can access and download scanned files through a web browser or a dedicated app (if available).
- USB Connection: Connect the scanner to your computer using the provided USB cable. The scanner will appear as a removable storage device. You can then access the Micro SD card's contents and copy files directly to your computer.

Image 5.3: This diagram illustrates how scanned files can be transferred from the BUTXET iScan Portable Scanner to a smartphone, tablet, or computer using either Wi-Fi or a USB connection.
5.5 Optical Character Recognition (OCR)
The included software CD contains OCR functionality. Install the software on your computer to convert scanned JPG or PDF files into editable text formats such as Microsoft Word, Excel, or plain text files.
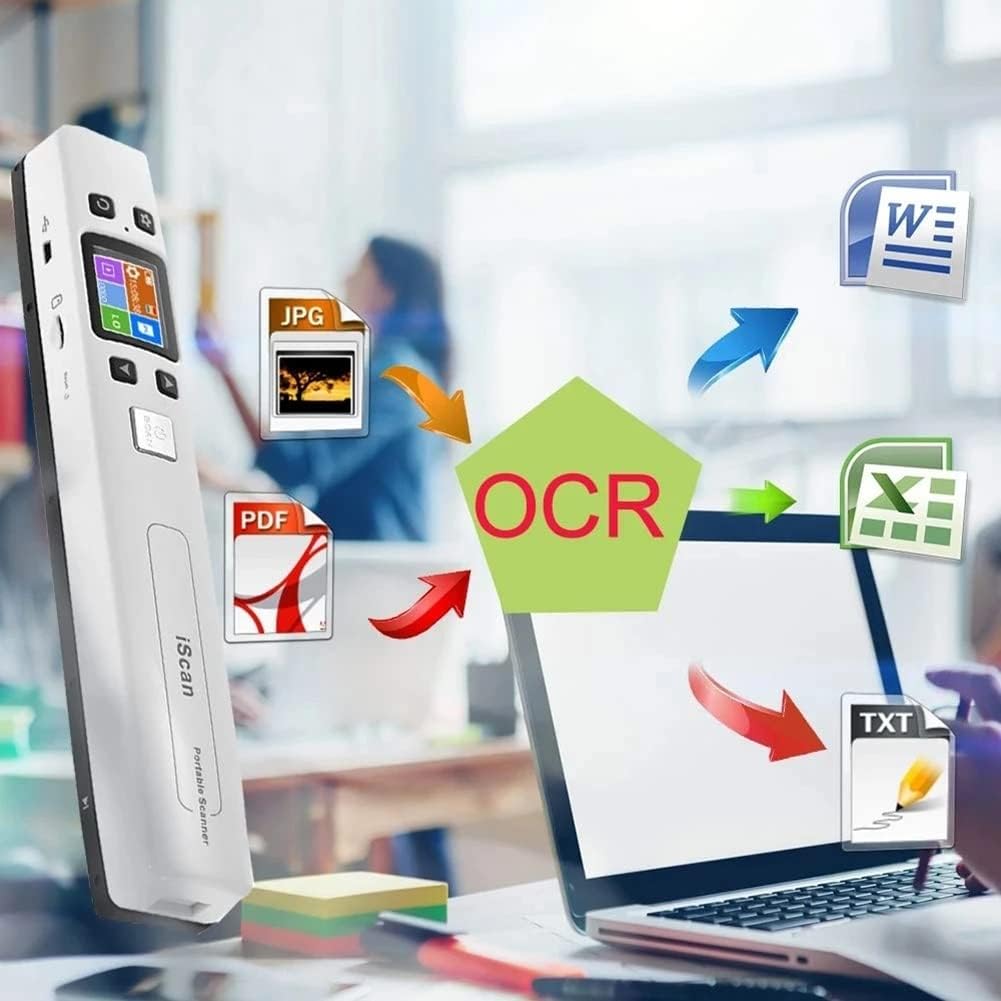
Image 5.4: An illustration depicting the OCR (Optical Character Recognition) process, where scanned JPG or PDF files from the BUTXET iScan Portable Scanner are converted into editable formats like Word, Excel, or TXT on a computer.
6. Maintenance
6.1 Cleaning the Scanner
To maintain optimal scanning quality, regularly clean the scanner's glass surface and rollers. Use the provided cleaning cloth or a soft, lint-free cloth. For stubborn marks, slightly dampen the cloth with a small amount of screen cleaner or isopropyl alcohol. Avoid spraying liquids directly onto the scanner.
6.2 Battery Care
To prolong battery life, avoid fully discharging the battery frequently. If the scanner will not be used for an extended period, charge it to approximately 50% before storage and recharge every few months.
7. Troubleshooting
- Scanner not powering on: Ensure the battery is charged. Connect the scanner to a power source and try again.
- Scanned images are blurry or distorted: Ensure you are scanning on a flat surface. Maintain a steady and consistent speed while gliding the scanner. Clean the scanner's lens and rollers.
- Cannot connect via Wi-Fi: Ensure Wi-Fi is enabled on the scanner and your receiving device. Verify you are connecting to the correct scanner SSID. Restart both devices.
- Files not saving to SD card: Ensure the Micro SD card is properly inserted and not full. Check if the card is locked (if applicable).
- Scanner not recognized by computer via USB: Try a different USB port or cable. Ensure the scanner is powered on.
8. Specifications
| Feature | Specification |
|---|---|
| Model Name | BUTXET |
| Scanner Type | Document, Photo |
| Resolution | 1050DPI / 600DPI / 300DPI |
| Image Sensor | A4 color contact image sensor (CIS) |
| Scan Size | A4 / A5 / 5R / 4R / 3R and below |
| Scan Width | 225mm |
| File Format | JPG / PDF |
| LCD | 480x320 HD TFT LCD |
| Auto Power Off | 3 minutes |
| USB Port | USB 2.0 high speed |
| Power Supply | Rechargeable built-in 850mAh Lithium-polymer or USB cable |
| External Memory | TF card (up to 32GB) |
| Charge Time | 2 hours |
| Support System | Windows 2000 or above, Mac10.4 or above, iOS, Android |
| Item Size | 25.5 x 4 x 2.7 cm (10 x 1.6 x 1.1 inches) |
| Item Weight | 199g (0.44 lbs) |
9. Warranty and Support
For warranty information or technical support, please refer to the contact details provided with your purchase documentation or visit the official BUTXET website. Keep your proof of purchase for warranty claims.