1. Introduction
This manual provides comprehensive instructions for the safe and effective operation of the Jesverty SPS-12003V DC Power Supply. This device is a variable 0-120V, 0-3A switching bench power supply designed for various electronic applications, including laboratories, educational settings, manufacturing tests, maintenance, battery charging, and DIY projects. It features encoder coarse and fine adjustment knobs, an output ON/OFF switch, and integrated USB-A and Type-C quick-charge ports.

Figure 1: Front view of the Jesverty SPS-12003V DC Power Supply, showcasing its compact design and clear LED display.
2. Safety Instructions
Adherence to the following safety guidelines is crucial for preventing electric shock, fire, or damage to the unit and connected devices. Always read and understand these instructions before operation.
- Power Source: Ensure the power supply is connected to an AC outlet with the correct voltage (AC115V/230V selectable input). Verify the input voltage switch setting matches your local power grid before connecting.
- Ventilation: Do not block the ventilation openings. Ensure adequate airflow around the unit to prevent overheating. The integrated cooling fan activates automatically when necessary.
- Environment: Operate the power supply in a dry, well-ventilated area, away from direct sunlight, high temperatures, humidity, and corrosive gases.
- Grounding: Always connect the power supply to a properly grounded outlet.
- Output Connections: Ensure all output connections are secure and correct before turning on the output. Avoid short circuits.
- Overcurrent Protection (OCP): Utilize the OCP function to protect your load from excessive current.
- Test Leads: Use test leads with sufficient current capacity for your application, especially for long-term high-current use. The included test leads are for general use.
- Servicing: Do not attempt to service the unit yourself. Refer all servicing to qualified personnel.
3. Product Features
The Jesverty SPS-12003V DC Power Supply incorporates several advanced features for enhanced precision and convenience:
- Encoder Coarse & Fine Adjustment Knobs: Digital encoder knobs replace traditional potentiometers for precise voltage and current setting. The coarse knob adjusts values before the decimal point, while the fine knob adjusts values after the decimal point (0.01V/0.001A resolution).
- USB-A & USB-C 20W Quick-Charge Ports: Equipped with dual charging ports supporting 20W fast charging, ideal for smartphones, Arduino UNO, Raspberry Pi, and other electronic modules.
- Output ON/OFF Button: A dedicated button to easily switch the output ON or OFF, allowing adjustments without disconnecting the load or powering down the unit.
- 4-Digit LED Display: Provides accurate readings for voltage, current, and power (watts) with high resolution.
- Multiple Protections: Includes Over-Current Protection (OCP) and a temperature-regulated cooling fan for safe and stable operation.
- OPN Output Status Setting: A function that allows the unit to output voltage and current immediately upon power-on without requiring the "OUTPUT" button press.
- Compact & Lightweight Design: Measuring approximately 7.1(D)x3.6(W)x6.2(H) inches and weighing 2.5 lbs, it saves valuable workbench space.

Figure 2: Close-up of the accurate 4-digit LED display, showing voltage, current, and wattage readings.
4. Components and Controls
Familiarize yourself with the various components and controls of the SPS-12003V power supply:

Figure 3: Detailed diagram identifying the front and rear components of the power supply.
- Voltage Display: Shows the set or output voltage.
- C.V. Mode Indicator: Illuminates when the unit is operating in Constant Voltage mode.
- C.C. Mode Indicator: Illuminates when the unit is operating in Constant Current mode.
- Current Display: Shows the set or output current.
- OCP Status LED: Indicates Over-Current Protection status.
- OPN Status LED: Indicates OPN (Output Power ON) function status.
- Power Display: Shows the output power in Watts.
- USB-C Quick-Charge Port: Type-C port for fast charging compatible devices.
- USB-A Quick-Charge Port: Type-A port for fast charging compatible devices.
- OCP Setting Button: Press to enable/disable Over-Current Protection.
- Output Control Button: Toggles the main output ON/OFF.
- Voltage Knob (Coarse): Adjusts the integer part of the voltage.
- Voltage Knob (Fine): Adjusts the decimal part of the voltage.
- Current Knob (Coarse): Adjusts the integer part of the current.
- Current Knob (Fine): Adjusts the decimal part of the current.
- Power Switch: Main power ON/OFF switch for the unit.
- Output Terminal - (Black): Negative output terminal.
- Grounding Terminal (Green): Ground connection terminal.
- Output Terminal + (Red): Positive output terminal.
- Cooling Fan: Automatically regulates temperature.
- Input Selectable Switch: Selects AC115V or AC230V input voltage.
- AC Power Inlet: Connects the power cord to the unit.
- Fuse Box (Spare Fuse Inside): Contains the main fuse and a spare.
5. Setup Guide
- Unpacking: Carefully remove the power supply and all accessories from the packaging. Verify that all items listed in the "What's in the Box" section are present.
- Placement: Place the unit on a stable, flat surface with adequate ventilation space around it. Ensure no objects obstruct the cooling fan or vents.
- Input Voltage Selection: Locate the Input Selectable Switch (21) on the rear of the unit. Set it to match your local AC mains voltage (115V or 230V). Incorrect setting can damage the unit.
- Power Connection: Connect the provided power cord to the AC Power Inlet (22) on the rear of the unit, then plug the other end into a grounded AC outlet.
- Initial Power On: Turn on the Power Switch (16) on the front panel. The LED display should illuminate.
- Output Terminal Connection: Connect your test leads to the Output Terminal + (Red, 19) and Output Terminal - (Black, 17). If grounding is required for your application, connect to the Grounding Terminal (Green, 18).
6. Operating Instructions
6.1 Setting Voltage and Current
The SPS-12003V uses encoder knobs for precise adjustments:
- Voltage Adjustment:
- Rotate the Voltage Knob (Coarse) (12) to adjust the integer part of the desired voltage.
- Rotate the Voltage Knob (Fine) (13) to adjust the decimal part of the desired voltage (0.01V resolution).
- Current Adjustment:
- Rotate the Current Knob (Coarse) (14) to adjust the integer part of the desired current.
- Rotate the Current Knob (Fine) (15) to adjust the decimal part of the desired current (0.001A resolution).
The display will show the set values. Pressing the knobs allows you to switch the active digit for adjustment, providing finer control.
6.2 Output ON/OFF Control
After setting the desired voltage and current, press the Output Control Button (11) to enable or disable the output. This allows you to adjust settings without disconnecting the load.
6.3 Over-Current Protection (OCP)
The OCP function protects your connected load from excessive current. To use OCP:
- Press the OCP Setting Button (10) to activate OCP. The OCP Status LED (5) will illuminate.
- Set the desired maximum current limit using the Current Knobs.
- If the output current exceeds this set limit, the power supply will automatically cut off the output and trigger an alarm, protecting the load.
- To reset OCP after an event, resolve the overcurrent condition and press the OCP Setting Button again.
6.4 OPN (Output Power ON) Function
The OPN function allows the power supply to automatically enable its output upon powering on the unit, bypassing the need to press the Output Control Button (11).
- To enable OPN, refer to the specific instructions in the full manual (usually involves a combination of button presses during power-on). When active, the OPN Status LED (6) will illuminate.
- When OPN is enabled, the unit will immediately output the previously set voltage and current upon turning on the main Power Switch (16).
7. USB Charging Function
The SPS-12003V is equipped with 20W USB-A (9) and USB-C (8) quick-charge ports on the front panel. These ports are independent of the main DC output and can be used to charge compatible devices simultaneously.
- Simply connect your device's USB charging cable to the appropriate USB-A or USB-C port.
- The ports support various fast charging protocols, providing up to 20W of power.
- These ports are ideal for powering or charging small electronic devices like smartphones, tablets, or microcontrollers (e.g., Arduino, Raspberry Pi) during your projects.

Figure 4: The power supply demonstrating its USB-A and USB-C quick-charge capabilities.
8. Maintenance
Proper maintenance ensures the longevity and reliable operation of your Jesverty SPS-12003V power supply:
- Cleaning: Disconnect the power supply from the AC outlet before cleaning. Use a soft, dry cloth to wipe the exterior. Do not use abrasive cleaners or solvents.
- Ventilation: Regularly check that the cooling fan and ventilation openings are free from dust and debris. Use compressed air to clear any blockages if necessary.
- Storage: When not in use for extended periods, store the unit in a cool, dry place, away from direct sunlight and extreme temperatures.
- Fuse Replacement: If the unit does not power on, check the fuse located in the Fuse Box (23) on the rear panel. Replace it with a fuse of the same type and rating (a spare fuse is typically included inside the fuse box). Always disconnect the power cord before replacing the fuse.
9. Troubleshooting
| Problem | Possible Cause | Solution |
|---|---|---|
| Unit does not power on. | No AC power; Power cord loose; Blown fuse; Input voltage switch incorrect. | Check AC outlet and power cord connection. Verify Input Selectable Switch (21) setting. Check and replace fuse (23) if blown. |
| No output voltage/current. | Output is OFF; OCP activated; Short circuit in load; Incorrect connections. | Press Output Control Button (11) to turn ON. Check OCP Status LED (5) and reset if active. Verify load connections and check for short circuits. |
| Output voltage/current unstable. | Poor connections; Overheating; Load impedance fluctuations. | Ensure all connections are secure. Check for adequate ventilation. Reduce load or adjust settings if operating near limits. |
| Cooling fan is loud or constantly running. | High ambient temperature; Heavy load; Blocked vents. | Ensure proper ventilation. Reduce load if possible. Clean vents if dusty. Fan operation is temperature-regulated and normal under load. |
10. Specifications
| Parameter | Value |
|---|---|
| Model Number | SPS-12003V |
| Input Voltage | AC115V/230V (Selectable) |
| Output Voltage Range | 0-120V DC |
| Output Current Range | 0-3A DC |
| Voltage Resolution | 0.01V |
| Current Resolution | 0.001A |
| Output Wattage (USB) | 20W (USB-A, USB-C) |
| Dimensions (L x W x H) | Approx. 7.1 x 3.6 x 6.2 inches (18 x 9 x 16 cm) |
| Item Weight | Approx. 2.5 lbs (1.14 kg) |
| Display | 4-Digit LED (Voltage, Current, Power) |
| Protection Features | OCP (Over-Current Protection), Over-Temperature Protection |
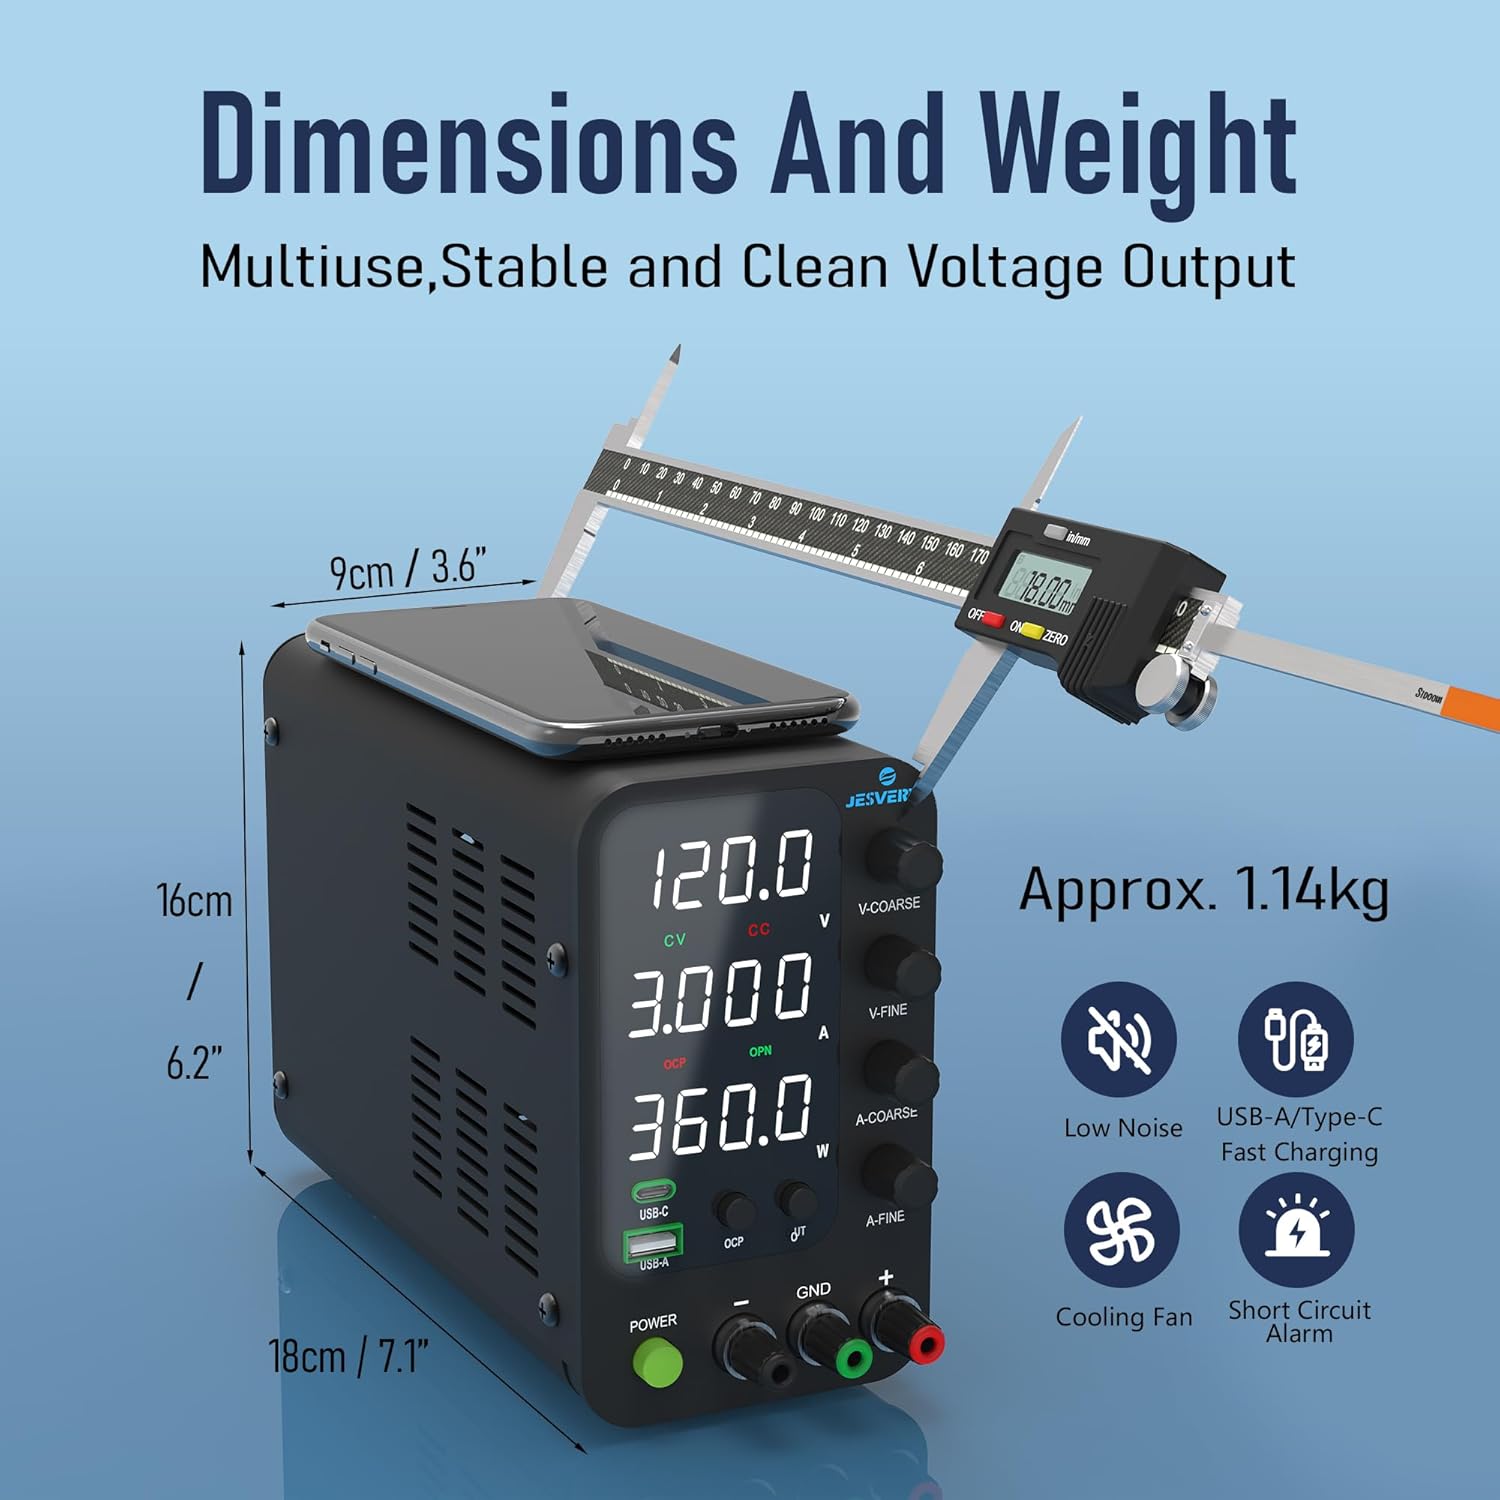
Figure 5: Visual representation of the compact dimensions and weight of the power supply.
11. Warranty and Customer Support
Jesverty provides professional technical support for its products. If you encounter any problems or have questions regarding your SPS-12003V DC Power Supply, please contact Jesverty Customer Service.
- Contact Information: Refer to the back of the instruction manual included with your unit for specific contact details (e.g., email address).
- Warranty: Information regarding the product warranty period and terms is typically provided with the purchase documentation or can be obtained by contacting customer service.
- Included Items: Your package should contain: 1 x SPS-V Unit, 1 x Power Cord*, 1 set of test leads*, 1 x instruction manual. (*Note: Power cords and AC input settings may vary by destination. Test leads are general-purpose; use higher capacity leads for long-term high-current projects.)


