Goudergo JZONTL-000000ND
Goudergo 90° Vertical Automatic Door Opener User Manual
Model: JZONTL-000000ND | Brand: Goudergo
1. Introduction
This manual provides detailed instructions for the installation, operation, and maintenance of your Goudergo 90° Vertical Automatic Door Opener. This electric door opener is a smart access solution designed for various flat-open doors in offices, conference rooms, laboratories, unit doors, and other locations. It integrates advanced motor technology and an intelligent control mechanism to deliver an efficient, smooth, and secure door opening experience for residential, commercial, or industrial settings.
2. Product Overview
2.1 Key Features
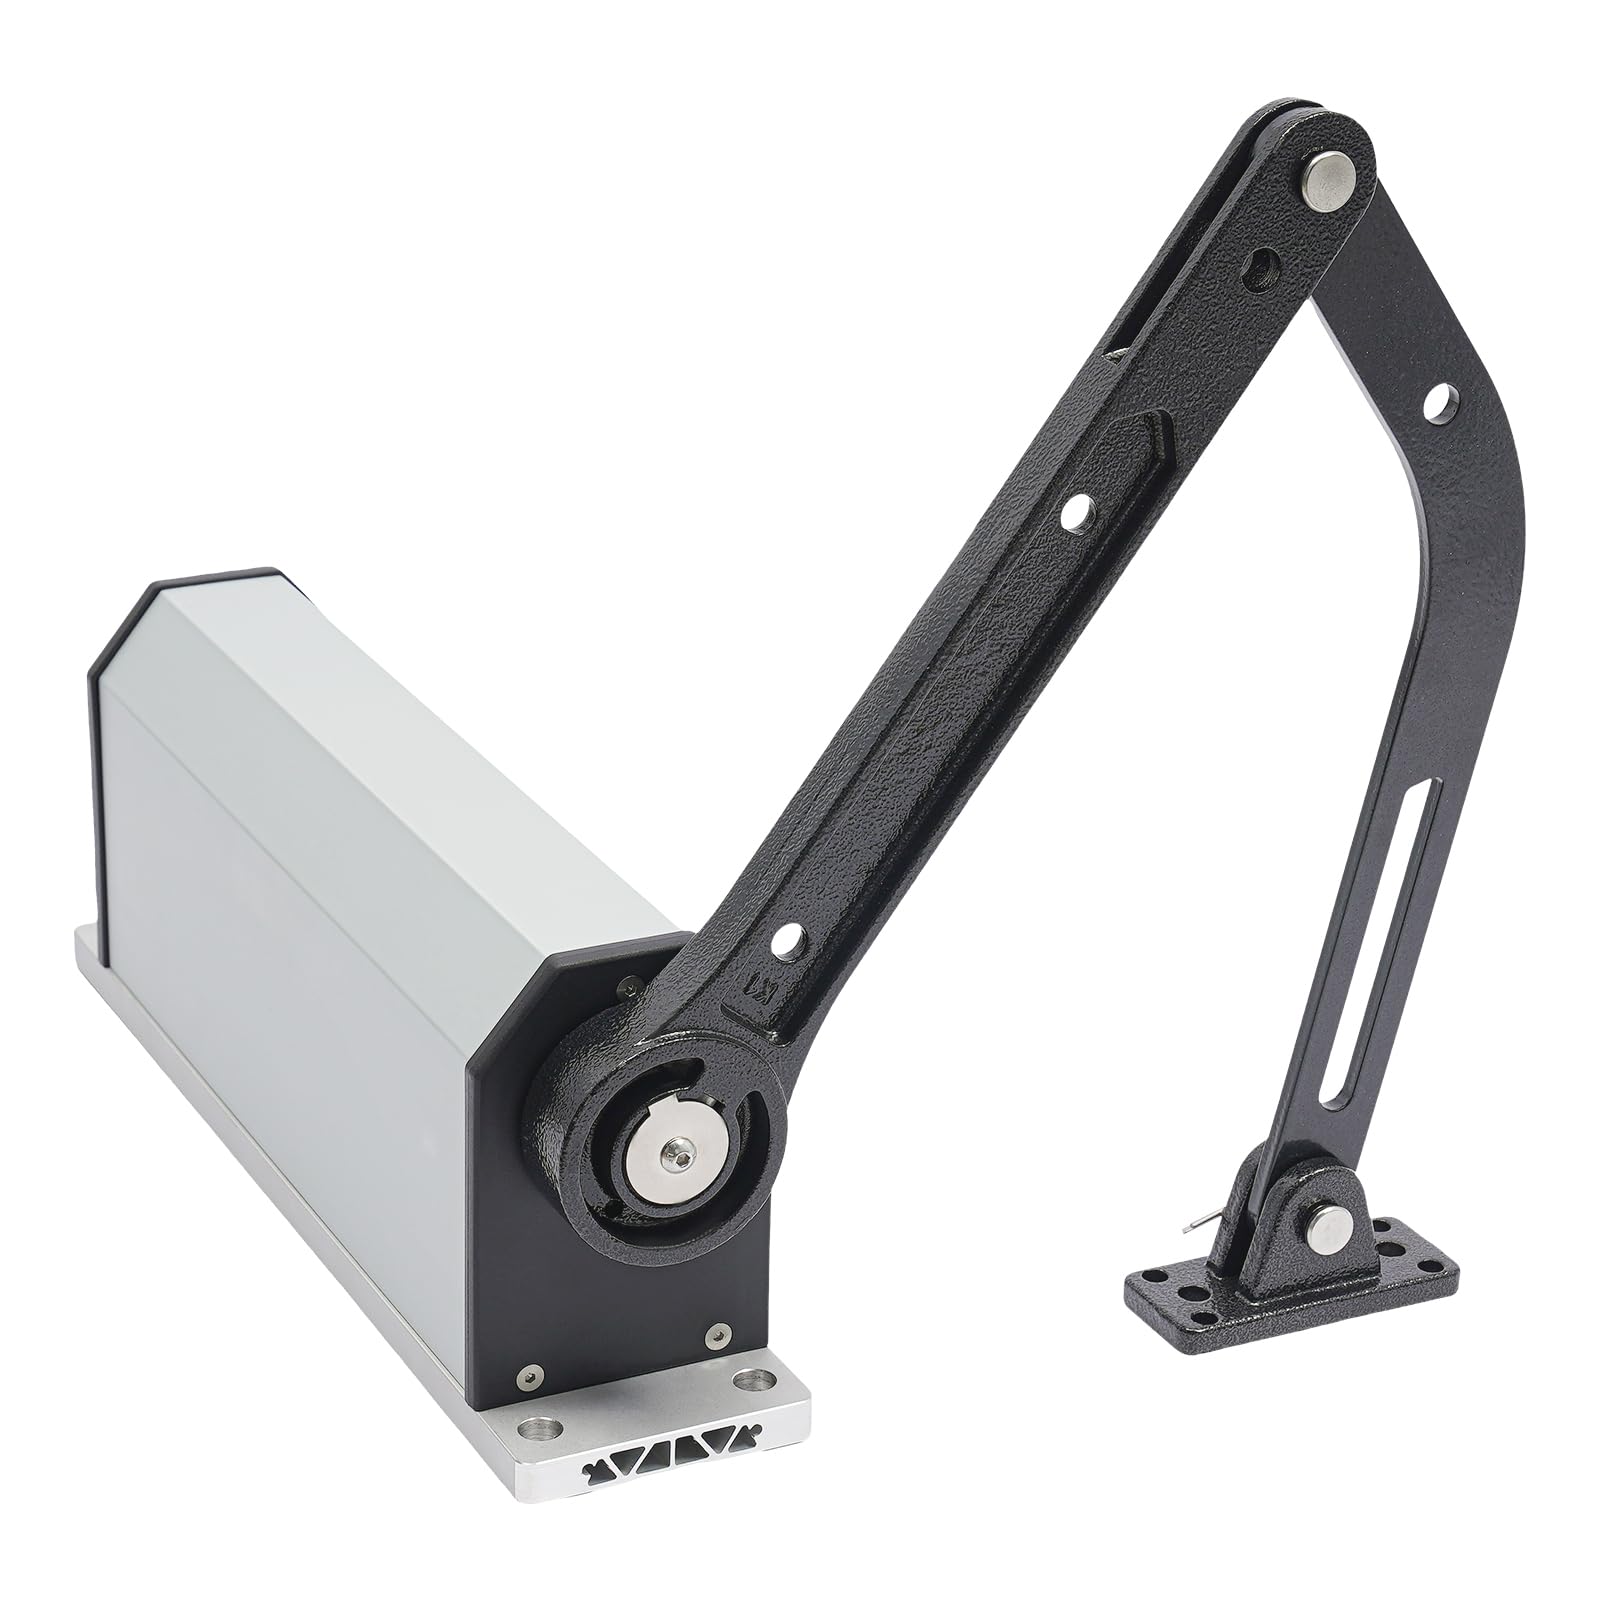
- Durable Construction: Made from high-quality aluminum alloy and hot-dip galvanized steel, treated with a plastic spraying process for long-lasting durability.
- Multiple Unlocking Methods: Supports both password and card unlocking for convenient access control.
- Remote Control: Operates the door opener from an open and interference-free distance of up to 98.43 feet (30 meters).
- Enclosed Housing: Designed to prevent rain and dust from entering the door opener, enhancing longevity.
- Easy Assembly: Simple structure with complete accessories and detailed illustrations for quick installation.
- High Efficiency: Opens doors in 3-7 seconds with an adjustable opening angle up to 90° and a holding time of 1-254 seconds.
- High Adaptability: Suitable for flat-open doors with a width of up to 62.99 inches (1600mm) and a weight up to 308.65 lbs (140kg). Features a microwave sensing module for stable detection regardless of environmental factors.
- Adjustable Design: Customizable door opening time (3-7S), buffer angle (0-30°), and 10-grade adjustable opening/closing speed.
- High Safety: Motor includes overcurrent, overload, and short-circuit protection. IP54 protection level. Rebounds upon obstruction to prevent pinching.
- Complete Set: Includes door opener, access control unit, switch, and two remote controls, along with other assembly accessories.
2.2 Package Contents
Verify that all components are present and undamaged upon unpacking:
- 1x Door Opener Unit
- 1x Access Control Unit
- 1x Switch
- 1x Infrared Probe
- 2x Remote Controls
- 1x English Manual
- 2x Chinese Manuals
- Other Assembly Accessories (screws, bolts, etc.)

3. Safety Information
Please read these instructions carefully before using the equipment to ensure proper and comprehensive operation.
- In the process of closing the door, if a trigger signal for opening the door is received, the door opening action will be executed immediately. Ensure the area is clear.
- The motor has built-in overcurrent, overload, and short-circuit protection functions.
- The system is designed to rebound in case of obstruction during closing, preventing people from being pinched.
- Ensure proper electrical connections and grounding to prevent electrical hazards.
- Do not attempt to disassemble or modify the unit beyond the instructions provided.
4. Setup and Installation
Proper installation is crucial for the safe and efficient operation of the automatic door opener. Refer to the following steps and the installation video for guidance.
4.1 Installation Steps
- Prepare the Door Frame: Ensure the door frame is clean and structurally sound to support the door opener.
- Mount the Main Unit Bracket: Position the main unit bracket on the door frame above the door. Mark the drilling points using the bracket as a template. Drill pilot holes and secure the bracket firmly with appropriate screws.
- Install the Main Unit: Carefully slide the main door opener unit onto the mounted bracket. Secure it in place using the provided fasteners.
- Attach the Arm Assembly: Connect the tension arm to the main unit's rotating shaft. Ensure it is securely fastened.
- Mount the Door Bracket: Position the door bracket on the door itself, aligning it with the tension arm. Mark and drill holes, then secure the bracket to the door.
- Connect the Tension Arm to the Door Bracket: Attach the free end of the tension arm to the door bracket. Ensure smooth movement and proper alignment.
- Wiring: Connect the power supply, access control unit, switch, and infrared probe according to the wiring diagram (refer to the control board details in the video).
- Cover Installation: Install the protective cover over the main unit and the arm assembly to protect internal components from environmental factors.


4.2 Installation Video Guide
Watch this video for a visual guide on the installation process of the automatic door opener.
5. Operating Instructions
5.1 Remote Control Operation
The door opener can be operated using the provided remote controls. Ensure the remote control has a 23A 12V battery installed (not included).
- Press the designated button on the remote control to open or close the door.
- The remote control has an effective range of approximately 98.43 feet (30 meters) in open, unobstructed areas.

5.2 Access Control Unit
The access control unit allows for password and card-based unlocking. Refer to the access control unit's specific manual for detailed programming instructions.
- Password Unlocking: Enter the universal password (1) or a programmed user password on the keypad.
- Card Unlocking: Present a registered access card to the reader. The card reading distance is 0.79-1.97 inches (2-5cm). The unit supports up to 2000 cards.
5.3 Adjusting Settings
The control board allows for adjustment of various parameters:
- Opening Speed: Adjustable (1-10 gears, corresponding opening time 10-3S).
- Slow Opening Angle: Adjustable.
- Closing Speed: Adjustable (1-10 gears).
- Slow Closing Angle: Adjustable.
- Hold Open Time: Adjustable (1-254S).
- Buffer Angle: Adjustable (0-30°).
Use the dip switches and potentiometer on the control board to make these adjustments. Consult the detailed wiring diagram and control board legend for specific settings.
6. Maintenance
Regular maintenance ensures the longevity and optimal performance of your automatic door opener.
- Cleaning: Periodically clean the exterior of the door opener unit and the access control keypad with a soft, damp cloth. Avoid abrasive cleaners or solvents.
- Inspection: Regularly inspect the mounting hardware, tension arm, and all connections for any signs of wear, looseness, or damage. Tighten any loose screws.
- Lubrication: The internal mechanisms are generally maintenance-free. If any moving parts of the arm assembly show signs of stiffness, apply a small amount of silicone-based lubricant.
- Battery Replacement: Replace the remote control batteries as needed (1x 23A 12V battery).
- Sensor Check: Ensure the infrared probe and other sensors are clean and unobstructed for proper operation.
7. Troubleshooting
If you encounter issues with your door opener, refer to the following common problems and solutions:
| Problem | Possible Cause | Solution |
|---|---|---|
| Door does not open/close. | No power, remote battery dead, sensor obstructed, wiring issue. | Check power supply. Replace remote battery. Clear sensor path. Verify wiring connections. |
| Door opens/closes slowly or too fast. | Speed settings incorrect. | Adjust opening/closing speed settings on the control board (refer to Section 5.3). |
| Door does not open fully or close completely. | Angle settings incorrect, obstruction, mechanical issue. | Adjust opening/closing angle settings. Check for physical obstructions. Inspect arm assembly for damage. |
| Remote control not working. | Dead battery, out of range, interference. | Replace remote battery. Move closer to the door opener. Check for sources of interference. |
| Access control (card/password) not working. | Incorrect password, unregistered card, wiring issue. | Ensure correct password entry. Verify card is registered. Check wiring to access control unit. |
If the problem persists after attempting these solutions, please contact customer support.
8. Specifications
| Feature | Detail |
|---|---|
| Material | Aluminum Alloy, Hot-dip Galvanized Steel |
| Color | Silver |
| Process | Plastic Spraying |
| Style | Modern |
| Mounting Type | Door Mount |
| Plug Type | US Standard |
| Remote Control Battery | 1x 23A 12V Battery (Not Included) |
| Voltage | 110V |
| Power Supply | DC 24V 5A |
| Rated Power | 25W |
| Static Power | <0.5W (No Electromagnetic Lock) |
| Application Range (Door Width) | ≤1600mm / 62.99in |
| Application Range (Door Weight) | ≤140kg / 308.65lbs |
| Open Angle | 90° |
| Open/Close Speed | 1-10 Gears, Adjustable (Corresponding Opening Time 10-3S) |
| Operation Temperature | -20°C~60°C / -4°F~140°F |
| Operating Humidity | 30% - 95% (No Condensation) |
| Atmospheric Pressure | 700hpa~1060hpa |
| Remote Control Distance | 30m / 98.43ft (Open and Undisturbed) |
| Buffer Angle | 0-30° Adjustable |
| Working Noise | <50dB |
| Max. Installation Height | ≤3.5m / 11.48ft |
| Working Current | Standby <8mA, Induction Output <15mA |
| Protection Grade | IP54 |
| Recognition Speed (Access Control) | ≤ 0.3S |
| Card Reading Distance | 2-5cm / 0.79-1.97in |
| Card Capacity | 2000 |
| Universal Password | 1 |
| Unlocking Method | Password/Card |
| Door Relay Time | 1~254S |
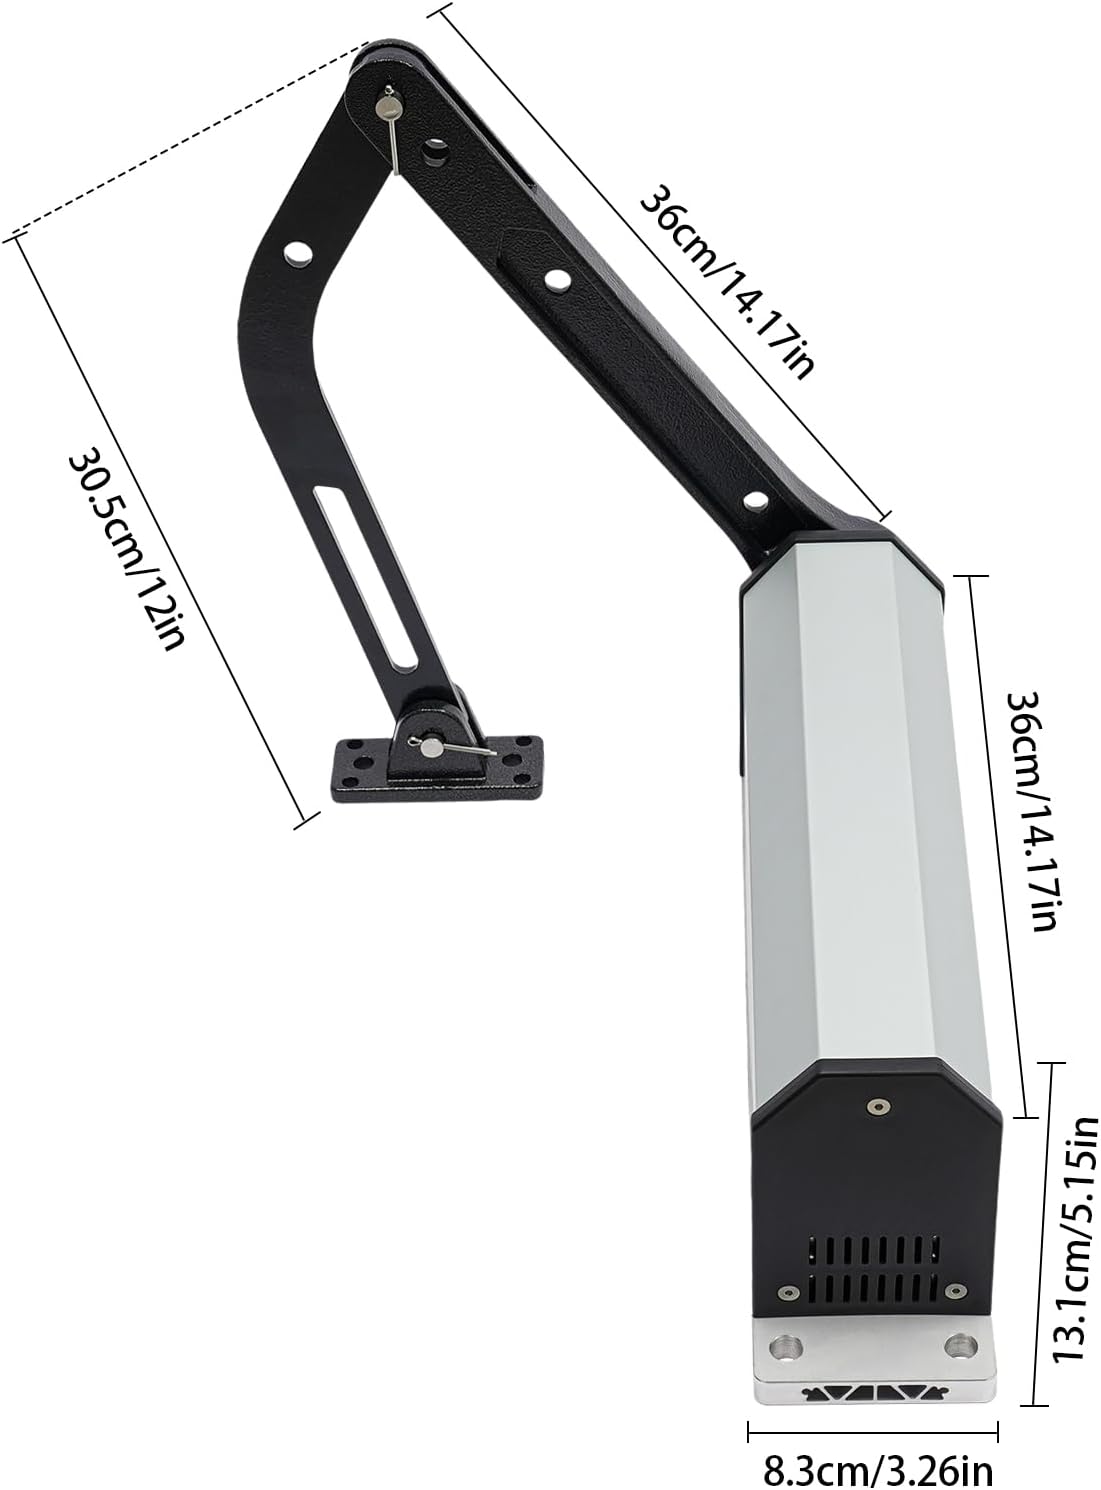
| Gate Opener Size | 360x83x131mm / 14.17x3.27x5.16in |
| Tension Arm Length | 360mm / 14.17in, 305mm / 12in |
| Net Weight | 7kg / 15.43lbs |
9. Warranty and Support
For warranty information or technical support, please refer to the contact details provided in your product packaging or contact Goudergo customer service directly.
Ask a question about this manual
Ask about setup, troubleshooting, compatibility, parts, safety, or missing instructions. Manuals+ will review the question and use this page’s manual context to help answer it.