
Yeiwenl TPM 2.0 Module
Yeiwenl TPM 2.0 Encryption Security Module User Manual
Model: TPM 2.0 Module
1. Introduction
The Yeiwenl TPM 2.0 Encryption Security Module is a hardware component designed to enhance the security of your computer system. A Trusted Platform Module (TPM) provides hardware-based security functions, including cryptographic operations and secure storage of sensitive data like encryption keys. This module is specifically designed for compatibility with certain ASUS motherboards and is essential for enabling features such as BitLocker drive encryption and meeting the hardware requirements for Windows 11.
2. Safety Information
Please read and understand the following safety precautions before installing or operating the TPM module:
- Always disconnect your computer from the power outlet and discharge any residual power before opening the computer case or handling internal components.
- Wear an anti-static wrist strap or frequently touch a grounded metal object (like the computer case) to prevent electrostatic discharge (ESD), which can damage electronic components.
- Handle the TPM module by its edges to avoid touching the gold pins or integrated circuits.
- Ensure proper ventilation around your computer to prevent overheating.
3. Setup and Installation
Follow these steps carefully to install the TPM 2.0 module into your compatible ASUS motherboard.
3.1 Pre-installation Checks
- Motherboard Compatibility: This TPM module is designed for specific ASUS motherboards. Verify your motherboard has a 20-1 pin TPM header. Note that some older motherboards (prior to X99) and those using DDR3 memory may not be compatible.
- BIOS Update: Ensure your motherboard's BIOS is updated to the latest version. An updated BIOS is often required for the TPM module to be recognized and function correctly.
3.2 Installation Steps
- Power off your computer and disconnect all power cables.
- Open your computer case to access the motherboard.
- Locate the TPM header on your ASUS motherboard. This is typically a 20-1 pin connector. Refer to your motherboard's manual for the exact location.
- Carefully align the TPM module with the header. The module has a missing pin (pin 19) which corresponds to a blocked pin on the motherboard header, ensuring correct orientation.

Figure 1: Yeiwenl TPM 2.0 Encryption Security Module. This image shows the compact design of the TPM module with its 20-1 pin connector.
- Gently but firmly press the TPM module into the header until it is fully seated. Do not force it.

Figure 2: TPM 20-1 Pinout Diagram. This diagram illustrates the pin configuration for the TPM module, showing the missing pin (pin 19) for correct alignment with ASUS and Gigabyte motherboards.
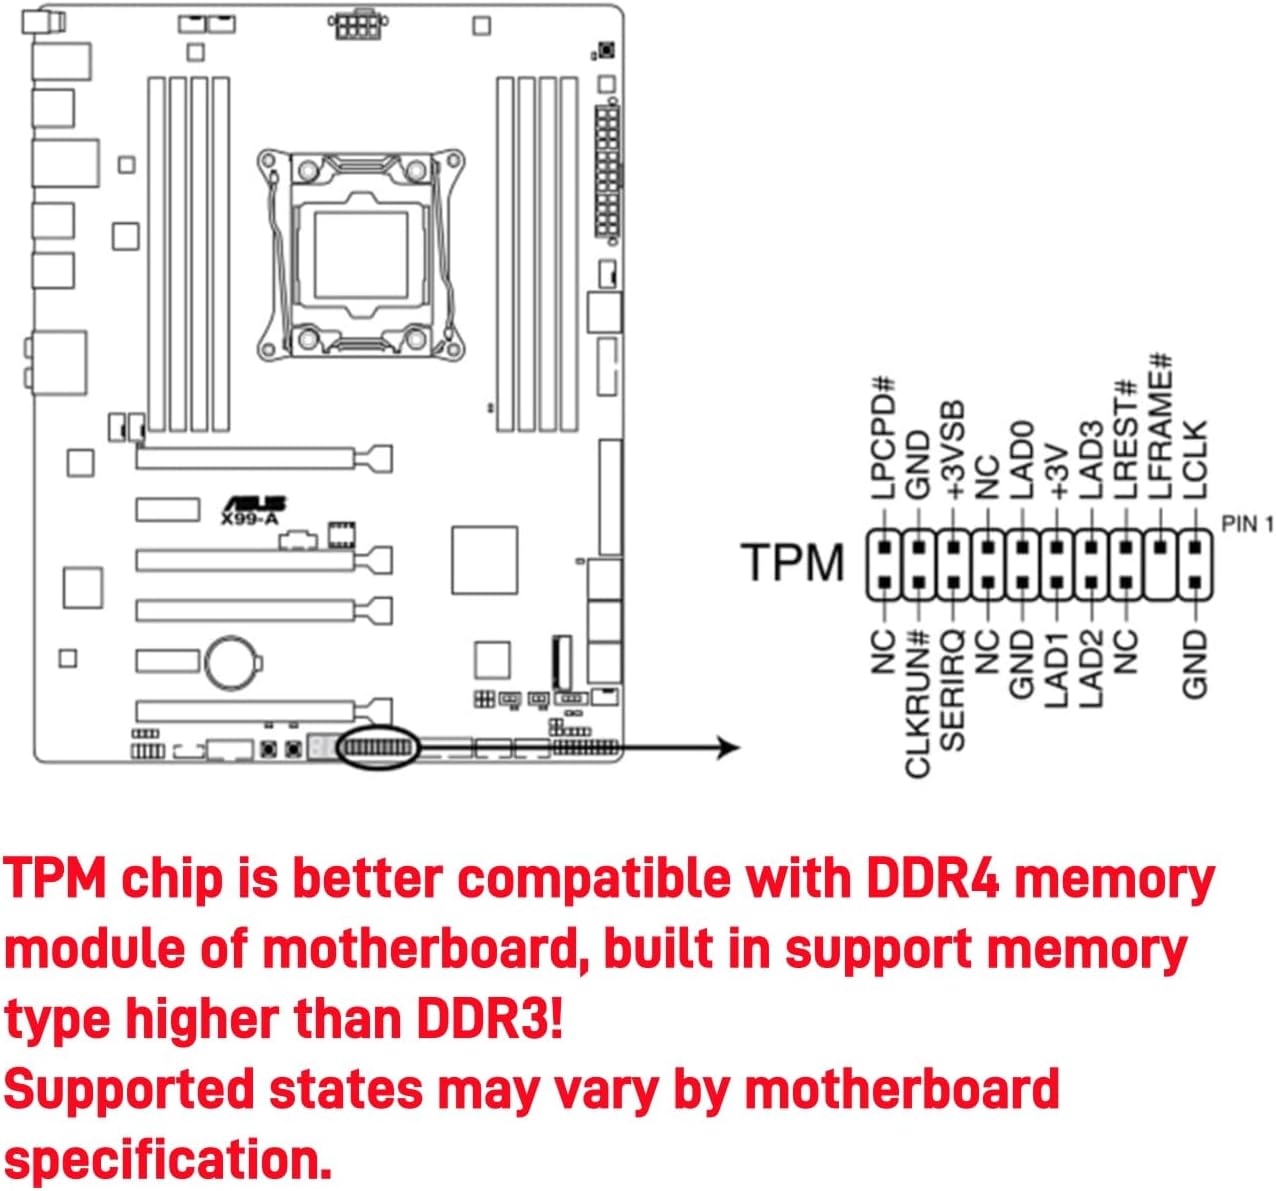
Figure 3: Example Motherboard with TPM Header. This image highlights the typical location of the TPM header on a motherboard and notes the compatibility with DDR4 memory modules.
- Close your computer case and reconnect all power cables.
4. Operating the TPM Module
After physical installation, the TPM module needs to be enabled and verified within your system.
4.1 Enabling TPM in BIOS
- Power on your computer and immediately press the designated key (usually Del, F2, or F10) to enter the BIOS/UEFI setup.
- Navigate to the security or advanced settings section. The exact path varies by motherboard model. Look for options like "Trusted Platform Module," "TPM Device," or "Security Device Support."
- Enable the TPM functionality. You may need to set it to "Enabled" or "Discrete TPM."
- Save your BIOS settings and exit. Your computer will restart.
4.2 Verifying TPM in Windows
Once Windows has loaded, you can verify that the TPM module is recognized:
- For Windows 10/11: Press Win + R, type tpm.msc, and press Enter. The TPM Management console will open. If the TPM is working correctly, it will show its status as "The TPM is ready for use."
- Alternatively, go to Settings > Update & Security (Windows 10) or Privacy & Security (Windows 11) > Windows Security > Device Security. Under "Security processor," you should see details about your TPM.
5. Maintenance
The Yeiwenl TPM 2.0 module is a passive electronic component and requires no routine maintenance. To ensure its longevity and proper function, keep your computer's internal environment clean and free of dust. Regular cleaning of your computer's interior with compressed air can help maintain optimal operating conditions for all components.
6. Troubleshooting
If you encounter issues after installing the TPM module, consider the following troubleshooting steps:
- TPM Not Recognized:
- Double-check that the module is fully and correctly seated in the TPM header.
- Ensure your motherboard's BIOS is updated to the latest version.
- Verify that TPM functionality is enabled in your BIOS settings.
- Some motherboards require specific BIOS settings (e.g., enabling Intel Platform Trust Technology (PTT) or AMD fTPM) to be disabled if a discrete TPM module is used. Consult your motherboard manual.
- Compatibility Issues:
- This module is primarily compatible with motherboards that support DDR4 memory. Motherboards prior to X99 or those using DDR3 memory may not be supported.
- Ensure your motherboard model is explicitly listed as compatible with a 20-1 pin TPM 2.0 module.
- Windows 11 Installation Issues: If Windows 11 installation fails due to TPM requirements, ensure the TPM is enabled in BIOS and recognized by Windows as TPM 2.0.
7. Specifications
| Feature | Description |
|---|---|
| Item Type | TPM2.0 Encryption Security Module |
| Material | PCB |
| Compatible Device | PC (specifically ASUS motherboards) |
| Pin Definition | 20Pin (20-1 pin, 2x10P, 2.54mm pitch) |
| TPM Version | TPM 2.0 |
| RAM Compatibility | Better compatible with DDR4 memory modules (does not support DDR3) |
| Operating System | Windows 11 (compatible) |
| Item Weight | 0.317 ounces |
| Package Dimensions | 5.16 x 4.37 x 0.43 inches |
8. Warranty and Support
For warranty information and technical support regarding your Yeiwenl TPM 2.0 Encryption Security Module, please refer to the documentation included with your purchase or contact the manufacturer directly through their official website or customer service channels. Keep your proof of purchase for warranty claims.
Ask a question about this manual
Ask about setup, troubleshooting, compatibility, parts, safety, or missing instructions. Manuals+ will review the question and use this page’s manual context to help answer it.