1. Introduction
The ELEGOO Mercury XS Bundle provides a comprehensive solution for post-processing 3D resin prints. This bundle includes a Wash Station for cleaning uncured resin from your models and a Cure Station for thoroughly curing the prints with UV light, ensuring optimal hardness and detail. The bundle also includes 1kg of ELEGOO ABS-Like Resin 3.0 Plus, designed for low viscosity, high precision, and reduced shrinkage.
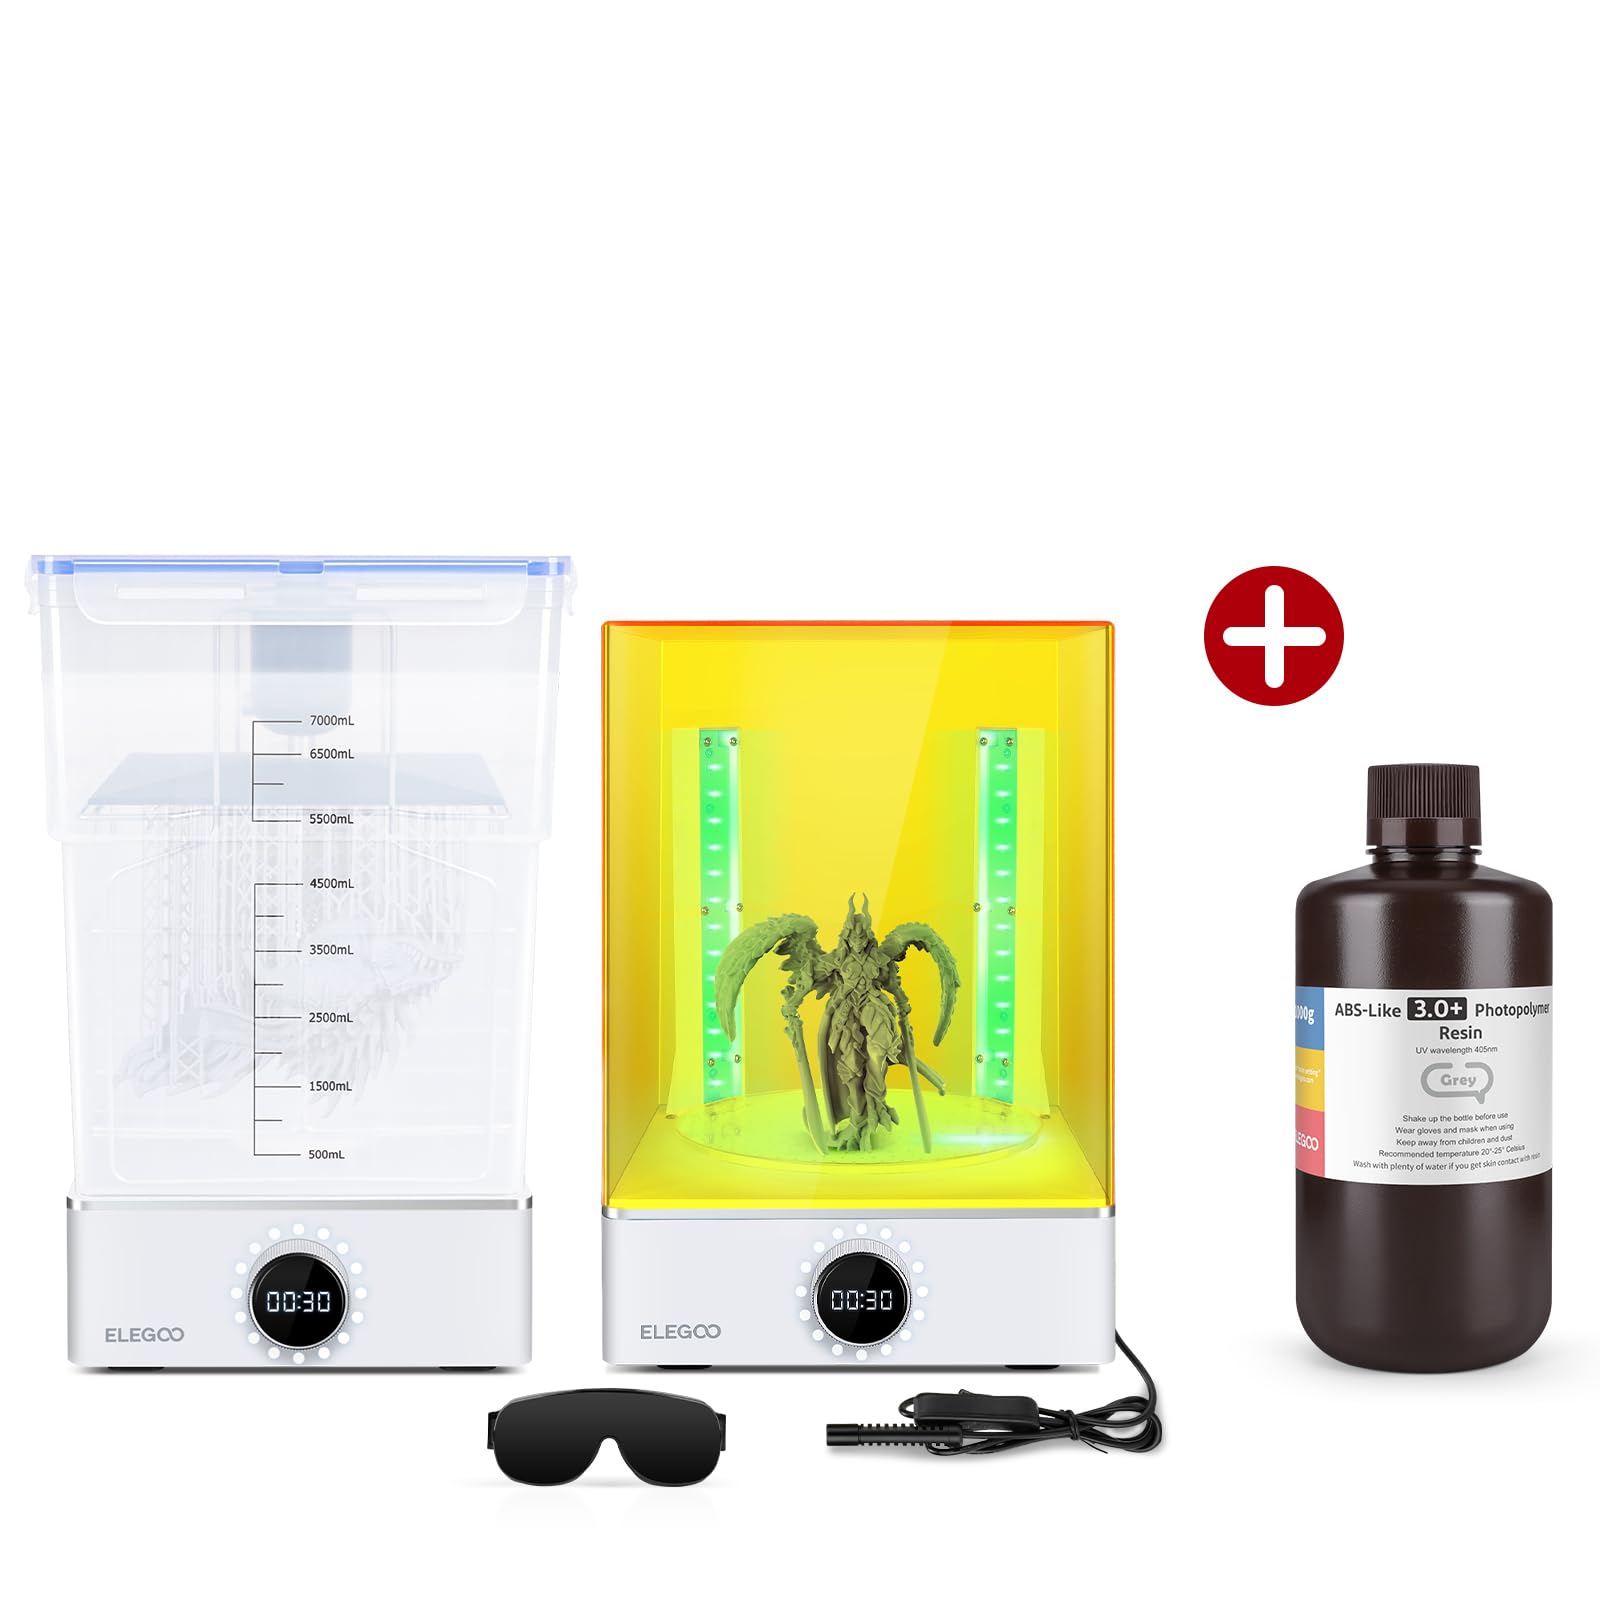
Figure 1: ELEGOO Mercury XS Wash and Cure Station side-by-side.
2. What's in the Box
The ELEGOO Mercury XS Bundle typically includes the following components:
- ELEGOO Mercury XS Wash Station
- ELEGOO Mercury XS Cure Station
- Wash Bucket with Lid
- Washing Basket
- Curing Platform (Turntable)
- Handheld UV Curing Lamp
- Power Adapter
- User Manual
- 1kg ELEGOO ABS-Like Resin 3.0 Plus (Grey)
For a visual guide on unboxing and initial setup, please refer to the video below:
Video 1: Unboxing and overview of an ELEGOO Mercury Wash and Cure Machine (Mercury Plus 2.0 model shown, but principles apply).
3. Setup
3.1 Wash Station Setup
- Place the Wash Station on a stable, level surface.
- Insert the washing basket into the wash bucket.
- Fill the wash bucket with an appropriate cleaning solution (e.g., Isopropyl Alcohol for standard resin, water for water-washable resin). Ensure the liquid level is sufficient to cover your prints.
- Place the wash bucket onto the Wash Station base. The magnetic rotor at the bottom of the bucket will align with the motor in the base.
- Connect the power adapter to the Wash Station and plug it into a power outlet.
3.2 Cure Station Setup
- Place the Cure Station on a stable, level surface.
- Assemble the curing platform (turntable) by attaching the support pillars to the base.
- Place the assembled curing platform onto the Cure Station base.
- Connect the handheld UV curing lamp to its designated port on the Cure Station base.
- Place the UV-blocking top cover over the curing platform. The machine will not operate without the cover in place.
- Connect the power adapter to the Cure Station and plug it into a power outlet.
4. Operating the Wash Station
The Wash Station is designed to efficiently remove uncured resin from your 3D prints.
4.1 Cleaning Mode with Build Plate
For prints still attached to the build plate, you can clean them without removal:
- Ensure the wash bucket is filled with cleaning solution.
- Carefully attach your build plate with the print(s) to the washing basket's holder.
- Lower the washing basket and build plate into the cleaning solution.
- Select the desired washing time using the control knob (up to 30 minutes).
- Press the knob to start the washing cycle. The magnetic rotor will agitate the solution, cleaning the print.

Figure 2: The Wash Station accommodates various build plate sizes for direct cleaning.
4.2 Cleaning Mode without Build Plate
For prints removed from the build plate:
- Place your resin prints directly into the washing basket.
- Lower the washing basket into the cleaning solution.
- Select the desired washing time using the control knob (up to 30 minutes).
- Press the knob to start the washing cycle.
The Wash Station features a powerful magnetic stirring mechanism that ensures thorough cleaning by creating a strong vortex in the cleaning solution.
5. Operating the Cure Station
The Cure Station uses UV light to fully cure your resin prints, enhancing their hardness and durability.
5.1 Standard Curing Mode
- After washing, ensure your prints are dry before placing them on the curing platform.
- Place the print(s) on the turntable of the Cure Station.
- Cover the station with the UV-blocking top cover. The machine will not start if the cover is not properly placed.
- Select the desired curing time using the control knob (up to 60 minutes). Typical curing times range from 2-5 minutes depending on resin type and print size.
- Press the knob to start the curing cycle. The turntable will rotate 360 degrees, ensuring even exposure to the UV light.
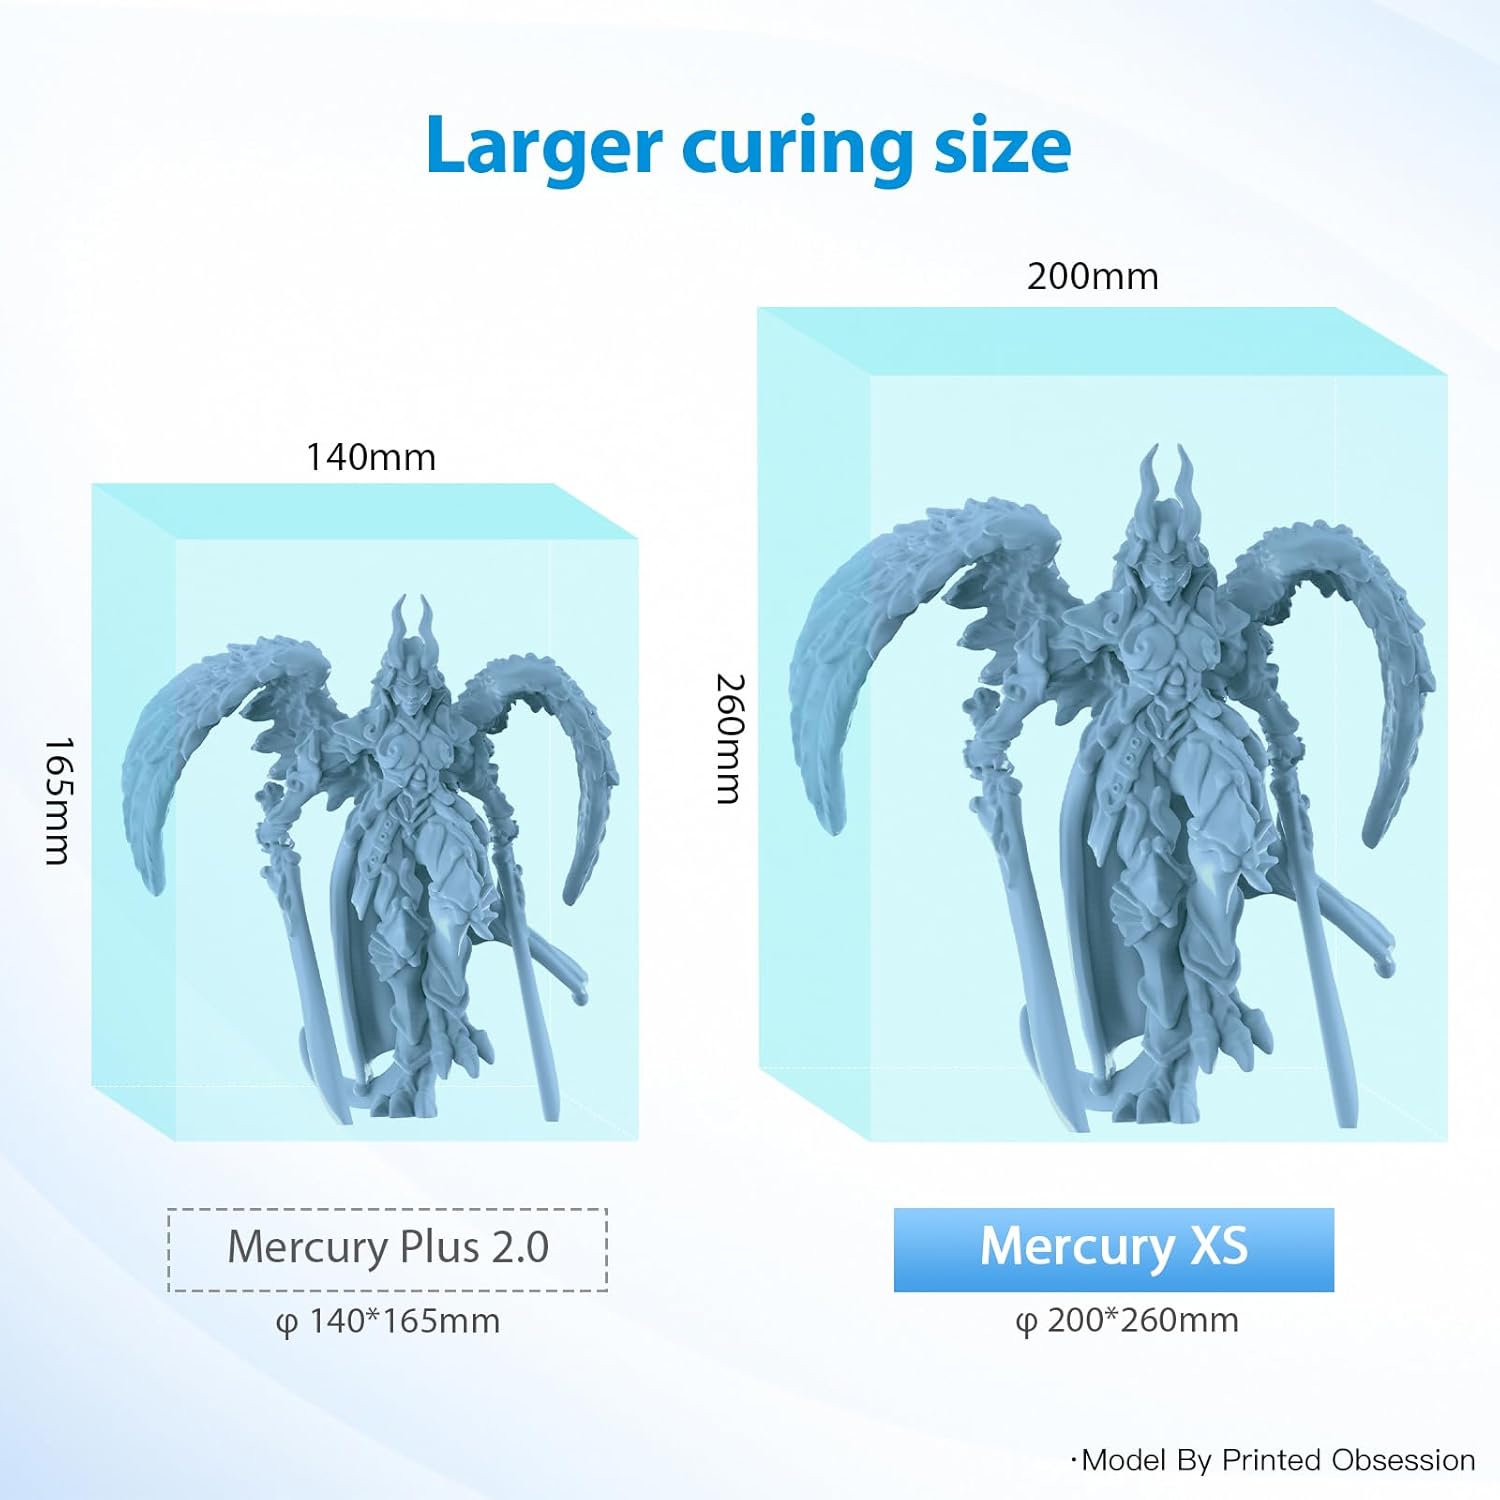
Figure 3: The Mercury XS offers a larger curing volume compared to previous models.
5.2 Handheld UV Curing Mode
For hard-to-reach areas or internal curing, use the handheld UV lamp:
- Place the print on the curing platform or hold it securely.
- Connect the handheld UV lamp to its port.
- Direct the UV light from the handheld lamp to the specific areas requiring additional curing.
- Ensure to wear appropriate UV protective eyewear during this process.

Figure 4: Handheld UV Curing Light for intricate details and internal curing.
6. ELEGOO ABS-Like Resin 3.0 Plus
The included 1kg of ELEGOO ABS-Like Resin 3.0 Plus is formulated for enhanced performance in 3D printing.
- Low Viscosity: Approximately 25% reduction in viscosity compared to ABS Resin 3.0, allowing for smoother flow and easier cleaning.
- High Precision & Stability: Designed to capture intricate details with excellent dimensional stability.
- Low Shrinkage: Minimizes deformation during the curing process, leading to more accurate prints.
- 405nm Rapid UV-Curing: Optimized for fast curing with LCD/DLP 3D printers and the Mercury XS Cure Station.
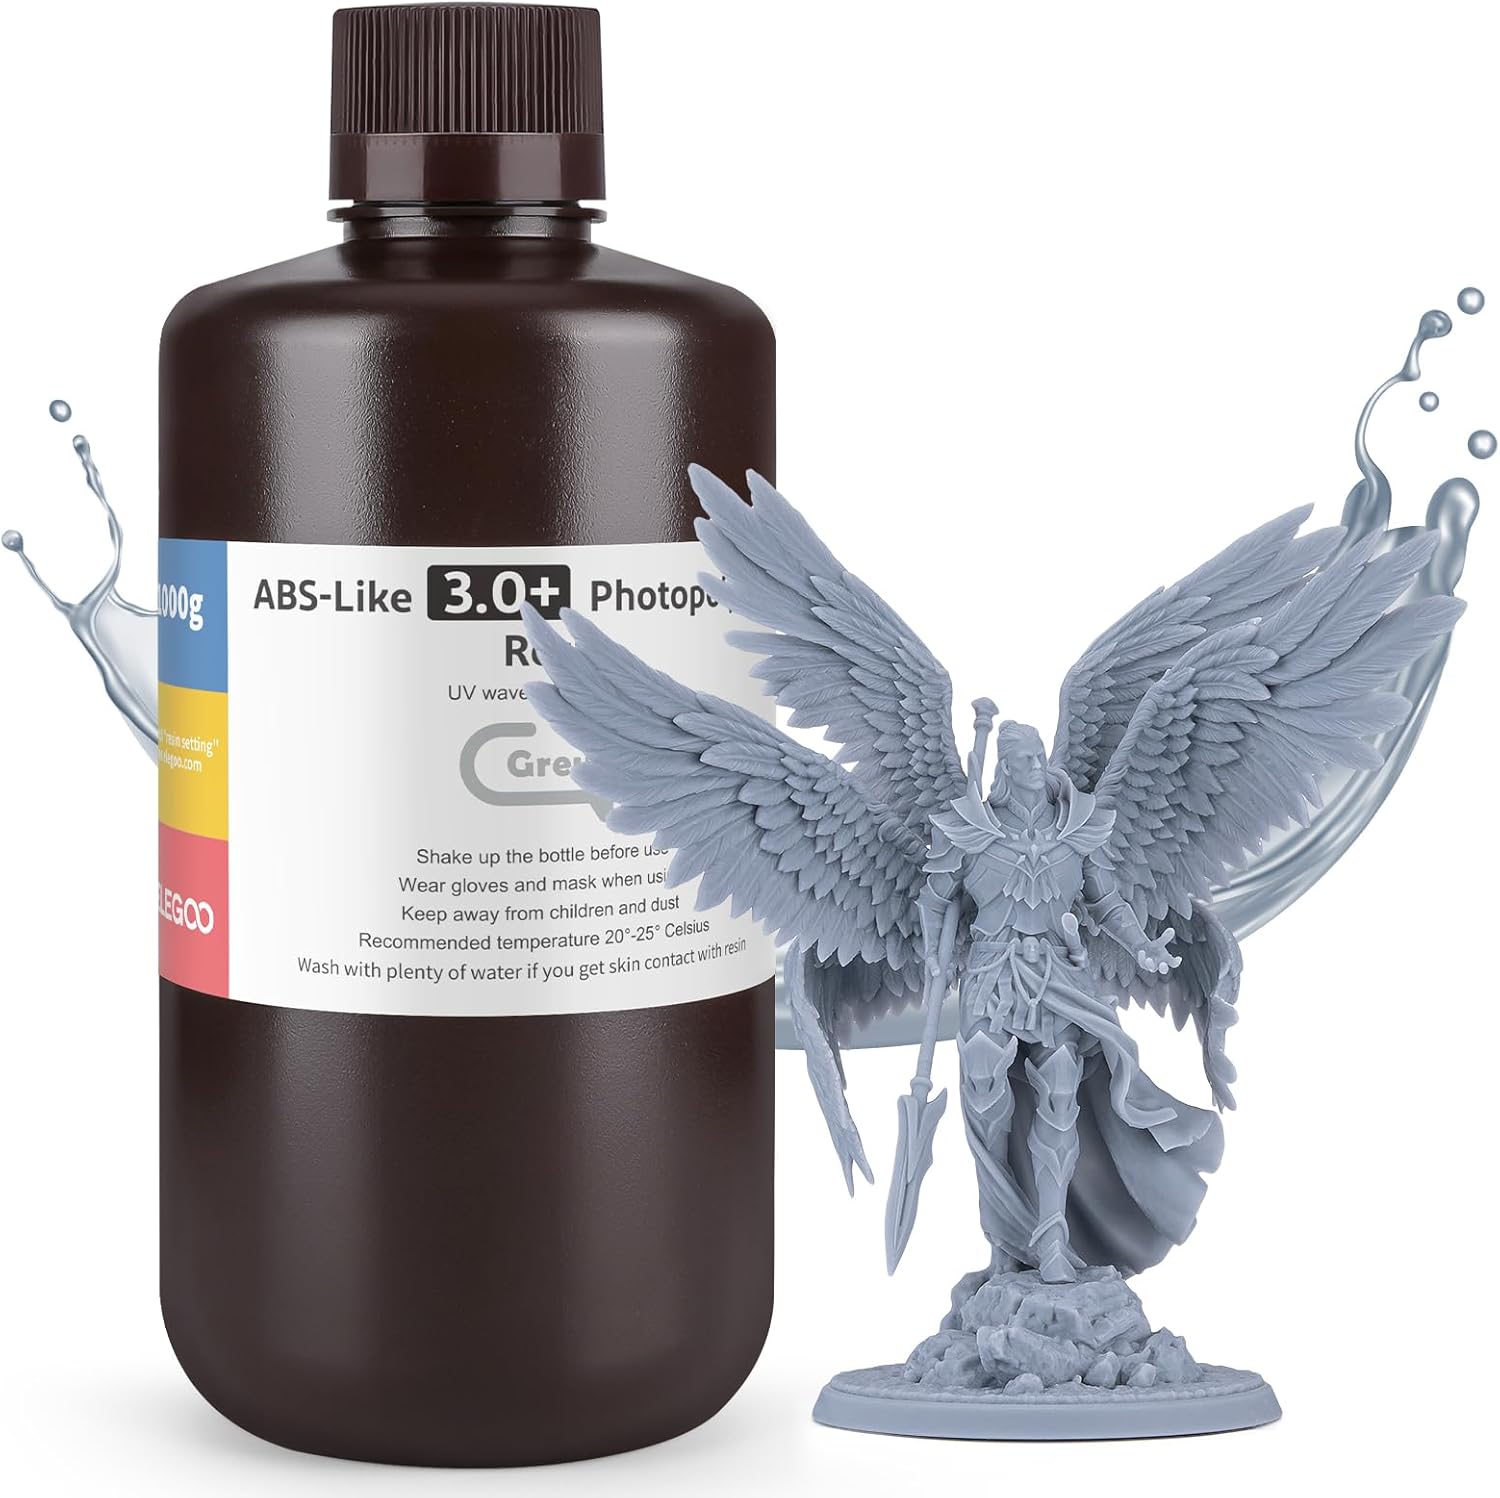
Figure 5: ELEGOO ABS-Like Resin 3.0 Plus bottle with a detailed 3D print.

Figure 6: Excellent fluidity of the ABS-Like Resin 3.0 Plus.
7. Maintenance
- Cleaning the Wash Bucket: Regularly clean the wash bucket and washing basket to prevent resin buildup. The bucket can be easily detached from the base for cleaning.
- Replacing Cleaning Solution: Replace the cleaning solution (IPA or water) when it becomes cloudy or saturated with resin. Dispose of used resin solution responsibly according to local regulations.
- Cleaning the Curing Platform: Wipe the curing platform and UV-blocking cover with a soft cloth after use to remove any dust or resin residue.
- UV Lamp Care: Keep the UV lamps clean and free of obstructions to ensure optimal curing performance.
8. Troubleshooting
- Machine Not Starting: Ensure the power adapter is securely connected and the machine is plugged into a working outlet. For the Cure Station, verify that the UV-blocking top cover is correctly placed.
- Prints Not Cleaning Properly: Check the concentration and cleanliness of your washing solution. Increase washing time if necessary. Ensure the magnetic rotor is spinning correctly.
- Prints Not Curing Properly: Verify that the UV lamps are functioning. Increase curing time. Ensure the turntable is rotating for even exposure. Check the resin's recommended curing parameters.
- Excessive Noise: Ensure the machine is on a stable, level surface. Check for any obstructions in the wash bucket or around the turntable.
9. Specifications
| Feature | Specification |
|---|---|
| Brand | ELEGOO |
| Item Weight (Bundle) | 2.2 pounds (Wash & Cure Station) + 1 Kilogram (Resin) |
| Material | Acrylonitrile Butadiene Styrene, Resin |
| Compatible Devices | 3D Printers (e.g., Saturn, Mars MSLA 3D Printers) |
| Resin Type | ABS-Like Resin 3.0 Plus, 405nm Rapid UV-Curing Photopolymer Resin |
| Resin Color | Grey |
| Resin Weight | 1000G |
10. Safety Information
- Always wear appropriate personal protective equipment (PPE), including gloves and safety glasses, when handling resin or cleaning solutions.
- Work in a well-ventilated area to minimize exposure to resin fumes.
- Avoid direct skin and eye contact with liquid resin. In case of contact, wash thoroughly with soap and water. Seek medical attention if irritation persists.
- Keep resin and cleaning solutions away from children and pets.
- Dispose of uncured resin and contaminated cleaning solutions according to local environmental regulations. Cured resin can typically be disposed of as regular plastic waste.
- Do not look directly at the UV light during operation. The UV-blocking cover is essential for safe curing.
11. Warranty and Support
For warranty information, technical support, or service inquiries, please refer to the official ELEGOO website or contact their customer service directly. Keep your purchase receipt as proof of purchase.


