1. Introduction
This manual provides essential information for the safe and effective operation of your AlgoLaser DIY KIT MK2 5000mW Laser Engraver. Please read all instructions carefully before assembly and use to ensure optimal performance and user safety.
The AlgoLaser DIY KIT MK2 is a versatile laser engraving machine designed for various materials such as wood, metal, acrylic, and more. It features a 3.5-inch interactive touch screen, WiFi connectivity, and compatibility with popular engraving software.
2. Safety Information
Your safety is paramount. The AlgoLaser DIY KIT MK2 is equipped with multiple safety features. Always adhere to the following guidelines:
- Laser Emission Protection: Avoid direct exposure to the laser beam. Always wear the provided laser safety goggles during operation.
- Emergency Stop Button: Press the red emergency stop button immediately in case of any malfunction or unsafe condition.
- Safety Lock: The machine includes a safety lock mechanism. Keep the key secure to prevent unauthorized use.
- Machine Offset Detection and Protection: The device is designed to detect and protect against unexpected machine movements.
- Machine Tilt Detection and Protection: Ensures safe operation by detecting and responding to unintended tilting.
- USB Connection Detection and Protection: Safeguards against issues related to USB connectivity.
- Voltage and Current Safety Control System: Monitors and controls electrical parameters for stable and safe operation.
- Ensure adequate ventilation when operating the engraver, especially when engraving materials that produce smoke or fumes.
- Keep the work area clear of flammable materials.
3. What's in the Box
Carefully unpack your AlgoLaser DIY KIT MK2 and verify that all components are present:
- Front Frame (A)
- Rear Frame (B)
- Left Y-Axis Frame (C)
- Right Y-Axis Frame (D)
- X-Axis Component (E)
- Laser Module (5W)
- Control Box with 3.5" Touch Screen
- Power Adapter
- Power Cable
- WiFi Aerial
- Support Feet (various types)
- Timing Belt
- Limit Switch
- Focus Assist Tool
- Machine Key Set
- Laser Safety Goggles
- USB Cable
- Air Pipe
- Wrench, Screwdriver, Allen Keys (various sizes)
- Thumb Screws, M5X30 Screws, M5X14 Screws, M5X8 Screws, M2.5X9 Screws, Washers (M5x15x1)
- Acrylic Sample
- Brush
- Metal Card Sample
- Plywood Sample
- Cable Ties
4. Setup & Assembly
Follow these steps to assemble your AlgoLaser DIY KIT MK2. For a visual guide, please refer to the official assembly video below.
Video Description: This video provides a detailed, step-by-step guide on how to assemble the AlgoLaser DIY KIT MK2 Engraver. It covers all major components and ensures correct setup for first-time users.
- Step 1: Assemble the Frame
Align the ends of the Rear Frame (B) assembly to the sides of the Left Y-Axis Frame (C) and Right Y-Axis Frame (D). Secure them using the provided M5X30 and M5X14 screws with Support Foot 1 and Support Foot 2. Ensure all connections are firm.

Image Description: A user aligning the frame components (Rear, Left Y-Axis, Right Y-Axis) and securing them with screws and support feet.
- Step 2: Assemble the X-Axis Component
Fit the X-Axis Component (E) into the Left Y-Axis Frame and Right Y-Axis Frame. Pay close attention to the direction of the X-axis to ensure correct orientation. The Front Frame (A) is then assembled to the Y-axis frames using the remaining support feet and screws.

Image Description: The X-Axis component being carefully placed between the assembled Y-Axis frames, ensuring proper alignment.
- Step 3: Assemble the Belt
Thread the timing belt through the designated holes in the direction of the arrow. Ensure the belt is placed in the correct orientation with the toothed side facing down. The belt passes through the hole at the other end along the Y-Axis. Tighten the belt and finish installing any remaining screws for the support feet. Gently move the X-Axis by hand to check the belt tension; adjust if it's too loose or too tight.

Image Description: A user carefully threading the timing belt through the mechanism, ensuring correct orientation and tension.
- Step 4: Assemble the Limit Switch
Place the screws into the two frontmost holes of the limit switch mounting plate. Secure the limit switch using the provided screws. Check if the limit switch is properly installed and functions correctly.

Image Description: Close-up view of the limit switch being installed and secured with screws onto the frame.
- Step 5: Assemble the Laser Module
Insert the rear dovetail groove of the Laser Module into the corresponding slot on the fixture. Tighten the Thumb Screw clockwise to secure it firmly in place.

Image Description: The laser module being inserted into its designated slot and secured with a thumb screw.
- Step 6: Assemble the Control Box Component
First, attach the WiFi aerial to the control box. Then, align the installation nut on the back of the Control Box with the mounting hole on the Front Frame and secure it with screws.

Image Description: The control box being attached to the main frame, showing the WiFi aerial and securing screws.
- Step 7: Assemble the Main Cable
Insert the cable connectors into the Limit Switches, Motors, and Laser Module. Ensure correct connection (refer to the video for correct vs. incorrect examples). Secure the cables in the appropriate positions using the provided zip ties. Finally, insert the power cord into the 24V 4A socket to power on the machine. Once the green light on the power cord is illuminated, the machine is ready. Press the power button on the laser machine to start. Check the Emergency Stop button functionality. Remove the screen protector. Set the language and connect to Wi-Fi.

Image Description: A user connecting the various cables to the machine components and plugging in the power cord.
5. Operating Instructions
5.1 Basic Operation
After successful assembly and power-on, the machine's touch screen will guide you through initial setup, including language selection and Wi-Fi connection. Once connected, you can access the main interface.
Video Description: This video demonstrates the basic operation of the AlgoLaser DIY KIT MK2 Engraver, including navigating the touch screen interface, selecting files, and initiating an engraving task on a metal card.
5.2 Engraving Process
- File Selection: Choose your design file from the built-in 8GB memory card, a connected USB drive, or via Wi-Fi.
- Parameter Setting: Adjust engraving parameters such as speed, power, and passes based on your material and desired outcome. The 3.5-inch color LCD touch screen provides an intuitive interface for these adjustments.
- Positioning: Use the on-screen controls to precisely position the laser head over your material. The laser spot size of 0.04x0.09mm allows for ultra-fine details.
- Start Engraving: Once parameters are set and positioning is confirmed, initiate the engraving process. The machine will display progress and estimated time.

Image Description: The 3.5-inch interactive touch screen displaying file selection and parameter adjustment options for engraving.
5.3 Software Compatibility
The AlgoLaser DIY KIT MK2 offers broad software compatibility:
- AlgoLaser App: Ideal for beginners, offering simple logo and photo engraving directly from your mobile device.
- Lightburn: A mature engraving software for common laser applications, suitable for professional users seeking advanced control.
- LaserGRBL: The best Windows software for image laser engraving, also catering to professional users for more delicate work.
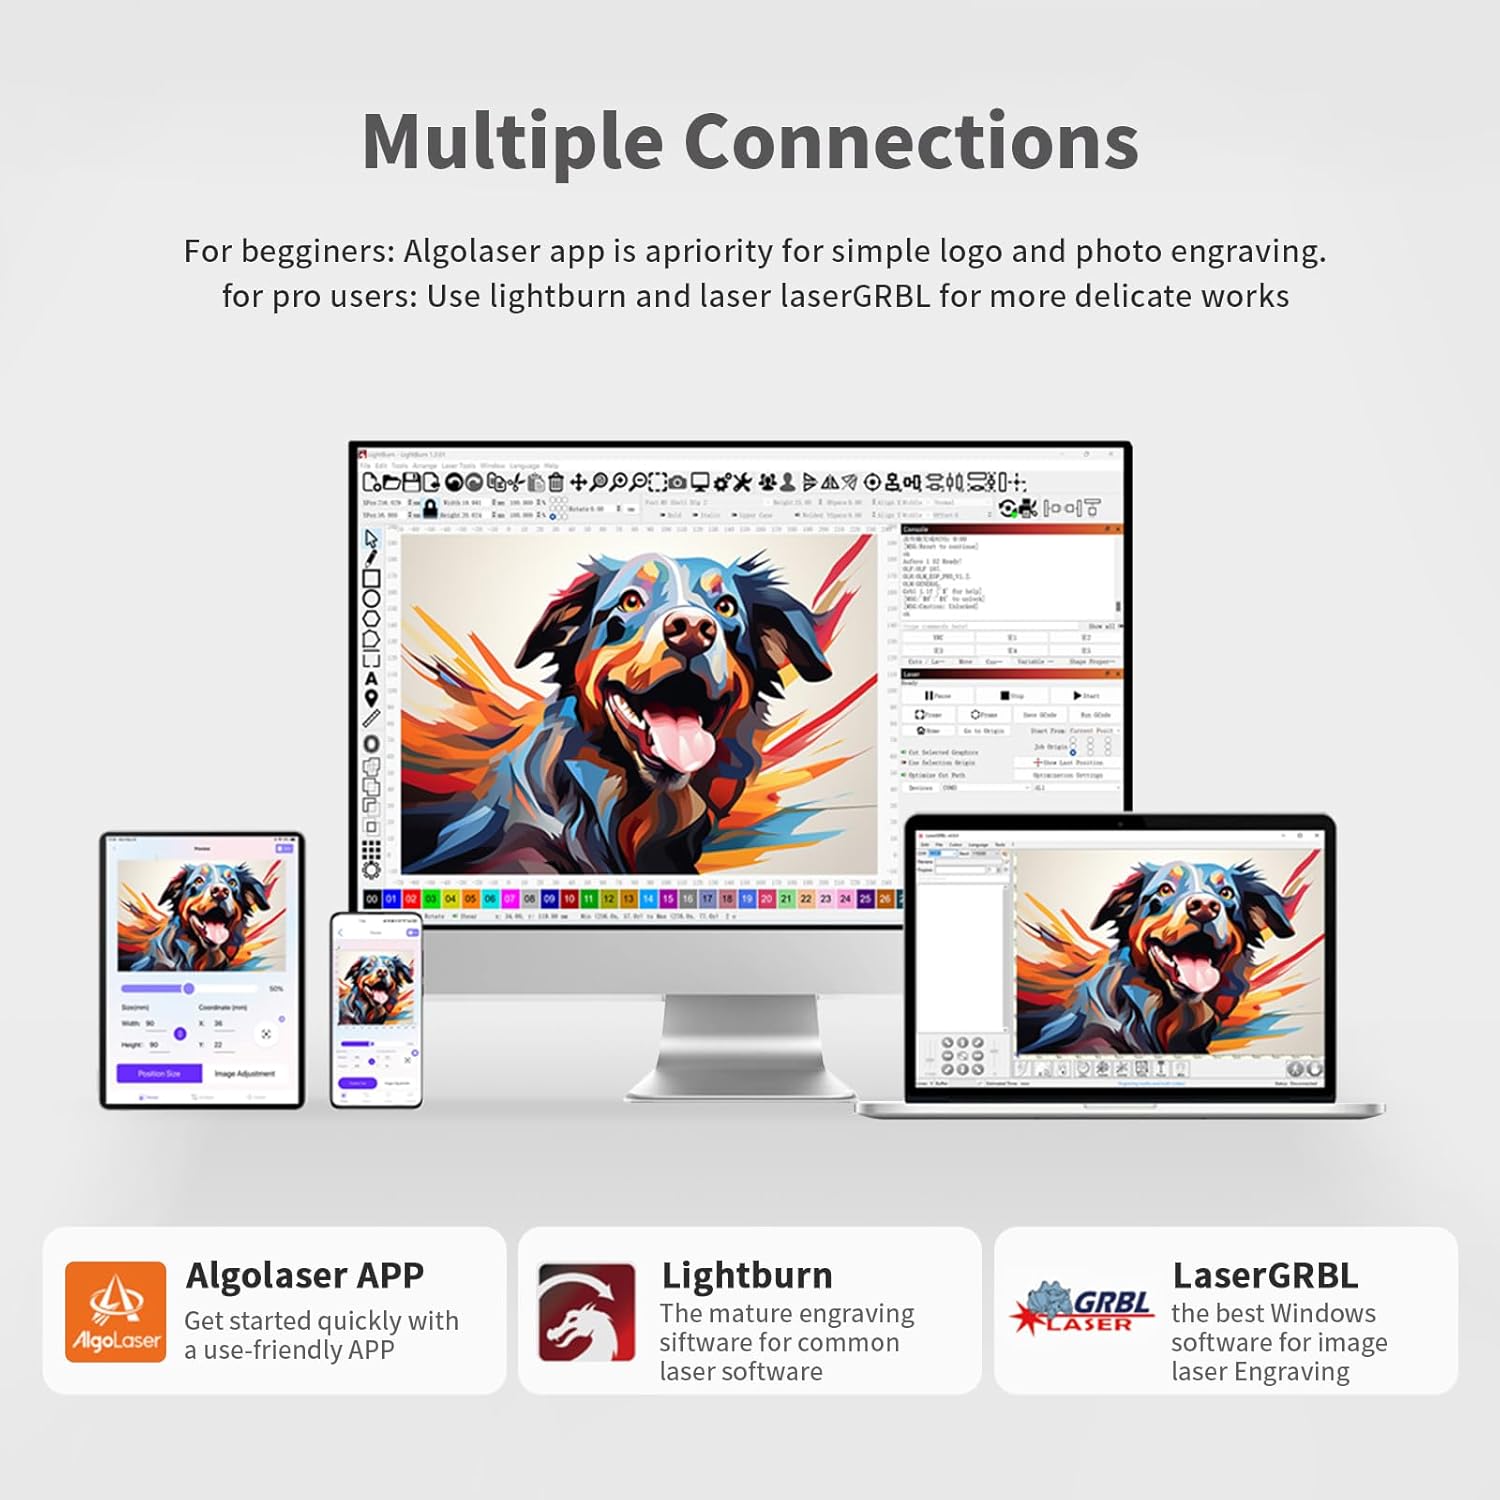
Image Description: Visual representation of the AlgoLaser app, Lightburn, and LaserGRBL interfaces, demonstrating multi-device compatibility.
5.4 Material Compatibility
The AlgoLaser DIY KIT MK2 can engrave and cut a wide range of materials:
- Wood
- Metal (e.g., stainless steel, plated metal)
- Acrylic
- Bamboo
- Paper
- Leather
- Glass
- Stone
- Ceramic Tile
- Food

Image Description: A collage showcasing various materials like wood, acrylic, bamboo, paper, leather, stainless steel, glass, stone, ceramic tile, and food, all successfully engraved by the AlgoLaser machine.
Video Description: This video demonstrates the AlgoLaser DIY KIT MK2 Engraver's capability to cut plywood, showcasing its precision and efficiency in material processing.
6. Maintenance
Regular maintenance ensures the longevity and optimal performance of your laser engraver:
- Cleaning: Regularly clean the laser lens and the work area to prevent dust and debris buildup, which can affect engraving quality and machine performance. Use a soft, lint-free cloth and appropriate cleaning solutions.
- Belt Tension: Periodically check the tension of the timing belts. If they are too loose or too tight, adjust them according to the assembly instructions to ensure smooth and accurate movement of the laser head.
- Firmware Updates: Keep your machine's firmware updated. The AlgoLaser DIY KIT MK2 supports One-Click OTA (Over-The-Air) upgrades for continuous performance boosts, issue fixes, new features, and an optimized experience.

Image Description: The touch screen displaying the OTA upgrade process, indicating the machine's ability to receive wireless software updates.
7. Troubleshooting
If you encounter issues with your AlgoLaser DIY KIT MK2, consider the following common troubleshooting steps:
- Machine Not Powering On: Ensure the power adapter is securely connected to both the machine and a working power outlet. Check if the green light on the power cord is illuminated.
- Laser Not Firing: Verify that the laser module is correctly installed and secured. Check all cable connections to the laser module and control box. Ensure the safety lock is disengaged.
- Engraving Quality Issues: Adjust laser power, speed, and focus settings. Ensure the material is flat and properly positioned. Clean the laser lens if engraving appears blurry or weak.
- Connectivity Problems: For Wi-Fi issues, ensure the WiFi aerial is properly attached and the network password is correct. For USB connection, try a different USB port or cable.
- Unexpected Machine Movement: Check belt tension and ensure all frame components are securely fastened. Verify that the limit switches are correctly installed and not obstructed.
For persistent issues, refer to the professional support section for assistance.
8. Specifications
| Feature | Detail |
|---|---|
| Product Dimensions | 26.31 x 23.68 x 0.04 inches |
| Item Model Number | ALDKMK2-5BD |
| Item Weight | 10.53 pounds |
| Manufacturer | AlgoLaser |
| Date First Available | August 15, 2024 |
| Laser Output Power | 5W |
| Machine Electric Output Power | 72W |
| Laser Spot Size | 0.04mm x 0.09mm |
| Engraving Area | 400mm x 435mm |
| Touch Screen | 3.5-inch Color LCD |
| Connectivity | 2.4G WiFi, USB-C |
| Internal Storage | 8GB |
| CPU | Dual-core |
| RAM | 8MB |
9. Warranty & Support
AlgoLaser provides professional customer service and support for your product:
- Warranty: Your AlgoLaser DIY KIT MK2 comes with a 1-year warranty.
- Customer Service: A professional customer service team is available to assist with any issues.
- Technical Assistance: For setup or technical assistance, please contact us via Amazon or our official email.

Image Description: An image highlighting AlgoLaser's commitment to 24/7 customer support and a 1-year warranty, with contact information for setup and technical assistance.