1. Introduction
Thank you for choosing the Tatub Queen Floating Bed Frame. This manual provides detailed instructions for the assembly, operation, maintenance, and troubleshooting of your new bed frame. Please read this manual thoroughly before assembly and use to ensure proper setup and safe operation. Keep this manual for future reference.

Image 1.1: The Tatub Queen Floating Bed Frame with LED lighting in a bedroom environment.
2. Safety Information
For your safety and to prevent damage to the product, please adhere to the following guidelines:
- Do not exceed the maximum weight capacity of 1000 lbs.
- Be cautious of sharp edges during assembly and use to prevent injury.
- Ensure all bolts and screws are securely tightened before using the bed frame. Periodically check and re-tighten as necessary.
- Keep small parts and packaging materials away from children to prevent choking hazards.
- Do not stand or jump on the bed frame.
- Use only the provided hardware for assembly.
3. Package Contents
Please verify that all components are present before beginning assembly. If any parts are missing or damaged, contact customer support.
- Metal Bed Frame Components (Side Rails, Center Support Beams, Support Legs, Slats)
- LED Light Strip
- LED Remote Control
- Bedside Caddy
- Integrated Charging Station (USB Ports)
- Assembly Hardware (Screws, Bolts, Washers, Allen Wrench)
- Installation Manual
4. Setup and Assembly
Assembly typically requires two adults and takes approximately 1-2 hours. Follow the steps carefully.
- Unpack and Identify Parts: Lay out all components on a clean, soft surface (e.g., a rug or blanket) to prevent scratching. Refer to the included parts list in the Installation Manual to identify each piece.
- Assemble the Main Frame: Connect the side rails and end rails using the provided bolts and Allen wrench. Ensure all connections are snug but do not overtighten until the frame is fully assembled.
- Attach Support Legs: Securely attach the support legs to the designated points on the frame. These legs are designed to be recessed, creating the floating effect.
- Install Center Support Beams: Place and secure the center support beams across the width of the frame.
- Insert Slats: Position the metal slats into the designated slots or attach them to the frame using the provided fasteners. Ensure all slats are evenly spaced and securely in place.

Image 4.1: Frame structure and dimensions for Queen size, indicating a 1000 lbs weight capacity.
- Attach LED Light Strip: Carefully adhere the LED light strip to the underside of the bed frame, following the path indicated in the Installation Manual. Ensure the strip is firmly pressed into place.
- Install Charging Station: Mount the charging station to the side rail in your preferred location. Connect its power cable to a wall outlet.
- Attach Bedside Caddy: Hook the bedside caddy onto the side rail. It can be positioned on either side of the bed.
- Final Tightening: Once all components are in place, go back and fully tighten all bolts and screws.
- Place Mattress: Carefully place your Queen size mattress onto the assembled bed frame. No box spring is needed.
5. Operating Instructions
5.1 LED Lighting System
The integrated LED light strip provides customizable ambient lighting.
- Power On/Off: Use the power button on the remote control to turn the LED lights on or off.
- Color Selection: Choose from 7 adjustable colors using the color buttons on the remote.
- Dynamic Modes: Select various dynamic modes (e.g., flash, strobe, fade) to create different lighting effects.
- Speed Adjustment: Adjust the speed of dynamic modes using the speed control buttons.
- Brightness Control: Increase or decrease the brightness level to suit your preference.

Image 5.1: The LED lights illuminating the floor beneath the bed frame.
5.2 Charging Station
The bed frame includes a convenient charging station with USB ports.
- Connect to Power: Ensure the charging station is plugged into a functional wall outlet.
- Charge Devices: Use standard USB cables to connect your electronic devices (e.g., smartphones, tablets) to the USB ports for charging.

Image 5.2: Charging a mobile device using the integrated USB port.
5.3 Bedside Caddy
The movable bedside caddy provides convenient storage.
- Placement: The caddy can be easily hooked onto either side of the bed frame.
- Storage: Use the caddy to store small items such as books, remote controls, glasses, or personal devices.
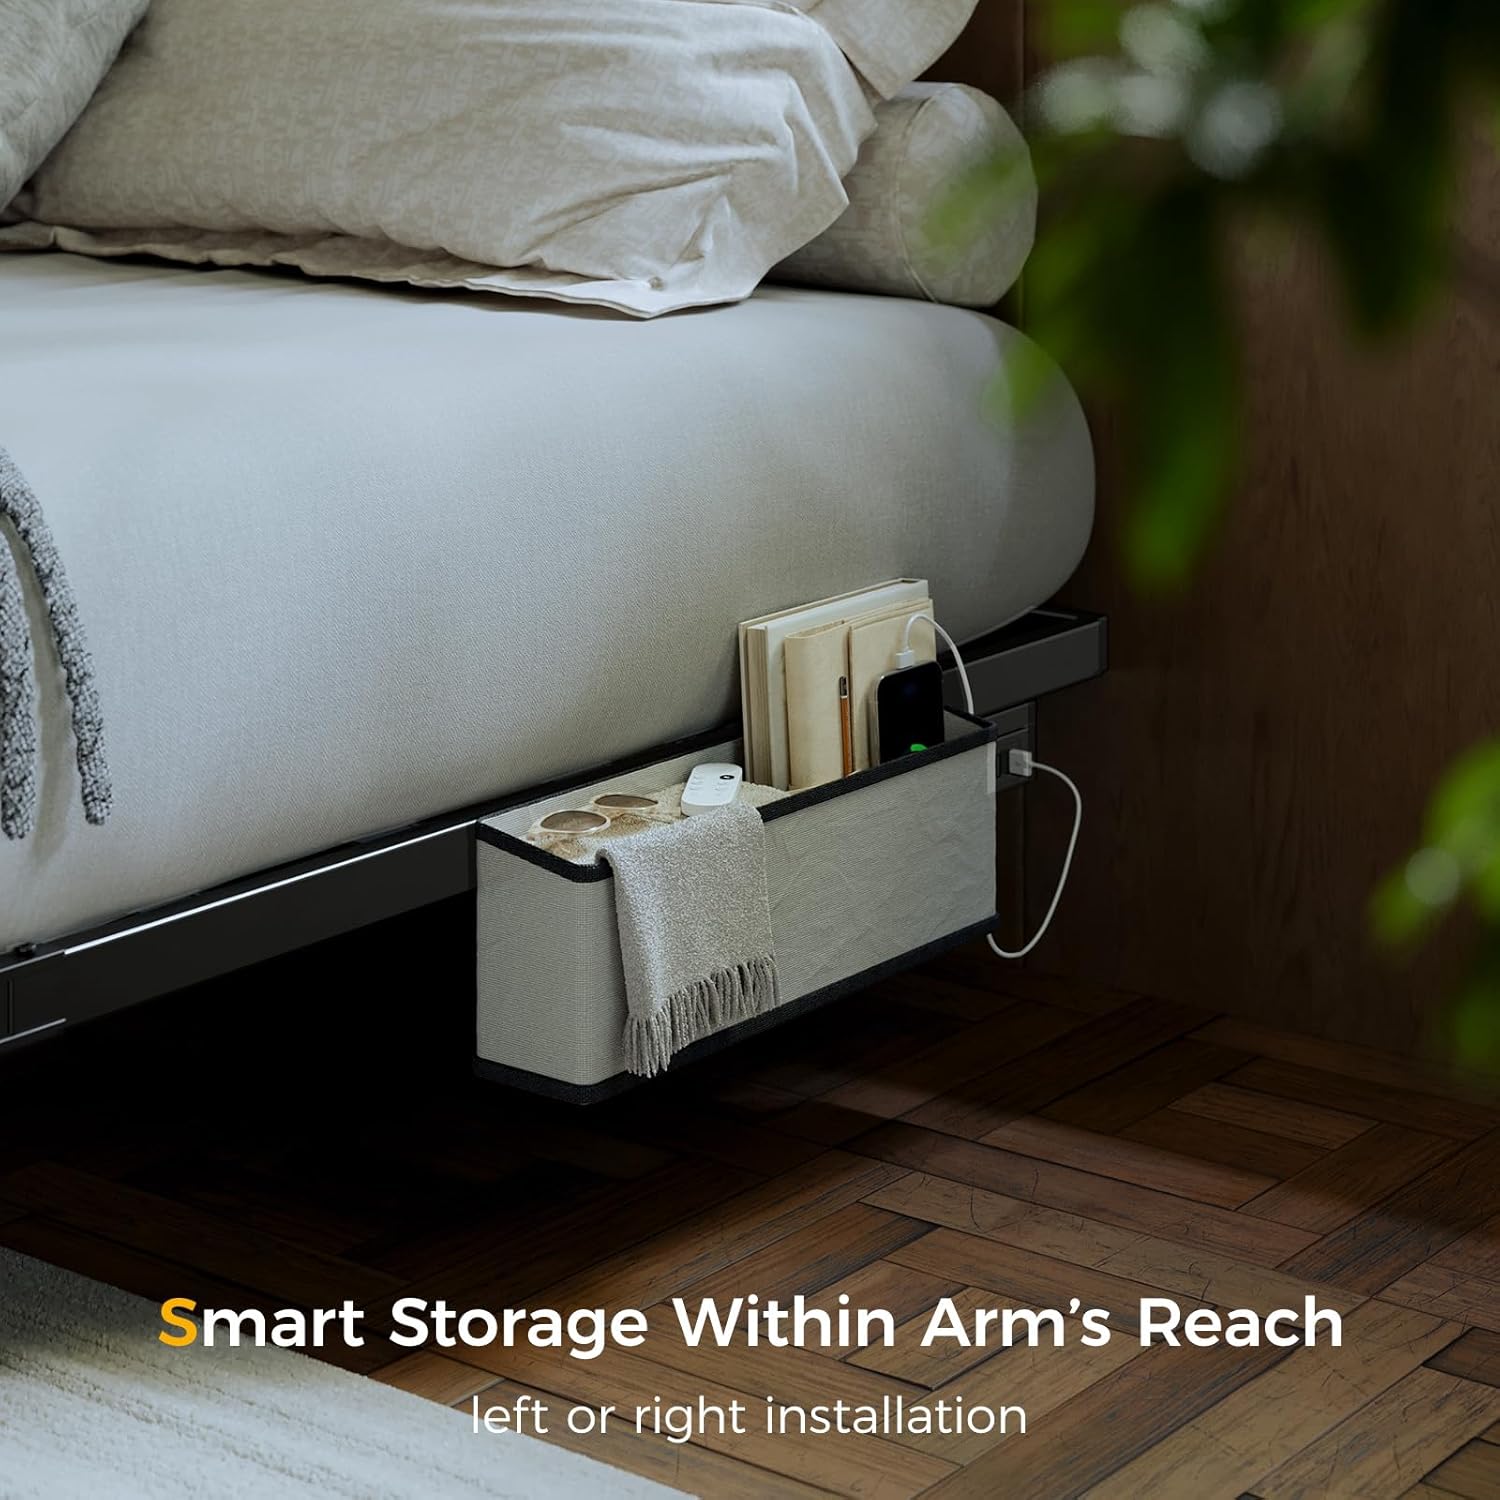
Image 5.3: The bedside caddy providing convenient storage.
6. Maintenance
Regular maintenance will help prolong the life and appearance of your bed frame.
- Cleaning the Frame: Wipe the metal frame with a soft, damp cloth. Avoid harsh chemicals or abrasive cleaners that could damage the finish.
- Cleaning the Bedside Caddy: For the fabric bedside caddy, spot clean with a mild detergent and water. Allow to air dry completely. The manufacturer recommends dry cleaning for thorough cleaning.
- Hardware Check: Periodically check all bolts and screws to ensure they remain tight. Re-tighten if any looseness is detected.
- LED Strip Care: Ensure the LED strip remains securely attached. Avoid pulling or bending the strip excessively.
7. Troubleshooting
If you encounter any issues, refer to the following troubleshooting guide:
| Problem | Possible Cause | Solution |
|---|---|---|
| LED lights not working | Loose connection, remote battery dead, faulty LED strip | Check all power connections. Replace remote battery. If issue persists, contact customer support. |
| Bed frame wobbles or is noisy | Loose hardware, uneven floor | Ensure all bolts and screws are securely tightened. Place shims under legs if floor is uneven. |
| Parts do not fit together | Incorrect orientation, manufacturing defect | Review assembly instructions carefully, ensuring parts are oriented correctly. If parts are genuinely misaligned or defective, contact customer support. |
| Missing assembly hardware or components | Packaging error | Contact customer support immediately with details of the missing items. |
| Charging station not working | Not plugged in, faulty outlet, damaged unit | Ensure the charging station is properly plugged into a working wall outlet. Test the outlet with another device. If still not working, contact customer support. |
If you are unable to resolve an issue using this guide, please contact Tatub customer support for assistance.
8. Specifications
| Feature | Detail |
|---|---|
| Size | Queen |
| Product Dimensions (L x W x H) | 79.9" x 60.2" x 7.9" |
| Special Features | Charging Station, Lighted, No Box Spring Needed, Remote Control, USB Port |
| Color | Black |
| Weight Capacity | 1000 lbs |
| Assembly Required | Yes |
| Item Weight | 16.28 pounds (frame only) |
| Compatible Mattress Size | Queen |
9. Warranty and Support
Tatub products are manufactured with quality and care. For specific warranty details, please refer to the warranty card included with your purchase or visit the official Tatub website. If you require assistance, have questions, or need to report missing/damaged parts, please contact Tatub customer support through the retailer where the product was purchased or via the contact information provided on the Tatub brand store page.
For further information, you may visit the Tatub Store on Amazon.